What is stamping
The “stamping” technique allows you to create amazingly beautiful designs on your nails, even for those who cannot draw and are not familiar with the intricacies of nail art. The process is otherwise called “stamping”. The image is applied to the nail plate using a stencil and stamp. The design is chosen based on personal preference. These can be various pictures, ornaments, abstractions, geometric and other shapes, fancy patterns.
To do stamping, in addition to paint, you will need a special set consisting of three main elements:
- A stencil is a metal plate on which a specific pattern is engraved.
- A stamp is a pad with a handle made of soft material (silicone, rubber). The purpose of the stamp is to imprint a pattern from a stencil and transfer it to the nail.
- A scraper (scraper) whose blade is made of metal or plastic. It is needed to remove excess paint from the stencil.
It remains to add that the technique of applying patterns using a stamp was invented in South Korea. The Konad company began mass production of stamping kits. But now other companies also produce accessories for stamping manicure. Products have different quality, as much depends on the brand.
Mastering nail art with training cards
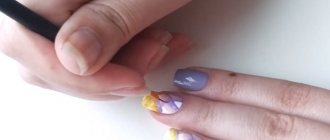
Have you ever wondered how nail art masters manage to paint the most unimaginable compositions on their nails? Few professionals have the innate talents of an artist. Each specialist hones and improves his skills in the process of working with clients’ nails. But before making any drawings, a professional must train in executing the design, using special diagrams and ready-made sketches. This allows you to significantly improve the technique and speed of painting. Today we will tell you how to create beautiful designs on your nails step by step, without the help of a professional.
To improve the quality of your manicure, we recommend that you purchase or simply download training cards on the Internet, which are available in a wide range today. Schemes for drawing on nails should be chosen depending on your initial level of training. Training cards can include patterns of quite large sizes - they are ideal for beginners. Smaller drawings will be more useful to those who already have certain skills. The cards for painting nails show ready-made patterns, and next to them there are translucent sketches or a diagrammatic description of the step-by-step application of the picture. Next, we will show you demonstration photos of drawings that you can easily implement in your manicure.
Collection of schemes with beautiful patterns
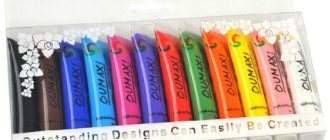
Training cards for painting nails are most often designed for working with acrylic paints. To ensure that the patterns are elegant and the quality of the designs is not inferior to the salon version, special attention should be paid to the choice of brush. It is advisable to purchase several copies at once. Each brush should be a different thickness. Cards for painting nails have a limited number of templates for training, so it is better to do the first tests on a piece of “checkered” paper prepared in advance.
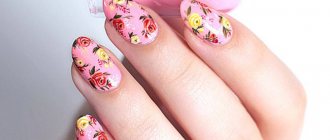
If you do not have the opportunity to purchase ready-made patterns of drawings, you can step by step draw the pattern you like from a sample found on the Internet, or download and then print it. During your training, you will most likely encounter certain difficulties, despite the step-by-step description of the pattern application technique. After all, to learn how to draw on nails, it is not enough to simply repeat ready-made sketches. It is important to master the main stages and nuances of this process, as well as learn how to use a brush and immediately determine the required amount of paint for each stroke. Our collection of photos will help you master simple drawing techniques step by step.
If some patterns seem too complicated to you, it is better to leave them for later and start training with simpler patterns. You should not be afraid of possible failures, because we all learn, first of all, from our own mistakes, which give us invaluable experience. If you are still unable to accurately draw pictures with acrylic paints, you can try a simpler option: use a regular needle to create patterns.
Methods of applying patterns using a needle
For resourceful girls, a beautiful manicure is not a problem. If you only have a couple of favorite polishes and a sewing needle in your arsenal, you can easily apply spectacular designs on your nails. As an alternative, a regular toothpick will do. The result you get will pleasantly surprise and delight you. In order not to be unfounded, we suggest you see for yourself how easy it is to paint on your nails with a regular needle by looking at the photo.
Such painting does not require special knowledge and skills. Working with needles in nail art usually brings only positive emotions. The main thing is to make sure that the nail polish is not too thick, otherwise the designs will not work out. In addition, you need to have a certain skill to move the needle quickly enough. If it doesn’t work out the first time, don’t rush to despair, try again and again. You can get more detailed information about working with a needle in the feature article on our website.
As for applying patterns with a brush: despite detailed photo examples of training cards, the drawings may not turn out entirely neat. This is often caused by incorrect hand placement. At the school where future nail art masters are trained, special attention is paid to this point. So that you can fully master the technique of drawing, we suggest watching the final video lesson. Learn and enjoy a beautiful manicure without leaving home!
homemanicure.ru
Advantages and disadvantages
The technique of applying patterns with stamps is in demand not only in the nail industry. Because the image you like can be transferred to any smooth surface. For example, on glass in a closet or the body of your own smartphone. Wide scope of application is not the main advantage. Stamping has a whole list of other advantages:
- Allows you to save on the services of a professional manicurist. This is true, because you can decorate your nails in the most original way yourself.
- You can choose the color of the picture. By the way, lovers of nail stickers are deprived of this opportunity, since they have to rely on the manufacturer’s proposals.
- A stamping manicure requires a limited amount of time.
- Each nail is decorated with the same pattern - perfectly smooth and clear (subject to following basic rules).
The disadvantages of stamping are associated with tools and materials, as well as a lack of experience. For example, if the paint (varnish) is too thick or dries quickly, then you will not be able to transfer the image. If you start working with a stamp on a non-dried coating, the design will be blurry or not work at all. That is why before starting work it is worth familiarizing yourself with the basic rules.
General recommendations
- Training allows beginners to acquire the necessary skills. It is impossible to get a perfect stamping manicure the first time. During the training process, you need to independently determine with what force it is best to apply pressure on the stamp and scraper.
- The silicone pad should be treated with a buff before work. Because silicone imprints patterns worse than rubber. It is noteworthy that the use of transparent silicone is a “production necessity”, since the master sometimes needs to see the area of the nail to be decorated.
- The coating on which the design is applied with a stamp must be completely dry. If the nail polish is not completely dry, the contours of the pattern will be blurred. It is worth noting that the contours will be unclear even if a top coat is applied immediately after stamping.
- Transferring an image from a stamp can only be done once. The procedure is repeated for each nail.
- The drawing can be supplemented and diversified. This is done using a thin needle or dots.
- Varnish (paint) remaining on the skin is removed using a cotton swab dipped in nail polish remover. But it is better to use a special skin protection product that is used to treat the corresponding areas on the fingers. The product turns into a film that is very easy to remove.
- For a bright and clear pattern, you must use a well-pigmented, dense varnish.
Schemes and drawings
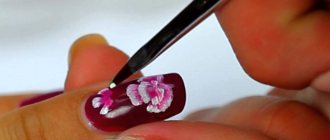
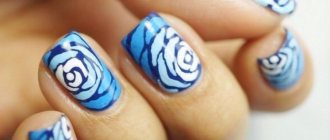
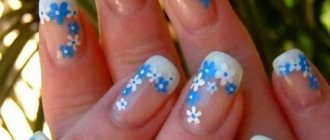
Dotsom flowers on nails . The process of drawing flowers is very simple. First you need to prepare your nail for work. After applying and drying the base color, you can start working with flowers.
To create flowers you need a tool to place several points at a short distance from each other. After they dry, a dot is placed in the middle of the future flower. The number of colors depends on the length of the nail. Finally, coat with strengthening varnish.
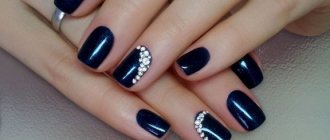
Dots on nails . Such drawings are easy to make. This does not require any special skills or abilities. It is necessary to work out the future design. The right combination of colors will make your manicure neat and attractive.
The nail needs to be prepared. After applying and drying the base color, the creation of the design begins. The points can be applied at an equidistant distance or overlap each other.
In a work where many colors are used, before applying a new one, you should definitely wait until the previous one has dried. Otherwise, the work may be smudged.
Monogram on nails . When creating drawings with a monogram, you need to be extremely careful. Failure to follow clear lines can result in the final version being said.
It is worth remembering that a small mistake can lead to the entire work being redone. The drawing should be one clear line. Adding further lines will result in a fuzzy and messy drawing.
For work it is better to use a small ball. You need to dip it in varnish and place dots that will serve as the basis of the monogram. Next, connect them together with one clear continuous line.
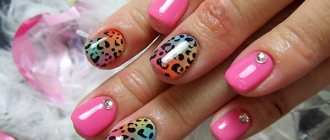
Animal prints . These prints are very popular now. They are used not only in clothing, but also in nail design. These prints look great on long nails.
To create such a pattern, it is best to use a tool with a medium ball. After preparing the nail for work and drying the base color, you can begin to create it.
Usually two colors are used. Before applying the second, the first one must be completely dry to avoid marks during the work. It is better to apply the drawing not with dots, but with blots.
Spring manicure . This manicure is usually decorated with flowers and simple patterns. He looks very fresh and innocent. The colors are tried on warm shades.
Winter manicure . The most winter pattern, which has been popular for many years now, is knitted. Dots is very convenient here. First you need to put the base points for the future drawing.
Next, they need to be connected with straight lines. Another winter drawing is snowflakes. To create it, you need to schematically place dots on the nail plate, followed by connecting with straight lines.
Tools and materials
Stencils
Stencils are plates of various shapes and sizes on which patterns are engraved. They can be plastic and metal. The first option is more suitable for working with thick paints, since the embossing of plastic stencils is deep and wide. Their service life is short.
Metal stencils are more versatile because they are suitable for working with paints of any consistency. But over time, scratches appear on their surface from the scraper. This negatively affects the result.
All stencils differ from each other in the material used for production, the depth of embossing, patterns and shape. It can be: rectangular, round, shaped. Up to 30 drawings can be presented on one plate. If you only liked one of them, then you shouldn’t buy an expensive plate just because of one image.
The most common option is a disc-shaped stencil. It can contain from 4 to 8 pictures. It is better to buy several disks than one rectangular plate. Laser engraved stencils are of high quality, especially branded ones - Konad. Chinese replicas can please or disappoint.
Stencils are always protected by a thin film that may not be noticed. When using for the first time, you must carefully move a sharp object along the part of the plate where the pattern is missing. This will allow the film to peel off and be easily removed.
Stamps
All stamps have approximately the same appearance, but their pad can be square or round, made of rubber or silicone. Rubber pads are harder and will not work the first time. Their silicone analogues are softer, but in order for them to tolerate the pattern well, they require preliminary surface treatment with a buff. Silicone and rubber have approximately the same number of fans.
The surface of a good pad has a semicircular shape, which is necessary to obtain a clear image. The presence of a crack on the stamp indicates that this tool will soon become unsuitable for work. Replacement pads are freely available, and “consumables” can easily be matched to any stamp. For precise application of small designs, it is recommended to use a stamp with a transparent body and a silicone pad.
Scraper
A plastic tool is much preferable because it does not scratch the plate and does its job well. If you don’t have a scraper, you can use improvised means, for example, a plastic card. Over time, nicks appear on the end of the plastic scraper. This results in poor image quality.
A scraper with a metal blade more thoroughly cleans the surface of the stencil from excess paint, but it tends to leave scratches on it. From this we can conclude that an ideal scraper does not exist in nature.
Paints and varnishes
This technique of decorating nails involves the use of special varnishes and paints, the bottles of which are marked “for stamping.” Theoretically, regular nail polish can be used to create stamped designs, but it must have a high concentration of coloring pigments. To check the degree of pigmentation, the print should be applied to a black background. It is necessary to take into account that there are quick-drying varnishes and paints, the use of which requires efficiency from the master. If you miss the moment, the varnish may dry out while still in the stencil.
Popular brands:
- MoYou London;
- TNL;
- Born Pretty;
- El Corazon;
- Konad;
- Dance Legend.
For wide patterns, a thicker varnish is required, for thin and elegant ones (lace) - a medium consistency.
How to use nail stamping
First you need to buy a set of necessary materials: plates, stamps, varnishes, scraper, buff. Stamping should only be done on manicured and completely varnished nails: the surface of the nail should be dry. It should also be sanded with a buff before applying varnish.
You need to transfer the design onto the nail using a stamp. To do this, the plate with the selected pattern is coated with varnish, the design is imprinted on the stamp and transferred to the nail plate. Before printing the pattern, you need to remove excess varnish with a scraper. The next step is very important: how to fix the stamping will determine its strength and durability. To do this you need to choose a good top.
Stamping kit
The right tools will help beginners quickly master the stamping technique and apply it when designing their nails. You can purchase all the tools in specialized stores: both online and offline.
show more
Plates
They are made of metal, on which various designs are depicted. When choosing plates, you should pay attention not only to the patterns that will be used in the work, but also to the depth of the engraving. The deeper and clearer it is, the easier it will be to transfer the design to the nail plate.
Depending on the brand, the plates are rectangular or round. Stencils usually contain from 5 to 250 designs. To protect the plate from scratches, you can additionally purchase a special cover.
show more
Stamp
Using a stamp, the design is transferred from the plate to the nail. The stamp looks quite miniature; its working side is made of silicone. When buying, you need to look at the material from which it is made. A rubber stamp is denser: it is much easier to work with at first. Silicone stamps are much softer in structure, so the design may sag or be poorly transferred.
In addition, the pads with which the pattern is transferred come in different colors. Transparent working material is most convenient, but colored replacement pads help when the design is hard to see on a colorless surface.
Pay attention to the number of work areas. You can find both single-sided and double-sided stamps on sale. There is usually a rubber surface on one side and a silicone surface on the other.
show more
Varnish
Stores sell special varnishes for stamping: they do not need to be dried in a lamp. They dry naturally. This is why this technology requires fast and precise movements. Beginners should pay attention to varnishes whose drying speed is average. For example, RIO Profi.
The difference between this varnish and a simple one is that it is more pigmented and has a thick consistency. This is important: the design may not show up well, spread, or smudge if you choose regular nail polish for stamping.
Gel
Gels, unlike varnishes, dry in a lamp. Therefore, when working with them, you do not need to work quickly. This is a great plus for beginners.
They are available in tubes or jars: in both cases, gel paints are convenient and easy to work with. They are used for coating with gel polishes and for nail extensions.
show more
scrapper
A tool with which varnish is drawn across a plate. There are several options to choose from: plastic or metal scraper. The latter, if used carelessly, can scratch the plate, so it is better to buy a plastic scraper.
show more
Base and top for fixing
The durability of the pattern and coating as a whole depends on the quality of the base. Small patterns are covered only with the top, while larger patterns are secured first with the base and then with the top.
show more
Step-by-step instruction
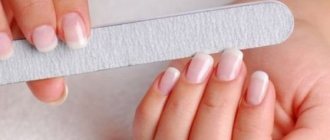
- Prepare the nail plates: remove the cuticle, adjust the length and shape of the nails, remove the coating.
- Degrease your nails, apply a base coat, and let dry. Apply any polish to your nails, preferably in two layers. Each layer must dry well.
- Prepare all the tools and materials that will be required for the job. Paint and varnish should contrast.
- Select a design on the stencil and completely paint over it with a pigmented stamping agent.
- Remove excess paint from the stencil. It is required to quickly, with light pressure, run a scraper along it, located at an angle of 45-650.
- Transfer the drawing to the stamp, and from it to the nail. To do this, you need to lean the pad against the drawing for a few seconds, applying slight pressure. The design is transferred to the nail with a “rolling” motion - from left to right.
- Perform the procedure on all nail plates. The paint should be removed from the plate and stamp each time.
- Wait until the paint dries and apply the top coat.
- Remove excess paint with a cotton swab (provided that no special products were used).
Dots on nails step by step
For those new to nail design, the following instructions will help you complete the job with ease. For a beginner, it is better to start with simple and not complex drawings. Carefully done work looks no less impressive. The finished drawing can be supplemented with lines, curls, and patterns.
The first step is to prepare your nails for work. Clean the nail plate, trim the cuticles, file sharp edges and shape the nails. Next comes the base color.
Before starting work, you should clearly work out the future design. Dipping the tip of the tool into the varnish, you should apply patterns or dots on the surface of the nail plate.
- First you need to prepare the nail plate. It should be cleaned, polished, the sharp ends of the nails should be filed, and the cuticles should be removed.
- After the preparatory procedures, a base should be applied to the nail. It will protect the nail from pigmentation and preserve the manicure.
- Next you need to decide on the design. Apply the selected varnish to the nail plate. If necessary, rotate the procedure. Leave the varnish until completely dry.
- Getting started with dots. For convenience, it is better to prepare a clean palette.
- Pour some varnish onto the palette. Dip the tip into varnish until uniformly coated with varnish. There should not be a lot of varnish, otherwise the work may be dirty, with smudges and blots.
- To keep the points even and neat, the tool must be held straight.
- You always need to keep an eye on the palette. The paint should not dry out. It needs to be updated periodically.
- For a neat drawing, the first points and each subsequent one should differ in diameter.
- Be sure to wait for the varnish to dry completely.
- 10 After completing the work, the tool should be cleaned, for example, nail polish remover, residues, to avoid further drying and damage to the tool.
Stamping with gel polish
The procedure is performed by analogy, but it has its own nuances. To begin with, you need to choose the right gel polish intended for applying the pattern. It must contain a large number of pigments. This is necessary for the print to be clear.
A well-pigmented gel polish adheres better to the base and does not smudge. If you use gel paint, this simplifies the task because it does not require drying. In this case, the top coat can be applied 5 minutes after decorating the last nail. To ensure that the pattern does not blur, the sticky layer from the base coating must be removed.
Reverse stamping with gel polish
This technique is not as complicated as it seems, but the effect it produces is amazing. First you need to prepare your nails and apply a base coat, which should dry well. After this, gel polish is applied in two layers, and each of them is thoroughly dried. Gel paint of the desired shade is applied to the plate pattern you like and, after processing the stencil, it is transferred to the stamp with a scraper.
The details of the drawing are additionally painted with bright colors, which is done using a brush for Chinese painting. Cover the design with topcoat and place the stamp in a UV lamp for a few seconds. Then you need to carefully remove the design from the pad with tweezers and transfer it to the nail. Next, treat with a top coat and dry in a lamp.
How to clean a stamping plate
All tools – scraper, stencil and stamp – must be cleaned of paint residues. To do this, you can use nail polish thinner or remover. Acetone can be an alternative to these products. Cleaning instruments requires a large amount of liquid. Acetone is inexpensive and perfectly dissolves paint and varnish.
The algorithm of actions is simple: you need to moisten a cotton pad with it and remove the remaining paint, paying special attention to the engraving. Upon completion of the procedure, wipe all instruments dry. You can use wide tape to remove paint from the stencil.