Master class on implementation
Preparatory stage
- All instruments are disinfected in a special chamber or using alcohol solutions if the procedure is carried out at home.
- Hands are treated with antiseptic.
- If the nail plates are covered with varnish, it can be removed with a nail remover.
Treatment of nail plates
- Using a nail file, the nails are given the required shape.
- It is recommended to start processing with the little finger and finish with the thumb.
- The file must be professional to avoid delamination and damage to the edge of the plate.
Filing technique
Only clean and dry hands should be processed.
- The file should be manipulated in one direction, starting from the left side, otherwise you can seriously damage the nail plate. The file should file the inside of the nail.
- The nail plate is given the desired shape, however, we do not recommend rounding the side edges too much.
- To eliminate small roughness, you can use a block or buff.
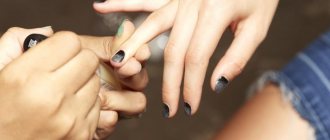
Baths for softening cuticles
- Fingers are immersed in a special container with warm water.
- You can add essential oils, herbs or sea salt to the liquid.
- When the skin softens, you can complete the procedure.
- While your fingers are wet, you can treat your nails with a special brush to remove any remaining filings or cuticle particles.
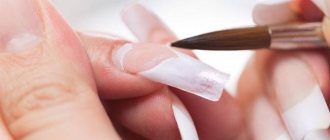
Cuticle removal
- Excess moisture is removed from the fingers.
- The cuticle is treated with a special preparation for removal - but this is not necessary.
- Using an orange stick, the peel is carefully moved away from the plate and lifted up slightly. It is necessary to act delicately to avoid damage.
- All elements are trimmed with sharp, sterile tweezers.
The trimmed manicure is ready, the nails can be subjected to further decorative processing and polishing.
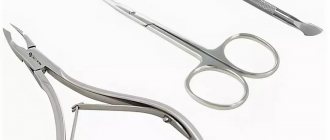
Materials and tools
To create a classic manicure you will need several specialized tools. There are slightly more of them than in Europe, however, they are freely available in many places and are not too expensive, and therefore extremely accessible. Before starting work, as mentioned above, the tools need to be sterilized.
- A spatula for separating the cuticle from the plate (can be replaced with an orange stick);
- Glass nail file;
- Nail and/or skin clippers;
- Nail scissors;
- Hand bath ingredients.
If you have all the tools, then you can begin. But before starting the process, we recommend that you familiarize yourself with how to properly do a trim manicure by watching our video tutorials.
Features and Recommendations
- When visiting the salon, you should make sure that the technician takes out disinfected instruments.
- If the nail plates are surrounded by a soft cuticle, you can avoid trimming the manicure by removing the leathery roller using special compounds.
- At home, all instruments should also be antiseptic.
- It is better to choose a ceramic or glass file.
- To prevent the growing cuticle from drying out, it is recommended to carry out a special procedure: cream or oil is applied to the skin before going to bed.
To protect yourself in case of a cut, you can purchase an antiseptic spray. It is easy to use and guarantees complete disinfection.
The condition of your nails should always be perfect. A beautiful shape, the absence of hangnails and cuticles, the shiny surface of the nail plate - all this indicates that the woman takes care of and cares for herself. A trim manicure will keep your nails in excellent condition at any time.
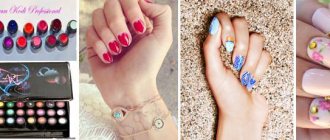
Design ideas for manicure at home
Modern fashion continues to dictate its terms. Along with a single-color coating, various designs and decorative decorations on nails are very popular.
Manicure with stencils
The fashion trend of 2017-2018 is geometric pattern. Even a novice master can do it. Stencils have been invented specifically for this, which save time and do not require complex skills.
These are blanks that are glued to the painted surface of the nail and covered with varnish of a different color. After removal, a design remains on the nails. To prevent the templates from slipping, one side is adhesive.
Kinds:
- Arc-shaped. Ideal for French and moon manicure.
- Linear. Allows you to divide the surface of the nail into zones.
- Zigzag. Used to create an unusual geometric pattern.
- Patterned. Allows for complex designs in the form of butterflies, hearts, flowers, etc.
In addition, there are disposable and disk blanks. At home, it is best to use disposable ones, as they are easier to use, cheaper and can be done using regular varnish or glitter.
Using a stencil will help you create the perfect manicure
Blanks of various configurations can be purchased in specialized stores or made independently.
How to make a stencil at home
Material: single-sided tape or adhesive tape. A workpiece 2–3 centimeters long can be cut using curly scissors. Width is at the discretion of the master. It can be just a thin strip or a 5 mm wide template that will divide the surface into two parts.
Step-by-step manicure using a stencil at home:
- Apply a base layer and a layer of colored varnish to the prepared nail plate, not forgetting to dry thoroughly.
- Check the coating with your finger: it should not be sticky and reflect the fingerprint.
- Attach the stencil blank. If its adhesive side is too sticky, first touch it to the skin, then transfer it to the nail.
- Apply varnish of a different color to the free spaces, dry a little, but not completely.
- Carefully remove the blank and coat the surface of the nail with a protective agent.
Manicure with patterns
Nail designs just seem difficult to do. But practice and patience will help you learn how to create small masterpieces of beauty. Using simple tools and tools, you can easily create patterns at home.
Tools and materials for drawing:
- thin brush,
- needle or toothpick,
- wooden stick with a cut,
- sponge or sponge,
- base and fixing agent,
- colored varnish and acrylic paints.
Today, nail design with acrylic paints is very popular.
Advantages of acrylic paints:
- drawings dry quickly;
- when mixed, any desired shade can be easily obtained;
- They are easily diluted with water and are washed off well at any stage of drawing, which allows a novice artist to correct a mistake.
It is better to start drawings on nails with acrylic paints with light shapes that will be easy to do for the first time.
It is recommended for a novice master to perform simple elements with acrylic paints
Ideas for the lazy: drawing in a few minutes
If you don’t have the strength or desire to tinker with the design, then silicone stickers, the range of which is very diverse, will come to the rescue. In addition, they are easy to work with, and the implementation of ideas is not limited. The essence of this method is to carefully place the sticker using tweezers on a dry nail plate covered with colored varnish. After this, the nail is covered with two thin layers of fixative and the manicure with a beautiful design is ready.
Golden silicone stickers add a special charm to your nail design.
Another quick design option is to paint on two nails with acrylic paints. Advantages: there is no need to maintain symmetry on all fingers and strictly adjust the pattern. The result is beauty and grace.
Using varnish in aerosol cans allows you to experiment with the uniformity of the coating structure and the intensity of the shade. It does not require extreme care, since after applying and drying the protective layer, the paint can be easily washed off with soapy water.
You can easily draw a stylish design at home using an acrylic nail marker. Advantages: the pattern is easy to correct during operation. After application, do not forget about the fixative.
Custom home manicure ideas
Knowing about women’s desire for uniqueness, we can confidently say that everyone has tried to create an original manicure at least once in their life. The variety of patterns never ceases to amaze: hearts, leaves, flowers, abstraction in the form of vague and strict lines, spots.
Drawing with a needle
The technique of drawing with a needle or toothpick is not difficult, but requires some skill. Its peculiarity is the application of a pattern on a layer of varnish that has not yet hardened, while the pattern of needle movement is best thought out in advance.
Tips for beginners:
- For the first time, limit the design to 2-4 nails, as the polish can dry out quickly.
- Before applying, review the drawing diagrams for beginners.
- Apply drops of varnish pointwise, in predetermined places.
- Using needles of different thicknesses will give the pattern an interesting look.
- Strictly follow the sequence of movement of the needle, then the drawing will look harmonious.
- For a smooth color transition, use thinner varnishes.
Video: drawing with a needle
Drawings with hearts
No art education is required to create a drawing. The main thing is a harmonious combination of the image with the design on the nails. There is no restriction on the color of the base and hearts: from delicate pastel colors to dark and bright colors.
What you can use to create a drawing:
- Glitter and stickers. Easily glued to the surface of the nail, look neat and stylish.
- Stencils. You can purchase ready-made templates or make your own.
- Acrylic paints. If you know how to draw with a toothpick, you can create unique masterpieces.
Hearts on nails will add youth and romanticism to the image
Funny emoticons
Smiling faces that can create a positive mood and a sense of celebration can be painted with acrylic paint using a thin brush, toothpick or needle. The easiest way is to use stickers.
Cool, kind, gentle emoticons on nails for young fashionistas
“Weaving” lace
For decoration you will need pieces of thin lace with a small pattern.
Step by step execution:
- It is necessary to cut 10 blanks from the lace corresponding to the size of the nail plates.
- Apply base varnish to the surface of the nail and dry. Then cover with colored varnish. Dry it a little, but not completely.
- Apply the lace to the nail and spread it over the entire surface using a toothpick. Fix the lace in the center of the nail, and then spread it along the edges.
- If there is lace left on the sides, carefully trim it with nail scissors after the base has dried.
Video: performance technique
Matte and glossy surface
Matte manicure looks expensive and noble, but, unfortunately, is short-lived. It’s easy to achieve this effect at home. It is enough, without waiting for the varnish to dry, to hold your hands over the steam for 2 minutes. After this, wait until it dries completely; there is no need to coat it with an additional fixing agent.
What will be needed in the process
Before you start manicure, you need to remove the cuticle. Next, as usual, apply the gel polish to the nails. First we treat it with a dehydrator and primer, after which we apply the base and color tone. Dry each layer in an ultraviolet lamp. In addition to a lamp and cosmetics, to paint your nails with gel polish, you will need the following tools:
- manicure brushes with fine tips;
- points (long rod with a rounded tip);
- needle or toothpick;
- palette (you can use thick cardboard or plastic).
Manicure brushes
Palette
With a few simple tools, you can create a completely unique design every time. With their help, you can draw flowers, a classic or colored jacket, monograms or other elements, the choice of which depends only on your imagination. Painting a snowflake with gel polish is not that difficult.
Author's design
Advantages and disadvantages of trimmed manicure
The types of manicure listed above are equally good - each of them is designed to solve problems that are different in nature.
The advantages of edged manicure include the following facts:
- Trimming is universal and is used in all salons.
- Trimmed manicure helps to radically solve the problem of untidy, neglected cuticles, while hardware and untrimmed manicures are more often used to maintain a neat appearance of the skin.
- Classic manicure is a quick procedure.
- This type of manicure is the cheapest.
However, edged manicure has many disadvantages:
- Trimming manicure is a traumatic procedure that must be performed by a qualified and experienced professional.
- There is the greatest risk of infection. With a trimmed manicure, it is easier to damage blood vessels, and skin injuries provoke bleeding. Also, tools for trimmed manicure require more attention - they require high-quality disinfection using special equipment.
- When trimmed, the cuticle grows back faster.
- With regular manicure trimming, the cuticle becomes rough.
- If the manicure was done poorly, or a blunt instrument was used, the cuticle will be “torn.”
A trim manicure is suitable for those whose cuticles are thick and dry - the tools will remove as much skin as possible from the nail bed.
This type of treatment is suitable for those who have not had a manicure for a long time, or for those who naturally have rough cuticles. The most effective is a combination of trimmed and untrimmed manicure - after the procedure, the skin is treated with cosmetics to soften and remove the cuticle, which does not allow it to grow.
Hardware manicure step by step photo instructions
We treat the skin of our hands with a disinfectant solution and rub it. We wait until it dries.
Hand treatment
If necessary, use a ceramic nozzle to remove the old gel coating.
Using a file, we give the nail the desired shape.
Removing the coating
Using a cone cutter with a rounded tip, we begin to lift the cuticle.
Lifting the cuticle
Use an orange stick to gently move the cuticles on all fingers.
Working with an orange stick
The nozzle should be positioned parallel to the surface being treated to avoid making a cut. If the cutter spins to the right, then our hand goes to the left and also in the other direction. The milling cutter operates in reverse. According to the rules, we process one half of the nail on all fingers, then switch the router and process the second half of the nail on all fingers.
While processing the cuticle, we also grind the side rollers.
Hand placement
Next, take the bur attachment and begin to thin the cuticle.
Working with a bur
Hold the nozzle perpendicular to the surface being treated. We move the cutter in one direction only along the skin; if necessary, we turn the finger and not the nozzle.
Now that the cuticle has been processed, it needs to be cut off. We do this with a smaller ball with fine abrasiveness.
Working with a smaller ball
In this case, we must follow the shape of the nail hole and move parallel to it.
We processed the cuticle. Now we switch the router to 5-7 thousand revolutions per second and use a polishing cutter to process the nail plate. We touch the nail in the cuticle area only with the tip of the cutter. Movements should be light, as if repulsive.
Working with a polishing cutter
The final stage is to go over all the nails with a brush and remove any remaining dust. Then, if we do not cover our nails with varnish, we apply a special cuticle oil. This is necessary to nourish and restore the nails and skin around them, as well as to give our manicure a finished look.
Oil treatment
Tips for Newbies
Treatment of the nail plate
So let's summarize:
The most important thing for a beginner in hardware manicure is not to work at high speeds, so as not to make cuts. Practice the correct hand position during various stages of hardware manicure
Practice the correct hand position during various stages of hardware manicure.
Select the right nozzles.
It is forbidden to work with a cutter at one point for more than 5 seconds, this will lead to overheating of the skin.
To prevent overheating of the router, it is recommended to take breaks every 5-7 minutes.
Do not neglect the rules of sterilization so as not to get fungal infections.
Hardware manicure
Router attachments
conclusions
What conclusions can be drawn about hardware manicure?
With the help of one device you can comprehensively treat your nails.
Eliminates the possibility of traumatic effects on the nail plate and surrounding skin.
After a hardware manicure, the cuticle grows evenly and longer.
The appearance of burrs and cuts is eliminated.
After a hardware manicure, you will not get a fungal infection.
When done correctly, processing time is reduced.
After the procedure, the nails become shiny and the yellowness goes away.
The nail plate becomes healthier and stronger.
The correct shape is formed.
Hardware manicure
Set of cutters
Conclusion
In hardware manicure as in any other matter
The competence of the master plays an important component.
After all, there are various nuances in this procedure. We must remember that we are working with a person and the main principle is do no harm. Therefore, I emphasize that this article is for informational purposes only and the data given in it is not enough to use the acquired knowledge in working with clients. The purpose of this article is rather informational, so that you have an idea about hardware manicure and can try this new method on yourself and so that you can imagine the distinctive features and differences from the classic edged manicure.
Of course, you need to invest some money to purchase everything you need. But if you are seriously interested in this topic and are determined to accept clients in the future, then over time you will get this money back. Moreover, with the help of a milling cutter you can do not only hardware manicure, but also pedicure.
Treatment of the nail plate
I wish you success, I hope that our tips, lessons and instructions were useful to you. I am sending you two videos with an example of hardware manicure.
Popular element – snowflakes
This element looks great on nails not only in winter. Draw and change designs quickly.
There are many types of models:
- large or small snowflakes;
- elements with rhinestones;
- jacket with snowflake;
- half a snowflake is placed along the edge of the nail.
For your manicure, apply a base color. It’s better to stick to dark shades, since we traditionally paint a snowflake with white gel polish. Use custom colors if you want an original design.
Snowflake pattern
The pattern is easier to apply with a brush. We paint snowflakes on nails with gel polish using a simple technique. First make a cross and then add diagonal lines. There can be many of them, depending on whether you are drawing a large snowflake or not. Complicate the technique by adding slanted or rounded elements on the sides.
We recommend:
Nail dryer: how to choose a nail polish dryer
It's also easy to paint with French gel polish and add snowflakes. First, a French manicure is performed, after which a design is applied.
Distinctive features of hardware manicure.
This means that you can easily save on baths, disposable bags, bath salts and of course water.
The third and fundamental difference between hardware and classic manicure is the tool with which the master works. In a classic manicure, this is a set consisting of nippers, scissors and a pusher (special spatula), and in a hardware manicure, all these tools are replaced by one device called a milling cutter.
And such manipulations as removing old coating, manicure, and cuticle removal are performed using cutters. They are different, depending on their purpose, but let's talk about this in more detail.
Stamping
Video tutorials showing nail designs using this technique can be watched below. To perform stamping, you need a special kit, as well as varnishes of sufficient density and optimal thickness. However, this manicure is quite simple and allows you to quickly get a high-quality and complex design.
Cover your nails with background polish, dry it and select a suitable stencil on the plate. Quickly apply two coats of varnish to the stencil and remove excess with a scraper, pressing it firmly against the plate. Press the stamp onto the stencil and stamp the design from the stamp onto your nail. After drying, coat the nail with top polish.
[yandex3] [google3]