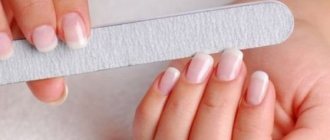
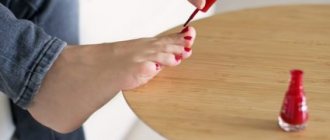
Nail design turns a manicure into a work of art, and learning nail art is not that difficult. We will reveal for you all the secrets of nail design, based on the experience of practicing manicurists.
In this article we will tell you:
- How to paint on nails - what tools are needed to paint on nails?
- What materials can you use to paint on your nails?
- How to paint with nail polish?
- What is the difference between gel polish and shellac?
- How to paint with gel polish on nails?
- How to paint with gel paint on nails?
- How to paint with watercolors on nails?
- How to paint with acrylic paints on nails?
- What can you paint on your nails?
- How to draw designs on nails?
- How to draw monograms on nails?
- How to draw flowers on nails?
- How to draw French on nails?
- How to draw patterns on nails?
You can sign up for manicure training courses in St. Petersburg, Nizhny Novgorod or Moscow and learn how to create stunning nail designs from professionals!
How to paint with nail polish?
The varnish has a thick texture and dries quickly in air. Therefore, it is difficult to paint on it with a brush. It is suitable for elementary drawings made on a wet layer with a needle or dots.
The downside of this manicure is that it doesn't last long. Rarely does polish last on your nails for a week. It is suitable for those who like to change their image.
A simple application technique is suitable for girls with no experience in nail design.
Simple instructions on how to learn how to paint on nails with varnish:
- Apply the background color of polish to the treated nails.
- Place dots of a contrasting color on the still damp surface with a brush or dot and gently stretch. This way you can make petals or artistic patterns.
- When choosing a nail polish for nail design, pay attention to the pigment. It should not be transparent, otherwise the drawing will be dull, almost invisible.
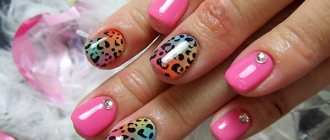
Drawings for beginners with decoration
It is better to buy glass rhinestones for manicure; they look more impressive and shine beautifully. To apply them, use an orange stick, previously soaked in a top product. They beautifully and simply decorate the smile of the nail by placing rhinestones on it. They are applied, gently pressed to the surface of the nail. The result is confirmed.
If you want to get a 3D effect, you should pay attention to the broths. A manicure using them is often called “caviar”. The registration process is similar to the previous ones. The broths are distributed over the nail plate, the excess is removed with a fan brush. A fixing layer is applied, the emphasis is on the edges of the nail, where the broths fall off most quickly.
Acrylic powder is a loose powder, has a porous texture and allows nails to breathe. It dries quickly, so careful and quick work is needed. Thanks to acrylic powder, three-dimensional designs are obtained that resemble a knitted sweater.
Apply 2 layers of gel polish and dry under ultraviolet light. After degreasing, patterns are created that fall under the lamp. In order not to spoil the velvet effect, you will have to choose a matte finishing agent.
How to paint with gel polish on nails?
Gel polish is used to paint using the “wet on wet” technique, which is also called “wet on wet” . This design is very easy to make .
Step-by-step instructions on how to learn how to paint on nails with varnish:
- Apply one coat of the background color to the nail and cure in a lamp.
- There is no need to dry the second layer. Apply drops of contrasting colors onto it, and use a thin brush or dot to make streaks.
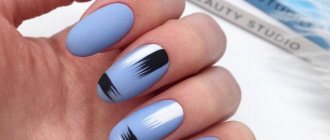
Gel polish is not suitable for complex patterns. It is impossible to draw thin lines with it because it spreads. Large elements are easier to draw. For example, French or reverse French.
If you decide to apply a complex pattern with gel polish, then apply the paint in thin layers, and then dry each one in a lamp. This makes it more likely that the image will not float.
When choosing gel polish for drawings, pay attention to the pigmentation of the material. Transparent colors are not suitable for design. They can be used as a background. The drawing requires rich and dense colors, otherwise the pattern will be difficult to see.
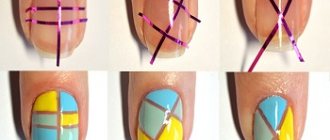
A toothpick is also an option.
Using varnishes of various shades and a regular toothpick, you can create an elegant option.
For work you will need the following materials and components:
- varnishes (shades can be chosen independently);
- toothpicks (2-3 pcs);
- paper napkin;
- fixative;
- base for the main shade.
The sequence of creating the selected pattern assumes that the base will first be applied and allowed to dry. Then you need to apply the main shade.
There is no need to wait for complete drying. Using other colors, apply the desired pattern using a toothpick. The fixing composition is applied at the end, when everything is dry.
Master class on video:
How to paint with gel paint on nails?
Gel paints have high density and pigmentation. They are easy to draw various design elements, including fine lines and raised details. It won't spread. Usually one layer is enough for the image to be bright.
Step-by-step instructions on how to learn how to paint with gel paint on your nails:
- Apply gel paint to the finished manicure covered with top coat.
- Start drawing from the central element.
- Dry the final result in a lamp.
- Cover with top coat if desired.
Choose gel paints from trusted manufacturers. Cheap options often turn out to be fakes. They apply poorly and are of poor quality.
Experiment with gel paints from different manufacturers. Only through experience can you choose the best option for yourself. Keep in mind that the paint color should be rich. The consistency should not be liquid so that it does not spread during drying in the lamp.
How to paint with watercolors on nails?
Watercolor design is simple, but looks very impressive.
Any watercolor will work. Choose fresh colors. They should have a uniform consistency without inclusions.
Watercolor is transparent, so it works best on a white background. Painting with watercolor is not so easy, so we have prepared step-by-step instructions for you.
Step-by-step instructions on how to learn how to paint with watercolors on nails:
- Gel polish as a base must be dried.
- To paint on nails with watercolors, treat the surface of the nail with buff until matte. Then the paint will spread less.
- If you apply an image in several layers, then the previous one must dry.
- Cover the finished design with 2 layers of top coat. The top will provide good durability to the manicure for about 2 weeks.
Before applying paint, draw the outline of the future design with a simple pencil or acrylic paint.
The difference between these approaches is that the pencil will not be visible at the end of the work, but the acrylic outline will be noticeable. The lines of the template drawn with acrylic will act as borders for the watercolor and will not allow it to spread over the entire nail plate.
How to draw strawberries with a needle?
To make the berry realistic you need varnishes:
- red;
- green;
- and black;
- yellow.
The nails are prepared and covered with a red base. To create leaves, take adhesive tape and cut out teeth on it. The entire surface of the nail except the base is covered with adhesive tape. Green varnish is applied to the free space of the nail plate, and leaves are obtained.
Remove the tape and apply small dots with a needle to imitate strawberry seeds. Acrylic paints are suitable for this design. Strawberry leaves can be simply drawn with a needle using emerald paint. For originality, the design is sprinkled with glitter.
An interesting option is voluminous nail art. Nails go through the preparation stage and are coated with the main base color. Without waiting for it to dry, apply a thick layer of transparent varnish. After a few seconds, indentations are made with a needle in place of the grains. When the coating dries, fringe is drawn in the form of thin leaves.
How to paint with acrylic paints on nails?
Acrylic paints dry quickly in air, so it is better to dilute them with water or a special liquid. They are easy to draw clear lines and openwork elements, and draw contours.
Acrylic is a difficult material to apply. Choose brushes with artificial bristles. The thickness of the beam depends on the chosen pattern: the thinner the pattern, the smaller the diameter of the beam, and vice versa.
Step-by-step instructions on how to learn how to paint acrylic designs on nails:
- Apply the material to pre-dried varnish or gel polish.
- Use acrylic to draw individual elements of a design made with another material, or create a complete composition.
- Cover the finished design with 2 layers of top coat to seal the nail well. Make sure the acrylic is completely dry before you “seal” your finished design.
Be careful, oil acrylic paints are not suitable for painting nails. They contain drying oil, which slows down the polymerization process.
How to draw monograms on nails?
Monograms are curlicues. They can decorate any manicure: both everyday and festive.
Step-by-step instructions on how to learn how to draw monograms on nails:
- Buff the glossy surface of the nail to prevent the paint from spreading.
- Apply paint onto the brush using a twisting motion. It should be elastic and thin, No. 0 or 00. If the material is not collected at the very tip of the bundle, then you need to dip it in paint again.
- Place a point and stretch the paint, slowly lifting the pile. This is the main element of the monogram.
- To make a curl, place a dot on the nail, press the brush, draw the paint, turning the bristle a little, then lift the brush and bring the tail of the monogram to a very thin line. You cannot tear off the brush while drawing the monogram.
- If an unpainted area is formed, then the movement is repeated on top of the applied layer from the very beginning, but there is no need to reapply paint to the brush.
- Dry the finished design and cover it with topcoat.
We found an inspiring video for you and are sure that you will learn to draw too:
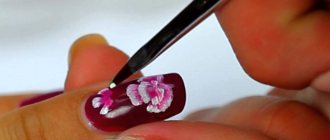
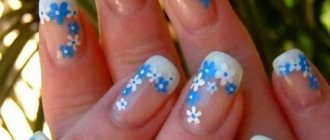
How to draw flowers on nails?
You can draw flowers using different techniques. The easiest way is to create a template of petals with gel paint or acrylic and fill it with color.
You can also use the “wet coating” technique, that is, put dots and connect them in the form of petals.
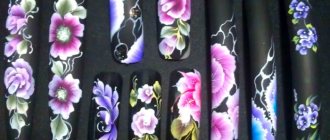
Let's take a closer look at the Chinese painting technique. It is often used by masters when creating flower designs on nails. Flowers using this technique are voluminous and vibrant.
Step-by-step instructions on how to learn how to draw flowers on nails using Chinese technique:
- Apply paint to the palette.
- Put one color on one side of the pile, and another on the other.
- Place the brush on the edge of the nail and extend the stroke away from the center of the future flower. At the end, lift the brush a little and place it on the edge. You should get a smear of two colors.
- Do the same for all the other petals of the flower.
- Decorate the middle of the flower with a different color or rhinestones.
- Draw leaves and petals on the sides of the resulting flower. No drawing of lines is required.
- Dry the nail with the design in a lamp.
- Cover the entire surface of the nails with the topcoat and dry.
Watch the training video to reinforce your new skill:
Simple patterns for beginners
Simple designs on nails that even a beginner can do at home should not have complex designs.
To get started, you should try options such as:
- heart (at the tip of the nail plate or in the middle);
- flower;
- water drop;
- snowflake.
The simplest option is a heart. To apply the design, you will first need to completely cover the nail plate with white varnish. To continue working, the base must be completely dry. Then, using red, pink or another bright shade, you can begin to apply the pattern.
Using a toothpick, apply 2 dots, which are then carefully connected, giving the shape of a heart. If desired, it can be completely painted over or left as an outline.
Options for drawing a heart. Photo:
How to draw French on nails?
French manicure is easy to draw if you follow the rules.
Step-by-step instructions on how to learn how to draw French nails:
- Cover the nail with the background color and dry.
- Walk over the nail with a soft buff and degrease the surface of the nail plate so that the material does not spread.
- Just below the smile line, place symmetrical dots with gel paint using a thin brush.
- From the marked points, draw straight lines to the free edge. There is no need to connect them.
- Mentally divide the square nail into 2 parts, and also divide each part into 2. Place dots on the free edge. This will be the end of the line. Mentally build oval or almond-shaped nails into a square and divide based on this shape.
- On a thin brush, pick up the paint you are using to paint the jacket. Draw a line parallel to the free edge, setting the thickness of the jacket.
- Round the inner corners of the lines with a thin brush.
- The French coat is ready, the last step remains: dry the coating and apply top coat.
There are several ways to draw a French jacket. You can watch some of them in the video instructions:
Design for the more experienced
Complex patterns are suitable for those who have experience in creating nail art.
Before starting the main work, you will need to prepare the nail plates. For this purpose, you can apply a stencil with the desired image option on them or cover them with a base color and let it dry completely.
Depending on what you have in mind, you can apply up to 2-3 different colors and shades, but each of them must be dried until completely hardened. Then, if stencils were used, you need to carefully peel them off, then paint over the empty spaces with varnish of a different shade; if not, apply the desired pattern with a toothpick.
In any case, the final stage will be the application of a fixing layer. It is recommended to use regular clear varnish for this purpose.
Drawing monograms. Master class on video:
Gel polish
The technique of working with gel polish requires attention and accuracy. This coating option will allow you to create designs of any complexity, suitable for summer or winter manicure.
If you don’t have enough experience or you have chosen a complex pattern, you can use glitter - they will correct mistakes and make your nails attractive.
It is important to apply them no less carefully than the main coating, since a mistake at this stage can ruin everything.
Techniques for working with gel polish for beginners. Video:
Some manicure options with a pattern can be done simply and easily.
For painting you will need:
- gel of desired shades;
- glitter (optional);
- lamp (UV);
- base coat;
- protective covering.
You will also need a toothpick or a thin needle for application, a tool that allows you to remove the sticky layer. At the initial stage, you need to prepare the nail plates - the work involves removing the cuticle and polishing.
Then a base coat is applied to the prepared plates (it must dry completely before further work; there is a special UV lamp for this purpose). Then a colored gel is applied - the shade is selected as desired or to match clothes and accessories.
It is important to remember that it does not need to be dried. Using a needle or toothpick, collect the required amount of glitter. They need to be carefully distributed over the surface, but not pressed against it. Excess glitter must be carefully removed so as not to visually spoil the manicure.
The next step is to dry your nails under a UV lamp. To complete the work, you will need to apply a final protective coating, which also needs to be completely dry. You can then use a stick remover.
This option is suitable for any season. It can be used for both daily and holiday use.
Acrylic paints
An excellent design and manicure option is delicate pink and white.
Stages of work:
- Cover the plate with a colorless coating (you can use a beige base, which is used for French manicure).
- You need to drop a little varnish onto the sponge and then press it onto the nail for 5-7 seconds.
- Using a thin brush, you need to apply white acrylic paint and draw any designs along the edges (this could be waves, curls).
Then you need to apply the finishing coat. Additionally, you can use a small amount of glitter.
Painting with acrylic paints. Video:
How to draw patterns on nails?
Even the most complex patterns are formed from various simple basic elements. You can draw geometric shapes, monograms, lines, dots, commas. The elements are first applied separately and then combined with each other.
Watch the video showing fine line patterns in detail:
In order to quickly master nail painting techniques, you should turn to professionals or take courses. During the learning process, teachers will help you place your hand and avoid mistakes.
When choosing courses, follow simple rules:
- Read reviews about the school. They can be found on the official website and on social networks. Write messages to the reviewers and ask them about the training.
- Look at the students' work. The best works are posted on the Internet. If you don't like these works, then the ones that haven't been posted are even worse.
- Sign up for a school as a model to assess the situation from the inside. Pay attention to the quality of the materials the students work with, the sterility of the instruments, and the presentation of information by the teachers.
- Choose a course where practice prevails over theory .
- Check to see if there is an exam at the end of the training and if a certificate is issued. It is important what is written in it: you took a course or passed an exam .
- Choose the cost of courses whenever possible, but remember: good courses are rarely cheap. There is no need to pursue expensive training if finances do not allow it.
- Be sure to enter into an agreement with the school and read it carefully before signing. Please ensure that your name, course title and class start date are spelled correctly.
Upon completion, you will be a certified technician. Clients trust more if they have a certificate and more easily forgive specialists for small mistakes.
Learning how to paint your own nails is not as difficult as it seems. You can practice each element on paper, then on tips, and only then apply it to the nail. The processing process can take a long time. The reward for your patience and work will be a beautiful manicure with a design.
This training may be right for you:
- Best Online Manicure Courses from 1,000 Rubles
- 10 Best Manicure Training Courses in Moscow
- 10 Best Manicure and Pedicure Courses in St. Petersburg
- Best Nail Extension Courses in Moscow from 1,000 Rubles
- 10 Pedicure Training Courses in St. Petersburg
- 10 Best Nail Extension Courses in St. Petersburg
Choose the Best Courses in Your City: Yekaterinburg , Krasnodar , Nizhny Novgorod , Novosibirsk , Rostov-on-Don , Perm , Krasnoyarsk , Voronezh , Omsk .