Every girl strives to make her hands look feminine and neat, and her nails to attract the gaze of others. A variety of designs on nails can emphasize individuality, add some zest and complete your look. Based on this, most girls, when creating a manicure, prefer a design with the presence of artistic painting, and the use of acrylic paints allows you to display an original, realistic design with a beautiful highlight of shadows.
What is paint?
Acrylic paint is a special mixture based on a water-dispersed liquid with a creamy consistency. It is quite convenient to use: it is diluted with water, has no odor and is quite easy to apply to the nail.
Before you learn how to paint your nails with acrylic paints, you should clarify some nuances: how to choose high-quality paint and how to apply it correctly.
Advantages of acrylic paints
- Can be applied to any surface such as paper, wood, concrete walls, metal, plastic, nails and so on
- Air dries quickly
- Good mixability, thanks to which you can get new colors and shades without purchasing
- After drying, the layer remains elastic, so it does not crack, crumble, or fade under the influence of ultraviolet radiation, which makes it possible to use it when building up and applying shellac
- The consistency is quite viscous, so it does not spread, which makes working with it convenient even in small drawings
- Bright rich colors
- The water base makes it easy to keep your tools clean, as it can be easily washed off under regular water.
- After drying, the acrylic becomes water-resistant, so you can safely apply a second layer without fear that the design will smear
- Errors in painting can be easily corrected with water
- Applying one coat gives a bright, rich color, unlike varnish, which needs to be applied several times
- After painting, marks may remain on the skin, which, unlike varnish, can be easily removed
Advantages of decor
The advantages of acrylic paints are as follows:
- Variety of colors. This paint allows you to mix shades with each other to get the color you need.
- Drawings can be applied to natural or artificial surfaces.
- Drawings with acrylic paints dry quickly enough in the open air.
- Acrylic paints are low cost and material consumption is low.
- The material is completely non-toxic. The paint is odorless, and its base is ordinary water.
- When the drawing is blurred or does not turn out very well, you can erase it with a sponge and drinking water.
- The technique of applying acrylic paints is quite simple and does not require additional equipment.
Considering all the advantages of acrylic mixtures, you can safely choose this material for applying high-quality manicure.
What do we need
Before you start painting your nails with acrylic paints, you need to acquire the necessary tools.
- Manicure accessories (tweezers, nail files).
- Set for applying gel polish.
- UV lamp.
- Acrylic paints of various colors.
- Brushes of different sizes.
- Surface for mixing paints (you can use a piece of foil).
- Cotton pads, a vase of water.
Having prepared everything you need, we begin to learn how to create a unique design at home.
What will you need during the work process?
Before you start creating patterns, prepare everything you will need in the process:
- acrylic paints (sold in any manicure store, their cost is low, but lasts a long time)
- fine paint brush
- dots (replaces a needle and toothpick)
- nail polish remover and a cotton swab (you will correct the design, removing errors)
- fixer (acrylic paints are washed off with water, so the drawing will need to be fixed with a clear varnish)
Acrylic painting technique
First of all, we will study in detail how to paint with acrylic paints on gel polish, so that the resulting design is no different from professional application.
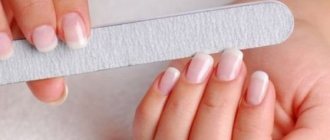
- We give a neat look to your nails. We remove cuticles, file nails and polish them.
- Degrease the nail plates.
- We apply Shellac coating in the standard way (base, color varnish and top coat).
- Remove the sticky layer using a special liquid or regular alcohol.
- We wait until the varnish layer is completely dry. At this time, leave a drop of paint on a separate surface; if the consistency is thick, dilute it with a drop of water and mix well.
- Using a brush of the required thickness, we begin painting on the nails with acrylic paints and apply the selected patterns.
- Dry the drawing in the open air and secure the finish with a coating.
Painting with acrylic mixtures is not that difficult, but painting experience will still help. If you are a beginner, try applying simpler patterns, each time making the design more complex.
How to use acrylic paints
Any design or simple painting begins with nail preparation. Cuticle removal, filing to the desired shape, cleansing. Next you need to think about the design.
It is best to first draw what you have in mind on a piece of paper, try out the colors on it, and analyze the drawing step by step, developing and preparing your hand for painting.
If the drawing is not an addition to the design, but the main element, then you need to think about the background. The best colors for this are white and bright yellow. Of course, everything depends on the color palette of the drawing, the main thing is that the shades contrast with the background, then the drawing will not be lost and will be clearly visible.
In order not to be disappointed the first time, beginners should not take on complex artistic elements, such as Chinese painting.
For beginners, simple geometric shapes, lines and dots are suitable. There is a very simple way, this is to put colorful dots, and then use a toothpick to smear them, creating colored swirls.
There are several techniques for painting with acrylic paints:
- Oil involves using a thick texture, then the strokes will retain their texture, which is similar to oil
- The watercolor technique is obtained by diluting the paint, then it becomes transparent, similar to watercolor. But unlike watercolors, acrylic is static after drying, and subsequent layers will not damage the first
- Sliding is a rather difficult technique. The structural gel is mixed with paints; the difficulty lies in calculating the proportions, otherwise the coating will not acquire the desired shade after drying
- Glaze is created by applying thin transparent layers. Each layer is applied after the first has completely dried, thus obtaining a transparent pattern.
French and butterflies on nails
The technique of drawing butterflies is quite simple, even a beginner can handle it, the main thing is to have a little patience and the luxurious design will decorate your nails for a long time.
Stock up on the following materials.
- Shellac coating kit.
- Beige and white matte gel polish colors.
- Pink and black acrylic paints (pink can be obtained by mixing white and red).
- Medium and fine brushes.
- A piece of foil, sponges, a little water.
Follow these step-by-step instructions:
- We cover the prepared nails with gel polish of a natural color.
- Draw a “smile” line in white.
- After drying the finish coat, be sure to remove the sticky layer.
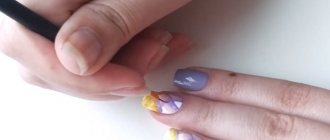
- Take pink acrylic paint and draw the wings of the future butterfly. It will look beautiful if you depict one half of the butterfly on one nail, and the second part on the next nail plate.
- After drying, we can highlight the outline of the design using black acrylic paint and a thin brush.
- The design can be applied to each nail or by focusing on only two or three surfaces.
- We fix the design with a top coat and dry it.
Having tried this design in practice, you will undoubtedly be convinced that painting on nails with acrylic paints is not as difficult as it seems, since a butterfly is a fairly large design that does not require excessive painstaking work.
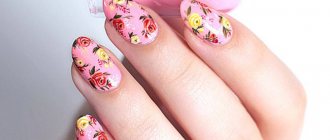
A plot from spikelets
Having mastered the technique of drawing large drawings with acrylic paints, you should learn to design with the presence of small details.
For this we need:
- Shellac coating kit.
- White, yellow, green and black acrylic paints.
- Thin brushes.
- A piece of foil, sponges, a little water.
Let's take a closer look at the image of the spikelets.
- We coat the prepared nails with gel polish. For this design, the nail plate can be left natural color.
- After removing the sticky layer of Shellac, you can begin to apply the design.
- First of all, we learn to depict green grass. We draw thin lines in a chaotic manner, thickening them closer to the free edge. It turns out quite beautiful if you make several shades of green, diluting it with white.
- Next, mix white and yellow colors and draw ears of wheat. Carefully make identical strokes.
- After the acrylic paint has dried, we can begin applying the accents of the design. To do this, draw the contours with black paint and show some highlights. Don't overdo it with dark lines so as not to spoil the design.
- After the acrylic paint has dried, we fix the resulting design with a finish - a coating.
Practice, try applying various designs with acrylic paints. The main thing is to use your imagination, and you will see that luxurious designs are not so complicated.
Basics for beginners
When starting to create designs on acrylic nails with your own hands, the first thing you should do is get used to the brush. To begin with, various design options can be practiced on cardboard or paper.
For training, it is better to coat some surface with varnish, wait for it to dry, and then apply drawings. During work, special attention should be paid to the pressure on the brush, the required amount of paint, color intensity and shades that are obtained by mixing different colors. It is more convenient to create drawings when the acrylic paint is not in a bottle, but on a palette.
After enough training, you can start drawing on your nails. You need to draw a nail plate on paper and try to draw a design you like on it. When it turns out smooth and neat, then you should perform a manicure on your nails with acrylic paints, a photo of which you can show to your friends and put in your portfolio for further work.
Photo of nail polish coating
Even more photos at the link: Gel polish with photo painting.