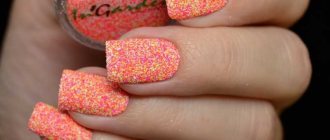
Beautiful nails with a spectacular, original design will always attract admiring glances. Fashion trends dictate to us marble patterns in nail design, and they are very easy to make using water and the resulting colored stains of nail polishes. If you want to make yourself an interesting nail design, try a water manicure. It looks impressive, attractive and fantastic. It is possible to combine different color combinations and various, unique patterns.
Today the site For-Your-Beauty.ru will show you what a water manicure looks like and how to do it yourself . Of course, such nail decoration requires accuracy and a certain skill in order to ultimately obtain the desired result.
Creating a water manicure is a creative process from which you will certainly get pleasure and a good mood.
Pros and cons of water manicure
Advantages:
- original unique design
- the ability to combine different colors and experiment
- Since a ready-made design is applied to the nail, it dries very quickly
Flaws:
- high consumption of varnish
- inability to do a manicure on all nails at once
- large time costs
Read our article on how to learn how to weave chic four-strand braidsLunar manicure is not an invention of modern society, find out where it comes from and how to do it
How to give your eyebrows the perfect shape, read at:
Important little things for a perfect manicure
Don't forget about the latest innovations in the world of nail art. To create an ultra-fashionable manicure, holographic varnishes are suitable, with the help of which your nails will acquire a unique metallic shine.
Also extremely interesting are varnishes with the ability to change color depending on temperature. Thus, the fashionista gets several manicure options in one.
You can do a water manicure with gel polish, but it should be noted that due to the thick structure, not all brands of gel polishes are suitable for this purpose.
Experts have identified a number of suitable brands, such as Shellac CND, OPI Gelcolor, Kodi Professional, Bluesky, Laque RuNail. Separately noted was the Aqua Coat varnish, which has the desired water-based texture and hypoallergenic properties.
In addition to the points already mentioned, there are a number of others that will help in choosing the ideal varnish. It is recommended to use varnishes of the same brand, because in composition they exactly match each other.
At the same time, it is necessary to abandon quick-drying varnishes, because they harden too quickly as a film on the water, and they will not be able to form the desired pattern, and, moreover, fix it on the nails.
And the last thing worth paying attention to is the high consumption of material. It’s worth taking a larger jar of varnish, because the bottle is usually a quarter or a third empty after just one procedure.
We recommend reading:
Nude manicure - trendy new exclusive manicure designs, 130 photo ideas, secrets and tricks from a manicurist- Manicure for summer - the most fashionable trends in 140 photos. Bright and beautiful options for summer manicure 2019-2020
Manicure with stretching - all the features of the most fashionable manicure. 127 photos of original new products, with exclusive design
How to do a water manicure
Step 1
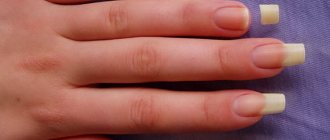
Prepare your nails: do your usual manicure (edged, not trimmed), pay special attention to the cuticle, it should be completely removed. The nail plate should be smooth, then the water manicure will look perfect. Apply a base coat to your nails - white polish or one of the colors you will be using. The manicure will look brighter on white polish. Wait until the coating dries, cover your fingers with tape so that only the nail is exposed.
Step 2
Pour water at room temperature (no more than 35 degrees) into the container. Many girls select the temperature experimentally; if it doesn’t work at one temperature, they try another. Place a drop of varnish into the water; it should spread to the edges of the container. Drip from a height of no more than 2 cm, otherwise the drop will drown. Add a different color of polish to the center of the first drop and continue changing colors 3-6 times.
Step 3
Using a toothpick, create the pattern you want in the water (watch the video to understand how to do this). You can draw stars, flowers, spirals or just colorful patterns by moving a stick from the edges of the container to the center and vice versa. After each line drawn in water, wipe the stick with a cloth or cotton pad.
Step 4
Quickly dip your finger into the water onto the resulting pattern, and use a toothpick to push the remaining varnish in the water away from your finger without removing it from the water. Carefully remove your finger, remove the tape and remove excess polish with a cotton swab dipped in nail polish remover.
Step 5
Repeat steps 2-4 for each finger. Seal the manicure with clear polish, sealing the ends. When you learn how to quickly do this manicure, you will be able to dip several fingers at once, reducing the time spent on this process.
Second option
The next option for water manicure, in which the skin of your hands will remain clean, is the so-called dry water manicure, when the varnish film dries completely. It will take about half an hour to create. After 30 minutes, you can take the varnish circle out of the glass and cut it into several pieces at once. It’s quite easy to “try them on” on your nails to determine how best to place a piece of film. You can fix it by gluing it onto a transparent varnish, and then cover it with another layer, which will dissolve the unnecessary parts.
What could go wrong?
Drops of varnish do not spread in water. First, check the water temperature, experiment with it, find the optimal one for your varnishes. Secondly, make sure to take liquid varnishes; thick or quick-drying ones are not suitable for water-based manicure. If, when you dip your finger into the water, you touch the edges of the container and thereby smear the design, take another container with wider edges or pour more water. Your water manicure is smearing. You may be taking your finger out of the water too quickly, hold it there longer. Carefully remove the remaining pattern in the water with a stick before you remove your finger. If you don’t have time to transfer the design to the nail, the varnish becomes crusty in the water. Check the water temperature: the lower it is, the faster the varnish dries, add hot water.
Strong and beautiful nails are the dream of every girl. Watch video tutorials about acrylic nail extensions yourselfRead in our article which makeup brush is intended for what, and how to choose the best one.
Preparation
- Fresh liquid varnishes are best suited for this technique. If you want to add shine, opt for varnishes with a pearl finish: they contain shimmer, but it is very fine, so it will not damage the structure of the spreading varnish. In this case, it makes no sense to use thick varnishes and varnishes with large sparkles, since they will simply settle to the bottom under their own weight.
- Those nails on which you plan to apply patterns should first be painted with white varnish. It will allow even a thin layer of varnish dissolved in water to look brighter.
- The skin around your fingers should be protected from staining with special liquid tape or tape, otherwise it will be problematic to wipe off the varnish from it. You should not use cream for these purposes: once it gets into the water, it will leave a greasy film on its surface.
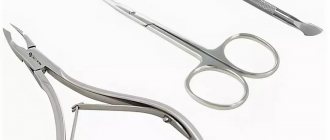
- Also, for water manicure, you need to prepare cotton pads and a toothpick in advance, on which you will first need to wrap a little cotton wool.
Manicure using liquid metal technique with matte finish
Volumetric drops on a matte base look simply amazing, the effectiveness of such a manicure is unreal. And all thanks to the contrast: matte top and glossy sparkling liquid metal.
Conclusion
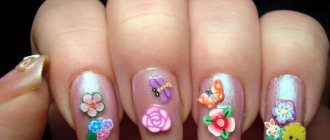
We learned how to make a water design with several shades of varnish, as well as how to decorate it with homemade decor from sculpting gel. The price in a showroom for a similar design can reach 2–3 thousand rubles, but thanks to the video in this article, you can repeat it yourself at home.
I invite you to share your impressions and successes in coating design in the comments, as well as ask questions about this topic.
Did you like the article? Subscribe to our Yandex.Zen channel
Text \ Photo Victoria BOLSHOVA Posted 12/17/2019
0
share:
To favorites
To print
If you want to thank, add clarification or objection to the author - add a comment!
Currently being discussed:
- Lyubov Burkina
20.08.2018
What hair color should I choose? Please give me some advice. I don't know which one I have...
- I
19.08.2018
I had eyelash extensions for 6 months and took a break. After 3 months I increased it again...
- Vasilisa
18.08.2018
Cool hairstyle
18.08.2018
Hi, can I dye my bleached hair (currently red) bright purple...
16.08.2018
Hello! I am a dark girl with black eyes. I want to dye my hair dark...
15.08.2018
The photo shows young beauties. Can older ladies have their eyebrows done? Age...
Comments »
Manicure unicorn tears in light colors
Light powdery yoghurt or marshmallow shades can be safely combined with liquid metal. In addition, these droplets can be made in any color. Diversify your nude manicure with unicorn tears in 2019-2020.
Features of the “liquid stone” design on nails
A manicure created using this technique is reminiscent of covering nails with rhinestones. However, instead of heavy, bulky stones and natural minerals, which fall off quite quickly.
This happens especially often if they are attached to natural nail plates, special gels and other additional materials are used. With their help, craftsmen reproduce original patterns imitating precious stones, gold, platinum and silver.
Liquid stones look very natural and impressive, so it can be difficult to distinguish them from jewelry creations.
Liquid stone for wedding manicure
Each bride carefully thinks through her wedding look, and a special place is given to her fingers. Traditionally, girls choose a French manicure - stylish and discreet, but with the advent of liquid stones they began to increasingly resort to casting. At the same time, it is not worth decorating each nail with a gem, since the bride’s appearance should remain gentle and not overloaded.
Therefore, most often they work with the ring finger, choosing not too bright stones - pearls, crystal, soft pink or white sapphires and they are framed exclusively in gold or silver to match the wedding ring.
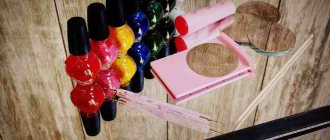
Required materials and tools
To create a manicure using the liquid stone technique, you will need the following materials and tools:
- UV lamp to speed up the drying of each layer of gel.
- Manicure foil that matches the selected stone.
- Colored art gel used to create a French jacket.
- Gel without dispersion.
- Gel paint necessary for applying contours and imprinting foil after polymerization.
- Thick sculpting gel.
- Stained glass gel for stone casting.
- Angled brush for making basic French.
- A basic brush for applying most layers of manicure.
- The so-called hair, necessary for drawing contours.
- Special polymer stones.
- Nail degreasing products.
- File to prepare nails for casting.