The simplest way
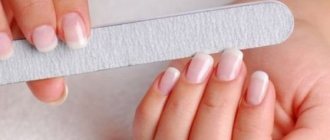
So, let's start with the easiest drawing option, the technique of which is accessible to everyone. Before you start painting flowers on your nails, it is necessary, of course, to put the plate itself in proper shape. Do a manicure, remove excess cuticles, polish the plate. Gather all the necessary tools that you will need to draw a flower. And now we present to you a step-by-step execution of a simple flower with varnish.
- Cover the plate with varnish base. When it's dry, start applying a solid color coat.
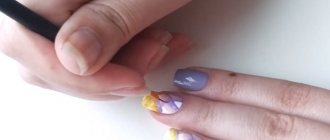
- After the varnish has completely dried, arm yourself with dots. Take two bottles of nail polish of different colors.
- Using dots, draw four circles that will represent petals. Place a dot of a different color in the middle - this will be the core.
- When the flower dries on your nails, you can apply topcoat. That's all, your simple flowers are ready!
As you can see, it's really not difficult. All you need is a little skill and accuracy; you don’t need any other special knowledge. By the way, if you wish, you can apply dots not only with dots, but also with a toothpick; this does not change the patterns. Well, if you have become skilled at drawing such flowers, then you can safely move on to more complex patterns.
A slightly more complicated diagram is shown below:
To find out more, we recommend reading the article: dots drawings and dotted manicure.
The classic way to draw flowers on the nail plate
To start drawing beautiful and complex designs on your nails, you first need to master the basics of nail art. The classic drawing technique is well suited for both beginners and more experienced people who are looking for new ideas. To draw a flower on your nail, use these instructions:
- Once your nails are ready to be painted, apply a base coat. It should be uniform and thin - this will allow it to dry quickly and correctly.
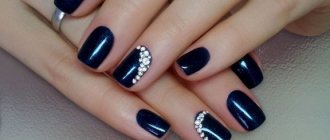
- After the base layer has completely dried, begin to form the design itself using a dots pen or a regular ballpoint pen. To draw a flower quickly and easily, place 4-5 bold dots in a circle of one shade - the petals, and inside 1 more of a different color - the core. This way you will get a delicate and uncomplicated drawing.
- Depending on your preferences, flowers can be supplemented with rhinestones and other small accessories, but do not overdo it. Flashy designs have long gone out of fashion and are a symbol of bad taste.
- When the varnish dries, apply a finishing transparent coat. It will serve as protection, which will allow the manicure to last longer without losing its aesthetic properties.
If this is your first time drawing flowers on your nails, we recommend starting with easy compositions that do not require a good level of skill. Simple designs will not only hide your inexperience, but will also provide a gentle manicure.
How to paint flowers on nails with polish
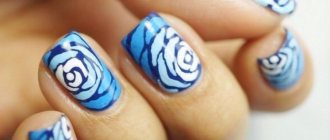
Varnish is a wonderful way to paint a variety of colors on your nails, be it cornflowers or, for example, roses. It is the nail design with roses that we will consider. Of course, you can depict flowers with paints, but we’ll talk about that next time. So, let's start creating a masterpiece with varnishes.
- Prepare red and white varnishes.
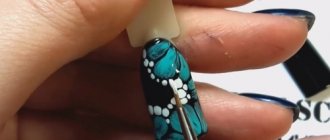
- Using a needle, carefully place 4–6 dots on the plate, alternating red and white so that they touch each other.
- Using the same needle, start mixing the colors in random order so that the outline of the rose emerges.
- Once finished, you can paint the leaves around the roses with green paint.
Here in this photo you can see what simple manicure with roses looks like. As you can see, it is very elegant and suitable for the most special occasions.
Draw flowers with a needle or toothpick
Above we have already described several schemes for drawing with a needle or toothpick. This technique is not at all that complicated and you can draw flowers on your nails using these tools without much difficulty. Just be prepared for the fact that you will need a firm hand and accuracy. Thin-diameter needles are used for drawing small elements; larger tools can be used for larger drawings.
You can draw with a needle or toothpick both on wet varnish and on already dried coating. In the first case, the patterns are applied before the varnish has time to dry. In the second, the design is depicted with varnish of a different color on a frozen base.
You can clearly see the drawing procedure in the video tutorial:
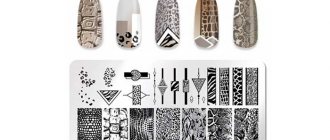
We create using stamps and stencils
Creating floral patterns using tools such as stamps and stencils is even easier than using additional tools. Stencils work on this principle - the design is glued onto the nail, after which those parts where there are voids are painted over with varnish. After which the adhesive base is removed, and a flower .
And here is the video!
Creating nail art using a stamp is a simple matter. Stamping is carried out in this way - the design printed on the plate is copied onto the stamp pad, after which this stamp is placed on the nail. As you can see, you don’t need to have any knowledge at all to put beautiful flowers . And here's what it looks like:
What do you need for a manicure with flowers?
© iStock
A manicure with a pattern is a delicate matter: if you do not have artistic skills, then, alas, you will not be able to create even the simplest patterns on your nails the first time. What can we say about flowers? You'll have to practice; perhaps even prepare a draft of a future drawing on paper. Another option is to contact a professional who regularly deals with nail designs.
Both home and salon manicures with floral designs will require a certain set of products and tools.
1
Base and top coat
You can’t do without them even when creating the simplest manicure. The base is responsible for protecting the nail plate and at the same time for better adhesion to the varnish. “Finish” gives the coating a beautiful glossy shine and provides the manicure with greater durability.
2
Colored varnishes
Delicate pastel shades; brighter ones - red, pink, purple orange; green options - for drawing stems and leaves. You can work on floral patterns with a wide palette. To narrow your arsenal a little, decide which flowers you will draw.
© pinselpoesie
3
Manicure brushes
Thin thread brushes will definitely come in handy: a design with flowers involves drawing a lot of small details. A brush from a bottle of varnish will not cope with this.
© iStock
4
Toothpicks
With their help you can master one of the simplest techniques for drawing flowers. A small drop of varnish is left on the nail, and then curls are “pulled” out of it with a toothpick, which as a result look like petals.
5
Rhinestones, glitter, manicure tapes
This toolkit is for those who want to further decorate their nail art with flowers.
© sparkle_nail4u
Technique for drawing poppies
To paint poppies on your nails, it is advisable to use gel paints, which are most convenient to work with. The drawings turn out very beautiful and airy.
There are no banners due to the fact that they are disabled or not provided for this location!
- Apply red on one side and black on the other to the tip of a flat brush. The ratio of tones should be different. The black color that will frame the core should be only a fifth, otherwise the poppies will not work. Applying the brush to the nail, draw two broken petals.
- To make the design more natural, for the following elements, pick up a white tone with the tip, highlighting a little red. Apply a second layer of petals on top of the first.
- Next, you can draw the core of the poppy. Use a green tone to fill the center of the flower, then use white to create a kind of “chamomile” and small stamen dots inside.
- When the poppies are ready, you can start decorating the leaves. To paint them, apply approximately 4:1 ratio of green and red to the tip of the brush. These elements are also applied with intermittent movements and should turn out torn. To clearly see how poppies are drawn on nails, we suggest watching the following video tutorial.
Drawing poppies on nails
To paint poppies on nails, it is best to use gel-based paints. Acrylic ones are also good, but working with them is several times more difficult. To get a beautiful floral design, we recommend taking note of the following instructions:
- Prepare the nail plate for painting, then apply one even base coat. It needs to dry well before you start painting, otherwise the outline may blur.
- A flat brush is ideal for painting poppies. It needs to be soaked in paint so that 1/5 is red and the remaining is black.
- Slowly draw 2 petals, slightly distorting the original shape.
- Then draw a few more petals of a lighter shade nearby. To do this, add white paint to the red tone.
- Inside, draw the core with green paint and put dots - they will symbolize the stamen.
- When the flowers are completely finished, make a thin outline in black, then add a couple of green leaves around.
Poppies go perfectly with all clothing styles, so you won’t have any problems choosing the right look. Casual or classic, business or casual – it doesn’t matter at all, your nails will perfectly complement any.
How to depict sakura?
The simplest flower design on nails is sakura. Based on the video, we will tell you step by step how to draw branches and small flowers of Japanese cherry trees.
- Select two fingers that you want to focus on and apply white polish, paint the rest of your nails with black polish. You can use either glossy or matte finish.
- Sakura is depicted on white nails. The drawings begin with black branches resembling a slingshot. It is most convenient to apply them with a thin brush.
- Next, between the branches you need to draw a cluster of three red dots, in the center of which apply a white pea. To make the sakura on your nails last longer, fix the flowers with a top coat. We invite you to repeat the step-by-step instructions by watching the following video lesson
Drawing sakura on nails
Drawing sakura on a nail plate will not be difficult even for beginners, but you will definitely like the result. To make the drawing process easy and fun, we recommend using the following instructions:
- Prepare the nail plate for painting and apply a base coat. It doesn’t have to be monochromatic; sakura also looks good in combination with a classic French jacket.
- When the base has dried well, you can start painting. Using a thin brush, paint the sakura branch using brown or black paint.
- Apply several cinquefoils and one unopened bud to each branch.
- Draw the core and stamen of each flower using black or brown.
- When the sakura is completely finished, apply a finishing clear varnish. It will increase durability and provide additional protection to the manicure from external factors: moisture, dirt, mechanical damage.
By depicting sakura on your nails, you can fully use your imagination. Such drawings are obtained well with both paints and varnishes. Moreover, in any variation they will look interesting and extraordinary.
Techniques for drawing roses
If you don't know how to draw a rose on your nails, carefully study the master class. The process is simple, even beginner nail art lovers can do it. The flowers turn out to be miniature, but in the composition they look very beautiful and delicate.
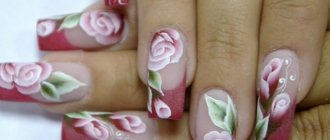
- Before painting roses on your nails, cover them with a base color, in this case a translucent beige shade. Be sure to wait for it to dry completely.
- To depict a flower, you will need red and white tones. If you apply designs with regular varnishes, give preference to thicker ones.
- For the base of the future dots rose, place two red dots next to each other and two white dots between them. All four peas should touch each other and form a conditional square.
- Using a toothpick, mix the dots together in random order to form a rose. Draw a few more flowers nearby in the same way.
- Apply leaves with green paint. Place 2-3 of them near each bud. The video will help you study the process of drawing a rose on your nails in more detail, and you can easily repeat the process yourself.
Lunar nail design with lilies - step-by-step master class with photos on home manicure
Do you like to paint your nails yourself? In this master class you will find a step-by-step lesson.
A neat, unobtrusive, but at the same time beautiful and surprisingly delicate nail design, combining moon manicure and small lilies, is ideal for every day and for special occasions. For work, you can use both regular and gel polishes, if you prefer a long-lasting effect and have already acquired special equipment.
- Materials and tools for manicure
- Step-by-step floral design technique
Materials and tools for manicure
To paint your nails yourself using this master class, prepare:
- colorless varnish (“base” and “top” or one universal one);
- colored varnish (white, pink, lilac/purple, green/light green);
- glitter polish (silver, gold or pastel shades);
- thin brush;
Step-by-step floral design technique
Cover the prepared nail plates with a transparent base.
The designs will decorate the nails on the middle and ring fingers. Start with the middle one, covering it with white varnish.
Apply a second layer on top of the dried first layer; the color should be uniform without streaks.
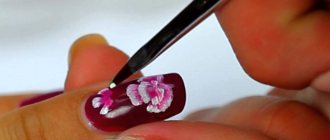
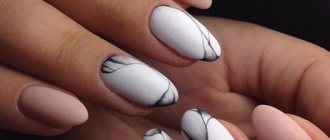
Using a thin brush, paint the pink base of the flower (4-5 mm in diameter). There should be a little varnish (literally at the tip) so that it does not spread to the edge.
Step back about 3-4 mm and draw the same flower.
You only have dark purple, dilute it with white. To do this, separately on a piece of foil, mix one drop of each shade until the color is uniform. Use the resulting shade to make another lily.
Wait for the flowers to dry. Then, with a thin brush, draw several white lines, drawing the petals. There should be very little varnish at the end of the brush, the lines should not go beyond the border of the base.
Apply a second layer to the white outlines.
Take a green or light green shade. Use a thin brush to paint the leaves. If the color is not bright, repeat.
Draw some single or double leaves around the edges of the flowers. Use the same method to decorate your ring finger nail (steps 2-10).
On the remaining nails, perform one of the variations of the fashionable moon manicure using white. Using a thin brush, outline the nail hole without painting over it. At this stage, you can use special stencils.
Cover the rest of the nail with two coats of white polish.
Wait until completely dry and use a decorative coating with glitter (1 layer). Apply topcoat or all-purpose coat for a high-gloss shine. Manicure is ready.
A sea of ideas for floral manicure awaits you in this album, and see lessons and tips for impeccable design in another publication. If drawing flowers seems difficult to you, then try snowflakes and stickers, even a child can handle them!
Take a few minutes to look at other posts on our Women's Hobbies site. We are sure that you will definitely find a new hobby and get acquainted with interesting types of needlework.
Flower Nail Art Ideas
We have provided several examples of floral designs for you. There are much more of them in the world of nail art. You can paint on your nails not only poppies, roses, sakura branches, but also, for example, a lily or any other flower. They all look gentle, light and beautiful, provided that they are made with high quality and accuracy . If you are not confident in your own abilities, try to depict the same lily or rose on your nails using special stickers. Flowers can be arranged in various compositions and combined with other elements. There are a huge number of variations, some of them are presented in our photo gallery.
An elegant floral manicure can be done for a special event or just for everyday wear to lift your spirits. The photos presented above will help you determine the direction in which you should move when choosing a suitable design. And in conclusion, we invite you to watch a wonderful master class on painting beautiful petunia on your nails. The author of the video will show you what Chinese nail painting is. This technique can be applied to other flowers, drawing, for example, a luxurious lily. Give free rein to your imagination, and everything will definitely work out!
Recommendations
Before you start creating your manicure, there are a few design tips to consider.
- If your nails are short, then it is better to avoid painting a large number of lilies. One or two colors will be enough.
- If the length of your nails allows, then here you can show your imagination and paint entire landscapes.
- The design with lilies makes it possible to create designs and the base in the same tone. Then from a distance only a single-color varnish will be noticeable, but up close the image will become clearer.
- Decorating with these flowers in pastel colors looks more beautiful and feminine.
Design
Let's look at nail design options with flowers that can be done using the above techniques.
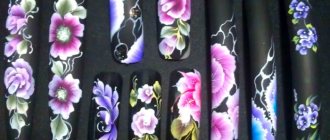
- White lilies look very beautiful on a black background. Black stamens will emphasize the bold character of the wearer of such a manicure.
- Pastel colors will give your manicure a very romantic and delicate design. The background for flowers can be pink, purple, peach. The petals look harmonious to match the base.
- You shouldn’t give up on bright drawings either. Violet lilies with bright green leaves, rich blue flowers, and even red specimens look bright, bold, and expressive. Lilies are a unique design that looks very beautiful on any nail shape. In addition, a manicure made in this decor is suitable for any occasion and in any weather. In summer, a manicure with lilies will fit perfectly into a bright floral landscape, and in winter it will remind you of a warm, picturesque summer.
You will learn how to draw lilies on nails in the next video.
Design Features
Nail art with lilies will add a special charm to the image and emphasize femininity. Its popularity is not related to the time of year and the weather outside the window. The flower looks beautiful on nails of any shape, regardless of their length.
Designers offer many nail design options. You can depict one flower or a whole bouquet, while fragments of one composition can be placed on two or three nail plates.
It is better to apply large flower images as an accent on several fingers, and small flowers or buds can be used to decorate each nail.
The use of coatings of different textures, as well as a combination of several techniques, will help make the drawing original.
Sometimes it is not a natural flower that is depicted, but a heraldic symbol. This kind of nail art, unlike floral, looks royally strict, restrained and noble.
Color combinations
This manicure is quite varied. When creating it, you can use different shades and combine them. Pastel delicate colors look beautiful, feminine, soft. These can be flowers of soft pink, peach or white.
At the same time, do not forget about bright colors. For example, purple, deep pink or orange flowers surrounded by green leaves look bold, catchy, and expressive. The background for such ney art can be:
- white;
- black;
- pale pink;
- light blue;
- beige;
- peach;
- silver
Original nail art is obtained by creating a pattern that is close in color to the main background. In this case, the image will only be visible up close, and from a distance the nails will appear monochromatic.
Manicure ideas with lily on nails
- Glossy-matte. A matte monochromatic manicure, popular this season, can serve as an excellent basis for creating a beautiful lily depicted with glossy varnish. This can be a realistic drawing with all the details drawn or a sketch made with contrasting varnish in the form of strokes. The business style will be perfectly complemented by stylish nail art, the basis of which is a dark matte finish with a glossy image of a heraldic symbol made in the same tone.
- French. Timeless French manicure goes well with floral motifs. An elegant flower on the entire nail as an accent on the ring finger will give the classic French jacket more sophistication. By painting the petals in soft pink or white, you can create nail art for a wedding look. You can decorate a moon manicure in the same way.
- Drawing on wet gel. The technique of drawing on wet gel allows you to create an original drawing. Visually, the image turns out to be three-dimensional with a slightly blurry outline, so the composition looks unconventional and stylish. This design in itself is quite attractive, so there is no need to complement it with decor.
- Stained glass. Stained glass is a fashionable technique that involves covering a finished image with translucent gel polish with some shade. As a result, it comes out a little muted. Designers recommend choosing the tone of stained glass varnish taking into account the color of the design itself. A stained glass manicure made in soft purple or blue tones looks beautiful.
- 3D. A stylish, rich look has a relief image of a flower. You can achieve this effect using acrylic powder and gel polish. Nail art with voluminous petals will not be very practical; it is suitable for an evening out, a holiday or any special event; on weekdays it is worth making the design simpler.
- Sweet bloom. The Sweet Bloom technique is quite popular this season. It allows you to create incredibly beautiful three-dimensional drawings. To depict a lily, you can use both pastel and bright colors. But it is better to place the flower only on one nail so that the design is more expressive.
- Rhinestones and broths. Rhinestones are a universal decor that can decorate any design. They can be of different sizes, colored or transparent. Small rhinestones can be used to strew the petals or highlight the stamens, and larger crystals can be used to decorate the center, lunula or smile when creating a French jacket. Rhinestones go well with bouillons and glitter; especially successful compositions are obtained when decorating wedding nail art. When using decor, you need to remember a sense of proportion so as not to overload your nails.
A manicure with lilies has a chic, noble look. It belongs to those types of nail designs that will never lose their relevance. Created using new techniques, it will be an excellent addition to any female look.
Daisies
A romantic and sweet manicure with daisies radiates warmth and serenity and perfectly matches the summer mood for relaxation and vacation. In 2022, summer manicure with daisies has its own characteristics:
- Along with the traditional white and yellow color scheme, the variety of background colors and decoration methods is expanding, while the design of a daisy flower moves away from the realism of the image and acquires a certain childishness and simplicity.
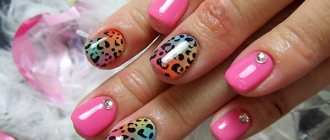
- Chamomile nail designs are based on light shades of yellow, orange, blue, green and pink.
- The white color of the petals is often “blurred out” against the background color, and the yellow core of the daisy on the nails is often replaced with golden rhinestones.
- The nail design shows a scattering of sparkles next to a daisy pattern, alternating patterns with a continuous coating of several nails with golden or rich yellow granulated sugar.
- The imitation of a summer field with blades of grass is enhanced by a pattern with a ladybug and a chamomile. Decorating with ladybugs looks romantic, touching and very popular among girls.
- A white reverse jacket on a bright yellow background and white daisies on nails with gel polish on a matte beige background of the index and ring fingers look stylish.
A manicure with wild daisy flowers fits harmoniously into fashionable summer looks with shorts, dresses and sundresses. The photo shows several versions of the original versions: MEnd MBegin:https://nail-trend.ru/uploads/posts/2017-06/1497890813_103.jpg|
In ancient times, the lily decorated the homes of Egyptian pharaohs, and in medieval Europe it became a heraldic symbol of many royal courts. The lily flower looks truly royal, graceful and elegant. Such close attention to the lily gave rise to a lot of mysteries and symbolic meanings around it. Lily flowers represent purity and tenderness. If you listen to the language of flowers, the lily is shrouded in an aura of beauty, innocence, and tender feelings. It is understandable that women value such positive symbolism of the flower and strive to surround themselves with its images. Nail designs with flowers are very feminine and attractive. The royalty and sophistication of lilies on nails makes the manicure stylish and elite. Fashionable nail art trends 2022 owe their success to a large extent to the gracefulness and royalty of lines and edges, borrowed from lilies. These It is difficult to overestimate the design of nails with lilies and the beauty of the design solution, in which a manicure with a lily of a delicate pink color is applied on a colorless “broken glass” decor with pink reflections. The versatility of decorating with lilies allows you to enjoy this manicure all year round. Seasons are no obstacle to femininity and tenderness. The nuances of design solutions will easily give lilies on nails a summer mood, the charm of a festive look or a discreet everyday look. The photo shows examples of combinations of various types of manicure and decoration products with lilies:
• Peonies
A manicure with a peony flower pattern is one of the most fashionable trends. In recent years, the passion for oriental culture, oriental calendars and symbols has influenced preferences in choosing the subject of painting on nails. For example, the ancient teaching of Feng Shui attributes to peonies the mysterious properties of awakening love, passion and ardor. As a symbol of strong romantic feelings and wonderful events, the peony, if you listen to the ancient theories of Feng Shui, can attract love and strengthen marriage bonds. Of course, this ancient teaching says nothing about manicure, but, wanting to find love, women surround themselves with its symbols, including painting peonies on their nails. The impressively popular manicure with peonies takes on new features every season. Its distinctive feature in 2022 was that nail designs with peonies acquired a more noticeable oriental style. The features of meticulous, fine Japanese painting, focusing on the details of the smallest details, characterize the design of nails with peonies. Such painting requires high professionalism and artistic taste, because these flowers are very complex and simple schematism does not convey their recognizable features (look at the photo). A predominantly nude spectrum of colors is used to convey the beauty of the flower. The most fashionable manicure color is pink. A delicate and feminine flower looks great on short nails; options for long nails can be more intricate and picturesque. When using additional decor, experts advise being very careful not to disturb the specific style of manicure with peonies to imitate oriental painting.
• Other ideas
For the creative searches of professional designers, flowers on nails are an inexhaustible topic. Without defining clear nail art priorities, 2019 provides a chance to realize the most daring ideas. Absolutely realistic and believable or absolutely fictitious, fantastic and fairy-tale flowers on nails with gel polish, as well as shellac, are additionally decorated with all known methods and techniques. Perfectly shaped tulips, spreading and colorful sunflowers, picturesque irises and an elite orchid are the most fashionable themes for designs on nail plates, regardless of the time of year. Themed manicures are most often done with tulips at the beginning of spring. The design of the decor with rhinestones, gradients, ribbons, glitter and modeling determines the lines and outlines of the flower design. A French manicure, in which the characteristic stripe along the edge of the nail is saturated with flowers, looks very unusual and stylish. Nail designs with black lace, geometric patterns, butterflies on flowers and chintz themes are in fashion. Sculpted voluminous flowers give the decor their own personality. A manicure with flowers is very variable and goes well with a moonlit jacket and a cashmere matte surface of the nails. The photo shows a number of options that use different techniques and a rich arsenal of decoration tools.
Nail design “Lily”
Create a beautiful lily on your nails in pastel colors. This new and delicate nail art will attract attention in the summer. The lesson is specially designed for advanced nail art masters. The design will look great on both long and medium length nails. To create the flower we used freehand drawing techniques and acrylic paints.
You need 3 polishes: 1 – transparent for the background (you can also use a base coat), 2 – white for a French manicure, 3 – with silver glitter
3 colors of acrylic paints: 1 – caramel for the petals, 2 – black for the outline of the petals, 2 – pearl yellow for the stamens
Broths, Brush, Base coat
We recommend doing nail art on all nails at once, not separately. For example, cover your nails with base polish, then draw the outline of the petals, then add the stamens. This method will save your time, your images will be similar and in a similar style. A few words about using acrylic paints: you can add a little water to acrylic paints, it prevents them from drying out quickly. Wash your brush after using each color.
1) First you need to degrease your nails.
2) Create a French manicure by adding a white smile line.
3) Paint your nails with silver glitter polish.
4) Paint the lily petals using acrylic paint and a thin brush. You can also use light brown or orange colors. It is better to draw petals on all nails.
5) Outline the petals using a thin brush and black acrylic paint.
6) Add pearly yellow stamens as shown in the picture.
7) Now add the broth.
Nails should dry.
Sources
- https://zen.yandex.by/media/id/5cda6650849658051f76aeab/manikiur-s-liliiami-5da0359b5eb26800b1d29b5c?from=feed&rid=3361077267.458.1577548913335.42475&integration=site_desktop&place= layout
- https://nailsfit.ru/dizajn/kak-risovat-tsvety-na-nogtyah.html
- https://HomeManicure.ru/nail-drawings/risunki-cvetov-na-nogtyakh.html
- https://vplate.ru/manikyur/risunki/lilii/
- https://stylish-lady.ru/moda_stil/tsvetochnyj-manikyur-s-liliyami.html
- https://nail-trend.ru/5-dizayn-nogtey-s-cvetami.html
- https://manicur4ik.ru/nogtevoj-dizajn/30-dizajn-lilija.html
Color combinations and decorative elements
When creating an original nail design with lilies, you should follow a few simple rules:
- owners of a short plate should not decorate all their fingers with bright flowers at the same time - a beautiful large lily on one nail is quite enough;
- long manicure is ideal for realizing bold artistic fantasies - here you can create compositions of any complexity;
- The pattern looks especially gentle and elegant in pastel colors.
Painted lilies are perfectly combined with various techniques that are actively used by nail art masters, namely French manicure, acrylic powder, rhinestones, mirror rubs, and stained glass.
Simple stylized images of flowers, which are painted with special gel paint or paste, look good with shiny rubs. Mirror powder is applied to the design after the shellac has dried or used as a background; rhinestones would also be appropriate in this design.
Exquisite lilies can be coated with translucent stained glass varnish on top - this way the image will become spectacular and elegant at the same time.
Attention! When designing using stained glass technology, you should remember that the color of the top coating should be harmoniously combined with the overall palette of the finished design.
Lilies decorated with matte acrylic powder look cute and quite original. Skillful alternation of light and dark tones, stylish transitions from a matte base to a delicate “plush” pattern turn a creative manicure into a real work of art!
Exquisite lilies will ideally complement a classic French jacket - luxurious white designs with the finest lace patterns and sparkling rhinestones will be an excellent decoration for a chic wedding dress.