For this technique of painting on wet, gel polish or shellac are ideal due to the fact that they cannot dry on their own. Therefore, there is more than enough time to create a masterpiece on your nails. The principle of operation here is similar to applying drawings with a needle. The most original chic designs that will certainly draw the attention of others to your nails - roses on wet gel polish. After some effort and diligence, you can create such a unique design yourself.
Chinese nail painting technique. Master Class
The Chinese “double stroke” technique is a set of drawing techniques united by one feature. 2 colors are applied to 1 brush at once and a pattern is created using various continuous movements of the brush.
There are only 5 main types of strokes presented in this technique:
smooth - straight line;
We draw lines on the nails and this is a good option for beginners.
- openwork - dense vertical wave;
- semi-openwork - a wide wave from top to bottom, then sideways, up and down, without lifting off the surface;
- feather - abrupt strokes with a thin brush in different directions;
- wave - continuous movement in different directions with rotation of the brush.
To complete a drawing using this technique you will need:
- LED lamp with UV spectrum, or UF lamp;
- white gel polish;
- acrylic paints in white, pink, black colors;
- finishing top;
- clinser;
- linen napkins;
- flat brush
- dotting brush;
- dots;
- palette;
- small rhinestones;
- water.
Their structure makes it easier to apply, distribute and mix paints at the time of the stroke. Master class “Flower” using Chinese technique with acrylic paints is very simple to perform and even the most beginner can handle it.
Master class “Flower” in Chinese technique
- Prepare your nails for painting.
- Apply white gel polish to all nails.
- Dry in a lamp.
- Repeat application of white base varnish.
- Dry in a lamp.
- Treat with a clinser.
- Treat the base layer with a thin buff.
- Apply a small amount of pink and white paint to the palette, close to each other.
- Dip a flat brush with opposite bristles into different colors. Draw test lines on a sheet of paper, checking the intensity and width of the paint, mixing it at the same time and removing excess from the brush.
- Using a circular motion, draw a circle in the left middle part of the nail plate with pink color inside. If necessary, correct the result.
- Place some black on the palette.
- Draw the rounded contours of the flower with a dotted brush, add leaf veins on top.
- Using the same point brush, draw out the central part of each petal, sharpening and shaping.
- Trace the outline of the flower again, achieving straight lines.
- Using pink paint and a dotting brush, draw the veins of the flower from the center to the middle of the petal
- Using dots, draw a lot of white small dots in the center of the flower.
- Using dots with black paint, mark the places where the rhinestones are attached on the free surface of the nail.
- Wait for it to dry
- Cover with a thin layer of finishing top.
- Attach the rhinestones to the prepared places. You can add small transparent rhinestones to the center of the flower.
- Dry in a lamp.
- Using the finishing topcoat, use a dotting brush to draw a circle around the rhinestone, further strengthening the adhesion to the surface.
- Dry in a lamp.
- Remove the sticky layer with a cleaner.
Drawing on nails for beginners is wiser to start with simpler techniques and techniques. Chinese painting fully reveals its beauty in the hands of experienced craftsmen.
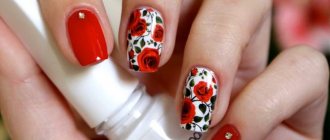
How to paint a rose step by step on nails with acrylic paint, photo
There are several techniques for creating a manicure with roses using acrylic paint.:
- Apply floral nail art to the base using lacquer-soluble paints
- Draw stylish rose patterns using water-soluble materials
The process of creating a design with roses
IMPORTANT : Experienced cosmetologists welcome the creation of manicures with floral designs using soluble paints. After all, it turns out to be more accurate - it spreads less. However, doing such nail art is not an easy task, because mistakes cannot be made when applying roses. Hand movements must be clear. And for beginners, it is better to use water-soluble materials, because they can be easily removed with a napkin from the surface of the nail plate when smeared.
Simple “Roses” manicure design step by step
What kind of design can you create?
More recently, the most common designs for wet gel polish were floral patterns. Today, trends have changed and the number of options has increased dramatically.
Flowers of various shapes, sizes and colors, as well as graphic patterns, abstractions, haze of various interpretations, butterflies and other patterns continue to be very popular.
Marble manicure, which is very popular today, is also performed using this technique. You can design circles with penumbra, a cobweb entangling your nails, or create a shell effect, as well as use a marine theme. All this is available using this technology.
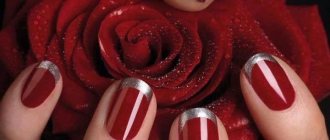
Black roses on nails, photo
Nail art with black roses will look stylish and playful. This manicure is practical, will fit perfectly into your everyday look and at the same time can be suitable for various celebrations.
Spectacular manicure with black roses
This design can be done without difficulty at home. To do this, you can use a needle, brush or toothpick, whichever is more convenient for you.
- Using black varnish we draw petals to our future roses from the center of the bud
- We gradually open our rose bud to the desired size and shape
- Afterwards, if desired, add some elements such as dots, curls, petals
Design option with black roses
- If you design the design closer to the “retro” style, then you will have to add dots. To do this, place them symmetrically over the entire background of the nail plate. You will get a polka dot manicure.
- Adding stripes on one nail will also look elegant. At the end of this combination manicure, cover your designs with a matte finish.
Cute black roses on nails
Simple drawings
For those who are not confident in their artistic talents, there are numerous simple schemes that allow you to do a wet manicure without excessive effort.
The simplest wet gel polish design is created using two different color shades and a special brush. The whole process can be divided into three stages:
- apply and dry the base layer with a lamp;
- use a brush to put dots or draw stripes, create beautiful patterns with a brush;
- dry, apply strengthening varnish.
If your patterns are already good, you can move on to simple drawings. The wet manicure technique produces butterflies very beautifully. This must be done in the same order as when drawing roses. The base layer is dried, a strip is drawn in a suitable color - the body of the butterfly. If desired, you can add a mustache. Place two drops of bright varnish on both sides of the strip and paint with a brush.
Not forgetting that only when wet the gel polish will give them the shape of wings. If you want to embellish your nails or hide irregular fragments of the design, you can glue rhinestones or small shiny crystals that match the color.
You can create a bright floral design on a wet layer of gel polish by painting beautiful flowers on your nails. There is nothing complicated here, the sequence of work is the same as for roses or butterflies, the main thing is not to forget to dry the layers when necessary.
Place a large dot on the base coat, draw oblong lines in different directions and use a brush to give them the shape of petals. After several trainings, you will get such a wet manicure like a professional master.
Ideas
Schemes for applying drawings do not require special effort or talent. You can master them very easily. Main types:
- spots. On the wet surface of the varnish coating, spots are drawn with dots. Different colors are applied in a certain sequence. The entire nail plate is filled with drops, a certain pattern is built on the sides or in the center. The colored monograms will flow neatly, creating unusual transitions;
- imitation of reptile coloring. Drawing is done using dotted technology in a checkerboard pattern, leaving small gaps between the dotted lines;
- curls. Paint is applied pointwise along the nail. Next, curls and patterns of the required shape emerge from the drops. Unusual method: using a needle between the points to draw figure eights and loops;
- flower. To form a beautiful floral print, you need to put several dots in a circle with varnish, then extend the lines towards the center or in different directions, forming petals. In order to draw roses, you need to use a brush - leave a few lines curved in a circle and finish drawing the core;
- branches. You need to draw a white line exactly. Drop emerald varnish into the middle of each point. Then you need to carefully pull a toothpick along the points, pulling them out to get a twig. Another method involves applying dots in two rows, alternating varnish. From each drop you can draw a leaf, stretching it towards the middle, gradually forming a twig;
- spring. A few drops must be placed in a row with alternating colors, and then walk over them with a dot, making movements in a spiral;
- shells. To apply the drawing correctly, you should draw a circle of dots, then draw another smaller circle. It is necessary to connect the drawing in a spiral motion, gently pressing at the curves of the shapes;
- marble imitation. This pattern is based on a combination of two shades, usually black and white. On a light tone, certain areas are darkened - on the sides and in the middle. Next you need to draw so-called “veins” from one darkening to another. Sometimes the lines can be shaded smoothly;
- butterfly. On a plain base, you should draw several colored parallel lines, and put a transverse line in the middle. After this, you can connect the tips at one point, thus forming butterfly wings;
- peacock feather. You should drip some varnish into the middle of the nail, then outline it with different colors, carefully extending the pattern to the sides. For this design, it is recommended to use varnishes with glitter;
- abstraction. This design is similar to a water manicure. It is better to use several shades for it. Draw stripes close to each other, then draw transverse lines, but changing the speed and pressure;
- cobweb-mesh. Using a regular brush from the bottle, draw two or three stripes vertically along the surface of the nail. Then, using a thin brush or toothpick, draw transverse lines, as if crossing out the composition. If you want to design the design in cobwebs, you need to do the same, only the transverse lines should be drawn unevenly and to the sides;
- French classic manicure. Created using the standard method, only with a vague border. On a damp base, you need to draw a curved line along the edge of the nail, and then shade its edges with a needle or soft brush.
Tips for beginners:
- It is better to give preference to contrasting shades. The most original ideas are obtained by combining bright colors. But you should remember that they are not suitable for everyday manicure;
- If it is necessary to change or correct the design, the brush must be wiped dry after any action. If you don't do this, the shades will easily overlap and blend beautifully, which is also very beautiful. Therefore, you just need to decide on the design;
- movements should be performed clearly and confidently - this is how the most unusual and beautiful combinations are formed.
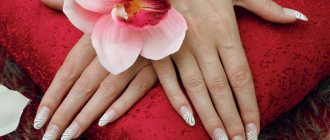
French with roses on nails, photo
French is a wonderful decoration for your nails. A white jacket with white roses and patterns is perfect for summer and spring. This manicure is easy to do.
French manicure with voluminous rose effect
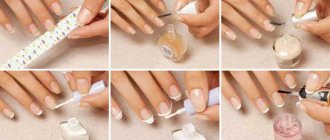
- We perform standard procedures for preparing nails for manicure
- We draw a French jacket in any way convenient for you
- Then everything depends on your imagination. You can add voluminous roses to your design or draw a beautiful rosebud with various design elements
- You can decorate with rhinestones
The variety of modern materials allows you to realize your most unusual fantasies.
Pink jacket with voluminous roses
What is technology
The main rule of this method is that the layer on which the drawings are applied is not dried in a lamp. This allows you to achieve the effect of blurred lines. This design is not as difficult to apply as it seems. And, moreover, it does not require drawing skills. It is suitable even for beginners.
Applying a pattern
In a similar way, drawings are applied to regular varnish. Most often, a needle, toothpick or a special manicure brush is used to create blurry lines. The only difference is that you don’t need to rush when creating a pattern, since gel polish does not dry without a lamp.
The choice of design depends only on your imagination. The photo shows the main drawings for wet gel polish.
Stencils
Another way to paint roses on your nails using varnish is with stencils. They are paper stickers with a protective backing that have slots that fold into a pattern. Such a stencil must be peeled off from the protective backing and pasted onto the nail, pressing firmly to avoid bubbles, and then covered with varnish. With the help of such a stencil, the drawing also turns out to be quite schematic, but recognizable.
The stages of performing such a manicure are almost similar to those performed when applying a dots pattern. You need to cover your nails with a protective base, then a lighter background varnish and dry it. The differences begin further - you need to glue a stencil onto the nail and carefully smooth it out so that it sticks to the entire area of the nail. Cover the slots in the stencil with a layer of thick varnish and wait until it dries. Peel off the stencil and cover the nail with a clear sealer for great shine and longevity of the manicure.
Variety of nail designs using wet gel polish
Nail designs in this style are gaining increasing popularity among many modern girls. Increasingly, representatives of the fair sex are striving to learn stylish techniques themselves using household tools. If you have the first skills, you can without a doubt start creating the following types of designs on the nail plate:
- Creating a manicure using bright and colorful designs on wet gel polish. Perfect for beginners, as this type is very simple and easy to perform. In this case, you need gel polish in variegated shades and a pillbox stick with a small ball at the end. In particular, the image is applied to the ring or middle finger. After applying the base base, dots of your chosen palette are applied to the gel and the hand is placed in a special beam machine. In the video of nail design using wet gel polish, you have the opportunity to see how elementary the technique being presented is.
- Manicure with quick drawing. The technique is as follows: apply the base and dry it in a manicure equipment (about 40 seconds), then cover the nail with black gel polish and dry it again, the procedure is repeated (only with the thinnest layer) and using a pillbox, a unique design is made. The process ends with the same drying in a lamp and coating the finished manicure with a special top coat.
- Wet gel polish images for beginners. In this situation, in addition to simple dots, you can try to apply several thin lines in the center of the nail plate or along the very edge (also using a dot). Cover the areas that remain unpainted with a selected gel polish, and then create the required pattern using a special tool. Complete the process by drying it in a lamp and securing it with clear varnish.
- A new version of manicure using wet gel polish with a chrome effect. After preparing the fingers, an acid-free primer is applied to the nail plate, followed by a base coat (it needs to be dried in a special apparatus). Next, they undermine the sticky base, apply white gel paint to places that are not sealed and also dry. Then another layer of white gel paint is applied, on which stains are made with a brush. Secure everything with a lamp and topcoat.
- Roses over wet gel polish are the most commonly used type of manicure. The procedure is as follows: first you need to remove the gloss, degrease, apply primer, base, then cover with a second layer and immediately begin drawing gorgeous roses. Secure everything with topcoat. In most cases, white, red and black shades of gel polishes are used. The manicure then turns out to be extravagant and bewitching, giving the woman determination and sexuality. For a very young girl, roses with a pink tint are perfect.
Among the unusual and more complex options for nail designs using wet gel polish is the effect of velvet roses. You can achieve the desired effect using professional acrylic sand. The selected image is applied to the prepared manicure according to the scheme using gel paint. Immediately after this, the illustration is sprinkled with velvet powder, which is immediately saturated with paint. Unnecessary residues are brushed off with a brush. This is the only case when, upon completion of a masterpiece, the nail is not covered with a fixative, since the velvet effect will instantly disappear.
Another type of manicure is a combination of French and roses. This gives a certain femininity and elegance to delicate female hands.
Circles, cobwebs, hearts
Nail designs using wet gel polish with the creation of various shapes and patterns are very popular.
- Circles are considered a simple pattern. It is better to choose different shades for the main and decorative coatings, otherwise the colors will merge. Dots in any form are applied to the working layer. They can be of different sizes and tones.
- The technique of creating webs is a little more complicated. You can put several dots and use a thin brush to distribute them in different directions, or you can draw lines directly on the gel polish. Using this method, cobwebs and twigs are created. They are usually applied in a dark color over a lighter tone.
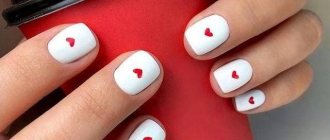
- You can draw a heart using a simple method. Place several dots and, using a needle or toothpick, without lifting the tip from the nail, draw a line through each of them, creating a heart. Using this simple technique you can create almost any drawing.
Circle pattern
Spider web pattern
Heart patterns
Design with roses
To create this look, you need to do a preliminary basic manicure. After applying the primer and covering the nail with the base coat, dry it under a lamp. Then follow these steps step by step:
- Apply a layer of background color. Polymerize in a lamp. Then apply the same color a second time and dry again. Carry out these actions with those fingers on which there will be no decor.
- Cover those legs where roses are supposed to be with a different color of gel polish in two layers. The first of them should be fixed in the lamp, the second should be left wet.
- The material for making the drawing must be as liquid as the background. If the gel polish is thick, add a little topcoat to thin it out. Use a thin brush to draw lines, imitating rose petals. They should be rounded and in some places slightly angular, like on a real flower.
- After applying the drawing, wait until it blurs a little. Draw the leaves.
- Cure the coating in a lamp.
- Apply top coat. Re-secure the materials under the lamp.
- Remove sticky layer.
At the request of the master, draw some details for greater realism. Floral themes are one of the most aesthetic; in addition to roses, it is possible to draw any flowers using this technique.
Color combinations of manicure with stains
White manicure with streaks
To create such a design, white gel polish is used as a base, and any other shade is used for stains. One of the most popular options is black stains on a white background. A white manicure with streaks suits any look - depending on the chosen companion color, you can get both an everyday manicure and a festive design.
Black manicure with streaks
Black color is another win-win option for creating a manicure with streaks. It can be easily combined with any colors and can be a great addition to any look. This design looks very unusual and attractive - due to the effect of a light haze that forms on the dark surface.
Manicure with smoke effect
Smoky manicure
Manicure with colored stains
Colored stains are a great solution for a summer manicure! You can take any colors and shades of gel polish - it all depends on your mood. A manicure with streaks made in several contrasting colors will look best, according to nail art masters. Don't be afraid to experiment - choose bright and neon shades (in 2022 they are more popular than ever!) and try the most daring and unexpected color combinations.
Fashionable manicure with streaks 2022
Red manicure with streaks
Red polish is a classic that is always in fashion, regardless of the time of year and changing nail art trends. One of the most spectacular and trendy designs is a red and black manicure with streaks. These could be marble veins or real flames on the nails - in any case, such a manicure will not go unnoticed. Another interesting combination is red with pink and white. It turns out to be a very original ombre.
Drawings for beginners, diagrams and implementation features
After numerous experiments, the experts of our magazine decided to share the simplest techniques. We will create nail art with varnish on a damp, undried layer of polymer material. With the help of simple diagrams, plant motifs and texture designs are created on the plate, reminiscent of the natural ornament of stone.
Dots, circles
Rounded elements will help give a textured look to the image. For the design you will need a hairbrush or dots. We use dots to transfer the paint. Choose the order of arrangement yourself, use a checkerboard row or a linear system.
For the first time, it is better to adhere to a certain sequence, creating a circle after another. Then, when spreading, the circle turns into a beautiful oval, changing the shape of a ball to an ellipse.
If one of the circles is not voluminous or even enough, correct the edges with a needle. To do this, you need to slightly redistribute the uneven edge to give the element the desired shape.
Web
To perform a manicure with a spider web, you will need three colors, a hair brush or a needle. Modeling of the web occurs in the root part. The wet layer is poured into the main coating, with the help of which the circle spreads.
To obtain a web, a point is placed one on top of the other, then with a needle we begin to stretch the blurred circle in different directions. When creating a web, it should look like you are drawing a sun with rays. After drying, the nails are covered with a finish.
Smears, spirals, curls
Elements in this category are the easiest to draw. Suffice it to recall the needle designs that used to decorate fingers.
The curl pattern is useful for creating beautiful wet curls. To simulate a design with streaks, it is enough to stretch the edges of the applied circle in different directions with a needle. The action must be performed quickly, since the strokes instantly blur during the period of inactivity.
Hearts, shells
It’s not difficult to decorate your nails with hearts; we’ll draw with circles. Place the points in a semicircle, moving from the root to the end.
Using a needle or the thin side of a dot, draw a strip through the center of all the dots. As a result, we tighten the edges of the circles and form a heart pattern.
A few nuances
- If somewhere it doesn’t turn out so smoothly, for example, the leg of a feather is thick, then using wet varnish this can be easily corrected with a dry brush. Well, if you don’t like it at all, you can always erase the undried layer and paint again.
- If the thread does not twist well, you can help press it to the nail, for example, with an orange stick.
- In general, it is better to use a thin thread. When cutting it off, a thin lint may remain, which can be used for design, or can be trimmed.
- We do not pull the thread with the applied gel polish, but lift it up, as if tearing it away from the palette, so that the colors do not mix.
You won’t be able to create such a design with regular varnish, since either the varnish on the thread will dry out or the background color will dry out while you are decorating the thread.
The advantages of thread design include not only the speed, but also the ease of doing it yourself on both hands.
Useful tips
- The nail coating needs to be chosen so that it spreads well, only then will you get the intended masterpiece.
- If wet shellac is not liquid enough and does not spread, it is recommended to mix it with a liquid top coat. And so that it does not flow under the sides of the nail, it should be applied in a thin layer.
- To make the intended drawings on the wet gel coating look neat and beautiful, it is better to make them using a doggy brush. This is a brush with a thick handle, a thin tip, and it picks up paint well.
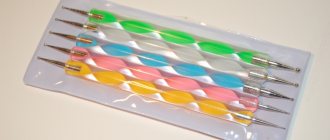
- To create bright, unique and interesting nail looks, it is recommended to stock up on various manicure tools: brushes, dots of various diameters, a needle, pencil, toothpick, tips (to initially practice artistic skills on artificial nails).
Manicure with wet polish is a win-win option for those girls who don’t like to spend a long time fiddling with their nails. You can create any interesting images, the main thing is that the dots and lines spread well over the nail plate. The rest is a matter of imagination or the successful application of schemes for creating a manicure on a damp surface.
Complex patterns
There is a sophisticated design for wet gel polish. Creating it will require more skills. The photo shows the main patterns that are popular.
- You can use any colors to create butterfly wings. First, its silhouette is drawn (using a brush or dots connected with a needle), after which the wings are painted in one or more shades. At the end, draw the mustache.
- You can draw a peacock feather. Place a yellow dot in the center of the nail. Then, with a brush, outline it first with blue, then with green varnish. The golden tone is stretched, imitating feathers.
Butterfly wings pattern
Peacock feather pattern
Step-by-step instructions for applying a pattern to wet gel polish
Wet nail design is done using watercolor gel materials and paints. There are special kits on sale that are sold for nail art. Painting kits can replace rubber polymers. Before starting a manicure, the most important thing is to decide on the substrate, due to which the spreading will occur.
Professional brands suggest using a special translucent white polymer so that the illustration elements magically flow on the surface.
In step-by-step instructions we will look at the stencil rose in detail. You will need two colors and a thin hair brush. We will perform the technique without a special substrate, which is recommended for purchase by the manufacturer.
- Prepare the plate for painting, apply the base and dry it in a lamp.
- The next layer will be colored; it can also be dried if desired, but then you will have to apply the color in another layer for a spreading effect.
- After applying the color coating, there is no need to dry the surface; we proceed to modeling.
- Put a little gel polish on the brush, place a dot and pull out the tail.
- The next stroke will be in reverse order. The first two commas should resemble a yin and yang symbol.
- In what order is the whole rose done?
- After the finishing touch is applied, send the coating to dry in a lamp.
If necessary, the elements of the painting can be given outlines using paint, outline the outline and make the rose more saturated. After drying the outline, cover the rose with the finishing topcoat and remove the sticky layer.
When performed correctly, one of the layers of the technique is replaced by a substrate with a spreading effect. It is very easy to work with, since its composition is specially designed to achieve spreading on the plate. Alternatively, you can use watercolor varnishes; they also have a light, watery formula.
What is the difference between the design on gel polish?
Artistic painting decorates the nails and makes them stand out against the background of the overall image. Drawings that are applied to regular varnish are usually drawn with a thin brush or needle. In the step-by-step technique of applying roses to wet gel polish, there is no need to rush, because the liquid hardens on the nail solely under the influence of the ultraviolet rays of the lamp. The only difficulty is the spreading of the varnish, which you need to be able to feel and control so that the drawing does not turn out distorted.
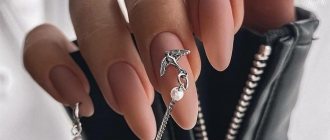
Roses on nails
It is better for a master to use no more than 3 colors of varnish in his work. A plain colored varnish of a pastel shade is selected as the base (substrate). A simple base will beautifully highlight the contours of the flowers and focus attention on the decor of the nail. Depending on the client’s wishes, roses can be applied to one of the fingers or to all nails. The trends of recent years have gravitated more towards minimalism - the master paints on no more than 30-40% of the surface of the nail plates on both palms. This means that the design can be applied to 3-4 fingers of one hand.
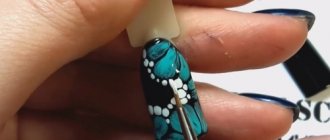
How to create a wet nail effect with gel polish
The effect of wet nails in a gel polish manicure is done by rubbing. First you need to cover them with a flower bed or camouflage base. And after drying and removing the sticky layer, rub shiny powder into the surface. It should be finely ground, and the color should be chosen according to your taste, since the shade of the gel polish will be hidden under it. After using the rub, fan the nails with a fan brush and cover them with a glossy top coat. The final step is its polymerization.
There is a second coating option, but “wet” nails will look as if there is dew on them. Manicure is performed in the usual way. After applying the flower bed, you can use a matte top coat over the entire surface. But then they put droplets on it with a glossy finish. And they send their hand into the lamp again.
Best ideas
A manicure with water drops on your nails can give a unique effect to your fingers. Let's look at the simplest and best options that every girl can repeat at home. Take note of them!
Depth effect
The simplest option for those who are tired of a single-color coating. If you want to somehow diversify your manicure, then here is an easy way to do it. Let's take a closer look at this original coating.
What you will need:
- base coat;
- colored gel polish;
- soft buff;
- matte top;
- dots;
- glossy top.
How to do a manicure with drops:
- Apply one base coat to nails.
- Dry your nails well in a lamp.
- Cover your nails with 2 layers of color.
- Apply a matte top coat and send your nails to dry in the lamp.
- Carefully treat them with a buff and remove excess shine.
- After this, using a dots, apply a few drops in a chaotic manner over the entire surface of the nail.
Video instruction
How to do a manicure with drops can be seen in detail in the video.
Schemes of drawings and patterns for beginners
Painting on your nails with a needle is not that difficult. Below we have provided several detailed diagrams that will tell you how to draw patterns, both the easiest and more complex ones.
Master class with a cat!
The modern nail art industry provides many options for a variety of designs using a needle and other improvised means. It’s not difficult to make such a manicure, but the result will exceed all your wildest expectations. Below we will show you a truly beautiful nail design with needles, which you can repeat yourself.
This beautiful nail art with an abstract pattern can be made using an ordinary needle.
Flowers are made incredibly well with a needle. You can draw them in a variety of ways, for example, like in this photo.
You can also create such extravagant nails with leopard print using a needle.
The tool will be useful for those girls who love complex patterns that are simply impossible to draw otherwise. No other tool can handle the finest lines better than a needle.
And if you complement simple needle designs with a variety of accessories, sparkles or rhinestones, you will get a very impressive design. With such a manicure, there is no shame in going out into the world and impressing everyone with the beauty of your nails.
Feel free to experiment with design, remember that you are subject to any of your fantasies. And you can bring them to life with a needle, with a little patience and accuracy. Start drawing, create and surprise others with your nails.
Farewell video... an interesting idea for a “needle” manicure:
If you liked the article, please share it on your favorite social media. networks!