What can you use to paint on your nails?
It’s quite easy to create a simple design on your nails with gel polish.
You can apply patterns using:
- gel polish;
- acrylic paint;
- watercolor paint;
- acrylic powder;
- shellac.
The most popular product for nail art is regular varnish . 2 contrasting colors are selected, one as a base, the second for drawing. The disadvantage of this option is that the varnishes have a thick texture, and it is difficult for a beginner to create thin lines. This method is more suitable for large and voluminous figures.
Acrylic paints are easy to use and come in a wide range of colors. They do not have to be mixed with water; after drying, they do not crack, so applying one color to another is acceptable. To add romance and tenderness to the image, crystals, rhinestones or sparkles are added. The resulting drawing must be covered with a fixative, since acrylic paints are easily washed off.
Acrylic paints are an excellent choice for creating simple designs on nails.
Watercolor paints are diluted with water, they are inferior to acrylic in drying speed. A large selection of colors allows you to paint entire pictures on your nails, but the technique is not easy to master.
Shellac is characterized by a safe composition, as it does not contain formaldehyde. It is easy to apply, looks beautiful, and lasts a long time without cracking or chipping. Painting with a hybrid of varnish and gel is not difficult. Shellac is thick, so it is difficult to apply elegant small patterns. You won't be able to draw small details with it, but it's great for creating gradients and contrasting patterns.
Acrylic powder comes in different consistencies and colors; it gives your nails a well-groomed and stylish look. The effect lasts for a long time, and nails grow and become stronger. White powder is used for wedding events, and neon powder is used for disco events.
Acrylic powder will correct defects in the nail plate and even out its surface.
Gel polish is suitable for nail art. The patterns are applied to the dried base. These could be butterflies, geometric patterns or flowers. The gel polish design lasts a long time.
Instructions for creating beautiful designs with gel polish
Constant experimentation with applying designs to nails will be excellent practice for novice nail artists. Before the girl has time to look back, ideas will be born in her head instantly, and the result will exceed all expectations. Let's try to analyze step by step the options for beautiful drawings for beginners in this creativity.
Option one
With this method of application, all the work will be done using an ordinary needle (you can use a toothpick).
You can also apply drawings to a helium surface using acrylic paints:
- Cover your nails with a base coat.
- After drying , decide on the choice of background and cover all nails.
- a needle, mark the dots of the future drawing or other patterns on the wet varnish
- Using a needle, carefully begin painting , mixing colors; if the drawing provides clear lines, then do them with great care.
- Dry the finished manicure under the lamp and secure with top coat.
Option two
This application system is ideal for beginners, and the tool used is the same needle and several shades of coating:
- Apply a colorless base to the nail plate and dry.
- Complete the background by applying a matte shade.
- While the varnish is still wet , make spot applications of a different color.
- Using a thin needle, begin to make circular connections of drops , based on the idea of the future drawing.
- Dry the drawing and secure with topcoat.
Option three
This method is performed using ordinary tape. No matter how surprising the method may seem, the drawing turns out to be very original:
- Cover the nail plate with base and dry well.
- From tape, cut out small geometric shapes and glue tightly onto the nail plate.
- Cover your nails with any color.
- After drying , carefully remove the tape with smooth movements.
- For added effect, cover the entire manicure with a clear coat.
Option four
With such an easy creative process, an example of applying patterns with various varnishes will be given.
Painting called nail is distinguished by its simplicity and justified result:
- It’s worth starting again with a basic application.
- Apply a background in any color scheme.
- Make any drawing using painting varnish, which has a special thin brush.
- Use the finishing coat to secure it.
Option five
The means at hand often come to the rescue. For example, an ordinary helium pen is capable of miracles. With its help you can create a masterpiece on your nails. An important feature is the fact that you do not need to learn to be confident in using such a tool.
In this application method, the drawing will be done with helium-based acrylic paints:
- Tweak your nails and correct any imperfections with several coats of clear gel.
- Squeeze several colors of acrylic paints onto a piece of foil, it will act as a palette.
- Use your imagination and start making the same designs on each nail plate, and finally secure the composition with a finishing agent.
Necessary supplies for painting nails
A simple design on nails with varnish, acrylic powder or shellac is applied using additional tools.
List of tools:
- a brush is a necessary element in the work . It is worth choosing brushes with natural bristles and purchasing several pieces for different methods of applying patterns. Flat brushes are needed for applying glitter and oriental painting, beveled brushes draw small details, fan brushes smooth out transitions and create veil effects, there are special brushes for writing letters and hieroglyphs;
- sponge or sponge - to create unusual patterns, the result depends on its texture;
- dots – resembles a standard pen with a ball at the tip. Designed for drawing swirls and dots;
- a toothpick or a wooden stick - does not damage the nail plate, it is easy to apply patterns with it, but it will not be possible to obtain clear patterns;
- sewing needle - craftsmen often use it, but it can scratch the nail when pressed.
How to make easy patterns on nails for beginners using stamping
Nail design using stamps
Stamping - also a way of transferring a design onto a nail using a stamp - is another simple technique for adding variety to a boring monochromatic manicure. To master it, you will need a little patience and a set of tools:
- Flat metal plate with engraved patterns
- A stamp with a silicone or rubber base for transferring the design from the plate to the nail
- Scraper to remove remaining varnish from the disc
Stamping saves time
Advice: the advantage of the stamping technique is the speed of execution. A pattern that would take a craftsman up to two hours to create can be drawn in 15 minutes using a stamp.
You will need a set of stencils and stamps.
Stamping scheme step by step:
- Degrease the nail surface and apply a base
- Paint your nails with your base color and let dry thoroughly.
- Apply the second varnish to the stencil
- Leave the varnish only in the recesses, remove excess with a scraper
- Transfer the image to the rubber surface of the stamp
- Select places on the nail for the stamp and press firmly onto the nail.
- If the design is imprinted on the skin, carefully remove the excess with acetone
- When the design is dry, cover your nails with top coat.
Stamps can be completely different Combination of tape and stamping Eternal classics Multi-colored stamping Fun black and white decor using stamps Stamping and gradient
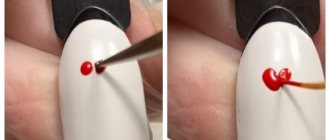
Master class: drawing a heart with a toothpick
A simple heart-shaped nail design can be created using any polish. The nail is covered with a base layer. Select a color, for example red. Dip a toothpick and place 2 dots side by side at the same level. Descends from each point along a line to form an angle. The varnish spreads and a beautiful heart comes out.
Don't miss the most popular article in the section: How to draw monograms on nails step by step for beginners. Instructions with photos.
Required materials and tools
Making designs on nails with gel polish will not work without the use of some tools and materials. Therefore, to do a gel manicure at home, you need to purchase a basic kit consisting of:
- Degreaser. You can use alcohol or alcohol-based nail polish remover instead.
- A base coat that has a transparent texture. It strengthens nails and enriches them with vitamins.
- Colored gel polishes. You can draw the pattern either directly with gel or with acrylic paints. But the use of special paints is considered more convenient and practical.
- The final coat is transparent.
- A hard file, cotton pads, brushes of different thicknesses.
You may also need dots if you need to draw a dotted pattern. This is a special tool with a small ball at the end. It is also recommended to purchase a palette designed for mixing multiple colors. If desired, you can use rhinestones, sparkles and other materials to decorate your nails.
How to draw strawberries with a needle?
To make the berry realistic you need varnishes:
- red;
- green;
- and black;
- yellow.
The nails are prepared and covered with a red base. To create leaves, take adhesive tape and cut out teeth on it. The entire surface of the nail except the base is covered with adhesive tape. Green varnish is applied to the free space of the nail plate, and leaves are obtained.
Remove the tape and apply small dots with a needle to imitate strawberry seeds. Acrylic paints are suitable for this design. Strawberry leaves can be simply drawn with a needle using emerald paint. For originality, the design is sprinkled with glitter.
An interesting option is voluminous nail art. Nails go through the preparation stage and are coated with the main base color. Without waiting for it to dry, apply a thick layer of transparent varnish. After a few seconds, indentations are made with a needle in place of the grains. When the coating dries, fringe is drawn in the form of thin leaves.
Easy nail designs step by step for beginners
Schemes for beginners will help you create beautiful designs on your nails, where the whole process is demonstrated step by step. So, to apply the popular “Twigs” pattern to your nails, you will need acrylic paints - it is much easier to paint with them than with regular varnish, so this technique is ideal for beginners. The pattern looks good in yellow-green tones, but in other color variations it will look no less impressive. “Twigs” are drawn as follows:
- the plate is covered with the main color - light pastel shades are ideal;
- one or two wavy lines (branches) are drawn from the bottom corner of the nail to the top;
- Use the same color acrylic paint to paint neat leaves along the entire length of the branch;
- the middle of each leaf is drawn in a lighter tone;
- The top of the drawing is coated with colorless varnish.
Important! When creating artistic masterpieces with acrylic paint using step-by-step master classes, you should remember about a transparent topcoat that will protect the designs on your nails, since this material is easily washed off with plain water.
Another simple, but very picturesque print is yellow-orange maple leaves. Drawing them on your nails, following step-by-step recommendations, is not so difficult:
- Conventionally, a maple leaf consists of five axial lines - according to the number of its “petals”, so first you need to mark the protruding edges of all the petals and the places where they connect, so the image will be symmetrical;
- Next they draw the stalk;
- all the points are connected by a smooth thin line, while you need to try to give the image a shape characteristic of maple leaves;
- You can start painting the middle of the leaf.
Flowers are one of the most beautiful and sought after nail designs. Available master classes will help you create bright and exotic, delicate and romantic, realistic and fantasy flower designs on nails step by step:
- First, the nails need to be polished with a buff, after which the plate is covered with white varnish;
- use a medium-sized sharp brush to pick up a little paint of the shade that will be used to paint the petals - red, pink, crimson;
- Using the tip of the brush, petals are drawn one by one on the nail - the movements must be precise and neat, but it is not at all necessary to fanatically achieve perfectly straight lines and edges;
- You shouldn’t place each flower strictly in the center of the plate - on the contrary, some randomness and creativity will make the pattern interesting and stylish;
- The empty centers are painted yellow, protruding leaves can be depicted at the edges with green;
- A thin brush will help you achieve clear, pointed ends.
A black outline carefully drawn with a very thin liner will make the design voluminous and graphic. Step-by-step instructions will help you do this:
- you can start from the center of the picture, placing several dots in the middle of the flower;
- Next, draw the outline of each petal; here it is not enough to simply outline the bright spots; on the contrary, you need to slightly go beyond the boundaries, gradually forming a three-dimensional pattern on the nail;
- The thickness of the lines may vary, and solid borders should also be avoided, favoring a light, broken outline and soft curls.
Drawings using dots
Dots are a special tool for applying patterns that look like a crochet hook with a steel ball at the tip. Using dots, it's easy to draw flowers. They will look beautiful on both short and long square-shaped nails.
The nails are prepared and the base is applied. Select the background color. Now 5 dots are placed on the nail, placing them in a circle. These will be the petals. A dot of a different color is fixed in the center. The tip of the dots must be constantly cleaned with a napkin so that the dyes do not mix. The final stage is the application of a transparent top product.
One of the well-known decor options using dots is two-color polka dots. Usually the combinations are: red and white, black and white, but you can combine other colors.
There are plenty of other decor ideas:
- bows;
- ladybugs;
- geometric figures;
- curls;
- French
Flowers
Drawing beautiful flowers on your nails is quite easy. They can be built based on dots and patterns.
What you need:
- gel polishes;
- dots;
- needle.
You should start drawing flowers with the petals. To do this, rather large dots are placed in a circle. They will form the basis of future flowers. Afterwards, from each point you should draw a strip with a needle to the center. Do this for each point. Then, from each point, draw the needle outward from the flower to pull out the petals. Next, the drawing is dried in a lamp. After polymerization, do not forget to place a dot in the center to imitate the middle of the flower.
Video “Simple flowers for beginners”
Drawings using tape and foil
A simple design on nails is created not only using regular varnish, but also using decorative tape or foil. To imitate beautiful ornaments, narrow adhesive tape is suitable. Experts advise not to use double-sided tape, and if the tape leaves a mark, then the manicure may not be neat.
Nail art with adhesive tape is performed according to the same type of pattern, only the pattern or the number of straight lines differs.
To get a manicure you need to purchase:
- several colored varnishes;
- base;
- top coating.
The nails are processed, a transparent base is applied, then any colored varnish. After drying, the tapes are attached to half of the nail plate diagonally. The part not covered with tape is painted in a different tone. All you have to do is wait until it dries and carefully remove the tapes.
Foil is an unusual material that can attract attention. To work with it you need not only standard accessories, but also:
- sharpened scissors;
- tweezers;
- orange sticks.
Foil comes in different types:
- holographic;
- embossed;
- engraved;
- covered with a protective film.
After standard nail preparation, a base coat, base varnish is applied, and foil is applied on top using glue or clear varnish. It can be glued either completely or partially.
If you need to cover the entire nail, only special glue will do. The foil is quite fragile, so working with it should be done using tweezers or tweezers. An adhesive composition is applied to the surface of the nail or varnish. The foil is applied and carefully leveled with an orange stick. The film is removed and the manicure is sealed with a top product.
Partial decoration of the nail plate with foil involves free arrangement of pieces of material or decoration of the hole.
Simple nail designs for beginners using a sponge
Ombre
This manicure is called a gradient or ombre, and any representative of the fair sex can handle it. To work, you will need a sponge/fine-pored sponge, varnish of several colors, a transparent base for a colored coating, a fixative and liquid latex.
Two color gradient
It is important that the chosen sponge does not absorb the varnish too actively, and that it itself is not thickened, otherwise nothing will come of the idea. Before practicing on your own nails, try to achieve the desired effect on a piece of cardboard.
Three color gradient
Step-by-step ombre coating technique
First way
- Get a manicure and apply a protective base to your nails
- Cover the nail with one of the colors in a thick layer
- Apply the second color to the sponge - one part should be thicker
- Press the sponge against the plate with quick movements; start from the middle to the free edge, making the color denser
Shades of red
Second way
It is considered more complex, but the color transition is smoother.
- Cover the palette tightly with varnishes of three colors and carefully blend the borders with a needle
- Apply liquid latex to your finger around the nail.
- Dip a sponge into the polish and cover the nail plate with it.
- When dry, remove the latex layer
- Secure your manicure with a top coat
Ombre can be emphasized by highlighting a couple of fingers with stickers. Rich blueberry Ombre in combination with a moon manicure.
Painting on nails with a brush
A simple design on the nails (with varnish, acrylic powder or shellac) is done with nail art brushes.
They come in different types:
- fan-shaped brush - for applying glitter, aluminum film and creating a smooth transition;
- hair-like brush – for drawing the smallest details. With its help it is easy to get a straight line or a beautiful curl;
- a thin brush is a universal tool for miniature and light design elements;
- flat brush – for creating large, wide patterns;
- petal brush – has a beveled edge, often used in Chinese nail art. Petals with this device turn out beautiful, deep and neat.
Don't miss the most popular article in the section: How to extend nails with gel polish. Nail extension instructions for beginners. Photo.
Step-by-step guide to creating monograms
- The preparatory stage involves removing the cuticle, leveling the surface and shape of the nails, and dehydration.
- Apply a base or single-color coat of varnish.
- Tools are selected.
- Before applying the decor, you should practice on paper, since monograms require perseverance, accuracy and smooth, clear strokes.
- The design is created carefully on the side of the nail.
- When depicting monograms, symmetry is important; it is better to make patterns voluminous, doubling the lines. A large drop is collected at the tip of the brush, which is then directed in the desired direction.
- Decorative elements are dried under ultraviolet light if the patterns are applied with gel polish or acrylic paint. The latter is ideal for monograms.
- Sparkles and rhinestones are added.
- The result obtained is confirmed by the top product.
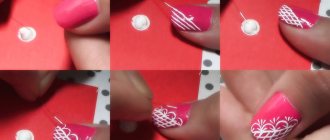
Mastering the technique of drawing with dots
Dots drawing technique: Photo instructions
Even a child can master the technique of drawing using dots. However, first, it is recommended to practice on volunteers or tips in order to get a clear image on your own nails. So, let's learn how to draw with dots using the following instructions:
- First of all, we prepare the nail plate: we adjust the shape, polish, remove or push back the cuticle.
- Apply the base coat, then cover the nails with transparent gel polish and dry under a lamp for 1-2 minutes.
- Now take a palette or any smooth surface and drip varnish of the main color onto it.
- Dip the dots into gel polish until the ball is evenly covered. We choose the size of the tool ourselves, taking into account the fact that later we will need to draw smaller balls. Apply the main beads to the nail, holding the dots at a right angle. Dry your nails under the lamp for one minute.
- Now we apply the secondary dots with smaller dots to give the drawing a complete look. Dry the nails again under the lamp for a minute.
- When the design has been created step by step on the nails, you need to cover them with finishing varnish and hold them under the lamp for four minutes.
- Finally, do not forget to remove the sticky layer and clean the varnish from the tools using a special solution.
For clarity, the dots drawing technique is shown in the photo. As an example, you can use the simple drawings shown in the photo.
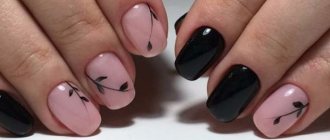
How and with what to draw a smile on your nails
To get the perfect French jacket, you need to know the rules and nuances. The smile line divides the nail into 2 zones – the main part and the grown part.
There are several ways to create a French manicure, depending on the tools used and the length of the nails:
- Method 1 – for short or medium-length nails. You will need a thin brush with long bristles. The smile is drawn in a standard way - from right to center and from left to center, drawing a common line. When creating a French gel polish, it is easy to correct unevenness until the coating has been dried under ultraviolet light;
- Method 2 – for those with long nails . A flat brush is used; after dipping into the gel paint, the bristles are pressed on both sides to create a clear line. A smile is drawn from one side of the nail to the other, applying the flat side to the grown part. It is important to change the angle in time during the transition to obtain a beautiful French manicure;
- Method 3 – use an angled brush. It is universal as it is suitable for short and long nails. The brush is applied perpendicular to the nail, then 2 lines are drawn to the center.
Nail patterns for beginners using tape
There is nothing easier than making French or colored blocks of different lengths and shapes. To do this, you can use either regular tape, which is found in every home, or buy special self-adhesive strips - they are sold in a cosmetic store.
Design using tape - what could be simpler?
The simplest lines are performed as follows:
- Apply a transparent base to the nails, then a layer of varnish of the same color
- After complete drying, glue the strips
- We cover the desired part of the plate with a layer of varnish of a different color/colors, depending on the idea
- When the coating is dry, remove the strips and secure with a transparent topcoat.
It is important to follow the sequence of actions.
Using the same technique, it is easy to create patterns with semicircles, rhombuses, triangles and other geometric shapes.
Let's look at several options for beginners in more detail:
Design with an accent: a yellow manicure with a couple of bright details looks fresh and bright in a summery way Self-adhesive strips will come to the rescue Three-color design using tape Bold and bright manicure Now you know how to make a moonlight manicure yourself
Single-color geometry step by step This decor can be achieved using semicircles rather than straight lines Any girl can handle triangles Another extremely simple and effective manicure in the 2017 season trend Matte finish is still in fashion A combination of classic black and white and metallic Lacquer-matte French with using adhesive tape
Acrylic watermelon drawing
This nail art reminds you of summer. To make a manicure with an imitation watermelon, you will need:
- brush;
- several colors of varnish;
- stencils (if necessary);
- fixative;
- basic basis.
A preparatory coating is applied to the nails, then a red varnish, which will create the pulp of the berry. There are 2 parallel lines along the top of the nail, 1 is light green, 2 is dark green. When everything is dry, all that remains is to make the seeds with black varnish and secure the result with a top coat, which will increase the durability of the manicure.
Drawing patterns with brushes
Applying patterns on gel polish nails: Photo instructions
Unobtrusive patterns on nails are a classic that is always in demand. It’s easy to learn how to create subtle and graceful patterns on your nails, the main thing is to arm yourself with a thin brush and follow the basic rules. We suggest you master the rules by considering the following step-by-step master class:
- Initially, we prepare the nail plates, after which we cover them with transparent gel. Dry in the lamp for one or two minutes.
- Now we mentally divide the nail in half lengthwise, after which we paint one part with blue varnish. Dry in the lamp for two minutes.
- Then we cover the remaining half with dark blue gel polish and keep it in the lamp for two minutes. And at the junction of the two colors, use a thin brush to draw a golden line. You can also use a dark color to outline the outline of the transparent zone of each nail.
- On the light part of the nail plate, use black gel polish to make several thin lines of different lengths, but of the same thickness. We do the same on a dark blue background, only we draw the lines in white. Dry the drawings in the lamp for one minute.
- Finally, cover all nails with top base, dry under a lamp for two minutes and remove the sticky layer.
This drawing scheme is shown in the photo. And for lovers of floral themes, it is useful to consider the following step-by-step master class on painting with brushes:
- Apply gel polish of the desired color to your nails and cure in a lamp for two minutes.
- Using gel polish of a different color, which will be used to depict flowers, you must first draw the petals. Dry your nails so that the petals do not become smudged in the future.
- After this, use the same color to add veins to give the flower volume. Next, we draw the leaves and dry the nails in the lamp again.
- Finally, cover the nails with a transparent base and dry in a lamp for four minutes.
Flowers turn out very impressive if you use the above diagram, which is shown in the photo for clarity.
How to paint a bow with gel polish?
To create such nail art, a dots or brush is suitable.
Steps for drawing a bow:
- It is better to decorate along the edge of the smile or diagonally on the nail.
- The required dye is taken with a dot, transferred to paper, and a drop of varnish is taken.
- A period is put.
- Triangles are drawn from it in 2 directions.
- The corners of the resulting figures are rounded.
- From the triangles, 2 stripes are drawn down.
- The bow is secured with a top product.
Drawings for beginners with decoration
It is better to buy glass rhinestones for manicure; they look more impressive and shine beautifully. To apply them, use an orange stick, previously soaked in a top product. They beautifully and simply decorate the smile of the nail by placing rhinestones on it. They are applied, gently pressed to the surface of the nail. The result is confirmed.
If you want to get a 3D effect, you should pay attention to the broths. A manicure using them is often called “caviar”. The registration process is similar to the previous ones. The broths are distributed over the nail plate, the excess is removed with a fan brush. A fixing layer is applied, the emphasis is on the edges of the nail, where the broths fall off most quickly.
Acrylic powder is a loose powder, has a porous texture and allows nails to breathe. It dries quickly, so careful and quick work is needed. Thanks to acrylic powder, three-dimensional designs are obtained that resemble a knitted sweater.
Apply 2 layers of gel polish and dry under ultraviolet light. After degreasing, patterns are created that fall under the lamp. In order not to spoil the velvet effect, you will have to choose a matte finishing agent.
Spectacular polka dots on nails
How to make a polka dot design on your nails? Yes, it’s easy, with the help of the same dots. In the process of creating a design, you must adhere to the following steps:
Prepare your nails. To do this, they are filed and changed shape. It is important to polish the nail plate well, since gel polish adheres better to a perfectly flat surface.
Apply a base coat and dry the nails. Then the main layer of gel polish is distributed.
After this, all nails, except the ring ones, are covered with black. But it is better to paint the ring nails white. The combination of black and white is a classic that will always look great on nails.
Then the peas are applied using dots. Light dots will look good on black nails, and dark dots on white nails.
Additional Information. To prevent the peas from spreading, it is not recommended to put too much gel on the instrument. After each layer, be sure to dry your nails.
Ideas for simple and beautiful patterns for short and long nails
Metallic stripes look great on short nails. They are purchased at a specialized store. Apply to the finished coating, excess edges are cut off.
Moon manicure looks beautiful. It requires French stencils. Only they are applied not to the tip of the nail, but to its base. The surface is painted in one color, stencils are glued on, and painted in a different tone. All that remains is to remove the stickers and secure the resulting effect.
To cover long nails, acrylic is suitable. Among the common options for nail art are diagonal stripes, applying rhinestones in the shape of a semicircle at the height of the nail, creating patterns and monograms.
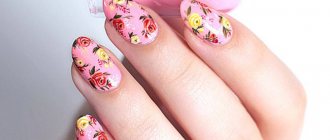
Draw flowers step by step
A popular element of manicure is flowers, especially roses. To apply the pattern you need to use a dots and a needle. Place a dot on the finished coating and carefully draw a line with a needle, twisting a kind of spiral. If you perform the technique on wet gel polish, the outlines of the colors will be more blurred, which will give a natural look.
Choose dark shades as the base color and paint on them with light varnish. You can also use the reverse technique - dark flowers on a light background. Try painting the leaves using a green tint. It is best to do this with a thin brush. Dry each layer separately so as not to smear the design when applying the next element.
Flowers pattern
Flowers are not considered the most complex pattern, but we recommend practicing on tips on which we paint with gel polish. The video of applying manicure is presented step by step below.
Tips from the experts: what not to do when creating a manicure
Common mistakes that should not be made:
- the cuticle is not cut, it is pushed back with an orange stick and then removed with a remover;
- the nail plate is filed in one direction to avoid cracks and brittleness;
- Before using the varnish, do not shake it, otherwise bubbles will appear, which will become an obstacle to creating an even coating;
- You can’t apply varnish in a thick layer, 2 thin layers are better;
- the edges of the nail are caught when painting, otherwise chipping cannot be avoided;
- Do not underestimate the benefits of the fixative; it increases the service life of the manicure;
- coatings are dried in the open air or under a lamp, do not try to do this in ice water;
- to remove excess polish on the skin, use a nail art brush;
- You cannot remove gel polish with a file; there are professional tools for this.
There are many techniques and decorative options, so every woman will choose an option to suit her taste. Salon procedures are expensive, but you can learn the basics of nail art on your own.
It is easy for a novice manicurist to learn how to make simple designs on nails. They are created using varnishes, bouillons, rhinestones, foil, acrylic powder or watercolor paints.
Article design: Olga Pankevich
The easiest ideas
Since learning to draw unique patterns on your nails yourself (especially with your left hand) is quite difficult, you can start with simple manicure design options that won’t take much time.
Almost all options are facilitated by the use of auxiliary tools, due to which the risk of missing and drawing an uneven stripe is reduced.
Abstraction
The technique consists of creating artistic painting on nails, which requires absolutely no drawing skills, especially in the field of manicure.
For the procedure you will need:
- Dots;
- Needle;
- Gel polish.
First you need to apply the gel to the nail plate in one or two layers and dry thoroughly in a lamp. After this, you need to collect a small amount of pigment on the dots and apply a few drops in a chaotic manner on the nail.
Then use a needle or thin dot to distribute the applied drops of gel. Place the tool in any area of the nail and start moving it across the entire plate, touching and spreading the pigment throughout the manicure, creating an abstract composition. Opposite shades should be used for the technique so that the effect is clearly visible.
When using the needle, be careful - tilt it at a slight angle so as not to scratch the gel coating or turn it over with the blunt side where the eye is.
Point technique
The effect of the technology looks advantageous, especially if it is done using different shades and sizes of tools.
The technology requires only two materials:
- Dots of different sizes;
- Pigment.
After applying the decorative coating of the main color, take a large dot, blot it in a different shade and start placing dots in the cuticle area. They need to be arranged in a chaotic order to make the work look more impressive.
After placing 3-4 large dots, change the dots to smaller ones and apply a few more neat spots anywhere. Thus, change several tools, reaching the minimum. The pattern should gradually move from larger to smaller, reaching from the cuticle area to the middle of the plate.
It is not recommended to fill the entire nail with a pattern, as it will look sloppy, but arranging 8-10 dots in a chaotic manner will help make the manicure more unusual. And to complete such a design on one finger usually takes up to three minutes, taking into account the application of the finishing layer.
Gradient
You can paint a gradient with a special brush, gradually creating a smooth transition from one color to another, but not everyone can succeed in this technique, especially when performing it for the first time.
There is a simplified version of the gradient, for which auxiliary tools are used:
- Foam sponge;
- Thin brush;
- Foil;
- Gels of different colors.
First you need to apply a thick base coat of gel to the nail (this can be any light shade that will not set off the background: white, cream, camouflage) and dry it in a lamp.
On the foil you need to make a gradient of several shades. The design is then transferred to the sponge by imprinting it with pressure. Make sure that the pigment is printed in a dense layer. After this, the sponge is applied to the nail, you need to press on it to transfer the gradient to the plate.
Excess that gets onto the periungual area must be removed and then the work must be dried. The effect is unique because it combines not only a smooth transition of shades, but also a voluminous manicure due to the porous structure of the sponge.
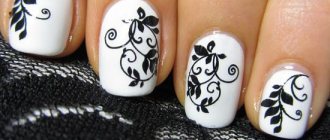
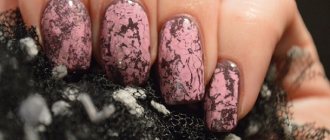
With tulle
One of the most unusual options for designing nails involves the use of tulle, which usually has unique lace patterns, the transfer of which to the nail is suitable for a manicure before a special event.
You only need three components:
- Dense brush;
- Gel polish;
- A few pieces of tulle.
After applying the base coat of dye, apply the tulle to the nail bed and secure it so as not to disturb the design. Apply a dye of a different shade over the tulle, then remove the tulle and dry the work in the lamp.
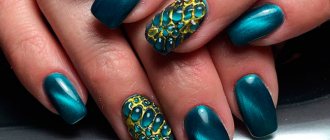
It is not the lace that is imprinted on the nails with gel, but the spaces that are on the fabric, so with the right combination of shades, the result can look like an animal print (leopard, cheetah, etc.), since it has many abstract spots.
After drying the pattern, also apply a finishing transparent coating and dry it in an ultraviolet or LED lamp.