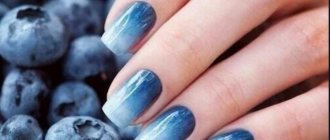
A gradient on nails with gel polish is the use of several colors on a plate and blurred boundaries between them, which looks very natural even with contrasting tones. It can be vertical, horizontal (classic), chaotic, there are “baby boomer” techniques, French, with sparkles, mirror rubbing, velvet sand, geometry.
The design is made with a comb brush, which blurs the boundaries of shades, or with a sponge, air puffing, or sponge. You can do it with an airbrush, but it requires special paint.
What does gradient mean on nails with gel polish?
A gradient on gel polish nails, also called ombre or stretch, is a smooth flow of one tone into another - from light to dark or vice versa. This technique has something in common with French manicure, but the most significant difference is the absence of a clear boundary between shades.
Transitions should be blurry, that's the beauty of design. And the shades of varnish are very different. But they look better when they belong to the same color scheme, for example, burgundy, red, pink.
We recommend reading the article on how to do a French manicure with gel polish. From it you will learn what you need to do a French manicure with gel polish, which gel polish is better and the types of French manicure with gel polish. And here is more information about how gel polish differs from shellac.
What is the difference between a gradient and an ombre on nails?
We come across different names and types of this design on the pages of magazines and on the Internet - gradient, ombre, Dip Dye and even striped manicure.
What is this design? Gradient manicure is a special nail coating technique in which one color smoothly transitions into another. This manicure is often called a fashionable ombre manicure. In part, this has become synonymous with the word gradient, but the ombre design on nails involves gradually lightening the tips by several tones, while the color remains in the same color range. There is a term Dip Dye, it is also a synonym and has a similar meaning, but it more reflects the essence of the gradient as such. Dip dye means dyeing it a completely different vibrant color. There are several types of gradient, among them horizontal
,
vertical
gradient and
gradient with transition
. Of course, every year more and more variations of this fashionable nail coating appear, but the classics still remain in fashion. The gradient manicure technique is not complicated, but it will require a lot of patience and perseverance to perform.
How to make a gradient on nails with gel polish, what is needed for this
To make a gradient on your nails with gel polish, you need to:
- perform a hygienic manicure
- use a base, preferably transparent, and if camouflage, then choose the most neutral shade;
- have 2 or more tones of varnish, topcoat, cleanser, lint-free napkins, orange sticks;
- prepare a comb brush or foam sponge, air puffing, sponge, airbrush, paint for the latter;
- the presence of a UV or LED lamp for drying the coating.
Depending on the type of ombre, you may need glitter, stencils, foil, film, and velvet sand.
There are several types of this manicure, but the main ones are:
| Type of manicure | Description | Photo example |
| Vertical | With it, the shades change from the area near the cuticle to the free edge and vice versa. | |
| Horizontal | The shades transform into each other from the right to the left sinus. | |
| Original | The flow of tones is carried out from one nail to another, that is, each of them is painted in its own color. | |
| French | Here, the free edge of the nail must be lighter or darker than the rest of the nail, usually it is white. |
What helps to achieve a smooth transition
A smooth transition of shades is achieved by shading one varnish over another. Both products should not be allowed to dry.
The flow of colors is ensured by using:
- Sponge or sponge made of foam rubber . You can take a dishwasher one, but only a new, unused one, be sure to cut it to reduce its size.
- Special brush - comb . It is quite wide, almost flat, and the hairs at the end are spread out, like the teeth of a comb.
- Aeropuffing . This is something like a brush, but its working part is not lint, but a foam ball.
- Airbrush . This is a compressor manicure device that sprays gel polish using air pressure.
Foam sponge to create a gradient Special brush - comb Aeropuffing Airbrush
After completing the gradient, before drying, you need to let the gel polish “sit” a little on the nail, the bubbles disappear. That is, you should wait a few seconds before sending it to the lamp.
What kind of brush should it be?
The brush called “comb” should be:
- with a fairly long pile;
- soft;
- with equally diverging hairs at the tip.
Similar ones are produced by TNL, Pole, RuNail, Rubloff, Patrisa Nail and others.
In addition to the “comb”, you will need a brush to apply the base shade; you can use the one in the bottle with the product itself. A “hair” is also needed for painting areas near the cuticle and sinuses. Skilled craftsmen use a fan brush instead of a comb. But not everyone will be able to work with it; the fleecy part of this tool is too wide.
Watch the video on how to prepare a gradient brush:
How to choose a sponge
The width and length of the sponge should be larger than the nail plate, quite thick so that it can be comfortably fixed with your fingers. The one designed for washing dishes is suitable. But you should use its soft side, and the hard side can be cut off, at the same time reducing the overall size. The sponge must be porous to hold the gel polish inside. Therefore, sponges that are too smooth are not suitable for applying cosmetics. They will make an even impression, as if with a brush, but shading is needed.
Varnish gradient
So, what should the varnish be like so that you don’t have to worry about damaging your nails? After all, a gradient manicure will certainly captivate you so much that you will want to constantly experiment. First of all, it must contain a large percentage of cellulose, since it is a natural product. You don’t need to look far for an example: cellulose is found in many plants, and 90% of cotton consists of it.
It helps strengthen your nails, and you don’t have to worry about their strength. And for nutrition and hydration, the content of camphor oil is necessary. Betonite is saturated with sea minerals, which whitens nails and helps to moisturize them. Brightness, shine and polishing effect are provided by silk amino acids. And, of course, you cannot do without vitamins, especially vitamin E, which helps strengthen, maintain health and beauty.
IMPORTANT: What should not be in the varnish is toluene formaldehyde, which has a destructive effect on the nail plate. In other words, it is a carcinogenic substance that it is better not to mess with.
Correctly selected varnish is the key to a good manicure.
There is a little trick to preserve the varnish longer - you should shake it, roll it between your fingers - then, due to the formation of air bubbles inside, its service life will be longer. Store the bottles in a warm place, but under no circumstances in the light. For a perfect manicure, be sure to use a manicure base and a quick-drying product along with the polish itself.
Use a base and dryer
As you can see, any fashionista can master a gradient manicure. The effect is no worse than the salon one. A little skill, accuracy and patience - and now your unique manicure is ready! Please yourself and others, but do not forget about purchasing a quality product.
Gradient on nails with gel polish step by step with a comb brush
A gradient on nails with gel polish using a “comb” is done step by step as follows:
- After degreasing the nail plate, a rubber base is applied and must be dried.
- At the base, the nail should be painted with a dark color, in the center with a neon shade, and the free edge should be made completely light.
- Using a comb brush, pull the dark shade through the middle to the tip of the plate.
- The “hair” is painted at the cuticle and dried.
- Next, steps 2-4 are repeated in the same order so that the varnish layer is denser and the stretching is smoother.
- Where there is a clear border of colors, you need to go over the comb brush again to better shade it.
- After drying the second layer of gradient coating, apply topcoat and place your finger in the lamp.
For a more uniform shading of colors, the brush can be dipped into the clinser and slightly squeezed, and then worked along the boundaries of the transition of shades. You should move the instrument with short strokes in the direction of the stretch and at the same time make movements from the right sinus to the left and vice versa. You need to walk along the sides of the nails with a “hair”.
How to fill an object with a gradient
If you fill objects with a gradient in Photoshop, you can achieve a cool 3D effect, which is the most trendy this year. I want to show you how to make a picture like this:
What a volume! With this example, you will understand all the basic principles of using a gradient on objects in Photoshop. See step-by-step instructions:
- I create a new document and fill the background with the saved gradient, as I showed in the previous paragraph.
- To create the balls, I'll use the Ellipse tool. He is located here.
- With the Shift key held down, I create an ellipse. It automatically appears on a new layer. You can select a color from the Fill menu.
- Now I double-click on the ellipse layer and the styles window appears.
- Here you need to click “Gradient Overlay” (on the left), and then click on the gradient box to adjust the color.
- I want to make a ball in raspberry tones. I choose what color the light and shadow sides of the ball will be.
- I adjust the angle so that the “lighting” of the object matches the gradient of the background.
The first stage has been completed. This is the main thing you need to know about filling objects with a gradient. But if you want to repeat my picture, look further.
Let's add a little “naturalness” to make the ball look more voluminous.
- I add the “Inner Shadow” item and click on the color.
- I choose the color of the shadow. Let it go purple.
- Now I'll adjust the angle, opacity, offset and size of this shadow. Play with the sliders to create the most natural and soft effect. After that, close the styles window.
Now I want to copy and resize the object. To copy, click on the object with the Move tool (V on the keyboard) and hold down the Ctrl key and move it to the side. The object ended up on a new layer.
To make it scale with the effects, right-click on the layer and then click on “Convert to Smart Object.”
This way I copy and place the ball several times in different places. Next, I'll draw another object using the Curvature Pen Tool (P).
You need to fill this object with the same settings as the balls. To do this, I right-click on the layer with the first ball (which is not a smart object) and copy the layer style. This function allows us to copy all the settings that we make in the Layer Styles window.
Now you need to right-click on the layer with the new shape and paste the layer style.
Look, now the new object drawn with the pen looks the same. This function works for all new objects you create.
I do the same for another figure. But here I thought it would be nice to add an internal glow to create the illusion of the light “enveloping” her. I double click on the new shape layer to bring up the styles window and add a glow.
You can copy a few more balls and add a Gaussian Blur filter to make them appear to be floating somewhere in the distance. The same goes for the object in the foreground - it will look more truthful. Here's a 3D simulation in Photoshop.
Manicure with color transition using baby boomer gel polish
A gel polish manicure with a color transition called “baby boomer” is done like this:
- After drying, a light beige flower garden is applied to oil-free nails coated with primer and base, covering each plate entirely. You will need 2 layers, both need to be dried.
- Apply white varnish to the tip of the foam sponge and blot this layer on the foil. You just need to touch the glossy surface with the product several times.
- Then tap the sponge along the free edges of the nails, almost to the center of the plates. The first layer must be dried and the second must be applied in the same way, and after the next drying, the third. The finger is again sent into the lamp, and the fourth layer is applied with a sponge. After drying, cover the nails with a non-sticky top, leveling them out. This is followed by final polymerization.
How to transition nails with airpuffing
The transition on nails with a gradient manicure using air puffing should be done as follows:
- A darker shade of varnish is applied to the prepared and base coated plate, covering it completely.
- This layer must be dried.
- Place a little dense gel polish or gel paint of a lighter tone on a clean palette.
- It must be collected by air puffing, tapping the product with the soft tip of the tool.
- Then the same is done at the base of the nail so that the border with the darker color is blurred.
- The finger should be placed in the lamp.
- Then a new, smaller portion of light gel polish is placed on the palette, collected by air puffing and applied with a tapping motion as a second layer to the same area of the plate.
- Border shading is done with the clean side of the device.
- The finished design is dried.
- All that remains is to coat the nail with topcoat and place it under the lamp again.
After use, wipe the instrument with a cloth moistened with a cleaner.
Transition region
Don't forget that when creating a gradient, not only the direction of the gradient line is important, but also the distance between the starting and ending points of the gradient. This distance determines the transition area between the colors of the gradient. What is the distance between the points, this will be the size of the transition area. Longer distances will produce smoother, more fluid transitions, while shorter distances will create harder, harsher transitions between colors. Now we will look at this in detail.
As an example, I will use a black and white gradient, I will create it from left to right with a large distance between the points.
Since I have a large distance between the points, the transition between colors turned out to be smooth and gradual.
Undo the gradient by going to the Edit menu and selecting Undo Gradient or using the keyboard shortcut Ctrl + Z.
In the next example, I'll be creating a new gradient in the same direction, but with much less distance between the points.
As a result, we see that the transition between colors in this gradient is sharper and more sudden. Therefore, always take this factor into account when working.
Let's take a look at the layers panel, the created gradient was added to a separate layer, which is very convenient to work with.
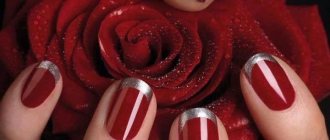
French gradient gel polish
French gradient gel polish is done so that the tips of the nails are highlighted in a lighter or darker tone or several:
- The prepared plates are treated with a dehydrator.
- Then an acid-free primer and a thin layer of base are applied to the nail and dried.
- From the base to a third it is painted over with dark varnish.
- The remaining clean part up to the free edge is covered with a lighter tone.
- Using a comb brush, making small movements across the nail, pull the dark color towards the end, periodically wiping the pile on a napkin.
- This layer needs to be polymerized.
- Then steps 3-5 are repeated, only the border should be shaded more carefully, and the nail should be painted with a thin brush near the cuticle.
- After drying, a top coat is applied and polymerized again.
Watch the video on how to make a French gradient:
Black and red manicure for short nails
Dark shades tend to narrow the space, so for those with short nails, the question is always relevant: what shades to use to make the manicure look attractive and stylish.
We offer several ideas that will help to visually enlarge short nails and decorate them with original patterns:
- use geometric patterns in nail art - a win-win option - a triangle with an angle to the edge of the nail, color blocks, stripes with a gradient design or rhinestones
- add another shade - gold or white shades, which are used to separate the main tones or to draw floral or geometric patterns, will help refresh the black and red design
- Avoid large rhinestones or metal figures - they will look bulky in a small space on the nail plate. Limit yourself to pigments, beads, glitter or other shiny surfaces that will help make the design more vibrant.
- combine black and red shades with the negative space technique
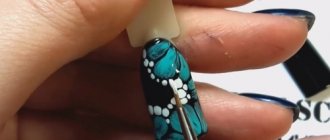
Gradient brush with glitter
A gradient with a brush can be made not only with different colors of gel polish, but also by highlighting areas of the nails with decor, for example, sparkles:
- A flower bed is applied to the dried base, covering the entire nail.
- After polymerization, a portion of glitter with a transparent base is placed on the tip.
- Using a brush, they are stretched towards the center of the nail so that the transition is smooth.
- The coating must be dried again.
- Finally, a top coat is applied, which is also polymerized in a lamp.
Changing the gradient color
Since by default the gradient takes colors from the foreground and background, we can easily change its colors at any time. To start, click on the top “Foreground Color” box; it is currently colored black.
A color palette opened and I selected red. Click OK to close the Color Picker window.
Now let's change the background color, click on the farthest square, currently it is white.
The color palette opened again and I chose a bright yellow shade. Click OK.
Color swatches have been updated.
Notice the gradient in the top options bar, its colors have changed to the colors we selected.
Let's start creating a gradient, this time I will draw a line diagonally from the lower left corner to the upper right. There's no need to delete the gradient; Photoshop will automatically replace it with a new one.
We have a red-yellow diagonal gradient.
Gradient on nails with gel polish sponge and rubbing
A gradient on nails with gel polish using a sponge using rubbing is no more difficult than just using different colors:
- The nails are covered with a base and placed in a lamp.
- The next step is the flower bed, it is applied to the entire plate with a regular brush, in one layer.
- After drying, cover with a top coat without a sticky layer and polymerize.
- Using a sponge, scoop up a rub of one color and drive it in at the base of the nails to about a quarter of the length.
- Take turns using the same product in two more shades, apply to the middle of the plates and in the penultimate quarter.
- Excess rubbing is brushed off with a flat brush.
- All nails are decorated in the same way, and part of the free edge is covered with the brightest gold powder.
- All that remains is to shake off the excess, cover your nails with 2 layers of topcoat, and dry both.
You can use one color rub or a transparent silver one. But then the gradient is made with several shades of gel polishes, dried, covered with topcoat, polymerized, and mirror powder is rubbed onto all nails. The final layer is applied with a finish, which is also dried in a lamp.
You should always use a very small amount of rub, as the excess will come off the nails. If the product gets on the skin, remove it with a cloth moistened with a degreaser.
Watch the video on how to make a gradient using a sponge and rubbing:
French gradient
If you want to create a beautiful and laconic manicure look, then a gradient French manicure is exactly what you need. This manicure can be done in two or more colors. And also complement your nails with various decor.
Gradient on short nails with gel polish: which one should not be done
Gradient gel polish on short nails will look natural if:
- use no more than 2 colors;
- give preference to shades of the same range (white with pink, beige, latte or blue-blue, red-burgundy);
- make the base of the nail darker and lighten it towards the free edge;
- abandon the abundance of geometric lines and large ornaments.
All other ombre options, except the last one, are not only acceptable, but also ideal, helping to visually stretch out the plates and make them more graceful.
Foreground to Background Gradient
Before we start creating gradients, let's look at one of them, namely the Foreground to Background gradient. Photoshop selects it by default. He is number one on the list.
There is an icon for choosing foreground and background colors in the toolbar. By default, the foreground color is set to black and the background color to white.
The Foreground to Background gradient is the easiest to set up and is also the most common. As further examples, I chose this one.
Shading on nails with gel polish and sand
Shading on nails with gel polish and sand is called a sugar gradient and is done like this:
- A classic ombre is applied to the dried base. It can be a vertical or horizontal gradient, of two or three shades.
- The gel polish is dried in a lamp. Then the same tones are applied in a second layer, shaded and polymerized again.
- Now you need to cover your nails with topcoat and do not dry it. Sprinkle transparent powder or tint powder on top with a spatula, or you can use sand of several colors on different parts of the nail.
- You need to lower your finger down and tap so that the excess product falls off. Drying is needed again.
- Then they go over the nail with a trusty brush to remove the remaining unnecessary sand. The final stage is applying the top and polymerization.
Velvet sand cannot be used on the entire nail. Sometimes it is enough to highlight one or several stripes for them, near the sinus, in the center, along the cuticle, in a word, as your imagination dictates.
Watch the video for step-by-step instructions on how to apply a horizontal gradient with a sponge:
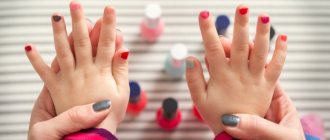
Where to get ideas for gradients: the best services
Creating a beautiful gradient yourself is not always easy. And sometimes there is simply no time to think. This is why we came up with services where you can get ideas for gradients. I have selected the 3 best for you.
Coolors
On this site you can view both ready-made sets of gradients and create your own. The colors have numbers, so they can be easily transferred to any editor.
You can go to the resource using the link.
Uigradients
Here you can see the most incredible combination options. The service is good because gradients can be viewed in full screen format. And there’s also a little trick: each gradient has a unique name, so it looks very atmospheric. What do you think of the gradient called Moonlit Asteroid?
Explore other options here.
CoolHue
A small but very cute collection of ready-made gradients. Any of them can be downloaded as a PNG image.
Link to the official website of the service
Gradient on nails with gel polish with white geometry
Gradient gel polish on nails with white geometric lines requires more effort than traditional ombre, although many of the steps are repeated:
- First, apply the base and dry it in a lamp.
- Then paint the nails with the main shade in 2 layers and polymerize.
- You need to go over the surface of the plates with a buff to remove the glossiness.
- Protective strips are applied to the nails where the base color needs to be left.
- White paint is sprayed onto the remaining open areas using an airbrush, maybe not evenly, but more on the free edge, less at the base.
- The protective strips need to be removed, and the ends of the nails should be lightly processed with a file to remove excess light pigment.
- Then, with a thin brush, white lines are drawn with gel paint along or across the plate, possibly diagonally, and polymerized.
- All that remains is to apply the finishing coat and dry it too.
To complete this design, you can do without an airbrush and make transitions with a thin brush using white over a darker base tone.
How to make a background gradient
- To fill the background with a gradient, select the Gradient tool.
- Then click the mouse in the part of the screen where the fill will begin.
- Move your mouse across the screen.
For example, to make a color transition like the one below, click and drag from top to bottom.
And to make such a transition, I clicked and moved the mouse diagonally from right to left. Try it! This works in all directions.
Gradient gel polish using a sponge and stencil
A gradient of gel polish using a sponge and a stencil turns out to be very catchy, so you can design one or two nails on each hand like this:
- The plate is covered with base and dried. The surfaces of the nails on which the stencil needs to be glued are treated with a buff.
- Use a napkin to remove sawdust. The stencil is separated from the base with tweezers and attached to the nail. You need to smooth it out, fix it well and use scissors to cut off the parts that are outside the plate.
- Strips of gel polish are applied to the palette in the order in which they want to be seen on the nail, layering one color on top of another and blending the transitions. There can be 2-3 shades.
- A sponge is applied to this multi-colored print. And then it is leaned against the surface of the nail with a stencil so that the open areas are painted.
- Now you can peel off the protective film by carefully picking up the edges with tweezers and pulling in the direction of the design. The finger must be placed in the lamp.
- A top coat is applied over the dried gel polish. It is also polymerized.
A striped gradient is also made using stencils:
- The strips are glued onto a dried camouflage base across the plate.
- The remaining open space is painted with white gel paint on a third of the nail.
- Each mini-strip is shaded with a sponge closer to the middle of the plate.
- Dry and repeat steps 2 and 3 a couple more times.
- After the next polymerization, the strips are removed, the nail is covered with a top coat without a sticky layer, and dried.
- New stencil devices are glued again across the plate, but this time covering the gradient.
- Gel paint in 3 layers is applied to the open stripes, only on the other side of the nail and almost up to half of it.
- Each time it is shaded with a sponge and polymerized without removing the stencil.
- After drying the 3rd layer of white gel paint, the strips are peeled off.
- The last step is to apply topcoat and dry.
Watch the video on how to make a gradient with gel polish using a sponge and stencil:
Materials needed to make the gradient
Depending on the chosen method of applying the gradient, you may need different materials and tools. We will provide a list of everything you need, and all you have to do is choose what you need for each specific design from the methods listed below.
- Gel polish in 2, 3 shades or shellac
- Acrylic paint when working with an airbrush or sponge (optional)
- Gel paint
- White gel polish or shellac for base/base
- Base, top for gel polish
- Degreaser, dehydrator
- Brush: flat, comb, fan
- Acrylic powder of different shades (for design with gradient powder)
- Pigments (for ombre manicure with pigments)
- Cuticle protector: cream, tape, liquid cuticle tape, cuticle stickers
- Final cuticle oil
On the Internet you can find many instructions and life hacks on how to make a comb brush yourself. You can take any flat brush for watercolor or acrylic paints and trim it with scissors.
Comb brush for ombre manicure
In order not to wash off the paint or varnish from the cuticle with all available means, it is better to protect it before starting work. You can carefully apply the nourishing cream, but if it gets into the gel polish when working with a sponge, the polish will swell with bubbles.
Manicure brushes - types, purpose, how to choose and care
At home, regular tape or PVA glue for cuticles is often used. In salons, professionals use Skin Defender - this is a liquid product that resembles the action of PVA glue. We apply it to the cuticle, it hardens, forming a thin elastic film. After applying the gradient, simply remove the film and the skin remains clean.
Geometric gradient gel polish at home
The following geometric gradient using gel polish at home is quite simple to do, despite the apparent complexity of the design:
- A little white varnish and colored varnish are laid out on the palette.
- A drop of the latter is mixed into the light gel using a “hair” brush.
- Using this mixture, draw 3 triangles in a row, the vertices of which should be at the beginning of the free edge of the nail.
- The coating is dried, and a little more color is added to the gel polish mixture.
- Use it to draw the next row of triangles, placing them lower and in a checkerboard pattern.
- After drying, steps 4 and 5 are repeated until the entire nail to the base is painted.
- The bottom row of triangles is made with dark varnish without adding white.
- After its polymerization, everything is covered with a matte topcoat and dried.
This design is done on 1-2 plates or on all fingers.
Geometry in combination with ombre can be in the form of waves, straight or irregular lines, and shapes. The main thing you need to do when creating a design this way:
- mix gel polishes with white on a palette or foil;
- work with a thin brush;
- dry each drawn detail.
Gradient palette
Now we need to select the gradient itself that we will use, there are several ways to do this. The first is to open the Gradient Palette, the second is to open the large Gradient Editor window. The difference between the two is that in the Gradient Picker you can select a pre-made gradient, while in the Gradient Editor (the name says it all) you can edit and create your own gradients. Today we will pay more attention to the Gradient Palette.
If you need to choose one of Photoshop's standard gradients, or one you created earlier and saved as a custom swatch, then click on the small arrow on the right side of the preview panel.
To select the gradient you like, simply double-click on the thumbnail or press Enter.
"Ink" gradient
The shading does not have to be symmetrical; chaotic also looks interesting, and it can be done in any tones:
- A drop of gel polish in two colors (for example, black and blue), as well as a top coat, is applied to the palette.
- The nails are prepared and the base applied to them is dried.
- At the base of the plate a top coat is applied in a stripe, the middle part is coated with blue varnish, and the free edge is coated with black.
- On the undried top coat, make streaks with both colors using a flat brush.
- It is used to smear the border between shades, after which the nail is dried.
- Then additional black and blue stains are applied with a hair on the transparent part.
- The free edge is drawn more clearly in the darkest tone.
- All that remains is to dry it, cover it with top coat, and polymerize it again.
Liquid varnishes are perfect for this manicure. But they need to work quickly. And the areas near the cuticle and sinuses should be painted with a thin brush after the first drying.
Watch the video on how to make an ink gradient:
Gradient manicure: new items for 2022
Gradient manicure 2022, as already mentioned, is one of the most popular. It has won high positions in the fashion rankings due to its unusualness and uniqueness.
Nothing compares to its smooth shades and play of colors, its tenderness and, at times, contrast. She is able to complement the image of a real woman, demonstrate her excellent taste, and also create a unique style.
There are many different gradient nail designs available. But even among them there are the most and least popular.
The most current trends for 2022:
- with decorative elements and inserts (rhinestones, stones, etc.);
- brightness and contrast of manicure;
- light-colored manicure;
- unusual design (for example, angular gradient).
Next, we will look at all the most popular new products of 2022 and answer the question of which of all the options is better to choose.
Gradient with glitter and rhinestones
If you're looking for a memorable design, the glitter and rhinestone gradient is perfect for you. Her “trick” lies in the special decoration of her nails - rhinestones.
Peculiarities:
- The most common mistake when applying such a manicure is the illiterate distribution of rhinestones.
- Sometimes the nails are completely covered with decorative elements (in some cases even the nail itself is not visible), and sometimes “the cat cried” with rhinestones.
- To prevent this from happening, you need to correctly calculate where the rhinestones will be located and where the paint will be.
- If you are creating a shade with glitter, you should take into account that the glitter should seem to stretch from the tip to the center of the nail plate.
- In a manicure, everything should be in moderation - unbalanced elements can easily spoil the overall picture. Therefore, the choice of individual design must be approached responsibly.
To avoid mistakes, we recommend seeking help from a professional designer who specializes in applying decorative coatings to nails.
Angular gradient from center
The next contender for the most trendy manicure of 2022 is an angular gradient.
Its peculiarity lies in the unusual transfusion of colors: the nuance is not present on every nail, but on the hand as a whole.
That is, for example, dark blue paint is applied to the thumb and index finger; in the center - a little lighter; on the nameless one - the border between blue and purple; and on the little finger - closer to pink, and in a more general sense to purple.
Bright manicure
Brightness has always been and will be in fashion. Therefore, we recommend that you also consider this style.
it is a little closer to the classic nail design options (compared to the above styles), but, nevertheless, has not gone out of fashion for many years.
Peculiarities:
To create a bright manicure, you need to choose the right colors. Red gradient manicure is a great choice. Also, in addition to red, you can use other colors, such as light green, yellow, orange and others.
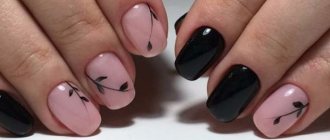
Contrast gradient
This style can also be called quite close to the classics. Contrasts and play of colors are among the highest in the fashion world today.
Peculiarities:
the choice of classic colors is preferable - a manicure with a white tint (from white to black) is one of the most contrasting.
In addition to black and white, you can also experiment with different colors of the rainbow—transitions from blue to green or red are also some of the most contrasting.
Full hand gradient
This option will look interesting on nails of any length and shape and will allow you to do without special equipment. However, to create a gradient effect for beautiful transitions from finger to finger, you need the perfect palette.
"Ink" gradient
The gradient does not have to be symmetrical; chaotic also looks interesting and can be made in any color:
- Gel polishes of two colors (for example, black and blue), as well as the top coat, are applied drop by drop to the palette.
- The nails are prepared, the base applied to them is dried.
- A striped top is applied to the base of the plate, the central part is covered with blue paint, and the free edge is painted black.
- On the undried crown, apply stains of both colors using a flat brush.
- We also smear the border between the shades, after which we dry the nail.
- Then, using hair, additional black and blue spots are applied to the transparent part.
- The free edge is drawn more clearly in a darker tone.
- All that remains is to dry, cover with top coat, and polymerize again.
Liquid varnishes are perfect for this manicure. But you need to work with them quickly. And the areas near the cuticle and breasts need to be painted over with a thin brush after the first drying.
Watch a video on how to create an ink gradient:
Pastel manicure with gradient
The soft pastel shade gives the impression of an airy “dessert”, no matter which direction of color transition you choose.
On oval and almond-shaped nails
This nail shape visually lengthens the fingers. This visual effect will be emphasized by a vertical gradient.
Gradient manicure with patterns
Various elements can be used as additional decorations, but patterns and motifs are considered the most suitable. Luxurious designs on a glossy or matte base will make your nails more graceful, elegant and attractive. If desired, each nail can be decorated with drawings. But if you don't want to overload a gradient design, then this is enough to decorate a nail or two. Feel free to create curls, flowers, twigs, birds and any other designs. Any ideas will be great if they successfully complement girls’ looks.
Chrome gradient
A trendy chrome, mirror or metal manicure will look new if done in a gradient style. With this manicure, you can focus on one or more nails by covering them with a mirror scrub. This design will definitely be the center of attention, and women's hands will acquire charm, grace and sophistication.
Gradient manicure is a sophisticated and sophisticated solution for creating an elegant and fashionable look. This nail art goes well with both summer and winter looks. As for the color scheme, here you can completely rely on your personal preferences, because there are no obstacles to the gradient. It is very difficult to resist such a design, which is why it is so popular and in demand. Feel free to experiment with adding rhinestones, stickers, patterns or negative space elements and stay stylish.
On short nails
Not all designs will look harmonious on a small nail plate, but one shade can be considered a happy exception. If you choose a vertical gradient option, you will also optically lengthen your nails.
Horizontal
Another option for a gradient on nails is the “stretching” of shades from one edge of the nail to the other, reminiscent of the play of bright lights on a glossy finish.
Original gradient
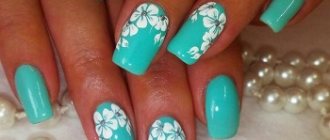
The original ombre design involves painting each nail a different color, but all shades must belong to the same range. For example, tones from soft pink to muted red or from light green to sea green are used. This design looks more organic on young girls. And it is better to use pastel shades.
We recommend reading the article on how to do a manicure with red gel polish. From it you will learn about manicure design options for short and long nails and application techniques. And here is more information about how to remove shellac at home.
Gradient is the richest design option, and many of them are easy to implement. And at the end you can get a unique manicure, calm or flashy - whatever you want. After all, the technique of applying varnishes gives you the chance to use colors that differ by a couple of tones, and contrasting ones.
Horizontal Gradient
In horizontal form, you can apply one color closer to the hole and another color towards the tip. Sometimes three colors are used, where the third is located in the center between the two options described above.