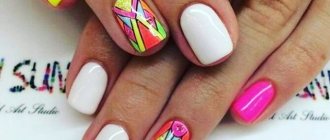
Why does a manicure with roses take a leading position among all floral nail designs? Probably because women love roses! Royal flowers love care and careful treatment and surprise with their beauty and tenderness! However, so do women!
The interesting, complex interweaving of rose petals can be called a miracle of nature. And, believe me, it’s very easy to recreate it on your nails! The article tells all the secrets, the photos show the most successful options!
Nail designs for beginners at home with a needle
Today, the corresponding technique is considered outdated, but you can try to master it at home
The most important thing is that the tools for such a manicure can be found in every home.
Practical exercises should begin with drawing the simplest figures and elements possible. First, as in previous cases, you need to start with a manicure. Next, apply a base coat of varnish and wait until it dries completely. Then dots are made using a needle, and a thoughtful pattern is formed using planned movements from one to another. Finally, let the coating dry and apply a sealer to it.
There are thousands of options for beautiful and simple manicures at home. If you happen to have a fan brush in your hands, and there are beautiful varnishes on the table, then completing the design will not be difficult.
Required tools and materials
To create an unusual design on wet gel polish, you will need some professional tools and materials.
- Curing lamp for drying varnish: can be used with an ultraviolet or LED lamp. The latter speeds up the drying time several times.
- The thinnest brush or wooden stick with a sharp end. Professionals usually choose a brush size of zero. Beginners can do without an expensive tool and make a custom brush from a regular bottle of used varnish.
- Basic transparent coating to protect the nail and better apply the gel to the surface of the nail plate.
- Top protective layer in glossy or matte format.
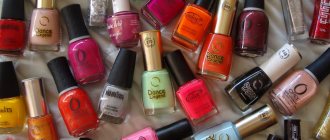
- The main color of the gel polish and one or two shades of your choice to create a pattern. It is worth choosing varnish without skimping on quality. The type of drawing will depend on its structure, and the work itself will be easier.
- Cotton swabs, coverage correction products, napkins.
- Additionally, you can use shimmer, rhinestones, and foil to create a design.
Technique for making patterns with a needle (secrets)
Drawing with a needle or thin stick requires certain skills. Without them, it will be difficult for a girl to create an impeccable and high-quality design.
Advice from experienced craftswomen: it is very convenient to use a car pencil with a fastening lead. Only instead of a stylus, a needle is inserted. Believe me, applying a drawing this way is very easy. The needle is firmly fixed, and there is no fear that it will slip out of your hands. The second point is that after finishing work, you can screw it into a car pencil and it won’t get lost.
It is best to choose a very thin needle for work, since if the varnish dries quickly, it can leave behind traces with gaps - this will affect the quality of the design.
When working, do not put pressure on the needle. You might scratch your nail. You need to work with it only by pressing lightly.
When performing a “rose on wet gel polish” design, the design will work best on the second layer of coating. Why? The first layer may lie unevenly or will not be dense enough.
You only need to work with one finger from start to finish. That is, if you have completely finished the first nail, you can start the second.
When working with diagrams, if they show a continuous line, then the movements of the needle along the nail should be exactly the same. Otherwise, you can easily ruin all the work.
After each drawn detail, you need to wipe the needle on a lint-free napkin. It is important. Otherwise, lint may get on the varnish.
Stamping
Drawing a rose on your nails, as in the photo, using this method allows you to get a fairly small and detailed image using nail polish, but still quite schematic. Choosing a stamping kit is quite difficult, since each of its components has many requirements.
In addition, it is important that the coatings are sufficiently dense and capable of giving a clear and rich color even when applied in one layer. The disadvantage of this method is that the choice of images is somewhat limited, as well as its one-color nature, however, some craftsmen can obtain multi-color prints, and the variety of stencils is very large
The advantage is the accuracy, accuracy and speed of drawing.
Stamping is applied to nails prepared using a method similar to the previous ones. The base is applied, then the background, then apply two layers of varnish intended for making the pattern onto the selected pattern on the plate. Quickly remove excess varnish with a scraper so that it remains only in the recesses of the stencil. Press the stamp onto it and transfer the polish from the stamp to the nail. Cover the entire manicure with clear polish.
Painting with varnish
In order to create a rose on your nails using simple nail polish, you may need many tools, such as a thin brush, dots, needle or gel pen to depict the smallest details and separate the petals. In any case, the image obtained in this way will be quite schematic.
In order to paint a rose on your nails with varnish, you need to prepare the following materials and tools that you will need in the process. This list is only suitable for the simplest design.
- Transparent varnish is the base;
- Transparent varnish - fixative;
- Colored background coating;
- Varnish the color of a future rose;
- Black gel pen that can write quite finely;
- Dots.
This design should be carried out in stages. First, the nails are covered with a transparent base, which protects them from the penetration of aggressive coloring pigments into the plate. After the base has dried, apply two layers of colored background varnish and dry it. In this case, the background should be lighter than the color of the picture, or the varnish of the color of the future rose should be dense enough to cover the rich background.
You begin dotting movements that form a comma or a crescent. You need to move from the center of the future flower to its periphery, gradually increasing the elements. It is worth keeping a certain distance between them and placing commas and crescents, alternating, in the manner of brickwork or fish scales. After the design is formed, complete the stem and dry the manicure.
Take a gel pen and complete the drawing with it. Separate the petals where they are drawn close to each other. You can also draw the entire stem with a pen. After this, let the pen dry and quickly apply a coat of top coat. Immediately after it dries, your manicure is ready.
More details on how to draw a rose on your nails step by step are shown in the video.
https://youtu.be/2bWsJecre-k
How to make wet roses on nails, photo
Wet manicure -
a technique in which you need to create a nail design using an undried layer of gel polish. This technique is similar to painting with a needle on a simple varnish; however, you should not rush, since gel polish does not dry out like regular varnish.
Usually, various tools are used to create this design - these could be the following items:
- toothpick
- needle
- thin brush
- pencil
There is a similar technique that tends to spread on the gel polish coating. This technique is often used to design roses. Let's take a closer look at how the process of creating original nail art occurs.
Step by step wet painting process:
- We prepare the nails
for gel polish coating: we do a trim manicure, bring the nails into the desired shape, degrease - Apply the base
to the nail plate,
dry for
the specified time (30 seconds) - We make a background coating
of gel polish, if necessary in two layers, dry it in a special UV lamp - We cover
the nails with
an additional layer of background varnish
, on which we draw without drying it. Because of this, this design is nicknamed wet. - On a wet layer we draw roses
, and first we make a semicircle in the middle of the bud, then we open the petals - After application, you need to wait 15-20 seconds for the design to spread, only after that we carry out polymerization, half a minute or a minute longer than usual
- Upon completion, we cover the design with a top coat
, not pressing too hard with a brush so that there are no streaks. Dry the finished manicure in a lamp - If desired, remove the sticky layer
Draw with a thin brush or needle
Instructions on how to make a very delicate rose on your nails:
- Prepare the nail plate and cover it with a layer of varnish (Illustration 1).
- Drop red and green varnish onto a piece of paper or a small lid (Illustration 2).
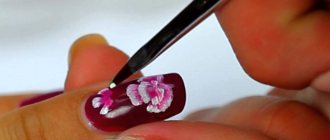
- Using a thin brush or needle, draw a small letter “C” in the center of the nail (Illustration 3).
- Draw another arc (Illustration 4).
- Gradually fill the nail space with arches. They should go in a spiral (illustrations 5 - 8).
- Take a little green varnish on the tip of a needle or brush and draw two stripes - rose leaves (illustrations 9 and 10).
- Rose is ready! All that remains is to cover the nail with top coat.
Modern ideas for painting nails with gel polish
Nail designs are made in various styles. If we look at nail art this season, moderation and conciseness remain relevant.
Monograms and patterns
Their peculiarity is that they are created by intertwining lines. There are several types of monograms: French, original and modern monograms. Simple curls can be easily drawn with a sewing needle or toothpick. Usually a thin brush is used for painting. With its help, you get an accurate result.
Geometric designs with gel polish
In this case, you can combine different shades and execution techniques. For geometric designs, you can use masking tape and stencils.
Ethnic drawings with gel polish
They are always associated with warm summer days. This is a bright and bold design. On the ornaments you can see motifs of various nations.
Volumetric drawings with gel polish and powder
This is a new trend this season. Such drawings look very interesting and attractive.
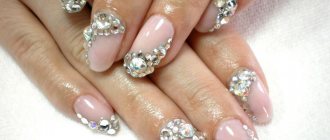
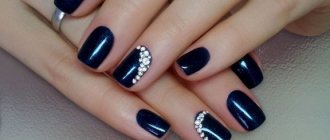
Gel polish designs with rhinestones
They look festive. For everyday manicure, it is better to apply rhinestones only on two nails.
Drawing in gold
This print goes well with a French manicure.
Sweater design on nails
This is a real hit this winter! This design looks very cozy and evokes only the most positive associations.
Films
Films and thermal films are essentially also a type of stickers. This is one of the easiest ways to draw a rose on your nails. They are very thin and can cover the entire nail. With their help you can even get photographic images of roses. From a sheet of such stickers, you need to cut out a fragment of the required diameter and place it on the nail, then cut off all excess and cover the nail with a fixative, carefully sealing the free edge.
Simple films are applied directly to the undried varnish base and adhere tightly to it. Thermal adhesives must first be heated under a lamp, which causes them to expand. Then they are placed on the dried varnish, they become narrower as they cool and are securely attached to the nail. Both stickers must be covered with a layer of fixative in order to prevent the formation of air bubbles under the coating and peeling.
Nail designs always look very unusual and beautiful, and floral motifs can add a special femininity to a manicure. All kinds of roses are very popular - they look tender and soft, regardless of color! How to paint roses with gel polish on nails? There are several interesting ways. Let's look at each of them in more detail.
Secrets and tricks
Don’t be upset if you weren’t able to accurately implement your chosen nail design right away. You will need to practice a couple of times to feel confident and get creative nails. The entire procedure should be done slowly and carefully. If you are a beginner, then just preparing your hands can take a long time. There's no need to rush. Speed itself comes with experience. It’s better to initially do everything slower, but better.
Don't neglect the preparatory procedures. Nails and fingers need to be perfectly groomed before creative designs are applied to them. Sloppy nail plates look not only unfashionable, but also vulgar, even if they have the most stylish designs. Be sure to organize your workspace. The quality of the procedure also depends on this. The table should be spacious enough to accommodate all the necessary accessories for a manicure. It must be light, otherwise you simply will not notice the small nuances of the design.
The nail plate should only be filed in one direction. This will avoid cracks and brittleness. At first, it may be unusual, because we are all used to filing our nails in both directions. But if you practice, you will quickly be able to perform such actions. A positive result will not be long in coming.
Do not shake the gel polish before use. This may cause bubbles to appear, which will create obstacles to creating an even coating. Apply the coating in a thin layer. It would be better to make several thin layers and dry each one in a lamp, than one thick one, which will spread and cause a sloppy manicure.
Experts strongly recommend capturing the edges of the nails when painting. This way you can avoid chipping, and a stylish manicure will delight you for a long time. Be sure to use a sealer. It gives the coating not only a glossy shine, but also guarantees durability and durability (of course, if all the rules of manicure are followed exactly).
All layers should be dried well in a lamp. The clarity of the design and the durability of the entire composition will depend on this. To remove excess gel polish, you need to use a special nail art brush. It will help gently clean the skin and keep your hands looking attractive.
It is better to remove gel polish using professional products. You should not use a file. In inept hands (and often in skillful ones!) it can injure the nail covering. It is better to protect yourself to avoid negative consequences.
If you want to create a unique decor, but do not have the proper experience, you should start with simple drawings. You can also use available tools: stencils, stamping, decorative elements. They will help you create a creative manicure.
An important point is also high-quality materials and tools. You should not purchase expired gel polish. It will not lead to the desired result. High-quality products are more durable
When painting decor, you should pay attention to the surface of the nail. Do not put multiple designs on the nail plates
It will look ridiculous.
How to draw a simple design on your nails?
You can draw different patterns using different materials. The simplest and most affordable are colored varnishes. But for those who are seriously interested in decorating their nails, it is worth trying other material options.
Gel polish
With gel polish you can create a variety of patterns and effects that will last until you have to repeat the procedure of covering your nails with this material. The technique of painting with gel polish can be different: on an undried coating and on a polymerized one.
The gel polish coating technology is as follows:
- Apply primer (base layer) to the nail prepared with a buffer. If necessary, dry in a lamp.
- Apply colored gel polish. It is at this stage that differences in further actions begin. This layer can be dried and then added with a design. But you can do this before the nail goes to drying. This technique is called “wet”. Only after designing the nail does it dry in a lamp.
- Apply fixative, dry, remove stickiness.
Drawing with gel polish step by step
Acrylic paint
Acrylic is a very convenient material for nail design. It dries quickly, has no odor, and retains pigment well. Apply acrylic paint to a dried surface (varnish, gel polish, shellac, even on a natural nail). To paint your nails, you will need a brush, preferably one with non-natural bristles.
Step-by-step drawing of a flower with acrylic paint
You can also make a French jacket with acrylic and decorate it with an original floral design. The acrylic painting technique is convenient because if the pattern doesn’t work out, you can simply wash it off with water before it dries and start painting again.
In order for the nail painting to last on the nail for a long time, a transparent fixative must be applied over the design.
Using shellac
Just as in the case of gel polish, you can decorate your nails with shellac using the “wet” or “dried” technique. You can use a French manicure as a basis, which is no problem to do on short or long nails. If your nails are still short, then you should not make the French “smile” too wide. When it comes to the design, it should not be too large so as not to visually enlarge the nail plate.
Using pieces of tulle
You can get an unusual manicure if you use simple tulle. Here you can use multi-colored varnishes for the base and pattern. A subtle effect will be achieved if you use a light varnish.
The technique here is simple:
- Paint your nails with a base color (it will act as the color of the final design). Allow to dry thoroughly.
- Place a piece of tulle tightly against the nail. Carefully apply a different color of varnish on top of it. Let the layer dry. Remove the tulle.
- Cover with clear varnish.
Using a piece of tulle with a different pattern, you can get ready-made designs, which is not difficult to do.
Using decorative elements
You can create your perfect manicure without painting on your nails, but simply by correctly using decorative nail material. The color base in this design is necessary in any case, but there are no restrictions on the use of decor.
Rhinestones, stones, and foil can give your nails a special shine that cannot be duplicated by any varnish.
In order for the rhinestones to stick well to the nails, it is better to place them on gel polish that has not yet been dried. After finishing the decoration, you can safely dry it. A layer of topcoat on top is required.
There is also a special foil that applies gel polish without a sticky layer or regular dried varnish. To get a design on your nails, you should glue the foil, iron it on top and carefully remove it. The design that was formed on the foil will appear on the nail.
There is another design option with foil. To do this, purchase special thin pieces of foil (they come in different colors). They are laid out on the nail with an applique, and then secured with a colorless varnish or top coat (for gel polishes). Only with foil you can create unique patterns on your nails.
Using droplets and dots
The dot painting technique will help you create an unusual, but painfully simple manicure. This manicure can be done using varnishes of different colors, as well as gel polishes, shellac, and acrylic paints. The tools you will need are dots. An alternative is toothpicks, a needle, a ballpoint pen tip, etc.
As in previous methods of decoration, you need to apply the main color to the nails, and after it has completely dried, apply the design. The manicure will last longer if you cover the resulting result with a fixative.
Design option for marigold using drip technique
Photo of nail gel polish with roses
If you want to learn the technique of drawing roses on your nails yourself, then read the article. Here you will learn how to create a manicure with a rose using simple methods and how it is painted in nail salons.
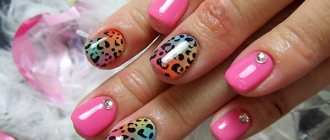
Roses on nails reflect new fashion trends; this design is called “shabby chic”. Flowers look romantic and impressive. Roses made from bed colors will add additional charm.
There is a wide variety of nail designs, with all kinds of elements. You can add stripes, make a voluminous manicure, add rhinestones, patterns, and much more. It all depends on your imagination.
Rose from a circle
To work, you need to take a toothpick, a needle or a very thin brush. For the background, use white or black varnish, and for the flower, any will do.
Master class on how to draw a rose on your nails:
- Prepare the nail plate and coat it with background polish.
- Using rose varnish, draw an even circle. This can be done with a thin brush or dots. The larger the circle, the more convenient it will be to draw the rose.
- Wait until the varnish dries.
- Take a small brush, toothpick or needle and start drawing a circle with thin lines, as in the diagram above. As a result, you will get a pattern that looks like a rose.
Finally, coat your nails with top coat.
How to paint roses on nails with gel polish?
Painting roses with gel polish is quite easy. If you are a beginner, choose a technique that avoids hard lines.
- Do a regular manicure. Cover the nail with primer and gel polish base. Dry
- Now apply the base coat. Of course, its color will depend on the overall idea of the manicure. But it is better if the base color is pale and the roses are bright. Ideal colors for the base - light blue, lilac, vanilla, milky, pink
- When the base layer is dry, start painting. Paint the spots with the color you will have roses. Make sure that the drawing does not look sloppy. Dry the layer
- Now take a contrasting gel polish and a sharp brush. The polish can be lighter or darker than the rose, experiment
- Using this varnish we draw lines that will imitate petals. The rose should not turn out clear. The beauty of this technique is that the drawing looks best from afar.
- Now you can finish drawing the leaves. Similarly, the body of the leaf is the main color, the veins are contrasting
- At the end we fix the drawing with a top coat and dry it
- It is better if roses are drawn on 1, maximum 2 fingers. This way the manicure will be bright and unobtrusive.
Drawing vintage flowers
If you want to create a romantic look, then a vintage-style manicure will help you with this.
Master class on how to draw a rose on a nail (see photo of the process below):
- Prepare the nail plate and apply a base top coat.
- Paint your nails with a base color polish. To stick to the romantic look and vintage spirit, choose shades like light blue, white, light beige and light pink.
- Wait until the polish is completely dry.
- Take a regular brush and dip it in pink polish.
- Place a circle with uneven edges on the nail plate (picture 1). You can simply make a couple of strokes with a thin brush.
- Wait until the spots dry.
- Take a thin brush and dip it into hot pink polish.
- Draw an arc along the edge of the circle (picture 2).
- Place another arc opposite the first one (picture 3).
- Draw a small strip between the two arcs (picture 4).
- Decorate the rest of the nails in this way (picture 5).
- If desired, you can complement the flowers with green leaves.
The vintage pattern is ready!
What can you draw with?
Many novice nail artists wonder what they can use to paint on nails coated with gel polish.
It turns out there are many options for this.
Patterns can be applied:
- regular varnish;
- acrylic paints;
- watercolor;
- acrylic powder-sand;
- Shallak;
- gel polish
The most common product is varnish. It is accessible, varied, and easy to use. To create the simplest design you will need only two shades - for the background and for the pattern. The downside is the thick texture of the gel polish, which makes it difficult for beginners to reproduce thin and small designs. But in fact, this is a matter of technology, it needs to be developed.
Another recognized material for manicure is acrylic paints. They are easy to use, adhere better to the surface, have a wide color palette, do not crack, do not spread, and dry quickly. They are very easy to work with and do not need to be diluted with water. The only drawback is that they wash off quickly, so they must be covered with a fixing layer of top.
What you need for home nail art
If a person is not going to become a professional and do manicure as a core activity, then it is absolutely not necessary to buy everything. It is enough to acquire a basic set of things that will be useful for drawing and developing designs.
To do your own manicure at home, you will need the following things:
- Scotch. It will help you create geometric shapes and do a French manicure;
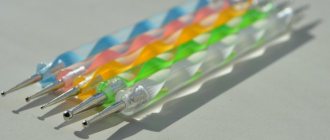
- Dots. This element is a small plastic or wooden stick with a ball at the end for making dot patterns. Using this device, if necessary, you can also draw;
- A set of brushes of different diameters. The choice should be made in favor of products with natural bristles;
- Gel polishes of different colors;
- Glitters, sequins, rhinestones.
- Toothpicks, cotton swabs for pattern correction;
- Manicure corrector or gel polish remover;
- Fixative. This is a means to extend the life of the coating.
Attention! You can’t start your business with professional and expensive materials. At the first stage, you can try to apply drawings using ordinary watercolor paints, which are easily washed off
The main rule is to avoid overdoing the design.
Drawing workshops
Drawing at home can be done naturally and easily. The main thing is to be patient and have good tools. First, you should use simple options to implement personal nail art. Gradually you will expand the boundaries of your skill and move on to more ornate patterns. You can find a variety of lessons and master classes on detailed drawing of objects. Follow them clearly and you will get positive results.
Hearts. Created using toothpicks. This design is all about precise movements and good light. Initially, a base is applied to the fingers, which is polymerized in a lamp. Then the nails are covered with a suitable shade. We take foil and put droplets of the selected gel polish there, which will be used to create hearts. Use a toothpick to place dots next to each other on the nail. From each mark downwards, draw a strip at an angle so that they connect. This way you can get a beautiful heart.
How to draw roses on nails?
There are so many ways to depict a beautiful rose on plates. You can admire the works of masters endlessly. But our task is to choose the simplest scheme to perform at home.
We begin to draw a rose from the center, bending two commas in a circle. Next, we begin to draw arcs near the middle. We arrange them in a checkerboard pattern, increasing each circle. The arcs have thin edges. The result is a kind of intermittent spiral, which turns into a lovely rose.
Another easy option is to use red varnish to place a rounded spot on the nail, the size of the future flower. And then we apply strokes on it (according to the same pattern) with a different shade of paint (for example, burgundy).
Although the drawing scheme is very simple, the result is a beautiful image! This is exactly the way experts recommend drawing roses.
Realistic pink motifs on nails
Roses on nails can be not only fantasy and fabulous, presented in the previous description, but also quite realistic. Manicurists offer a chic tutorial on how to draw blooming roses cascading down like a waterfall. Warm undertones-shades of varnish compositions will help to avoid excessive pretentiousness.
- Armed with a flat brush, apply the main shade of the future flower to one tip, and paint the other, a calmer background one. Do not rush to immediately apply the color to the nail; first, spread the shades on a white sheet of paper, this will help get rid of excess color.
- On the already painted nail, with a leisurely movement of your hand, outline a round row of petals, let them be wide and large.
- Inside the petals, form 3 more petals, but smaller ones. The middle one should be left for the bud; it requires especially careful drawing.
- Now shade the formed bud.
- Decide on the color of the outline of the rose and use a stripper to outline the clear edges of the flower in the areas where the shadow should be placed. The remaining part consists of varnish one tone lighter than the shadow.
- Within 10-15 minutes, put aside all household chores and let the picture dry thoroughly.
- Protect the image with an additional application of a clear protectant.
Rhinestones acting as dew will add sophistication to the manicure and complete the composition. To ensure a good fixation of the rhinestones, before distributing them, you need to cover the nail with another layer of transparent varnish.
Creating a manicure with a Chinese rose
If Chinese motifs are close to you, then you can try to depict a rose in this style. For experienced masters, this technique is familiar and understandable, but for a beginner it will be difficult to cope with it.
The drawing is usually done on a white or black background, which will emphasize its unique style. Place one drop of contrasting varnish on foil or paper. It can be black and red, pink and gray. Now put both of these colors on one brush. It's not scary if they come into contact with each other.
When you draw the petals of an open rose, you will see that they have a smooth gradient due to the mixing of two shades. This is the effect we wanted. Draw a flower with five petals and expand its diameter with additional circles of petals. The middle should be darker. If you look at a living rose, it has exactly the same natural color transition.
Of course, it is more convenient and easiest to use special stickers, but if you yourself can repeat such a masterpiece on your nails, then every time you look at it you will experience moral and aesthetic pleasure.
The technology for applying Chinese roses to nails is presented in more detail in the following video.
Required Tools
A list of what you may need to get a beautiful rose on your nails:
- base and top protective coating;
- varnish for the background (preferably without sparkles and glitter);
- rose varnishes (for example, red, pink, white and so on);
- green varnish for leaves;
- thin brush;
- toothpick or needle;
- dots (a special tool that can be replaced with a match).
Since you may not get a rose on your nails the first time, stock up on nail polish remover and cotton pads.
Acrylic painting
Painting with acrylic paints is usually only possible for professionals. Working with them requires a certain skill, as well as a fairly large number of tools and brushes. This pattern is called Chinese painting and it looks very gentle and unusual. However, before applying it, it is better for a non-professional to practice on false nails and understand exactly the steps of how to draw roses on nails.
Painting with acrylics is done in much the same way as with watercolors. These paints are easily diluted with water, mixed with each other and washed away. They can create a beautiful stretch of color within one element, which can depict, for example, a shadow, and allows you to get a complex and voluminous pattern. Mixing colors and the transition itself must be done on the palette in order to dip the brush into the ready-made stretch. It is very difficult, due to the small area, to stretch directly on the nail.
You can learn how to paint Chinese painting on your nails from the video, among which there is an image of a rose.
Stencils
Another way to paint roses on your nails using varnish is with stencils. They are paper stickers with a protective backing that have slots that fold into a pattern. Such a stencil must be peeled off from the protective backing and pasted onto the nail, pressing firmly to avoid bubbles, and then covered with varnish. With the help of such a stencil, the drawing also turns out to be quite schematic, but recognizable.
The stages of performing such a manicure are almost similar to those performed when applying a dots pattern. You need to cover your nails with a protective base, then a lighter background varnish and dry it. The differences begin further - you need to glue a stencil onto the nail and carefully smooth it out so that it sticks to the entire area of the nail. Cover the slots in the stencil with a layer of thick varnish and wait until it dries. Peel off the stencil and cover the nail with a clear sealer for great shine and longevity of the manicure.
Original floral variations of roses
Thanks to the interesting and original fantasies of nail artists, even a simple rose can be depicted in an unusual way.
- Black roses look mysterious and at the same time elegant on a beige background. And don’t think that such color variations look depressing, because a stylish combination of these colors will become a charming highlight of your look and will complement absolutely any style.
- Drawings in the French style look gentle and romantic, and designers advise decorating the French area with roses, leaving the rest of the area monochromatic.
- Roses look fun and playful in combination with peas.
- Matte variations are at the peak of popularity. In addition, matte roses on a glossy background look not only stylish, but also voluminous.
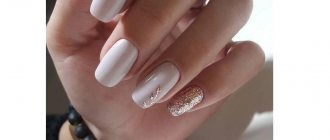
- Velvet roses can be easily created using glitter powder or glitter.
- Roses look interesting in an inverted jacket, and in this case there are a huge number of color variations.
Light and elegant design with roses allows you to experiment and imagine. After all, the simple lines of this delicate flower create unique nail variations and allow you to combine absolutely any technique. And this, in turn, is an ideal chance to create your own style and conquer others with your uniqueness.
French manicure with roses
For many years, French manicure has been considered a classic manicure design that never goes out of fashion due to its delicate and unique look. For a more sophisticated perception, the jacket is complemented with buds of lush roses. This manicure design option is certainly suitable for a wedding ceremony, romantic dates and special events.
Coating materials
The list of materials can be no less wide, but we will list the main ones.
- Degreaser. At home, you can use nail polish remover or alcohol.
- Base. This transparent coating is necessary to strengthen and smooth the nail plate. Also, the latest new products contain various vitamin complexes.
- Gel polishes of different shades.
- Finish top. A transparent product consolidates the result, making it complete.
- Decorative details: sparkles, rhinestones, foil, beads, acrylic powder.
- Stencils make the job of creating a manicure much easier. Not only special purchased ones are suitable as a template, but also made and available ones. For example, for geometric patterns you can use narrow masking tape, and for an openwork pattern - a piece of lace or tulle.
- Glue for attaching decor.