Features of removing gel and acrylic coatings
Nail extensions are made using two materials: gel and acrylic. Before removing extended nails, you need to ask the master what material he used to apply the extensions. After all, gel and acrylic are removed in different ways. If there was a gel coating on the nails, then it can only be removed by filing and nothing else. The gel does not dissolve and cannot be removed by any solvents. Acrylic, on the contrary, is best removed with a special means, the so-called winding technique. With it there is no need to sit for hours on your nails. It's time to learn how to remove nail extensions yourself.
Nail care after the procedure
Many nail service professionals consider extensions to be an aggressive procedure, especially when done at home, without proper knowledge. However, technology does not always have a negative impact on the health of a natural manicure, because most often problems with the integrity of the nails arise when the work is removed.
Extended nails, on the contrary, fit tightly to the bed, which is why they prevent external factors from affecting it. But using a remover to remove them can disrupt the microflora of the plate.
Because of this, after each removal of the work, it is recommended to apply essential oil to the entire surface, paying special attention to the cuticle area, from which the oil will transfer to the matrix.
But there are other recommendations for caring for the delicate area:
- Apply nourishing creams to your hands every night, giving a small massage to your hands. This will speed up the blood, increase metabolism and increase cell regeneration;
- Use restorative varnishes. They contain useful microelements that increase the elasticity of the nail plates, and visually create a thin glossy film on the nails;
- Balance your diet. It is imperative to include protein and fiber in your diet, as they are building materials that accelerate the recovery of the entire body. Also supplement it with cereals, herbs, fruits;
- Make steaming baths and compresses with the addition of natural ingredients. You can also use ready-made compositions for manipulation, but most often natural products work more effectively.
The main thing is to prevent aggressive effects on weakened nails. Because of this, during household chores you need to wear protective gloves to prevent the penetration of alkalis and acids into the skin of your hands.
You need to do a manicure carefully during the rehabilitation period. To correct the length and shape of the free edge, use a file, moving it in one direction so as not to disturb the location of the stratum corneum. The length of the nails should be minimal to reduce the risk area on them.
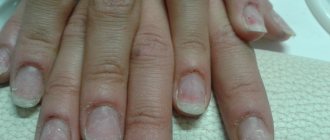
Step-by-step process for removing the gel layer
If you decide to save money and not resort to the services of a master, then you should find out how to remove extended nails at home so that they are not damaged. Let's look at the step-by-step process of removing artificial short gel nails:
Step 1
Soak a cotton pad in degreaser. Rub the nail with it.
Step 2
Use a soft file with 220 grit abrasiveness to begin removing the gel coating. Movements must be careful; sawing off the top layer should be done slowly, so as not to damage your own plate. Some girls mistakenly believe that it is better to remove gel with a device. But that's not true. The device can simply damage the nail plate due to uncontrolled and very fast operation.
Step 3
Periodically you need to treat the nail with a cotton swab dipped in a degreaser. Since the frequent mechanical friction of the file against the edge of the nail heats up, we use a wet cotton swab to cool it down. In addition, by wiping the nail plate, you can see how the process is progressing and whether the file has reached the natural plate. Our task is to get as close to the nail as possible.
Step 4
Then adjust the length of the nail with a nail file. We look at the process of removing short gel nails. If a girl takes off her long nails, then she needs to cut them first with clippers, and only then level the surface. You need to remove the gel from the nail very carefully in order to preserve the natural nail layer as much as possible. It is not necessary to thin the nail completely. It’s okay if a small layer of gel remains; after 2.5 months, the nail plate will be renewed and the gel coating will be cut off. Many masters do not advise removing the gel completely, otherwise the fingers will become too sensitive and will react to any influence: cold or hot water, wind, shock, etc.
Step 5
If the gel layer has been completely removed, the nail plate is too thin, then to make it less sensitive, you need to apply a special strengthening coating to it. For example, Global product in 2-3 layers on a pre-degreased nail. Then clean it up a little and let the plate dry. In this way, we strengthen the plate and give it the opportunity to heal painlessly.
Step 6
After stripping the gel at the end, you can use 3-sided grinding and polishing. First, go through the harshest sanding, which smoothes out what the nail file has done. Then you need to treat the plate with the smoothest grinding surface.
If you did everything correctly, then the previously extended nail will remain hard, will not sag and react to external irritants.
Remember! It is not acrylic or gel that spoils your nails, but a nail technician who clumsily applies nail extensions, files off a thick layer of the plate, and then roughly and incorrectly removes the artificial coating.
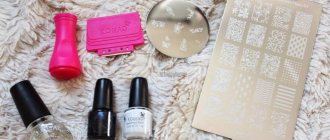
Tools and materials
Depending on what type of extension was used and what type of material was used, you may need certain tools and compounds to remove extended nails. The simplest kit you will need to remove insoluble gel:
- High abrasive file (80 – 100 grit);
- A file with a lower abrasiveness (100 – 150 grit);
- Traditional polisher with four working surfaces;
- Orange sticks;
- Nail clippers or scissors.
If the gel is soluble, then in addition to nippers and files, a special liquid for removing the gel will also be useful. It can be replaced, for example, with acetone or acetone-containing nail polish remover. However, such a composition may not only be less effective, but also cause significant harm to the nails.
In addition, you will also need cotton pads and foil to create a “compress”. It is much more convenient to use special sponges for this - pockets and caps instead of foil. However, this is only a matter of comfort and such a replacement does not have any significance for the health of the nails.
Removing acrylic will also require you to use a highly abrasive file and polisher, orange sticks, and wire cutters. In addition, you will need acrylic nail remover, foil and cotton pads.
Removing acrylic coating
To remove acrylic we need:
- foil;
- file;
- cutter, also known as a tip cutter, removes excess length in one motion. If you don't have such a professional tool at home, you can use regular nail clippers. However, with them the procedure will be longer and more painstaking;
- sponges;
- solution for removing acrylic material;
- pusher or orange stick;
- oil.
Removing acrylic coating from nails is as follows:
Action 1
Use a cutter to remove the length. During manipulation, you need to be very careful not to touch the front roller of your finger.
Act 2
File the surface with a nail file and remove the shine from the coating.
Act 3
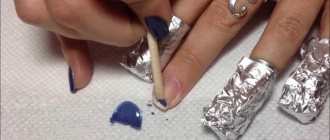
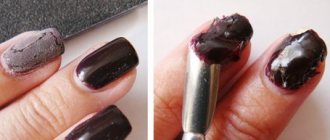
Soak a cotton pad (sponge) in acrylic remover solution, place it on the plate and wrap the top of the finger with foil. Leave for 15–20 minutes.
Act 4
Carefully remove the foil and use a manicure spatula or an orange stick to remove the remaining acrylic coating, which now looks more like a jelly-like mixture. Remember that the foil does not need to be removed from all fingers immediately, since the acrylic will harden again and you will need to reapply the substance later. When removing acrylic, movements must be careful so that the natural nail remains healthy and not injured. File off the remaining acrylic with a soft file with an abrasiveness of 180 grit or higher. Then you should wash your hands thoroughly with soap and treat your nails with a soft brush.
Action 5
Apply the oil to the cuticles, nails and the skin around them and rub it in thoroughly with massage movements.
How to remove acrylic nails at home?
Many women wonder how to remove acrylic nails at home. The procedure goes as follows:
- First, you need to cut off the overgrown acrylic nail area with pliers. Manipulations must be carried out carefully, since the material is elastic and hard, and pieces of it can damage the mucous membrane of the eye if not handled carefully. It is recommended to take your time and use clear glasses.
- After this, you need to start cutting off the topcoat, which is the top shiny layer of the product. Craftsmen apply this substance to fix acrylic. It must be removed to begin dissolving the acrylic layer. The finish is cut down slowly. Without this coating, the nail surface will look rough.
- Once the finish is removed, the nails can be removed. In the presence of a special solvent, the procedure is painless. It needs to be applied to a cotton pad and washed off the acrylic. If you only have acetone, then cut sponges must be wetted with the product, applied to the nail and wrapped with a piece of foil on top so that the liquid does not evaporate quickly.
- After half an hour, the acrylic will become soft and turn into a substance resembling a jelly-like consistency. The foil and sponges must be opened and removed quickly. The softened material is removed with a sharp nail file. If after this there are pieces of acrylic left on the surface, then you need to remove them with acetone and sand the plate.
- In the future, you need to thoroughly wash your hands and apply a nourishing and moisturizing product in the form of cream or oil to them. This stage is an important part of removing the extensions. When carrying out the procedure in the salon, it takes about 10-15 minutes.
The use of cosmetics is the final and mandatory step, since acetone has a harmful effect on nails. You can build them up again immediately or wait a while to restore the structure.
Useful tips and tricks
- Manicurists advise girls to wear glasses before removing artificial nails at home. The sharp edges of the acrylic coating can easily injure your eyes if the pieces start to bounce off during cutting.
- When removing extended nails, you should never rush, you should plan your time. Take it with a reserve; you will need at least 2 hours to remove the built-up layer.
- It's okay if a little of this material remains on your nails after removing the gel. As the nails grow, corrections will still be made and the length will be removed, so the acrylic will soon be cleaned off.
- Before removing the extended nails, you need to prepare a work surface: cover the table with a small towel so that dust falls on it.
- Some women do not know how to properly remove biogel from nails. The procedure is similar to removing acrylic coating, but only in this case a special solution is used specifically for removing biogel.
- After removing the extended layer, natural nails need to be cared for: regularly nourish the cuticle with oil, moisturize the skin, make restorative hand baths with sea salt, olive oil, and plant decoctions. It is also recommended to cover your nails with protective varnish so that your fingers are not sensitive. Hand contact with household chemicals should be avoided. And to quickly strengthen the nail plate and activate its healthy growth, it is recommended to introduce more calcium, iron and natural vitamins into the diet.
Removing extended nails is a very important procedure that goes along with the extension itself. The health of the entire nail plate depends on its correct implementation. Under no circumstances should you tear off artificial nails. The main thing is to be patient and follow all our instructions for removing gel and acrylic. And video instructions for the processes of removing acrylic and gel will help you do the procedure correctly and safely.
Step-by-step instructions for removing extended nails
Preparation.
Regardless of whether you have a gel or acrylic coating, the preparation is the same.
Take nail clippers or scissors and cut off the edge of the tips on the fingers of both hands. Take your time, the artificial plate is quite rigid, so the procedure will not be easy.
Be careful not to injure yourself on the sharp edges of the cut tips. To reduce the length of extended nails, masters use a special tool - a tip cutter (cutter). It can be purchased at a professional cosmetics store.
After the first task is completed, proceed to the second stage. Self-removal of artificial nails depends on the extension technology.
Reasons for deletion
Gel, acrylic or other artificial nails must be removed periodically to allow regeneration and restoration of the natural nail plate. It happens that cosmetics manufacturers do not take this need into account, but if you neglect it, you will soon see that the extended nails no longer look attractive, and your own nails are very damaged. Subsequently, several weeks of intensive medical therapy may be required to restore and strengthen them.
Sometimes it happens that gel nails are subject to mechanical damage, which can cause them to break or peel off along with the natural nail plate.
Peeling gel nails
There are several important reasons why you have to get rid of them:
- Suspicion of significant destruction of the native nail due to continuous wearing of gel nails for months.
- Pregnancy and hormonal disorders that cause too high levels of moisture in the nail plate.
- Nail diseases, such as fungus.
Pregnancy, disorders and hormonal imbalances in the body can cause poor adhesion of the gel mass to the surface of the nail plate. The gel applies and sticks very poorly if it is too wet or oily. In turn, applying it if you have nail diseases will, for obvious reasons, harm them even more.
You can remove gel nails yourself at home, or by contacting a specialist in a beauty salon. In the second case, you will have to pay a decent amount for the procedure, so if you do not want to waste time and money, then you can get rid of the gel yourself. How to do this correctly and how to then care for your nails in order to restore them, we will look a little further.