- July 20, 2018
- Nail care
- Nikita Karpov
Short nails have been gaining popularity lately. Firstly, they are easier to care for; secondly, they are much more convenient. Don't worry that you won't be able to create an original design on your nails. Now there are a huge number of them. After all, a short manicure does not mean boring or old-fashioned.
Preparation
To achieve a high-quality manicure on short nails at home, you need to prepare your nails. First you need to give the desired shape to the nail plate. A metal file will not help you with this, so put it aside. When working with short nails, sand files that are made on a cardboard or plastic base are perfect. You can also use ceramic or glass. Don't forget the polishing file. It will help smooth the surface of the nail before applying varnish, as well as extend the wear of the manicure.
It is equally important to choose the right nail shape. Most often, preference is given to square. You need to remember that in this case it is better to pay attention to your fingers and their length. For example, for short ones, a shape that can visually lengthen them is perfect - for example, oval.
It is imperative to remove the cuticle from the nail plate. This can be done using a classic edged or unedged manicure. Before applying polish, degrease your nails with nail polish remover. Only after all these procedures can you begin to create an unsurpassed design.
Rules for home manicure for short nails
- Before adding beauty to short nails, you need to decide on their shape. For the lucky owners of long fingers, square ones are suitable - they are now in trend. For those who cannot boast of long fingers, a win-win oval nail shape is suitable.
- Nails should not be too long (no longer than 6 millimeters) and not too short (fingertips should be left covered).
- Before applying polish, you need to take a nail bath for 10-15 minutes to soften the cuticle. You can choose the method of processing it, trimmed or untrimmed, but it is necessary to remove the cuticle.
- The varnish is applied only to the base (a special transparent product): this way it will last longer and will not damage the nail plate.
- In order for the varnish to lie evenly on the nails, it must be applied in strokes: two along the edges and one exactly in the center.
- The manicure is completed with a topcoat so that the polish lasts longer.
What you will need
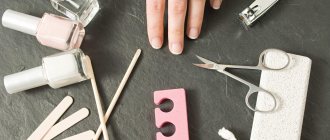
If you decide to do a manicure at home, you need to prepare in advance and purchase basic tools. You will need dots, a thin paint brush, adhesive tape or stencils.
Nowadays you can easily repeat any design you like. The main thing is to follow the rules for applying varnish and fixing it. At the end of creating the design, you need to apply a top coat; it will help the manicure last for several weeks.
Modern craftsmen have almost completely abandoned simple varnish and prefer to use only gel coating. It can last more than two weeks without additional care and with any use. This coating also provides the opportunity to turn even the most amazing design ideas into reality. This article presents photos of a gel manicure for short nails.
Gel polish for short nails: coating features
Convenience and minimalism are the main priorities of girls who prefer ultra-short nail lengths. It is important to take into account only a few factors that determine the quality of gel polish coating and the degree of its durability. Thus, owners of a laconic, in every sense of the word, manicure, as a rule, have a rather narrow nail bed, which requires a slightly different technology for applying a gel coating, which differs from the classical one. Let's look at the system step by step:
- be sure to pre-grind and degrease the plates, otherwise you risk quickly losing the presentability of the color highlights;
- Apply primer as thinly as possible to prolong the durability of the decorative product;
- put a layer of transparent base on the primer, drying it in an ultraviolet lamp;
- begin to evenly distribute the shade of shellac you have chosen;
- secure the result of your efforts with a glossy or matte top finish, sealing the free edge to eliminate the possibility of chipping.
How to create the perfect manicure
Not every manicure you do yourself at home on short nails will look attractive. Quite often it is made too catchy. The best option is plain. With its help you can perfectly emphasize the shape of your fingers and highlight your image. Moreover, on short nails, bright colors look more attractive and are not as noticeable as on long ones.
Lovers of French manicure for such nails should try doing it as follows:
- Apply polish to match your skin tone.
- Draw a small, thin white line at the edge of your nail.
If you do everything carefully, you will end up with slender, well-groomed and beautiful fingers. After all, beauty is in simplicity.
A large number of drawings, patterns, and mixing colors will suit long nails. For short ones, it is better to use such designs on one or two fingers. You can also make a small design on each one.
It is very important to paint your nails correctly. There is one old and simple scheme:
- First you need to draw a strip along the center of the nail plate, starting from the cuticle.
- Then draw two more stripes on the sides.
This simple method will help you create a neat manicure with polish on short nails. His photo is presented below.
How to visually lengthen short nails?
You can often hear from women that they do not want to cut long nails (even if they are inconvenient), since in this case their fingers will look short and rough. This is all nonsense. You just need to properly care for what you have. Moreover, there are three simple rules that will visually help lengthen your nails.
You need to take care of the cuticle. Everyone knows about this rule, but for short nails it is especially important. When you push back the cuticle, the nail plate visually appears larger. As a result, you can get a fashionable manicure for short nails.
There is an opinion that it is better not to cut the cuticle, as it protects the nail plate. Some people disagree with this statement. Therefore, in the fight against cuticles, you can use unedged and trimmed manicure. In both cases, it is necessary to soften it and then move it to the root. In the case of an unedged manicure, everything is left like that, but in an edged manicure it is cut off.
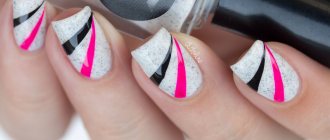
You can lengthen your nail using a special design. Vertical stripes in manicure will help perfectly with this. The most important thing is to draw stripes that are not the same color as the base color. There must be contrast.
You can also try adding diagonal stripes. In this case, do not be afraid to use bright colors - they will be appropriate.
Step by step guide to nail care
In order to perform a wonderful manicure on short nails without resorting to the help of professionals, you should follow the step-by-step instructions.
Step 1. Cuticle removal
There are two methods to remove cuticle from a nail:
- classic way. The fingers are immersed in a bath of sea salt or soap solution. After the cuticle has softened, it must be trimmed using special scissors.
- European way. Its essence is as follows: first, the cuticle is treated with a special softening agent, and then it is moved away from the nail plate using an orange stick.
Step 2. Preparing the nail surface
Before you perform a home manicure, you need to prepare your nails for treatment. To do this, their surface is cleaned of varnish using a liquid that should not contain acetone. Then the nails are degreased and only after that you can proceed to the next stage.
Step 3. Correcting the shape of the nails
The shape given to the nails depends on what type of manicure is used. With a French manicure, the shape of the nails takes the shape of an oval, while with a wedding manicure, it takes the shape of a circle. A special file is used to correct nails. It is recommended that it be glass or diamond.
Step 4. Applying various coatings
In the process of creating a manicure on short nails, the base coat is first applied to the surface of the plates, after which you can begin to cover the nails with colored varnish. You can paint various stripes and patterns on your nails. Special stickers can also be used for decoration. A protective layer of fixative is applied over the varnish.
Step 5. Completion of work
After applying all varnishes, solutions and other cosmetics, you must wait until the nail is completely dry. The skin of the fingers is covered with a nourishing mask or cream that promotes the recovery process.
Varnish selection
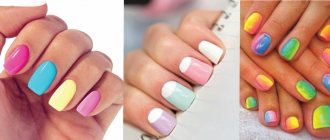
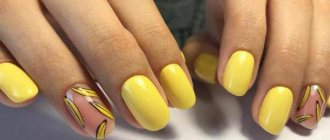
For manicures on short nails at home, calm and warm colors are best. Basically, these are nude and pastel shades. They can visually lengthen your fingers as they blend in with your skin color. It's best to use shades that are several shades lighter than your skin tone.
When using dark tones, it is better not to paint over the entire nail. If you leave a few millimeters on the sides, then visually the finger will appear graceful and elongated.
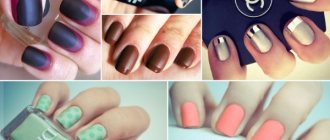
Not only the color of the varnish is very important, but also its texture. Matte and glossy nails are suitable for such nails, but you will have to say goodbye to glitter. Because it will make your nails look even shorter.
Oddly enough, with a bright varnish, a manicure on short nails perfectly highlights them. Don't be afraid to experiment.
Those with fair skin tones should pay attention to dark red and plum polishes. They are able to create contrast and accentuate the nails. But orange or scarlet nail polish is perfect for dark-skinned girls.
Fashionable colors for designs on short nails with shellac
Since naturalness is in fashion today, the color scheme for nail design should be as close as possible to natural pastel shades. The most fashionable colors of this season:
- White,
- Beige,
- Blue,
- Peach,
- Grey,
- Cream, etc.
At the same time, bright colors are also relevant. Therefore, you can safely dilute a delicate pastel manicure with rich accents (black, brown, raspberry, lilac, purple, blue, burgundy, etc.). Stylists recommend combinations of two colors in a design, but a single color does not give up its position. A timeless classic – red nails.
What manicure is fashionable in 2022?
Short nails are not just a monochromatic manicure. Despite the small coverage area, you can make interesting designs on it.
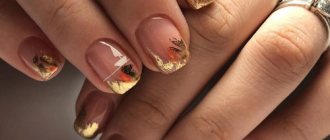
In 2022, manicures using bright colors and combining them on one surface are considered fashionable. It is also worth paying attention to gold and metallic shades. You can see a photo of a manicure on short nails in this style.
Required materials and tools
Let's consider what tools are needed to create a unique design. Typically the following familiar attributes are required:
- dots,
- artistic brush for painting,
- stencils.
Study manicure ideas for short nails in the photo, choose the method you like and repeat it yourself.
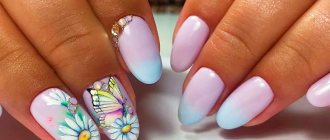
How to do ombre?
Ombre or gradient is one of the most famous and popular types of manicure. It is often found among celebrities and various beauty blogs. In order to do this manicure on short nails at home, you will only need a couple of polishes and a sponge or a piece of sponge.
First, take a sponge or small piece of sponge and apply two stripes of the polishes you are going to use. It is best to use them from the same range of shades. Then apply the sponge to the nail plate. Remember to apply a fresh coat of polish to each nail. In order not to have to worry about removing the remaining nail polish on your fingers, apply a special substance around the nail plate, which can be easily removed after a manicure. If this is not the case, then a simple cotton swab dipped in acetone will help to cope with this problem.
If you can't master the ombre technique on one nail, you can try transitioning the color scheme on all nails. That is, apply different varnishes on each finger from light to dark in the same color scheme. There are many photos of summer manicure. Short nails with this design look very interesting.
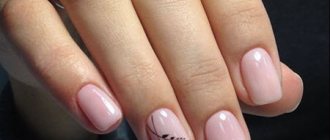
Making a French manicure for short nails
French manicure is a very delicate design, so it is better to use pastel shades to create it.
Step-by-step instruction
- First you need to degrease the nail with nail polish remover.
- The next step is to apply the base. Most often, pink, peach, and cream polishes are chosen for this.
- Dry the base using a lamp.
- The most important step is drawing the stripes. To do this you need to use a thin brush. You can apply the stripes using a special stencil, but it is better to do it by hand. Carefully draw a stripe with white varnish, emphasizing the shape of the nail.
- We consolidate the result by applying the finishing coat.
The difference between a French manicure for short nails is the thin edging line, since the nail plate is not large and in order for the manicure to look harmonious, you need to choose the right line of the top edge.
Metallic design
For short nails, metallic polish is ideal. Since it is impossible to carry it for a long time on long ones, it begins to chip and peel off. In a manicure, you can use various metallic options: silver stripes or patterns, mirror or chrome manicure, adding foil. This effect can be used as you wish. The most important thing is that it doesn’t end up being stuck on. A photo cannot fully convey the beauty of such a manicure on short nails.
Geometric design
Many girls think that geometric designs on nails are too strict or rude. On the contrary, this design will make the manicure laconic and interesting. Moreover, to implement it, you will not need special skills, so you will not have to contact a master.
If you want to try geometry, you can try the simplest option. Apply an arrow to the tip of the nail. To do this, you need to draw two thin lines so that they connect and form an acute angle. It should look towards the tip of the nail.
For a more complex design, you need to glue strips of masking tape to the nail plate. You can choose their direction at your own discretion. In this case, they will act as a ruler. The varnish should be applied on both sides of the tape. The combination of colors can be varied. A photo of a manicure design on short nails is presented below in this article.
Is it possible to get a beautiful gradient on short nails?
Making a beautiful gradient on your nails is not at all difficult, the main thing is to purchase some tools: pieces of foam rubber or sponges.
Step-by-step instruction
- We prepare our nails as for a regular manicure.
- Next, apply the base and dry it.
- Apply the cream around the nail to easily remove any remaining polish.
- Place a drop of light polish on a sponge and gently apply the gel at the base of the nail.
- Then apply a drop of another gel a shade darker to the sponge and blot the nail with the sponge from the middle of the plate to the edge.
The double gradient is ready. This is the easiest option. If you want to make a more complex gradient, then you need to apply another shade in the same way to the tip of the nail.
Design with dots
There is another option for a fashionable manicure - with a dot. With it you can easily lengthen even the smallest nails. To make this manicure design for short nails, first you need to paint your nail with a single-color varnish. It is better to do this in two layers so that the color is more expressive. Once you do this, let the nail plate dry. Then you need to take any thin brush (suitable even for painting) and place small dots. The varnish you use to make them should be a contrasting color.
The location of the points does not matter. They can be done in a chaotic order. To visually stretch the nail, the points must be placed in a strict sequence. From the base of the nail plate they are large, closer to the tip - smaller. You should be careful with this design: if you go too far in the number of dots, it will turn out too flashy and tasteless.
It is important to monitor the thickness of the varnish on the brush. When it gets too thick, you need to wipe it off with acetone and reapply.
Space on nails
Space is a trend of the last year. It is used everywhere: on bags, shoes, clothes. Nails are no exception either. It's pretty easy to make. It does not require precision in creation.
The base color is dark - black or dark blue. It should be applied in several layers. After it dries, you need to apply white polish to the nail using a sponge or small sponge. Thus, the effect of cosmic haze should be obtained. Then don't wait for it to dry. Apply any varnish in small strokes.
Simple design for beginners for short nails
For short nails, new designs are quite difficult to create on your own. It is very simple and easy, even for a beginner, to do a manicure using dots, and it will look beautiful and original. To make even, neat dots, you will need a special tool - a dots. You will see an interesting summer manicure idea in the video.
Graffiti or nail art
Graffiti or nail art is considered the easiest design to create. After all, this is an ordinary abstraction that is created individually by each person.
First you need to coat your nail with a base polish. It is advisable to use light colors and thick consistency. The coating should be dense and should not show through. Next, using brushes or toothpicks, you need to make streaks and lines. For them, take multi-colored varnishes. Photos of a gel polish manicure on short nails are presented below.
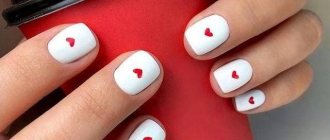
Funny manicure
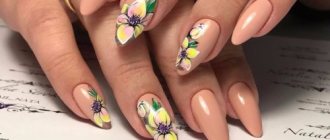
Manicure is an opportunity to express yourself and create something interesting on your nails. Of course, beautiful designs with neat patterns look amazing, but sometimes you want to stand out. This can be done with the help of funny and amusing drawings. They look very cute on short nails.
It is best to choose images that you can easily repeat at home. The easiest option is to paint scrambled eggs on your nails. The tip of the nail should be painted over with white varnish that does not show through. Be sure to wait for it to dry. Next, place yellow dots in the middle of the white spot - they will imitate an egg yolk.
The article presents just a small list of designs that can be used on short nails at home. There are also matte, moonlit, shiny, French, manicure with rhinestones and others. Each of them will look great, the main thing is to follow the rules of color combinations and not use too much of everything in one manicure.
Remember: short nails are not a reason to go without a manicure or do the most primitive designs. Don't be afraid to experiment.
Moon manicure - various variations for short nails
Moon manicure is the complete opposite of French manicure. Here the holes of the nails are emphasized. For this design we use shellac. Variations on this theme can be different: from the simplest to the ultra-original. As a rule, the colors for this type of manicure are contrasting but compatible.
There are several types of lunar manicure:
- Classical,
- With unpainted holes,
- Lunar French - when the edges of the nail (smile) and the holes are simultaneously emphasized,
- Moon manicure “reverse” - a hole is drawn in the opposite direction.
Many people believe that moon manicure is not suitable for short nails, making them visually even smaller. In fact, this is not true. It’s just that for short nails you need to choose light, soft colors and, of course, you shouldn’t completely outline the hole, it’s better to make it smaller and thinner.