Little girls notice beautiful things quickly, especially if it comes from their mother. Little ones will definitely want to recreate well-groomed hands, and even with an attractive, bright manicure with a pattern, on their still fragile fingers. What can you offer to little fashionistas 5-6 years old and girls under 14 years old, so as not to harm their health and fulfill their desire? One of the best options for getting out of a situation with two unknowns is false nails for children.
False nails for girls
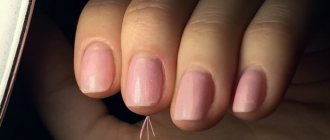
Nail care for children and teenagers
The technique of performing children's manicure and design is completely different for five-year-old children and teenagers 12-14 years old. To carry it out correctly without causing injury, you should know that up to the age of 15, the formation of the matrix occurs - the zone in which the nail plate is formed.
This area is located next to the cuticle, so it is not recommended to use tools to remove it, as in a classic manicure for adults. Up to 8 years, the cuticle is simply slightly moved with a soft stick, if necessary. For 8-10 year old girls, soft, gentle treatment with preparations such as a dissolving agent or hand balm is allowed. Cuticles cannot be cut with scissors or removed with any abrasive materials.
At home, without proper experience, you should not manipulate in children's manicure, so as not to cause serious injury to the matrix. Teenagers 12-14 years old are allowed a more intense effect during manicure, if the thickness of the skin and the location of small vessels near the nail plate allow. Professionals in spa salons use non-abrasive tools when performing children's manicures.
How to choose false nails
You can buy tips in a professional salon, where specialists will advise you and help you choose the right material for your nails, but such a purchase can be much more expensive than ordering online. Catalogs with product descriptions on the website and some tips on how to choose a manicure that suits you will help you buy the option that’s right for you in the online store.
- If you want to quickly get your nails in order for one evening, without planning long-term wear, then the option of self-adhesive and flexible plates is suitable for you. Such nails will cost less, but it is better to choose not the cheapest option, but to purchase products from professional brands.
- If you plan to do the design yourself, then transparent or natural plates are suitable for you. Pay attention to the price and manufacturer; such a product, if it is of high quality, cannot be cheap. Read the information on the packaging; the description should indicate plastic for cosmetic purposes. This point also applies to the selection of children's products.
- Short false nails are often sold with a ready-made color coating and size. When ordering such a product, please read the parameters specified in the description to avoid situations where your nail and tips differ in size.
- When choosing products for children's manicure, it is better to turn to professionals and evaluate the quality of the product before purchasing. Plastic plates should be safe for children's fingers, so the edges of the nails should be soft so as not to injure the pads of children's fingers.
Technology of unedged children's manicure
- You should remember the main rule of manicure: do not start working on your nails without disinfecting your child’s hands. This will prevent the possibility of contracting a fungal infection. Any antiseptic in the form of a gel, spray, or wipe will cope with this task.
- Next, select a nail file to process your nails. The best option for thin nails of girls would be ceramic and glass, which have a degree of abrasiveness in the range of 220-320 grit. Ceramic - has the property of sealing the processed edges of the nail; both materials do not allow the nail plates to delaminate.
- File the open edges of the nails, leaving at least 1 mm in length.
- Get rid of cuticles using a remover cream. Apply it in a thin layer, then use an orange stick to gently push back the cuticle.
- Use rounded scissors to remove existing burrs.
- If a little fashionista still allows herself to bite her nails, then she should use a special anti-biting coating. This will allow the polish to last longer after application.
- The penultimate step is varnish coating, for which it is better to use gentle bio-varnishes for children.
- The finishing touch will be the application of care oil to protect the baby's delicate hands and nails. It can be used from the age of 4 years.
Fake nails
Important! When a child gets a small cut while doing a manicure and there is bleeding, the area is treated with hydrogen peroxide and a bandage is applied. If an abscess occurs on the nail, apply levomekol and make a bandage. If you do not trim your nails properly, the nail may become ingrown into the skin.
In this case, baths with furatsilin (1 tablet/cup of water) will help. If your nail is deeply ingrown, you should definitely visit a doctor. It is better to push back the cuticle after a preliminary warm bath, when the skin has steamed and is easily affected. Then there is less chance of burrs occurring. Gradually, the child will gain nail care skills and learn to use a file and scissors.
Caring for children's nails
Manicure for the little ones is limited only to cutting nails and removing hangnails. In this case, you need to not make the edges too small and cut your nails in a rounded shape so that sharp corners do not form.
When performing the procedure, you should be careful and not cause pain to the child. If it happens that blood starts to flow, then a very small child needs to apply a bandage soaked in hydrogen peroxide to the finger, and for an older child, apply a bandage. Keeping the bandage on the wound is enough until the bleeding stops completely.
Caring for children's nails
If an abscess appears on the nail, apply Levomekol and secure the bandage. When it happens that the nail was not cut quite correctly, ingrowth into the skin can occur. In this case, the best remedy would be a bath with furatsilin (1 tablet = 1 glass of water), in this solution you need to keep the ingrown nail a little. If inflammation occurs, brilliant green will help. If the ingrowth turns out to be deep, then it is better to visit a doctor.
Important! Cuticles should not be cut on children. The maximum is to push it away with an orange stick if there is a strong build-up.
Basically, active interest in manicure appears after 4 years. It is better to push back the cuticle while taking a bath, when the fingers are best prepared for this; steamed skin yields more easily and does not cause discomfort to the child. This will help save you from a lot of hangnails, when the nails begin to grow faster, the skin does not have time and reaches for them.
The child must understand exactly how to cut and care for nails, be able to use scissors and a nail file, and regularly use cuticle and nail oil. The oil is useful from the age of 4 years - it nourishes the nail and helps it grow beautiful and healthy. Home treatments are no less useful than salon treatments.
At what age are false nails acceptable?
False nails for little ones
How to restore nails
The later a girl starts using nail polish, the better. It’s good if the mother controls the composition of the product that her daughter applies to her nails. Children's varnish should not contain formaldehyde and toluene.
False nails for children are a good alternative to polish, but they have their drawbacks. This is fashionable, you can choose them for any event: for the holidays, for the time of year, for your mood. They can be long, short, round or straight. But, in order not to harm the nail plate of children, it is better to wear them for a short time, not constantly.
The false nail and the natural nail are firmly attached to each other with glue. In case of damage to the upper artificial nail, a moist environment is formed in the layer between them, favorable for the development of infection. When wearing false nails for a long time, the infection is invisible, but can lead to serious consequences (fungus, etc.).
Artificial plates dry out natural ones, thinning them and making them brittle, which is not beneficial. In addition, gel and glue can cause an allergic reaction, which leads to various types of inflammation of the nail bed. The time when false nails will cause less harm comes at the age of 14-15 years.
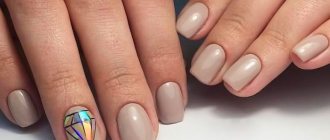
Advice. Nails for girls 12 years old can be decorated with thrips of different types. Fortunately, there are entire sets on sale, complete with glue and false nails.
Thrips of different sizes
Self-adhesive false nails for children
False nails for children 10 years old cannot be glued if there are diseases or irritations of the nail plate. When using for the first time, you should stick one nail and wait half an hour to monitor the body’s reaction. If allergic reactions do not appear, then all nails can be glued to the end.
Manufacturers and prices
The table shows the manufacturers and costs of self-adhesive tips:
| Manufacturer | Cost, rub.) |
| Joyme | 325 |
| Kiss Broadway Little Diva | 450 |
| Newair | 325 |
| Frozen Fashion Princess | 1450 |
Criterias of choice
False nails for children 10 years old should be chosen from high-quality, well-known manufacturers, so that the child does not have an allergic reaction while using the tips. The cheapest material, in contact with a nail file, quickly cracks in half.
It is necessary to pay attention to the size of false nails, since for different age groups manufacturers produce tips of different shapes and sizes.
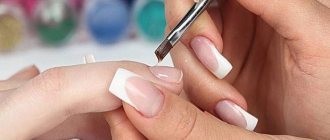
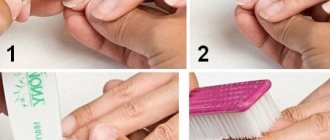
Preparing nails for applying false nails to children
Before gluing artificial nails, you need to prepare your hands:
- Disinfect with any antiseptic, then remove hangnails.
- Lift the cuticles with a bamboo stick.
- Using a ceramic nail file, file the edges of your nails.
- To ensure that the tips hold securely, degrease the nail plates.
If the shape or length of plastic nails is not suitable for a child, then the defects must be corrected before gluing the tips. It should be remembered that long nails look inappropriate on children's hands.
How to glue, step by step guide
To glue artificial nails you need:
- Select the tips according to the size of each finger and place them carefully on the table so as not to mix them up.
- If necessary, at this stage adjust the width of the false nails.
- Remove the thin film from the overlay plate and press the adhesive side onto the desired nail.
- Press the tips with pressing movements, then smooth them to eliminate bubbles and secure them more securely.
When doing the work, you need to take into account that the tips will not stick to wet nails.
How to remove
You cannot pick up and tear off false nails by hand or using nail scissors. This method will cause pain to the child and damage the nails.
To remove the plastic plate, you need to:
- Apply a drop of nail polish remover that does not contain acetone to its surface.
- Wait a minute and remove the tip.
After removing the plate, children's nails become weakened, so you need to place your hands in a vitamin bath for 10-15 minutes, which will help them regain a healthy appearance.
False nails will help introduce a girl to hand care and take the first step towards beauty and neatness. In order not to cause harm to the nail plates, children over 10 years old need to get their nails in order under the supervision of adults.
How to make nails out of paper
Gel polish for short nails
When your child doesn’t have enough patience to wait until it’s safe to apply false nails, you can suggest that your daughter use white paper thrips. Making and decorating them will turn into a fun activity. The sequence is as follows:
- Measure the sizes of the nails and sequentially transfer them onto paper.
- The length is selected to be medium, slightly protruding beyond the nail plate.
- Marigolds are cut out of thick but soft paper.
- Girls apply colorless varnish or glue for false nails to the nail plates and attach paper blanks to it, holding each 15-20 seconds.
- Decorate your nails with a design.
You can get rid of paper thrips without difficulty and harm to the nail plates. Knowing how to make paper nails for girls, all that remains is to decide on a design for them.
How to properly glue and remove false nails
There is an opinion that false nails do not hold well, fall off almost immediately and for this reason are absolutely not practical to use. In this article I want to dispel this myth, as well as give some useful recommendations for caring for your own nails, which will help you restore your exhausted nail plates from the consequences of sadistic manipulations of extensions and corrections.
So, three basic rules for firmly and securely gluing anything to anything:
1. Thoroughly clean the contacting surfaces (remove any remaining paint, rust, grease, glue, etc.)
2. Ensure maximum adhesion (adhesion - in physics, the adhesion of surfaces of dissimilar solids and/or liquid bodies)
3. Press the glue-coated surfaces firmly against each other.
Everything seems clear? And it seems that we already know all this and have heard it more than once before somewhere and sometime in our lives. So what's stopping you? What prevents us from performing these three simple procedures? Haste and our eternal purely Russian “Oh, that’ll do!” There’s a nail in one hand, glue in the other, a blunder, a blunder, a crooked mess, nonsense - it seems to have stuck and okay. Let's run...
An hour later at the disco we discover that the thumbnail has gone off to do its own thing, leaving behind an unsightly speck of dried glue and a bit of disappointment. In another couple of hours, the second arm will also thin out. When we try to tear off the remaining “three poplars on the ivy” ourselves, we experience pain and anger at the disgusting Chinese who “are churning out this rubbish.”
And in order to deprive you of these unpleasant moments in the future, I will now tell you step by step how to properly glue false nails.
You can glue them in three different ways:
1. Temporary gluing (used for trying on the nails themselves, trying them on with certain outfits and wigs, for photo shoots and modeling shows, when nails need to be replaced at lightning speed several times within a short period of time, etc.)
2. Permanent adhesion with the possibility of reusable use and self-removal of nails without damaging them.
3. Gluing tightly to victory.
Is everything clear with the first method? Nails are glued with Velcro (so-called double-sided tape). These Velcro are usually present in each bag of false nails along with cheap disposable glue. Professionals, however, have their own Velcro, which is also more stable and sticky. Well, that's why they are professionals. Nails glued to tape stay straight and strong enough to take a couple of shots or try on a couple of dresses.
But we need to talk in detail about the second and third methods. These methods are very similar - there is only one tiny difference, which I will describe at the end, but for now, step-by-step instructions:
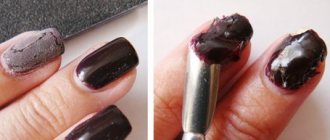
Well, I’ll skip the “foreplay” in the form of manicure cleaning and pushing back cuticles here, okay? Any woman knows about this. Let's get straight to the process. Lay your nails out in front of you and choose the appropriate sizes. Clean thoroughly. We completely degrease the surfaces of both our nail plates and the inside of false nails with acetone.
Now we create adhesion. Remember what the dentist does to your tooth when he puts a filling? He drills. Do you think it only removes dirt and caries? Yes, that too, but basically he drills out a hollow for us so that the filling has something to hold on to and it would sit in the tooth longer. So we must create the same conditions for the glue. Smooth surfaces stick together much worse than ribbed and gaped surfaces. We take a coarse-grained nail file in our hands (for example, it’s more convenient for me to do this with regular sandpaper - it conveniently wraps around a pencil and climbs inside the false nail) and sand/sand the surface of both our own and false nails.
This procedure is mandatory!! Without it, your nails won't last long. I'll explain why. No matter how good your glue is, on a smooth surface in any situation, no matter how quickly you grab and press the false nail against it, it will still have time to spread into micro-puddles, i.e. your nail will stick as if in spots. You won't see or feel it at first, but as you use it, water, fats, and anything else your hands come into contact with will flow under the nail. Without the ability to dry instantly, all this wet substance will rot, creating a favorable environment for both the rotting of the horny plate and the destruction of the glue itself. Water, as we know, wears away stones. The sanded surface will ensure that glue microparticles are retained where you spread them, and when you squeeze, this “drip spreading” will not occur.
So, sanded it. Great. We shake off our fingers and false nails from the remains of the husk and once again go through a cotton swab with acetone in order to remove excess fat that has got on them from the skin of the pads of our fingers. Our fingers are terribly oily, and fat is the mortal enemy of glue. We have come to the final and, in fact, the main part. Well, what’s so important about it, you say? Just think, I took some glue, dropped it on my nail and glued it on. Just business..
Uh, no. Right now the main point begins, in which you cannot make a mistake. Let's start with the fact that right now our two methods will go further in different ways. Method two. Those. when you glue your nails with the expectation of removing them in a couple of days, or even today after the party. We take Velcro. Yes, that same Velcro in the form of a square with double-sided tape. And we cut off a tiny triangle from it, each side of which will be no more than 3-4 millimeters. We glue this cocked hat in the middle of the nail close to the cuticle so that one side of it lies flush with the cuticle, and the sharp corner points towards the nose of the nail. Now let's take the glue. (I’ll say a couple of words about glue. Almost all nail glues are made in the same way and have the same chemical composition. The only difference is in consistency and adhesive strength. For this very reason, I do not recommend using cheap Chinese tubes from bags of nails. Buy It’s not the most expensive glue in any salon, but it’s not the cheapest glue either, and I assure you, it will pay for itself.) So we took the glue and carefully, without nerves or haste (it won’t dry out or harden in those seconds that you reach for your nail) apply drop it around our triangle, trying to spread it in an even layer over the nail, but not reaching the edges and cuticle, about two millimeters. Once smeared, take the prepared nail and place it on top of the smeared glue with a sliding motion, bringing it closer to the cuticle. They stuck and pressed the nail firmly to the nail plate. Press it very, very hard, with all your might, and do not let go as much as indicated by the glue manufacturer. For example, on my bottle it says to press for 40 seconds. This is the time when the chemical setting reaction takes place. Release earlier - the nail will stick in parts and may later fall off.
I explain why we need a cocked hat. Everything is very simple. In this tiny gap, which remains unglued, we can subsequently insert the tip of a sharp nail file or nail scissors and, with careful movements up and down, left and right, we will gradually loosen and crack our adhesive layer under the nail, having previously steamed the handles in hot soapy water.
Method number three. Monumental. It differs from the second method only in the absence of a cocked hat made of adhesive tape and the presence of reinforcement. What, did you smile? Don't laugh. I'm quite serious. Surely, when hearing the word “reinforcement”, many people immediately had associations with concrete screed and construction. But reinforcement can be different and for different purposes, but it is always used to strengthen any structures. So you and I will strengthen our fingernail/glue/nail sandwich with some kind of reinforcement with which our false claws can be torn off from us only if with fingers. I’ll say right away that I myself prefer not to use this method, because I like to change my manicure often and give my own nails a rest. But if someone really needs to glue false nails tightly, you are welcome. Take a piece of gauze... tell me more, or have you already understood everything yourself? In general, any thin translucent fabric will do, cut a tiny square to the size of your nail and lay it dry on your nail before applying glue. That's all. The coupling will be reinforced concrete.
And now a little about nail treatment.
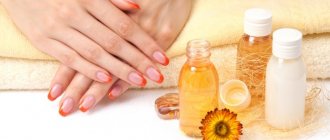
We all know about the benefits of various oils, creams and nail baths, right? How many of you naturally give yourself baths? Who bothers to brew all sorts of herbs and specifically buys nail care products? There are such? If so, then they don’t have to read any further - they will perfectly heal their claws with oils and creams. Now I want to give a couple of pieces of advice to those who, like me, are desperately and always in a hurry and never have time to do anything, out of breath in life, when in the evening there is no time for baths... to crawl to bed. And now I suggest you crawl to this very bed with benefit. Or rather bodies. After all, in fact, our nails love two things more than anything else: salt and fat.
Salt contains potassium, which promotes rejuvenation and regeneration of nail plates. Salt also contains a large amount of antioxidants, thanks to which harmful substances, radicals and toxins are removed from the body. Salt also prevents the formation of cancer cells. What is oil? Fat nourishes and moisturizes the stratum corneum, softening it, thereby creating optimal conditions for the body to launch all regenerative and restorative processes. So why don't we combine these two delicacies? Listen to my recipe and don't mind! It’s been about five years since I forgot about peeling, poorly growing nails and hangnails. Does everyone have vegetable oil in their kitchen? Yes, absolutely everyone. Everyone also has salt. Mix the two ingredients and spread the deliciousness on your fingers. Don’t be shy, get fatter and thicker!! You can then crawl to the bed and even collapse on top of the blanket, preferably without crawling under it for 5-7 minutes. This will be enough for your claws to eat and grunt with pleasure. If you are not too lazy, you can add iodine and soda to the mash to taste - these are also ingredients that are quite respected by nails and are also always available in everyone’s house. Well, whoever has such a delicacy as olive or linseed oil - then your nails will start dancing the rumba for you. Flaxseed oil contains so many minerals and trace elements that the periodic table turns green with envy. That's all for now. If you have any questions, write, I will try to answer everything. I hope my personal experience will be useful to someone))
Stages of nail extension for children 9-12 years old
In some cases, manicure specialists advise girls 10-12 years old to have their nails done with gel polish. The cause may be pain arising from improper nail growth (in the wrong direction) or a bad habit of biting nails. The extensions are done once for a month, after which they are cut down as they grow.
Nails for girls 12 years old
For the same reason, salons often recommend replacing false nails for children 10 years old with gel polish. This way the correct direction of growth of the nail and its surface is restored. It is important to give your nails a rest and take breaks when applying gel. In order to maintain the intervals between coverings, it is better to introduce them to holidays and significant events (March 8, summer, New Year, school).
Nail extensions
The gel nail extension technique consists of stages that differ in duration and purpose:
- hand disinfection;
- cuticle removal;
- surface grinding;
- applying primer;
- applying gel polish with a brush (without touching the skin);
- lamp drying up to 2-3 times;
- applying the finishing layer;
- shape correction with a file;
- drawing.
Correctly performed gel extensions last 3-4 months. After which the child needs to take a break.
It is important to know! Only professional salon technicians can do nail extensions correctly.
Advice from experienced manicurists
Experienced manicurists will never advise children under 14-15 years of age to perform shellac nails or extensions for no apparent reason. They will always warn the child about the consequences of the procedure and offer an alternative option.
Professionals will use soft surface files. Experts advise preventing the appearance of burrs and regularly cutting them off with sharp scissors, followed by disinfection. It is recommended to only move the cuticle, but not cut it. When doing nail extensions, it is important to apply a base (base) under the gel, and at the end - apply hand and nail cream.
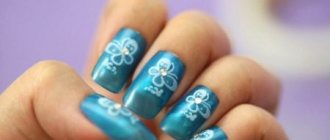
Thrips options
Beginning fashionistas are recommended to use stickers of different themes: stars, flowers, stripes. Each age has its own patterns on the nails. Extended nails for teenagers will be closer to the design of young girls. This is natural, because they are almost adults.
Girls, becoming familiar with hand care, take the first steps towards neatness and beauty. If they are interested in this, then parents have only one thing left to do: support the younger generation in their passion and guide them along the right path. The main thing is to contact competent specialists in salons.
Video
Coffee capsule Nescafe Dolce Gusto Cappuccino, 3 packs of 16 capsules
1305 ₽ More details
Coffee capsules Nescafe Dolce Gusto Cappuccino, 8 servings (16 capsules)
435 ₽ More details
Sounders