- July 20, 2018
- Nail care
- Nikita Karpov
Short nails have been gaining popularity lately. Firstly, they are easier to care for; secondly, they are much more convenient. Don't worry that you won't be able to create an original design on your nails. Now there are a huge number of them. After all, a short manicure does not mean boring or old-fashioned.
Preparation
To achieve a high-quality manicure on short nails at home, you need to prepare your nails. First you need to give the desired shape to the nail plate. A metal file will not help you with this, so put it aside. When working with short nails, sand files that are made on a cardboard or plastic base are perfect. You can also use ceramic or glass. Don't forget the polishing file. It will help smooth the surface of the nail before applying varnish, as well as extend the wear of the manicure.
It is equally important to choose the right nail shape. Most often, preference is given to square. You need to remember that in this case it is better to pay attention to your fingers and their length. For example, for short ones, a shape that can visually lengthen them is perfect - for example, oval.
It is imperative to remove the cuticle from the nail plate. This can be done using a classic edged or unedged manicure. Before applying polish, degrease your nails with nail polish remover. Only after all these procedures can you begin to create an unsurpassed design.
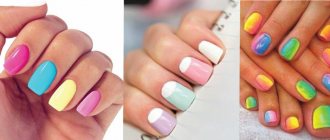
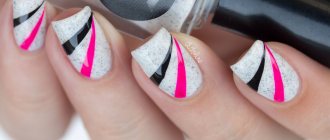
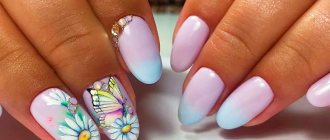
Pink manicure with a gradient for short nails
- Apply fuchsia nail polish to your thumb
- Make 4 identical “puddles” of varnish and add white varnish drop by drop to them: in the first - one drop, in the second - 2 drops, in the third - 3 drops, in the fourth - 4 drops. (You can mix varnishes in a plastic bag)
- Mix polishes
- Now apply the polishes to your fingers one at a time. Use a clean brush for each finger! (To clean the brush, dip it in nail polish remover and dry with a cotton swab)
- Give your manicure a finished look with clear polish
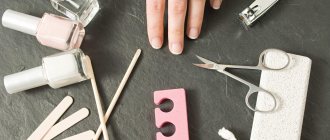
What you will need
If you decide to do a manicure at home, you need to prepare in advance and purchase basic tools. You will need dots, a thin paint brush, adhesive tape or stencils.
Nowadays you can easily repeat any design you like. The main thing is to follow the rules for applying varnish and fixing it. At the end of creating the design, you need to apply a top coat; it will help the manicure last for several weeks.
Modern craftsmen have almost completely abandoned simple varnish and prefer to use only gel coating. It can last more than two weeks without additional care and with any use. This coating also provides the opportunity to turn even the most amazing design ideas into reality. This article presents photos of a gel manicure for short nails.
How to create the perfect manicure
Not every manicure you do yourself at home on short nails will look attractive. Quite often it is made too catchy. The best option is plain. With its help you can perfectly emphasize the shape of your fingers and highlight your image. Moreover, on short nails, bright colors look more attractive and are not as noticeable as on long ones.
Lovers of French manicure for such nails should try doing it as follows:
- Apply polish to match your skin tone.
- Draw a small, thin white line at the edge of your nail.
If you do everything carefully, you will end up with slender, well-groomed and beautiful fingers. After all, beauty is in simplicity.
A large number of drawings, patterns, and mixing colors will suit long nails. For short ones, it is better to use such designs on one or two fingers. You can also make a small design on each one.
It is very important to paint your nails correctly. There is one old and simple scheme:
- First you need to draw a strip along the center of the nail plate, starting from the cuticle.
- Then draw two more stripes on the sides.
This simple method will help you create a neat manicure with polish on short nails. His photo is presented below.
How to visually lengthen short nails?
You can often hear from women that they do not want to cut long nails (even if they are inconvenient), since in this case their fingers will look short and rough. This is all nonsense. You just need to properly care for what you have. Moreover, there are three simple rules that will visually help lengthen your nails.
You need to take care of the cuticle. Everyone knows about this rule, but for short nails it is especially important. When you push back the cuticle, the nail plate visually appears larger. As a result, you can get a fashionable manicure for short nails.
There is an opinion that it is better not to cut the cuticle, as it protects the nail plate. Some people disagree with this statement. Therefore, in the fight against cuticles, you can use unedged and trimmed manicure. In both cases, it is necessary to soften it and then move it to the root. In the case of an unedged manicure, everything is left like that, but in an edged manicure it is cut off.
You can lengthen your nail using a special design. Vertical stripes in manicure will help perfectly with this. The most important thing is to draw stripes that are not the same color as the base color. There must be contrast.
You can also try adding diagonal stripes. In this case, do not be afraid to use bright colors - they will be appropriate.
Varnish selection
For manicures on short nails at home, calm and warm colors are best. Basically, these are nude and pastel shades. They can visually lengthen your fingers as they blend in with your skin color. It's best to use shades that are several shades lighter than your skin tone.
When using dark tones, it is better not to paint over the entire nail. If you leave a few millimeters on the sides, then visually the finger will appear graceful and elongated.
Not only the color of the varnish is very important, but also its texture. Matte and glossy nails are suitable for such nails, but you will have to say goodbye to glitter. Because it will make your nails look even shorter.
Oddly enough, with a bright varnish, a manicure on short nails perfectly highlights them. Don't be afraid to experiment.
Those with fair skin tones should pay attention to dark red and plum polishes. They are able to create contrast and accentuate the nails. But orange or scarlet nail polish is perfect for dark-skinned girls.
Wedding manicure
Most often, brides do a classic French manicure , decorating it with rhinestones and colored painting with an emphasis on the ring finger.
Over the past year, voluminous designs and the combination of gel polishes with 3D gel have burst into ideas for holiday manicure.
Winter brides prefer snowflakes and knitted patterns on their nails. Golden mesh patterns, bows, stars, roses and other delicate decorations look wonderful. The design mainly uses white, pink, and pastel light colors .
If the wedding is themed or contains certain colors, the bride will be perfect for a manicure using them.
In such cases, focusing on the ring finger looks especially creative.
What manicure is fashionable in 2022?
Short nails are not just a monochromatic manicure. Despite the small coverage area, you can make interesting designs on it.
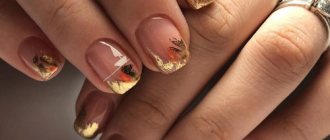
In 2022, manicures using bright colors and combining them on one surface are considered fashionable. It is also worth paying attention to gold and metallic shades. You can see a photo of a manicure on short nails in this style.
Negative space manicure for short nails 2022
If you like your nails to look like a piece of art, be sure to try a negative space manicure in 2022. Negative space is the space between and around the subject of the image and is a natural nail topped with bright colored patterns such as stripes, dots and blocks.
Negative space on short nails will never be boring.
How to do ombre?
Ombre or gradient is one of the most famous and popular types of manicure. It is often found among celebrities and various beauty blogs. In order to do this manicure on short nails at home, you will only need a couple of polishes and a sponge or a piece of sponge.
First, take a sponge or small piece of sponge and apply two stripes of the polishes you are going to use. It is best to use them from the same range of shades. Then apply the sponge to the nail plate. Remember to apply a fresh coat of polish to each nail. In order not to have to worry about removing the remaining nail polish on your fingers, apply a special substance around the nail plate, which can be easily removed after a manicure. If this is not the case, then a simple cotton swab dipped in acetone will help to cope with this problem.
If you can't master the ombre technique on one nail, you can try transitioning the color scheme on all nails. That is, apply different varnishes on each finger from light to dark in the same color scheme. There are many photos of summer manicure. Short nails with this design look very interesting.
Decorative manicure
Let's consider various manicure options for short nails. Believe me, it’s possible to create a beautiful manicure at home: just follow the step-by-step instructions provided.
Manicure with dots
The simplest type of decorative coating, after a plain one. Stock up on a needle or toothpick before dyeing.
- Paint your nail plates with a solid color of your choice.
- Pour a drop of varnish onto a piece of paper and dip a toothpick into it.
- Place dots on the nail randomly or in an invented order.
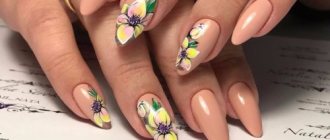
Using a toothpick you can create a great variety of designs: waves, flowers, geometric shapes.
Manicure with stripes
Use stripes to create a beautiful manicure . They can be cut from tape for even stripes, or you can use store-bought ones. They are available in various shapes: zigzag, semicircle, oval. Schemes for a beautiful manicure with stripes are provided below.
Lunar
Manicure is extremely simple. Use semicircular strips for a French manicure. After applying the base coat and drying it completely, proceed to decorating the nail plates.
- Stick a strip at the base of the nail , retreating a few millimeters from it: the small side of the semicircle should look at the base.
- Paint the resulting hole with varnish of a different color.
- Wait until the varnish dries , then remove the strip.
- Cover your nails with a clear sealer.
Drawings on the water
This method is quite difficult - not all girls manage to achieve the desired result the first time . Follow the recommendations to make your nail design shine with splendor:
- Pour warm water into a glass.
- Shake one drop of varnish from the brush into the water : it will spread, forming a circle with uneven edges.
- Shake drops from brushes of varnishes of other colors into the center of the circle.
- Insert a toothpick into the center of the multi-colored water circle and begin to create petals on the varnish surface: make movements carefully, barely skimming the surface. Penetrating the toothpick deeply into the water will blur the design.
- Coat the skin around the nail plates with cream. Dip one finger into the varnish film. Pull out slowly. The pattern previously formed on the varnish surface will remain on the nail.
- For each nail you need to make an individual varnish film.
- Finish the manicure by coating all the plates with topcoat.
Gradient
The simplest version of this wonderful manicure can be done using a cosmetic sponge . It is important to take into account that the sponge must have a fine-grained structure. If you don’t have such an item, but really want a manicure, use a piece of sponge for washing dishes. Naturally, it must be new. Follow these steps step by step:
- Apply a colorless base varnish to the nail plate . It is better if it is a specialized base that has a healing effect. At your request, the base varnish can be colored.
- Apply a thick cream to the skin around your nails so that the applied gradient does not stain it.
- Place two drops of varnish of different colors on a sheet of paper . It is important that the drops overlap each other.
- Using a toothpick, mix the crossed edges of the varnishes, combining them into a single whole..
- Blot the prepared polish with a sponge and press it onto the nail plate for a few seconds. Do the same with the rest of your nails, remembering to renew the polish on the sponge.
- Apply a fixing varnish : it will even out uneven surfaces and preserve the gradient from abrasion.
Metallic design
For short nails, metallic polish is ideal. Since it is impossible to carry it for a long time on long ones, it begins to chip and peel off. In a manicure, you can use various metallic options: silver stripes or patterns, mirror or chrome manicure, adding foil. This effect can be used as you wish. The most important thing is that it doesn’t end up being stuck on. A photo cannot fully convey the beauty of such a manicure on short nails.
Nail design with stones for short nails
Nail designs with rhinestones always look festive and elegant, so this type of nail art is more suitable for special occasions than as an everyday manicure. On short nails, stones should be applied as an accent; you need to be careful not to overdo it with the decoration.
Manicure stones come in several varieties:
- crystal
- glass
- acrylic stones
- zirconium elements
- plastic elements
Also, stones and rhinestones come in different shapes, sizes and colors - they can be transparent, colored and with a hologram effect, which allows you to do a wide variety of manicures with them. But, do not mix pebbles with other decorative elements and do not overdo it with the design.
Geometric design
Many girls think that geometric designs on nails are too strict or rude. On the contrary, this design will make the manicure laconic and interesting. Moreover, to implement it, you will not need special skills, so you will not have to contact a master.
If you want to try geometry, you can try the simplest option. Apply an arrow to the tip of the nail. To do this, you need to draw two thin lines so that they connect and form an acute angle. It should look towards the tip of the nail.
For a more complex design, you need to glue strips of masking tape to the nail plate. You can choose their direction at your own discretion. In this case, they will act as a ruler. The varnish should be applied on both sides of the tape. The combination of colors can be varied. A photo of a manicure design on short nails is presented below in this article.
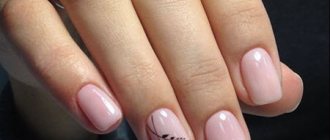
Design with dots
There is another option for a fashionable manicure - with a dot. With it you can easily lengthen even the smallest nails. To make this manicure design for short nails, first you need to paint your nail with a single-color varnish. It is better to do this in two layers so that the color is more expressive. Once you do this, let the nail plate dry. Then you need to take any thin brush (suitable even for painting) and place small dots. The varnish you use to make them should be a contrasting color.
The location of the points does not matter. They can be done in a chaotic order. To visually stretch the nail, the points must be placed in a strict sequence. From the base of the nail plate they are large, closer to the tip - smaller. You should be careful with this design: if you go too far in the number of dots, it will turn out too flashy and tasteless.
It is important to monitor the thickness of the varnish on the brush. When it gets too thick, you need to wipe it off with acetone and reapply.
Space on nails
Space is a trend of the last year. It is used everywhere: on bags, shoes, clothes. Nails are no exception either. It's pretty easy to make. It does not require precision in creation.
The base color is dark - black or dark blue. It should be applied in several layers. After it dries, you need to apply white polish to the nail using a sponge or small sponge. Thus, the effect of cosmic haze should be obtained. Then don't wait for it to dry. Apply any varnish in small strokes.
Graffiti or nail art
Graffiti or nail art is considered the easiest design to create. After all, this is an ordinary abstraction that is created individually by each person.
First you need to coat your nail with a base polish. It is advisable to use light colors and thick consistency. The coating should be dense and should not show through. Next, using brushes or toothpicks, you need to make streaks and lines. For them, take multi-colored varnishes. Photos of a gel polish manicure on short nails are presented below.
How to do a manicure with gel polish?
To do a manicure, you need a pusher (a stick for pushing back the cuticle), a degreasing liquid (or 70% alcohol), a lint-free cloth, a base coat for gel polish, a brush for removing excess coating, and a UV or LED lamp for drying.
Working with an LED lamp is quick (about 0.5 minutes), while a UV lamp requires longer polymerization (1.5-2 minutes). You can use a primer - a special product that is used to better bond the material to the nail plate.
If you plan to make a design, you need to prepare all the necessary tools for applying the design. These can be needles, dots (a stick with a round end, can be of different diameters), a sponge, a brush and similar tools.
Gel polish manicure technology includes the following steps:
- The nail is given the required shape, the cuticle is pushed back with a pusher.
- A degreasing liquid is applied to the nail plate. If a primer is applied, it must be dried for 30 seconds.
- The nail is covered with a base coat and dried in an LED lamp for 15-20 seconds (for a UV lamp the time increases to 1.5 minutes). After drying, you need to remove excess base with a brush.
- One thin layer of gel polish is applied, followed immediately by a second one. The end (edge of the nail) is sealed. When one nail is ready, the hand is turned palm up to prevent the material from flowing into the side rollers. This should be done after each painted nail. The coating is dried in a lamp for 30 seconds - LED, 2 minutes - UV. If a complex design is being made, the nails are dried as it is applied (each layer of varnish and each nail separately). Layers that are applied as a design can be dried for 5 seconds in an LED lamp and for 10 seconds in a UV lamp.
- The final coat is applied and cured again in a lamp (30 seconds or 2 minutes).
- The surface is treated with a lint-free cloth with a degreaser (Cleaner).
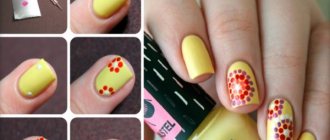
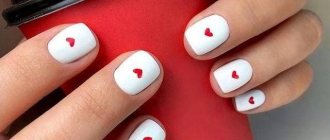
Funny manicure
Manicure is an opportunity to express yourself and create something interesting on your nails. Of course, beautiful designs with neat patterns look amazing, but sometimes you want to stand out. This can be done with the help of funny and amusing drawings. They look very cute on short nails.
It is best to choose images that you can easily repeat at home. The easiest option is to paint scrambled eggs on your nails. The tip of the nail should be painted over with white varnish that does not show through. Be sure to wait for it to dry. Next, place yellow dots in the middle of the white spot - they will imitate an egg yolk.
The article presents just a small list of designs that can be used on short nails at home. There are also matte, moonlit, shiny, French, manicure with rhinestones and others. Each of them will look great, the main thing is to follow the rules of color combinations and not use too much of everything in one manicure.
Remember: short nails are not a reason to go without a manicure or do the most primitive designs. Don't be afraid to experiment.
Manicure for short nails step by step at home
Step-by-step photographs of manicure for short nails show that a decent result can be achieved by spending a minimum of effort and money. Take a look at some examples of interesting but simple manicures.
Manicure with rhinestones (sequins) for short nails
This manicure is more of an evening manicure because of the rhinestones. But it is so gentle and unobtrusive that it is quite suitable for everyday wear.
- Apply base color polish to prepared nails. It can be any pastel shades. When the base is dry, apply special adhesive tapes for manicure (you can find them in any cosmetic store) on your nails to create a diamond-shaped pattern.
- Apply another layer of varnish on top, several shades darker than the base. Without waiting for it to dry, peel off the strips and only then dry.
Tip: To make your nails dry faster, use a regular hairdryer.
- Glue special rhinestones or sequins to the intersections of the stripes. They are usually sold in sets along with glue.
- Finish your manicure with a topcoat.
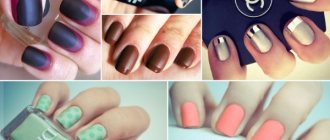
Matte-glossy manicure for short nails
Matte varnish has been a trend for several seasons now, and it is not going to lose ground. For this option, it will need to be paired with a glossy companion varnish of the same color.
- The main varnish will be matte. Cover your nails with it and wait until it dries completely.
- Place limiters on each nail diagonally. These can be special stickers from nail design kits, or they can just be strips of regular masking tape (unlike transparent tape, it can be easily pasted and removed from the nail without tearing off the varnish).
- Cover the un-glued part with glossy varnish. Without waiting for it to dry, carefully separate the stoppers.
- After the glossy layer has dried, apply the finish to your nails.
Caviar manicure for short nails
For this popular type of 3D manicure, you will need special multi-colored beads (in other words, bouillons). It can be applied to each nail or just one (this is the most fashionable option).
- Cover the prepared nails with varnish of any color.
- On the nail that will be covered with “eggs”, apply transparent varnish and quickly, before it dries, dip the nail into a jar of beads. If your beads are not in a jar, but in a bottle, like varnish, apply it with a brush.
Tip: experiment and pour the broths into a container that is more convenient for you: a small jar to dip your nails in, or a bottle to apply them with a brush.
- Press down the stuck beads to make them stick more firmly.
- If there are any empty areas, use an orange stick and clear nail polish to carefully cover them.
- Apply another layer of clear varnish and topcoat on top for durability.
- If there is a special glue in the set with broths, use it instead of clear varnish. In this case, there is no need to additionally cover the nail on top.
Multi-colored French for short nails
This version of the French manicure is more spontaneous, playful and perfectly suits short nails.
- Prepare your nails for a manicure. Cover them with pastel-colored varnish and wait until dry.
- Apply special stickers for French manicure to completely dry nails. Of course, you can do without them, but it’s quite difficult to draw even stripes by hand.
- The most interesting thing is to choose a varnish for the multi-colored stripes. You can take one color scheme, or you can play with contrasts. Apply the selected polish to the tips of your nails, immediately peeling off the stickers without waiting for them to dry.
- Admire the colorful smiles on the tips of your nails, and when they're dry, apply topcoat.
Have you already tried a manicure for short nails at home? Share in the comments!