Surely you often look at pictures of manicures on the Internet and try on designs for your nails. Do you think that you will never be able to make one yourself, but that a craftsman will cost you as much as an airplane wing? We asked the experts, and now we know exactly how to do a French manicure yourself. Read the article and put your knowledge into practice.
In this article we will tell you:
- Types of French
- How to make French polish?
- How to make French gel polish?
- How to make a French jacket with a stencil?
- How to make a French jacket without a stencil?
How to make French gel polish?
French manicure with gel polish is the optimal combination of durability and speed of manicure.
Making French gel polish is not as difficult as it might seem at first glance. The main thing is to follow the instructions and do not forget about the rule: base + top. Otherwise, the coating will begin to chip off within 3 days.
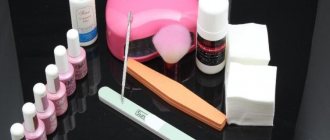
You will need:
1.top and base; 2.gel polish peach and white; 3.orange stick; 4.dehydrator; 5.primer; 6.files and buff; 7.stencils; 8.UV lamp.
How to remove old coating with a special liquid for gel polish?
- Push back the cuticle with a wooden orange stick.
- Use a 240 grit file to file the free edge of the nail and give it an oval or square shape. The weaker and thinner the nails, the higher the abrasiveness of the file. For natural nails 180-240, for artificial nails 100-180 grit.
- Degrease your nails with a dehydrator. This will extend the life of the jacket.
- Apply primer to improve the adhesion of the gel polish to the nail.
- Don't forget about the base. Dry the coating in a UV lamp for 2 minutes.
- Apply the main color of the gel polish (camouflage) and do not forget to dry it in a UV lamp for 2 minutes.
- Place the stencil on each nail one at a time, draw a smile line and dry.
- Apply the top coat in a thin layer and do not forget to dry.
- Remove the sticky layer from your nails.
Finally, apply a special oil to the cuticle to soften and nourish. French manicure with gel polish is ready!
If you don't understand something from the instructions, watch the video to do a French manicure with gel polish:
Nail preparation
As with any other type of manicure, preliminary preparation is required here. We process the cuticle using standard actions and form the shape of the nail. Regarding the shape of nails, French manicure dictates its own rules. It is generally accepted that a square nail shape will look good on thin, long fingers, a square one with rounded corners is suitable for those who have naturally wide nails, a round one is for short nails, and an oval one is a universal option for everyone.
How to make a French jacket with a stencil?
If this is your first time making French stencils, then this is what you need! With their help, you can easily apply even the most intricate designs.
Stencils are not only semicircular for the classic French jacket, but also with lace, wavy and oblique patterns. They are made from paper, vinyl film and even metal or plastic.
Vinyl stencils are easy to use. They fit tightly to the plate of the nail and allow you to draw an even pattern.
How to make a French jacket with a stencil?
- After you have applied the base color to your nail, wait until the polish dries completely.
- Carefully peel off the stencil from the plate and stick it on the nail, stepping back a few millimeters from the edge of the nail.
- Press the stencil firmly with an orange stick.
- Using a brush, gently apply the polish to the tip of your nail and let it dry.
- Peel off the strips and apply topcoat.
French manicure with shellac
Shellac French
As mentioned above, Shellac French, the implementation of which is shown in the video, suits almost any style of clothing and any situation, and therefore there is often no need to change such a manicure. However, it quickly loses its attractive appearance and has to be remade often. But this task is far from easy and requires quite a lot of time. This is where shellac comes to the aid of fashionistas!
This unique composition combines the minimal harm of nail polish and the excellent characteristics of an extension gel. It stays on the nails for up to three weeks and strengthens them mechanically (that is, due to its own layer). They make the nails less likely to break, bend, and peel.
Exactly how long shellac will last on nails depends on many characteristics, such as the initial condition of the nails, compliance with manicure technology and mechanical wear. But this coating will never last less than a week. Proper use of this manicure involves the use of rubber gloves when cleaning, washing and washing dishes. This can significantly extend the life of your manicure. In addition, it is strongly recommended to wear gloves or mittens during the cold season, as sudden changes in temperature can cause the shellac to wear off quickly and cause bubbles to form.
Shellac lessons at home do not introduce many restrictions for those who want to use this coating, however, some precautions are worth considering. It is strictly forbidden to apply shellac to peeling nails, as well as to those affected by fungal diseases. Any traumatic damage to the plates should also be considered as a prohibiting factor. However, in rare cases, its application is possible even with such damage.
[yandex2] [google2]
How to make a French jacket without a stencil?
- Drawing a “smile” with a brush is a little more difficult. Start by preparing your nail.
- Correct the shape of the nail.
- Use a buff to remove any imperfections on your nails.
- Treat your nails with a dehydrator and primer.
- Paint your nail with your base color and let it dry.
Afterwards, you can move on to painting a “smile” with a thin, hard brush.
- Draw a horizontal line along the edge of the nail.
- Draw small lines on the side to give the design a curve.
- Draw a semicircle with your brush, connecting the top point of the line at the side edge and the center of the nail. Repeat this on the symmetrical side of the nail.
- Then paint over the “smile” line and let it dry.
- Cover the jacket with a French top.
Ready! Now draw “smiles” on other nails just as beautifully.
To prevent the drawing from being accidentally blurred, draw a “smile” on each finger in turn and dry it.
Have you learned how to make a stunning French coat so that your friends ask in unison for the contact details of the artist? Or do you still dream of learning? Then you have a direct path to the nail industry. But before that you need to complete the courses and get a certificate.
At the manicure school, you will study in detail and practice on models all stages of classic and French manicure, learn the secrets of perfect coverage and creating stylish nail designs.
Course duration is 1-2 weeks, 4 hours each . The average cost in Moscow and St. Petersburg is from 15,000 rubles . In the regions from 5,000 rubles .
Models, varnishes and materials for design will be provided to you by the school at the time of training. But sometimes you have to buy something yourself. Therefore, carefully read the rules and curriculum at the school. It is possible that there is no “all inclusive” clause in the contract.
Students are the most important indicator of a teacher’s professionalism. Look at their work on social networks, Google reviews about the school. Look for information on third-party resources, not just on the school website.
After completing the course, you will be given a certificate confirming that you can now do your nails like a goddess! Many salon doors are open to you. Go for it!
We have told you all the secrets of the perfect French coat, and now take everything you need and start practicing on your friend, mother or aunt.
This training may be right for you:
- Best Online Manicure Courses from 1,000 Rubles
- 10 Best Manicure Training Courses in Moscow
- 10 Best Manicure and Pedicure Courses in St. Petersburg
- Best Nail Extension Courses in Moscow from 1,000 Rubles
- 10 Pedicure Training Courses in St. Petersburg
- 10 Best Nail Extension Courses in St. Petersburg
Choose the Best Courses in Your City: Yekaterinburg , Krasnodar , Nizhny Novgorod , Novosibirsk , Rostov-on-Don , Perm , Krasnoyarsk , Voronezh , Omsk .
Tell us in the comments how you feel about a black or red jacket? Do you think it looks bright and aesthetically pleasing or, conversely, inappropriate? Repost the article, these instructions will be useful to you!
Preparing for a manicure
The strength of the coating depends on how thorough the process of preparing the nail for a manicure with gel polish is.
Spend a couple of hours on a full manicure, following all the steps - believe me, this is not only a pleasant, but also a beneficial procedure for your nails.
- Place your fingers in a bath of warm water for 15-20 minutes. This is best done using aromatic oils.
- Push back the cuticle with an orange stick and trim it carefully. This is easier to do when the skin is steamed, so that the cuticle can be removed more easily.
- Give your nails any shape you want by pushing back the free edge of the cuticle or filing the feather. The nail plate must be filed neatly, otherwise it will not hold the polish. The shape for the jacket can be round, oval, square, triangular.
Nail treatment
The specific composition of gel polish requires preliminary degreasing of the nails, otherwise the manicure will not last even a day. If you decide to apply a more durable coating, you should do a couple more steps, which can be seen in the photo (see step-by-step guide):
- Polish your nails with a buff. With the help of this file, the nail plate becomes rough, which will allow the gel polish to last longer.
- Wipe your nails with a napkin.
- Apply a degreaser to the nail, which will prevent the polish from peeling off. It is important not to touch the treated part of the nail.
- Use a primer to wipe your nails clean. Once the white coating covers the nail plate, you can be sure that the gel polish will now lie firmly on the surface.
The sequence of the following stages depends on your desire and imagination. You can start applying a colored coating to the entire surface of the nail, and then draw a line for a moon manicure, which, by the way, is very fashionable now.
If you decide to leave most of your nails bare to get a classic French manicure, follow these next few steps (starting with step five in the picture).
French manicure with gel
If you are familiar with the basics of gel nail extensions, then it won’t be difficult for you to make an even French nail extension correctly.
- Prepare the nail plate, after degreasing, apply camouflage gel and dry it in a lamp for three minutes (most gels harden during this time).
- We remove the sticky layer, polish the surface, give the nail a shape, simultaneously creating a neat smile line.
- We place the form for extensions, after which we lay out white gel butt to the free edge. Dry in a lamp, remove the sticky layer.
- Level the surface of the nail and polish it.
- We finish the work by applying the finishing coat.
It is important to remember that if you decide to make a French jacket using the method described above, then special attention should be paid to the choice of material. In particular, the white gel should have a dense texture, otherwise the free edge will turn out translucent, which will ruin the overall impression of the manicure.
What kind of French stripes exist?
The strips for creating a neat French edge have an adhesive layer that fixes them on the nails. That's why stripes are also called French stickers. If you use this stencil correctly, you will be able to create a French manicure with ease, in little time, and the result will look attractive and professional.
There are stickers for creating a classic shape with a smooth arc, and there are more interesting ones, for example, zigzag or asymmetrical, in which the smile is “beveled” in one direction. Particularly interesting on long nails are stencil shapes with a corner, which can also be symmetrical or located on the side. A wave-shaped edge looks stylish, especially when done on a colored surface. This will give freedom to the artist’s imagination when creating a French manicure.
Here are the options for stencil shapes offered by modern manufacturers:
| Stencil type | Description |
| V-shape | It is a strip with a correspondingly shaped edge cut out. |
| Oval | This is the classic French smile shape. In some sets for French hair, the stickers have different sizes, adapted to the size of each finger of the fashionista. The shapes for the thumbs are the largest, and for the little finger, respectively, the smallest. It's definitely convenient. |
| Curved | They emphasize the elegance of the nail and lengthen it visually. |
| With a deep arc | This is a classic French jacket for oriental women. Japanese women prefer a low and deep smile line. |
There are many more forms of factory-made stickers, but your imagination can create even more unique and original ones. To do this, you can make such stickers yourself and, moreover, for free.
Manicure with ribbons on gel polish
To ensure that a design using adhesive strips lasts a long time, we recommend applying a varnish coating to the gel. If regular polish begins to chip on the third day, then gel polish can stay on your nails for 2-3 weeks.
Step-by-step guide to creating a manicure with ribbons on gel polish:
Trim your nails, push back the cuticles, and go over the plate with a buff.
Paint your nails with colored gel polish in one or two layers, after each be sure to dry your fingers in a lamp. To give your design more brightness, you can use gel polishes of various colors and combine all kinds of shades. In this case, the manicure tape will subsequently act as a delimiter.
Cut off the tape from the roll with a margin so that later it is convenient to remove its remains. Glue a bright strip onto a dry coating, having previously treated the surface of the nail with a buff. Cut off the excess tape tails with pliers.
Apply the fixative to the nails, paying special attention to the places where the tape is glued. Remove the sticky layer.