Manicure › manicure with drawings
Share the page with your friends!
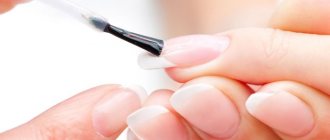
Manicure with gel polish is becoming increasingly popular. Women not only choose a new coating in salons, but also learn how to apply it at home. But now you can forget about chips, not be afraid to do wet cleaning at home and enjoy the look of beautiful, well-groomed nails for up to two weeks! If you have already mastered the technique of applying gel polish, then it’s time to move on to the next stage to bring something new to your look. We offer you video tutorials on drawings on nails with gel polish, which we have selected specifically for beginners.
What you need to paint gel polish on nails
It is a very common opinion that gel polish looks ideal only when applied in a single color. In fact, this is far from true. This varnish can not only last on your nails for quite a long period of time, but also decorate your manicure with a beautiful design in the form of various patterns.
A boring drawing can be easily removed or replaced by another. For these purposes, the base varnish coating is repainted, and artistic compositions are made on its surface.
To perform a high-quality manicure using gel polish, you will need the following tools and materials:
- Professional nail polishing;
- Basic coating;
- Gel polish of different colors;
- Finish coating;
- Sticky layer remover;
- Lint-free wipes;
- UV lamp;
- Special liquid for removing gel coating;
- To create an aquarium composition, you will need a transparent gel polish;
- If you want a French manicure, then you need to purchase a pink tone of varnish and a white camouflage one;
- Fan brush and paint brushes of different sizes;
- Decorating materials such as foil, glitter or mica;
- Palette and dots.
When is voluminous nail design appropriate?
Remember, at one time there was a craze for volumetric elements on nails? At the same time, the length of the extended nails was, to put it mildly, excessive. We are against such overkill and believe that any art (and three-dimensional modeling is a wonderful art!) should be harmonious. Therefore, we recommend, firstly, not to decorate all nails with volumes (1-2 on each hand is enough). This design will look organic and beautiful as a daily option. Secondly, if you nevertheless choose to decorate a larger number of nails, then try to time it to coincide with a specific celebration (wedding, anniversary, etc.), at which a somewhat flashy manicure will be very useful.
Slider design for beginners
Slider design is a technique that uses special transfer stickers. The images are printed on a film that peels off by soaking. The film, due to its plasticity, perfectly follows the shape of the nail plate.
Nail design lessons for beginners using a slider include several main steps:
- The nails are prepared, the surface is degreased and the base varnish is applied.
- An image is selected that matches the size of the nail plate.
- The sticker needs to be soaked in water for 40 seconds, during which time the adhesive base is activated.
- The image is transferred with the adhesive side using the shear method.
- The pattern is carefully smoothed to remove any remaining air and water.
- After drying, the nails are covered with fixing varnish. If desired, the design can be diversified with various decor (sparkles, rhinestones, colored or shiny dust, etc.)
Nail design using a slider: video
How to choose manicure courses?
In order to quickly master nail painting techniques, you should turn to professionals or take courses. During the learning process, teachers will help you place your hand and avoid mistakes.
When choosing courses, follow simple rules:
Learning how to paint your own nails is not as difficult as it seems. You can practice each element on paper, then on tips, and only then apply it to the nail. The processing process can take a long time. The reward for your patience and work will be a beautiful manicure with a design.
You may also be interested in:
- 10 Best Manicure Training Courses in St. Petersburg;
- 10 Best Manicure Training Courses in Moscow;
- 10 Best Manicure Training Courses in Nizhny Novgorod;
- How to Strengthen Nails at Home? 4 Simple Instructions That Will Make Your Hands Beautiful and Well-Groomed;
- How to Do a Pedicure at Home? 2 Step-by-Step Lessons and Helpful Tips for Beginners;
Stickers
This method allows you to create a rather complex and interesting manicure, although the designs on the nails are not made independently, but with the help of stickers, as the video shows, which you can watch below. Stickers come in three types and differ in the type of design and method of use. Film stickers allow you to create a design over the entire area of the nail, while transfer and simple stickers allow you to create only a small fragmentary design on any area of it.
As you can see in the video, designs on nails using stickers are the most interesting, but the lessons for applying them are also quite complex. And if paper and decals are relatively easy to apply to a plate, then significant difficulties can arise with films, since they require application to the entire area of the plate. The straighter and smoother your nails are, the easier this procedure will be.
In conclusion, we note that everything that we draw on the nails, as the video lessons show, must be covered with a fixative. Without it, the drawing will begin to scratch and deteriorate much faster, so it will have to be updated more often. Since this is a complex and lengthy process, it is better to try to preserve the design for as long as possible.
Tips and tricks
Often girls are interested in how to make drawings with gel polish. To make your nail design successful, you need to follow some tips and recommendations while working. The main rule when working with gel coating is to degrease your nails before applying it. Due to this, there is a more reliable adhesion of the varnish to the nail plate. Otherwise, after a few days the gel coating will swell and air bubbles will form.
The gel layer should be thin and uniform. Otherwise your nails will look too rough. You should not allow the coating at the tip of the nails to be thicker than at the base. Be sure to dry your nails under a lamp after each layer. Do not allow the gel to get on the skin of your fingers or flow onto the cuticle. This will make the manicure seem sloppy.
Thus, you can make a beautiful manicure using gel polish at home. But during the design process, you must follow the recommendations of professionals, otherwise the coating will turn out to be of poor quality. As for the drawing, it can be anything. The main thing is to choose the right colors.
Using gel polish
Gel polish is a nail coating that is very popular. After all, thanks to its use, the surface of the nail is strengthened, so it does not break for a long time. So, a manicure done using gel will last for several weeks without changing its external characteristics. Depending on the manufacturer, there are varnishes with varying degrees of stickiness and viscosity.
With its help, you can draw designs on both natural and extended nails. The gel needs to be dried only using a special device - LED or UV lamp. The first option is considered better because the nails dry within 30 seconds rather than 2 minutes.
What pattern should I draw on my nails?
Depending on where you are getting your manicure done, for what event or just for fun, there are several options and tips. It is worth noting that it is unlikely that you will be able to create a drawing of ideal beauty the first time. Don't be disappointed in yourself and don't quit.
options for simple designs on nails with a toothpick and a needle
Try a simple drawing with a toothpick or a needle “Mixing two colors”:
- To do this, you need to paint your nail with two colors at once.
- Choose colors of the same tone: blue and light blue, red and pink, black and gray
- While the polish is fresh and wet, take a toothpick and draw a few horizontal lines.
- If you draw with a needle, the result will be much more accurate.
- When you draw lines, you should not clean the needle every time - this is the secret of a beautiful drawing
- While you are drawing a line, you will drag one color onto another and literally “mix” them along the way, resulting in a beautiful iridescence
beautiful manicure with a mixture of related colors
Volumetric designs on nails with gel polish
Sea shell
For this easy gel polish nail design, we will need just one color of polish and a medium-length manicure brush.
Execution steps:
- Sand the base color of the gel polish until it becomes matte.
- Using a brush and polish, draw lines from the edge of the nail towards the cuticle.
- It is imperative to change the pressure on the brush so that the line becomes thinner as it approaches the cuticle.
- You need to make several such lines throughout the nail to create a pattern that resembles a seashell.
- To make the drawing three-dimensional, you need to apply another layer of varnish along the lines.
- We must dry each layer in a lamp.
For such a pattern, gel polishes of the same tone or different colors can be used.
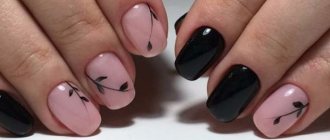
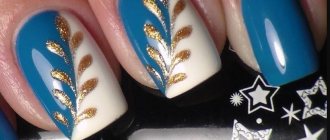
Modeling pattern
For such a beautiful design on nails with gel polish, we will need two polishes with contrasting colors, a brush and a buff.
Drawing technique:
- We cover the nails with the main color of gel polish.
- Using a brush and gel polish of a contrasting color, we make a few strokes on the nails to create a flower.
- To create volume, the contours of the flower must be applied in two layers. Be sure to dry each layer in a lamp.
- We cover the nail with a thin layer of base varnish so that the design is completely painted over. Dry it in a lamp.
- To better highlight the drawing, you need to polish the contours with a corner of the buff.
- We cover the nails with the finish and dry them in a lamp.
Other ways to decorate your nails
As you can see, there is currently a huge variety of educational materials for beginners on various methods of decorating nails, from popular options with rhinestones, sparkles, crystals, acrylic paints and metal foil to relatively new techniques of “caviar”, “aquarium” design or experiments with textures. Another new trend in the nail industry is Chinese painting. This is a more complex technique that requires certain skills, but a novice master can master it with the help of video lessons with step-by-step instructions.
It is no secret for modern fashionistas that the popularity of long and sharp nails is behind us; today, moderate nail lengths are popular. This means that all the possibilities of nail art are quite feasible on short nails. Their owners should not give up the idea of decorating their nails themselves using a needle, a thin brush, ordinary varnishes and various decorative elements.
Tweet
Cool
Beautiful and simple designs on nails
- a great way to diversify your everyday manicure. Making such a manicure is not at all difficult, and at the same time, simple nail designs are in trend today. There are many ways to create beautiful nail designs at home. Today we will focus on simple techniques that are suitable for beginners.
Nail designs: video
Nail designs: palm tree
Tags: nails
Market Analytics
- COVID-19 is changing the rules of the game in the cosmetics market
- Beauty of the future: cosmetic innovations 2022
- New ingredients are the driving force of the cosmetics industry
Convenient search for beauty salons on our website
Beauty salons in Moscow Beauty salons in St. Petersburg Beauty salons in Ekaterinburg Beauty salons in Novosibirsk
Latest blog posts on our website
- Naturecream / PEPHA-TIGHT - instant skin lifting
- Naturecream / Blue light - a danger to the skin
- Naturecream / Cocoa Butter – A treat for the skin
- Naturecream / Trylagen - supports the entire collagen life cycle.
- Naturecream / Spring skin rehabilitation
- Naturecream / Cleavage - a woman's passport
- Naturecream / Anti-cellulite “Memo”
- Naturecream / Peptides instead of beauty injections.
- Naturecream / Microplastics in cosmetics
- Naturecream / Sea buckthorn oil - “liquid gold” for the face
Other articles in this section
Manicure with the effect of broken glass Manicure with the effect of broken glass will allow your own imagination to run wild, since it has many options for nail design. “Broken Glass” manicure is now in trend. Beautiful manicure Exquisite ideas for creating a beautiful manicure will help you choose the best option for a laconic completion of your look. You can try to apply the polish yourself or have your nails done by a professional. We offer ideas for creating a beautiful manicure and reveal some secrets. Men's pedicure A few years ago, when asking men for their opinion about pedicure, almost every second person answered that it was some kind of female procedure. But the situation is changing, and men's pedicure is no longer exotic. Manicure with foil Nail design options are very diverse. One of the most original techniques with a wide range of design options is decorating nails with foil.
This nail art is very impressive, noticeable and immediately attracts attention to its owner. And you don’t have to be a professional to do it.
The necessary materials, instructions, a little practice - and you will succeed. Removing an ingrown nail with laser and radio waves: which method is more effective? Ingrown nails (onychocryptosis) are a common cosmetic defect that causes many problems. The process is accompanied by painful sensations, the skin on the finger becomes red and swollen. Complications in the form of purulent discharge may occur. Just 5-7 years ago, doctors resorted to a surgical method to eliminate the problem, using a scalpel and stitches. Medicine does not stand still. Currently, it is widely practiced to remove ingrown toenails using laser or radio waves. We'll talk about what the procedures are in the article. Manicure for Halloween In this article we will learn how to do a manicure for Halloween, since the holiday is just around the corner. We offer you a step-by-step simple Halloween manicure that you can easily do at home. Traditional colors of choice for Halloween manicure: black, orange and white, but we diversify it with other colors. Manicure for September 1st with a jacket September 1st is coming soon. Children will go to school, some even for the first time. And on this day you want to have a corresponding manicure. We offer you an interesting nail design with a jacket pattern for girls and boys. Your nails will be dressed in school uniform just like your kids. Gradient manicure. How to make a gradient on nails Bright and unusual color combinations, smooth transitions of shades on nails - a fashionable manicure with a gradient effect has not lost its relevance for several seasons. Despite all the apparent complexity, the gradient manicure technique is quite simple, and making a manicure with a gradient effect at home is quite simple. Read our article about how to make a gradient on your nails correctly, what techniques for creating smooth color transitions on nails exist and what shades are best to choose. Combined manicure Every girl chooses the type of manicure depending on her personal preferences, but combined manicure is becoming more and more popular manicure.Manicure: apple (photo and step-by-step instructions) Today we will look at how to draw apples on your nails. This nail design is suitable for both summer and autumn. Apples can be made red, green or yellow, or you can draw a cut apple with seeds. So let's get down to step-by-step manicure: apple.
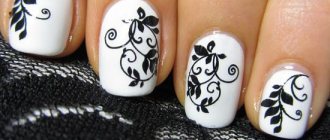
How to draw monograms on nails
One of the main devices for painting a manicure is a brush. It is advisable to choose an item of excellent quality. When purchasing, you need to pay attention to the following properties:
- the base must hold tightly and not roll along the seam;
- you need to try to pull out the hairs, and if all remain in place, feel free to purchase;
- when wetted, all bristles should fit perfectly;
- a tool with a seamless shell is more convenient to use compared to others;
- It is worth giving preference to handles made of hardwood.
For different line drawings you may need the following brushes:
- with short, thin stubble;
- medium size with a pointed tip;
- thin, small with a sharp end;
- with elongated hairs;
- beveled dauber.
Brushes for nail design
In addition to the brush, you need:
- regular varnish;
- acrylic paints;
- gel polish;
- shellac;
- napkins;
- degreaser;
- lamp for drying the gel coating.
Needles and toothpicks, various stickers and other decorative elements will also come in handy.
For beginners, you can use additional items in the form of stickers and stamping.
Brushes for monograms
When painting patterns by hand, it is advisable to use thin brushes that draw lines well, mark dots, and apply paint uniformly.
Learning to draw monograms on your nails is not that difficult. Using the right tools and a step-by-step description of the process in numerous photos and videos will help you cope with the task.
When in doubt about choosing a brush, you should listen to the advice of professionals and purchase:
- a special brush with a thin and elongated base that carefully draws lines. It is used for ordinary and more complex patterns;
- a beveled tool is suitable for removing curls;
- column 00, which has short and fine bristles for depicting small details and dots.
Having old varnishes, you can make brushes yourself. To clean them, you need to take several pieces from the bottles, remove any remaining varnish using acetone, rinse in a warm soapy solution and degrease with a solution containing alcohol.
Next, use nail scissors to cut off the excess fibers and give one brush a thin shape, and make a short cut with the other and bevel it. An alternative to a brush can be a needle or a toothpick that has sharp and thin edges.
To design lace monograms, it is best to use stencils, since the web should look very thin and accurately drawn.
Nail design with openwork mesh
Those who prefer to do a manicure by hand need to be careful and practice using several brushes with different hair contents.
To get the perfect nail design you need to choose the perfect color scheme. The base shade should be in harmony with the pattern and accentuate the precise lines and uniform curls.
Drawing with dots
In case of difficulties when drawing clear small objects on the nails, the manicure industry offers a special design device called “dots”, which is translated from English as “dot”.
Using this tool, it is easy to depict even strips and other small links of different sizes.
A dot is a small, thin stick with a metal circle at the end, and is made of wood or plastic. There are dots that have balls on both sides, but have different calibers.
Nail salons use whole sets of these devices, but for home use, small and medium-sized dots are sufficient.
Convenient and easy to use, even without drawing skills, you can use it to create beautiful garlands, lace patterns, twigs and straight lines. This occurs due to the gradual decrease of paint at the tip; with leisurely coloring, it lasts longer.
They resort to it when creating additional decor of a small size and when adding streaks with rhinestones.
To create a painting on your nails using dots, you need to:
- Paint your nail with the intended color of polish and wait until it dries.
- Apply paint (preferably acrylic) that matches the background shade. Dip the ball into it, drowning it slightly.
- Next, move the dots like a regular pen, drawing periods and commas. For long strips, drive slowly. You need to wipe the device on a napkin from time to time to get rid of the paint.
Drawing monograms on nails step by step is not difficult. Having mastered the skill, you can safely experiment, and the nails will be original, unique and will delight both the owner and arouse admiration among others.
Glitter stretch
The most impressive design is made using shiny gel polish.
What you will need:
- gel polish with glitter;
- fan-shaped manicure brush.
First, choose where the shiny stretch will come from: from the base or edge of the nail. In this place the concentration of sparkles will be greater, and then will disappear. A strip of shiny gel polish 1-2 mm wide is applied to the selected beginning of the design. Then, using a fan brush, stretch this strip to the other side of the nail and dry the layer. Repeat these steps about 3 times. Each time, apply the strip thinner and stretch it less and less.
Applying dot patterns using dots
The most popular and favorite way of applying a decorative design is to depict it using dots . In addition, it will help make the drawing as even as possible. This is especially true for amateurs. Dots make it possible to depict original and stylish compositions on nails of different shapes. Externally, the dots have something similar to a regular pen, which makes working with varnishes much easier. The innovative tool makes it possible to create a drawing of any technological complexity:
- peas,
- exotic flower,
- animal pint,
- lines,
- exquisite ornaments,
- curls and patterns.
Dots and an ensemble of several shades of varnish allow you to create the most luxurious, original and creative manicure of your dreams. At the same time, a combination of the simplest elements, at your suggestion, turns into exclusive design solutions.
Video “Patterns on nails”
Video “Types of patterns using dots”
Instructions for creating beautiful designs with gel polish
Constant experimentation with applying designs to nails will be excellent practice for novice nail artists. Before the girl has time to look back, ideas will be born in her head instantly, and the result will exceed all expectations. Let's try to analyze step by step the options for beautiful drawings for beginners in this creativity.
Option one
With this method of application, all the work will be done using an ordinary needle (you can use a toothpick).
You can also apply drawings to a helium surface using acrylic paints:
Cover your nails with a base coat.
After drying, decide on the choice of background and cover all nails.
Use a needle to mark the dots of the future design or other patterns using the wet varnish.
Using a needle, carefully begin painting, mixing colors; if the design provides for clear lines, then do them with great care.
Dry the finished manicure under the lamp and secure with top coat.
Option two
This application system is ideal for beginners, and the tool used is the same needle and several shades of coating:
- Apply a colorless base to the nail plate and dry.
- Complete the background using a matte shade.
- While the varnish is still wet, make spot applications of a different color.
- Using a thin needle, begin to make circular connections of drops, based on the idea of the future drawing.
- Dry the drawing and secure with topcoat.
Option three
This method is performed using ordinary tape. No matter how surprising the method may seem, the drawing turns out to be very original:
- Cover the nail plate with base and dry well.
- From tape, cut out small geometric shapes and glue tightly onto the nail plate.
- Cover your nails with any color.
- After drying, carefully remove the tape with smooth movements.
- For added effect, cover the entire manicure with a clear coat.
Option four
With such an easy creative process, an example of applying patterns with various varnishes will be given.
Painting called nail is distinguished by its simplicity and justified result:
- It’s worth starting again with a basic application.
- Apply a background in any color scheme.
- Make any drawing using painting varnish, which has a special thin brush.
- Use the finishing coat to secure it.
Option five
The means at hand often come to the rescue. For example, an ordinary helium pen is capable of miracles. With its help you can create a masterpiece on your nails
An important feature is the fact that you do not need to learn to be confident in mastering such a tool.
In this application method, the drawing will be done with helium-based acrylic paints:
- Tweak your nails and correct any imperfections with several coats of clear gel.
- Squeeze several colors of acrylic paints onto a piece of foil, it will act as a palette.
- Use your imagination and start making the same designs on each nail plate, and finally secure the composition with a finishing agent.
How to learn to paint on nails at home for beginners?
First of all, you need to decide on the pattern - what do you want to depict? What image and style of clothing will this or that pattern suit? Next, you need to select colors, study the diagram and stages of creating a drawing, and then prepare the tools. We will consider the basic techniques and methods for creating drawings with your own hands below.
Brushes of different thicknesses allow you to depict straight or curved lines, flowers with a core of beads or rhinestones. The drawing will be brighter if you use acrylic paint, and it is also easy to apply. The base coat can be chosen light, dark or transparent, based on this, contrasting colors are selected for the future design. For example, a flower is painted using the thinnest brush; this does not require much experience. Usually it is placed in the lower corner of the nail, giving the petals any shape. Detailed drawing of the petals and their outline is done with a contrasting or shiny varnish, also with a thin brush. The middle of the flower can be a sequin, a drop of shiny varnish, beads, etc.
Patterns and drawings using needles or toothpicks
Drawing with a needle gives room for imagination. The thin tip of the needle allows you to create elongated drops, wavy smooth transitions, stars, flames and even inscriptions. The technology is not complicated, it is important to think through the drawing in advance or take a ready-made sample from the Internet. Before you start painting, be sure to apply a clear varnish to your nails and wait for it to dry. This layer will protect the surface of the nail from possible scratches. Then cover your nails with background varnish, onto which the patterns will be applied. After this, we put a few drops of varnish of the desired shades on the background and begin to draw lines with a needle from the center to the periphery. You can make intersections of lines of different colors, you can draw them in an arc parallel to each other. It is important to take into account one nuance - you need to draw with a needle accurately and quickly so that the varnish does not have time to dry, so it is recommended to first practice on a palette.
Simple geometric patterns using tape
Working with tape requires more time, care and patience, but the result is worth it. We choose the desired design, it can be alternating contrasting stripes located vertically or horizontally. You can depict cells, herringbone, rhombuses, triangles, etc. For a beautiful design, two varnishes of different shades are enough. The base color is applied first, it should dry very well. Then strips of tape are glued onto this layer to create a stencil of the selected design. A different color of varnish is applied over the tape. After the varnish has completely dried, the tape can be carefully removed with tweezers. Scotch tape is also indispensable in performing the classic French manicure, which is loved by many.
The use of decorative elements in manicure
Beads, sparkles, sequins, stickers of any theme, rhinestones and other accessories add a festive touch to everyday manicure.
Decorating is very simple. It’s enough to come up with a pattern, design it on the nail and be sure to apply a layer of transparent varnish on top to fix it. There are no limits to imagination in decor: modern craftswomen create unique masterpieces on their nails - mini-paintings depicting butterflies, bears, emoticons, all kinds of three-dimensional figures, as well as luminous patterns (using neon nail polish).
By combining designs and various decorative elements, you can create an exclusive manicure with your own hands for any style of clothing (for a casual look, for a party, for a wedding). When it comes to nail art, you don’t have to be afraid to experiment. And if you don’t have many ideas of your own, you can always look at examples and diagrams from the Internet.
The above descriptions of nail painting techniques will allow every novice amateur to learn how to paint on nails at home. Over time, you can easily learn to depict not only simple two-color schemes, but also complex three-dimensional patterns and drawings. Once you gain experience, you can purchase professional tools and materials that will make painting your nails much easier and allow you to enjoy the process itself.
The modern nail industry offers a huge variety of techniques and means for creating a unique manicure, from classic varieties to the most unusual designer ideas. Among the popular trends are decoration with rhinestones, colored feathers, glitters, bouillons, transfer stickers, using metal foil, fimo - three-dimensional figures and acrylic paints. But the most popular way to decorate nails has been and remains drawings that allow you to create real small masterpieces on the surface of your nails.
Dot designs on nails with gel polish
Flower
On the base varnish we place several dots of acrylic paint so that we get a flower. The points should touch tightly. The center of the flower can be made with acrylic paint of a different color.
Flower with elongated petals
Cover the nail with the main color of gel polish. We put a dot with dot, and then stretch it out so that we get petals.
Rows of dots
- Using dotters with tips of different sizes, you can make a series of dots in which each subsequent dot will be smaller than the previous one.
- With the help of a dotter, you can make a variety of drawings, the outline of which will be dots.
How to paint with nail polish?
The varnish has a thick texture and dries quickly in air. Therefore, it is difficult to paint on it with a brush. It is suitable for elementary drawings made on a wet layer with a needle or dots.
The downside of this manicure is that it doesn't last long. Rarely does polish last on your nails for a week. It is suitable for those who like to change their image.
A simple application technique is suitable for girls with no experience in nail design.
We have prepared for you simple instructions on how to design nails with varnish:
- Apply the background color of polish to the treated nails.
- Place dots of a contrasting color on the still damp surface with a brush or dot and gently stretch. This way you can make petals or artistic patterns.
When choosing a nail polish for nail design, pay attention to the pigment. It should not be transparent, otherwise the drawing will be dull, almost invisible
Eye-catching patterns on nails using a needle
In order to recreate the glamorous nail design of those beauties from the cover, you can create a daring and stunning manicure using a needle . Unlike the first tool, drawings made with a needle look more realistic, graceful and refined. And even somewhat filigree. To perform a luxurious and memorable manicure, you need to use the tip of a needle to create a small and therefore attractive, exciting pattern, which can then develop into something more - a mysterious and uncompromising pattern. If you are an amateur in this matter, then the masters suggest starting with the depiction of small details of the drawing, which are of an abstract nature.
Video “Patterns on nails with a needle”
Gel polish removal process
Under no circumstances should you remove gel polish from the nail surface without first softening it - scratches and snags will remain, which will greatly spoil the appearance of your nails. To speed up the process, you can use a buff - it will help remove remnants of gel polish and remove the dispersed layer.
- Cut pieces from a napkin or cotton pad, the size of which should be slightly larger than the shape of the nail.
- Wet the resulting piece with nail polish remover and place it on the nail surface. The gel will soften and begin to peel off.
- We wrap each finger with foil and go about our business for about fifteen to twenty minutes.
- Unroll the foil and remove the cotton pieces.
- Using an orange stick or cotton pads, remove the remaining gel polish. Repeat the softening procedure if necessary.
- Polish the nails thoroughly with a nail file.
- Using scented soap, wash your hands thoroughly.
- After all of the above, apply your favorite moisturizer to your fingers.
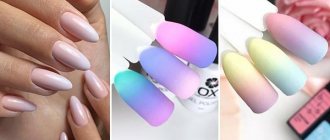
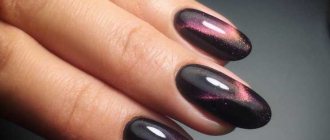
Matte manicure with gel polish
This year, matte manicure is on the list of the most fashionable trends. The secret of popularity lies in the ease of application and the achievement of an incredibly effective combination with other textures. Matte manicure looks very unusual and impressive.
A manicure with a matte finish will suit every girl and will go with any image. The coating can be done in a single color or try to complement it with glossy varnishes. Make various patterns, geometric shapes, decorate with sparkles and rhinestones ─ just use a little imagination. In any case, the tone of the coating should depend on the event for which it is being performed.
Whatever pattern or application method is chosen, it is important to remember that the matte finish is very easily soiled. Due to the rough surface, dirt gets on it, which looks like worn suede leather
Therefore, you need to take into account that on a light manicure, the stained areas will be very noticeable. To avoid this effect, choose dark shades of coating.
If you really want to do a matte French manicure using a pale pink shade, then buy more liquid to remove the matte gel coating; you should always have it on hand. If your nail is dirty, you just need to wipe it a little with the product and everything will be perfect again.
How to paint with gel paint on nails?
Gel paints have high density and pigmentation. They are easy to draw various design elements, including fine lines and raised details. It won't spread. Usually one layer is enough for the image to be bright.
Step-by-step instructions on how to paint with gel paint on nails:
- Apply gel paint to the finished manicure covered with top coat.
- Start drawing from the central element.
- Dry the final result in a lamp.
- Cover with top coat if desired.
Choose gel paints from trusted manufacturers. Cheap options often turn out to be fakes. They apply poorly and are of poor quality.
Experiment with gel paints from different manufacturers. Only through experience can you choose the best option for yourself. Keep in mind that the paint color should be rich. The consistency should not be liquid so that it does not spread during drying in the lamp.
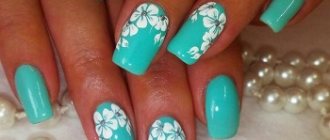
Refined flowers
We paint roses and other flowers with gel paint on gel polish using a dot or brush. The technology is as follows. Apply a base and then a color coat to the nail plate. Next, the nails are dried in a lamp and degreased.
Now you can move on to drawing. Flowers are applied to two or three fingers using a brush, and their middle dots are decorated with this.
What to draw with? For petals and centers, it is better to choose contrasting colors of gel paint. For example, white and yellow, as in the next photo. And the base is made in a rich dark blue tone. Although you can choose the opposite method, when the base remains light and flowers are painted on it with black or dark brown gel polish.
An acrylic jacket looks very good when two fingers on one hand are covered with a floral pattern.
The hand-made print must be dried in a UV lamp and covered with a top coat. Be sure to watch the video at the end of this article to understand how to paint with gel polish.