What is stamping?
Stamping is a nail decoration technique in which a design is imprinted from a special plate onto the nails using a stamp. Comes from the English word stamp - stamp. Craftsmen value technology for the simplicity and speed of design creation. And clients love stamping because it can help bring the most creative ideas to life. Because of its simplicity, stamping is also appreciated by lovers of home manicures.
This technique has many undeniable advantages:
- Using stamping, you can reproduce the smallest details and lines of an image. Sometimes it is impossible to make such lines with a brush;
- if the image is applied to several nails, then on each of them it looks the same;
- the market offers plates with the widest range of images;
- You can choose any colors to apply the image. For example, this cannot be done when using sliders;
- saves time - the procedure takes only a few minutes;
- The technique is used not only in manicure; you can apply designs to other surfaces, for example, on the back wall of a mobile phone.
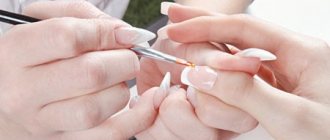
In order to stamp, you need to follow 3 simple steps:
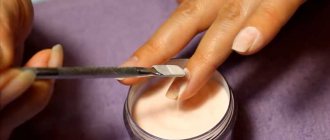
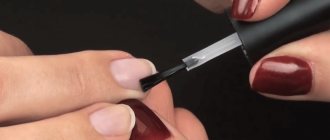
- apply special paint or varnish to the design located on the plate;
- print the drawing on a stamp;
- transfer the design from the stamp to the nail plate.
Nail stamp: how to use, what can be replaced at home, photo and video tutorials
October 14, 2015
Fantasy manicure has long become not just a familiar accessory for any lady, but also a way of self-expression. For creative types, decorating nails is a pleasant, many-hour process of creating nail masterpieces, but for the busiest and most practical beauties, the global industry has provided a faster and easier option - a nail stamp. How to use this wonderful set?
The question is so simple that even a child can understand this technology, all he has to do is practice a little, following the advice of experts. Acquiring skills will help you create clear, bright designs and significantly save on the services of a salon nail artist.
A wonderful nail design stamp device helps you apply an even and beautiful design without any artistic abilities, the ability to draw and create the smallest details of patterns! It is easy to use, you can quickly and effortlessly decorate your nails with an exquisite design. Stencils help in this simple matter - metal plates with patterns carved on them, from simple ornaments to complex compositions: flowers, natural motifs, animals and abstract textures.
They can be purchased either in sets or individually, choosing according to your taste and style. Using ready-made decors, you can create a unique mosaic on each nail or complete your look with a modest artistic accent on one or two fingers. At the same time, for experts, spectacular nail art takes no more than half an hour, and those who often practice decorating nails using stamping can handle it in 10 minutes!
Standard stamping kits, in addition to metal discs with patterns engraved on them, include a silicone or rubber nail stamp, which anyone who has ever stamped documents knows how to use; a scraper that helps remove excess varnish from the disk surface, as well as special acrylic paints for applying designs, reminiscent of varnishes, but with a thicker texture. It allows them not to spread, and craftswomen can create clear contours with the help of such paints. One stencil (round, hexagonal or rectangular) usually contains several print options (4-8, 7-9 or 8-10).
Knowledgeable lady craftsmen advise beginners to first purchase a ready-made set, and then purchase additional discs and paints of interest. The most popular and high-quality sets today are considered to be sets from the South Korean company Konad, but there are also more budget options, for example, such as Fix Price (China). In reviews you can find recommendations to start with the best disc manufacturer, and then, once you get the hang of it, move on to more affordable stencils. Otherwise, the desire to save money on templates can lead to disappointment and negative experience in the stamping technique: soft Chinese plates with unclear contours can cause sloppy prints on nails. Scrappers (or scrapers) can be equipped with a metal insert that makes it easier to scrape excess paint from the plates. However, it can also cause scratches and other unwanted damage to the disc. Experienced home craftsmen often use old plastic cards instead of scrapers; they are ideal for this purpose. In addition, the nail stamp has different configurations and sizes. It is better to think in advance how to use this tool with a rectangular shape (for long nails) or a small round one (for applying to short nails). Large patterns for small nails will be excessive, and small patterns on long nails do not look so harmonious.
Strict adherence to the rules and knowledge of several secrets of the craft will help transform stamping from a painful and fruitless activity into pleasure (not only from beauty, but also from the very process of creating a high-quality professional manicure). Preparation before stamping is no different from caring for nails before a manicure: first you need to degrease the surface of the nail plates, then use a nail file and an orange stick to give the nails the desired shape, gently pushing back the cuticle. Next, you need to apply a base layer of strengthening varnish. It will help to evenly distribute the decorative layer and protect the nail from its coloring pigments. At the same time, due to good adhesion to the plate thanks to the base coating, the pattern will last longer. When the base is dry, you can cover the nail with the background color. After waiting for this layer to be completely fixed, before using the stamp and nail scraper, fill in the desired pattern on the plate with a contrasting acrylic-based varnish. At the same time, it is necessary to ensure that the entire pattern is filled with paint, otherwise a fuzzy pattern will appear on the nails. Holding a scraper or old plastic card at a 45-degree angle, quickly and firmly remove the excess varnish once it has set. Next, to transfer the design you will need a nail stamp. How to use this tool?
We place it perpendicular to the surface of the disk, pressing it lightly, and roll it out to remove the paint from the engraved notches so that the pattern is clearly fixed on the silicone or rubber pad of the stamp. Then we transfer it to the nail plate, pressing it tightly and with a precise movement onto the working area of the nail and trying to completely imprint the pattern. Next, lightly roll the stamp without moving it or smearing the contours of the design. The silicone stamp pad requires special care and quick response. When the nail stencil is filled and slightly dry, you need to quickly imprint the design on the nail with a stamp made from this modern material. To do this, experienced people advise placing all the tools as close as possible in order to have time to transfer the print to the nail before it is firmly fixed on the silicone. The final stages of simple nail decoration will be correction of the design using a dart, a cotton swab or a toothpick with a small amount of cotton wool and nail polish remover, which will help to carefully remove errors from the side ridges and cuticles, as well as a fixing layer with a top transparent coating.
Knowing how to use a nail stamp correctly, you can repeat these steps as many times as you need to create designs on your fingers. After all, stamping is not just a lesson in creativity, but an excellent way to create masterpieces without resorting to the services of professional nail designers.
Before using all stamping tools, you must ensure that they are absolutely clean. When removing the film from the stencil, you need to treat the plate with an acetone-containing product. You should also clean the die thoroughly. Any oil products form a thin film that negatively affects the quality of stamping masterpieces. They can also be removed with a liquid containing acetone.
The openwork pattern with finely applied lines dries quickly enough, so after just 0.5-1 minutes it can be covered with 2-3 layers of topcoat. Moreover, this must be done with careful, quick movements so that the drawing does not become blurred. A full imprint of the ornament should be obtained the first time. The density and saturation of the varnish play a big role, so you need to purchase only special acrylic varnishes. The usual one is too liquid - it will pour out of the stencil and spread over the nail.
A varnish that is too thick will not fill all the voids in the template and will not adhere well to the background coating of the nails. Particular attention should be paid to how to use a nail stencil with a stamp made of rubber that is too hard or too soft. A poor-quality hard stamp base will not transfer the design, and a pad that is too soft will displace the paint from the template, and the pattern will be unclear.
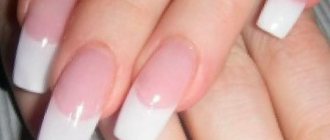
If stamping seems too simple to you, then you can use it as a basis for artistic painting, giving free rein to your imagination. For many craftswomen, small elements on discs become a real godsend to revive a French or any other classic manicure.
Another modern technique for those who are bored with a plain manicure is reverse stamping. It will take a little more time than usual practice. Its essence is just as simple: a layer of black or colorless varnish is created on the stamp, then, when it dries a little, a small pattern from the plates is added on top of it. After the sticker-film has dried, it is removed from the stamp and transferred to the nail, after covering it with top coat or plain varnish.
For beginners, it is better to do this with a small pattern so that you do not have to trim it. Experts who have become skilled at it can create entire mosaics from individual drawings from different plates.
Opinions about this revolutionary technology in nail art are usually only positive. Anyone who has tried stamping at least once cannot remain indifferent to this practice. Fast, convenient, easy in conditions of total shortage of the most important resource - time, this technique is simply irreplaceable!
Fashion on Naked: the best images of stars. We select a Naked cosmetic bag for your make-up It’s nice when fashion pushes us not only to experiment, but also to accept ourselves and our beauty. It is fashionable to have a positive attitude towards your own body.
Toxicosis: causes, consequences, treatment It is incorrect to assume that nausea only bothers a woman in the morning. It can last all day, but is most pronounced in the morning. This comes from.
20 photos of cats taken at the right moment Cats are amazing creatures, and perhaps everyone knows this. They are also incredibly photogenic and always know how to be in the right place at the right time.
9 Famous Women Who Have Fallen in Love with Women Showing interest in people other than the opposite sex is not unusual. You are unlikely to be able to surprise or shock anyone if you admit it.
7 Body Parts You Shouldn't Touch with Your Hands Think of your body as a temple: you can use it, but there are some sacred places that you shouldn't touch with your hands. Research showing.
How to look younger: the best haircuts for those over 30, 40, 50, 60 Girls in their 20s don’t worry about the shape and length of their hair. It seems that youth is created for experiments with appearance and daring curls. However, already last.
Materials: https://fb.ru/article/209703/shtamp-dlya-nogtey-kak-polzovatsya-pravilno
What is stamping?
It's not always possible to go to a salon to get your hands in order. And at home, it’s somehow safer - and there’s no risk of catching a fungus, and you’ll save money. And you can always learn the most necessary procedures for maintaining pens in decent condition.
For those who want to stand out from the crowd and want to be creative, there are different methods for decorating nails - from simple varnish to creating real nail art. Difficult? Certainly. But there is an easy way to get beautiful designs on your nails. And it's called stamping.
Dots
Dots or dotter, nail dotter is a small stick made of wood or plastic with a metal tip with a ball. The name is translated as “point”. Indeed: the tip leaves dot marks on the nails. This is what the tool was invented for. For a polka dot manicure, this is an ideal device.
The size of the dots can be any. The size of the imprint on the nail depends on it. It’s a pleasure to create nail art using such a professional manicure tool: daisies, curls, balls... It’s best to buy dots with a medium-sized ball on one end and a smaller ball on the other: choosing the right size will be a simple matter. But you can easily replace the dotter with a pin with a ball at the tip, a used pen refill, or a toothpick to always look attractive.
What is stamping
This is a method of applying a design to nails when the design is literally transferred from a stencil using a stamp and varnish to the nail in just a couple of movements. The technique is so simple that it can easily be used at home.
To do this, you need to acquire several tools, select discs or plates with the decor you like, and purchase several shades of special stamping varnishes. By the way, for home use of the technique, some things can be replaced with more affordable options. Below we will consider the issue of possible replacements in more detail.
Recommendations and ground rules
There are a few important stamping rules to remember:
- Purchase only high-quality materials, for example from Konad. Having bought inexpensive materials, you can be disappointed in this manicure technique, not knowing that the fault of the unsuccessful design was the low quality of the tools. The stamp may not absorb paint well, and the scraper, for example, may not be good at removing excess paint from the stencil
- To make the patterns rich and beautiful, you should use acrylic-based paints for stamping. Due to their absence, thick or slightly dried regular nail polishes may be suitable.
- It is necessary to allocate 2 hours of free time in order to try the stamping technique for the first time; having mastered it, the cosmetic procedure will take no more than 15-20 minutes.
- It is better to practice transferring the design to the plate on an uncoated nail. This way you can quickly erase patterns and correct mistakes without destroying the base layer.
Rules regarding stamping technique:
- You should first degrease the surface of the nail.
- How you transfer the design to your nails determines its clarity and aesthetics. You need to reprint the pattern using a stamp using rolling movements.
- It is imperative to use a fixative, applying it over the design.
- The varnish is removed from the scraper and plate with oil-free nail polish remover, so the tools can be reused.
- The scraper must be pressed tightly against the disc without fear of scratching it, as this will not affect the manicure itself.
- To make your stamped nail design perfect, you should hold the scraper at an angle of 45⁰.
By following these rules, you can quickly achieve results in the basis of stamping technology.
Stamping tools. What it is
1. The most important tool is a stamp. It is not as simple as it might seem at first glance. Consists of a handle and a polymer elastic pad. She is the one responsible for high-quality copying of the drawing. The handle can be more or less large - choose according to your hand. There are also double-sided stamps: on one side there is a small pad for small elements, on the other there is a large area (for drawings on the entire nail).
2. Another important tool is a scraper. He's a scraper. Designed to remove excess varnish from the plate. It must have a perfectly flat and smooth working surface - otherwise defects are possible. And the reverse side should be comfortable to grab with your fingers.
3. Where do the drawings come from? From stencils. They come in different shapes, with round discs and rectangular plates being the most common. They contain a different number of drawings (from 5-6 to almost a hundred). Accordingly, the greater the number of motifs presented, the larger the stencil area, the more expensive it will cost you.
4. It’s good to have an orange stick to correct mistakes if necessary. But a bamboo toothpick will also work, and in some cases a cotton swab.
Tools and materials for stamping
The stamp, stencils and stamping scraper are sold in sets and separately. The features of their choice will be discussed further.
Stamping kits: types, composition and features
Stamping kits include:
- Stamp transferring patterns;
- scrapper;
- discs and stencils with indentations in the form;
- manicure varnishes or acrylic paints.
The following stamping kits are considered the most popular:
- Stamping from the Korean company Konad. The company's products are high quality. She offers a wide range of small stencils for beginners and large stencils for nail technicians. The disadvantage of this set is that the scraper is metal, it scratches the surface of the disk itself.
- Essence stamping kit. Its price is slightly lower than the previous set. However, the product has identical properties. The only negative is that the designs are poorly cut, so if you don’t press enough, they may not be perfectly transferred to the nail.
- Fix Price stamping kit. They are suitable for beginners, since their price is low and allows them to master the technique while learning. The engraving of the stencils is shallow, which also complicates the process of transferring the pattern.
Today, there are a large number of sets from manufacturers in China; they can be ordered via the Internet, but you need to pay attention to the material of the scraper and stamp, and the depth of engraving of the discs.
How to choose a stamp for stamping and what to replace it with
A stamp, as a nail stamp is called in the foreign version, is a small pillow in a plastic case that transfers a design to the nail. In other words, it is a nail stamp. They come in several types:
- Rubber. Their pad is highly rigid, so the pattern may turn out pale. There are two options for cleaning it: using stationery tape and acetone nail polish remover; it should not contain oils or other fatty components.
- Silicone. They are characterized by increased softness. When imprinting a pattern, you should not press hard on it, as it may take on a different shape. The design may not be translated due to the remaining thin protective film on the stamp. Before using a silicone nail stamp, you can carefully file off the top layer of gloss from the stamp with a file. Also, the transferred drawings may be thinner than on the stencil due to contamination of the stamp. You need to clean it with tape. Acetone can quickly damage the surface of the device.
- Silicone with a sticky layer. Their properties are similar to regular silicone ones, but they feel softer and allow the nail to completely sink into the material. There is no need to process such stamps with a nail file. They are also cleaned with tape.
Thus, silicone stamps can be considered more practical. But due to their absence, you can make a nail stamp with your own hands. To do this, you need to cut out a small circle either from linoleum or from a regular eraser. These are the ones that a newbie in stamping can use to replace a nail stamp from a store.
Stencils, discs, plates: what is the difference
Stamping discs are thin metal plates with engraved designs. Depending on the number of patterns available on the stencils, the manufacturer and other features, plates intended for stamping can be made in a variety of options.
Typically, stencils for reprinting a design onto a plate are produced in the format of small round disks, on which 4-6 different patterns are presented. Stores also carry large rectangular plates with dozens of patterns.
When purchasing, you need to pay attention to the clarity of the edges of the design and the engraving itself; it should be deep. It is these factors that determine the quality of stencils.
Which scraper to choose
A scraper is necessary to remove excess varnish or paint from a disc.
There are metal and plastic scrapers. The former eventually scratch the surface of the stencils, but this does not in any way affect the quality of the resulting drawings. The latter do not remove excess varnish from the recesses evenly enough, and therefore the design is not completely transferred. A metal scraper ideally removes varnish, leaving as much paint in the engraving as is necessary for a clear print.
A regular old plastic card can be used as a replacement for a store scraper for a beginner.
What varnishes are best to use
For stamping, special paints should be used. However, if it is not possible to buy stamping varnishes, then thick regular varnishes will do. The texture should be slightly viscous and thick. Their color should be rich.
What kind of paint is needed for stamping?
Stores sell special acrylic paints for stepping. They are thick and dense in consistency. When choosing a product, you should focus on its pigmentation and color saturation. It is recommended to use only bright colors, otherwise the patterns on the plates will be dull and pale.
Budget stamping paints don't always meet all the criteria, so sometimes it's better to use an old regular varnish than a bad special paint.
Other tools
When transferring a pattern to a nail, varnish marks may remain on the rollers and around the nail, which are difficult to remove. To do this we need a cuticle protector or Cuticle Defender. It should be applied to the nail before the stamping procedure. You can start manicure after it has dried. Then, after creating the design, the resulting film must be removed.
What errors are possible and why stamping fails?
It happens that shortly before the design, you applied cream to your hands or were fiddling around in the kitchen, and your nails were not degreased before stamping. In this case, the drawing may not be printed or will not adhere well.
Perhaps you chose the wrong varnish. And it either dries right on the stencil, or flows from it, or does not completely fill the grooves of the ornament.
The most common mistake is working too slowly. All movements must be fast and jerky. Before blaming your supplier for faulty plates or bad varnish, practice your speed and make sure you're doing it right.
The design can smear if you cover it with a top coat of varnish and do it unprofessionally: apply too much pressure to the brush, brush repeatedly over the same place, etc.
Stickers
Sticker stickers for nails - save time in drawing complex patterns. If you don’t have enough experience, time, or patience, but you need to create an effective design “here and now” without much effort, then stickers will help out. True, stickers can hardly be called only a professional tool for manicure: after all, we have been using them successfully at home for a long time.
We cut them out or peel them off, apply them to the nail or a layer of colorless varnish, look at the type of sticker, and apply a finishing coat on top. All is ready! Thin paper or newspapers can replace stickers in creating a stylish manicure: cut out, applied and varnished. By the way, the relevance of newspaper design has not diminished. And always looking attractive with him is a simple matter.
How to replace a stamping stamp and other tools
Sometimes you don’t have enough time or money to buy professional stamping tools. But I want to experiment. Is it possible to replace them with something?
· Strain
difficult to replace. But probably. The main thing in it is a pad of suitable elasticity. At the same time, it should not absorb liquid and not have pores - therefore foam rubber is not suitable. You can take a piece of pliable plastic or silicone. You can experiment with children's “jumping” balls; they are made from a material that has suitable properties. Anything can be used as a handle – metal, ceramics, wood, plastic. You can attach an improvised pad to it using quick-drying universal glue or a glue gun.
· scrapper
easier to replace. For example, any plastic card can play its role. The main thing is that its edges do not have grooves, cracks, or chips. Otherwise, defects in the design are guaranteed.
· Stencils
Unfortunately, nothing can replace it. They are made using high-precision engraving. It will not be possible to imitate it at home.
Transparent Stamp for Stamping: 5 Rules of Work
The transparent stamping stamp has become a real discovery in the world of stamping design.
It opened up wide possibilities for perfectly centered patterns, as well as multi-layered and colored stamping.
As a reminder, the Crystal Clear Jelly Stamper is made of clear plastic and has an inspection hole at the top of the body. The pad of a transparent stamping stamp is transparent, just like glass. It consists of non-stick silicone with optimal softness.
The transparent stamping stamp appeared on the market relatively recently, but has already received a huge number of admiring reviews.
(We will collect reviews of the transparent stamping stamp for you in the next article)
The transparent stamping stamp has rightfully become the most popular among stamps. But at the same time, about 10% of users encounter difficulties in working with Crystal Clear Jelly Stamper. The fact is that owners of the new stamp simply do not know the specifics of working with silicone stamps and, in particular, with a transparent stamp.
Today we will look at the basic rules that should be followed when working with a transparent stamping stamp.
In general, using a transparent stamp for stamping is absolutely not difficult and is even much easier than, for example, rubber or sticky silicone stamps. You just have to adhere to certain principles.
Don't press too hard
Strong pressure and pressure on the pad when capturing the design onto the stamp is the most common mistake when working with a transparent stamp. If you press hard with the stamp on the plate, the paint is partially pushed out of the engraving, and the design will turn out with bald spots.
When transferring the design from the plate to the stamp, use a light roll (without pressure).
When transferring from the stamp to the nail, use pressure with a little more indentation in the area of the side ridges, but do not overdo it with pressure so as not to distort the design.
We recommend watching a visual video: “Working with a transparent stamp for stamping” (the video is also at the end of the article)
Work fast
The basic principle of working with any silicone stamping tool is maximum speed. Silicone absorbs slightly less paint from the plate than rubber, and therefore the paint dries faster. If you aim for a long time and try on the design, it will simply dry out on the stamp and will not be imprinted on the nail. Therefore, we recommend that you practice and work on, first of all, the speed of movements on paper.
The engraving of the plate is of great importance. If the design is dense and the engraving is deep, you can hold it on the stamp a little longer.
If the engraving is not deep or consists of thin lines, you must work very quickly and spend no more than 3-5 seconds on each movement.
3. Clean with tape
The silicone pad of the transparent stamping stamp has an enhanced ability to attract dust and small particles. Therefore, you should not clean the Crystal Clear Jelly Stamper with cotton pads or napkins - because... they leave lint behind.
It is recommended to clean the stamp pad with the sticky side of tape or a clothing cleaning roller. This is not only the most effective, but also a very convenient method of cleaning the stamp. And also - significant savings on railway transport.)
For ease of use, just unwind a little tape and, bending the sticky edge, secure the strip to the roll.
In addition, the manufacturer of the transparent stamping stamp states that transparent silicone can become cloudy when exposed to acetone-containing HDSL for a long time. So it’s still not worth the risk.
Use thinner stamping paints
Some owners of a transparent stamp have discovered that in some cases the stamp behaves differently depending on the stamping paints. In particular, Crystal Clear Jelly Stamper does not always work well with Konad stamping varnishes, which are considered the highest quality.
In some cases, a transparent stamp behaves unstable with old El Corazon Kaleidoscope stamping inks (most often with black St-01 Black, white St-02 White, and occasionally with St-21 Gold and St-22 Silver). Other colors of Kaleidoscope paints do not create any problems when paired with a transparent stamping stamp.
We hasten to note that the black and white paints of El Corazon Kaleidoscope are not finalized in their composition and too often cause difficulties in working with different stamps. So when purchasing these paints, be prepared for possible surprises. They look like this:
If you encounter difficulties working with a transparent stamp and Konad or El Corazon Kaleidoscope varnishes, it is recommended to dilute the varnish with a small amount of HDSL (without oils or additives).
We have been testing different paints with transparent silicone for quite a long time and came to the conclusion that the most suitable paints for transparent stamps in terms of their structure are KADS stamping paint and original BORN PRETTY paints. Read more about KADS paints: read here...
What material should I use to replace special stamping varnish?
There are craftsmen who take the risk of stamping with acrylic paints. We don't recommend it. Acrylic materials harden quickly in air and are extremely difficult to wash out of the stencil grooves. There is a possibility that such a disk or plate will have to be thrown away.
It is better to experiment with ordinary varnishes - choose dense, saturated shades of medium thickness. Or pay attention to varnishes marked “for drawing”; they are most often sold in small bottles with thin brushes. By default, such materials dry quickly enough, have a dense, rich color and suitable thickness. Moreover, they are inexpensive.
Requirements for the room where stamping is done
Always remember that you are working with nitro soluble organics. Accordingly, it has a strong chemical odor and is highly flammable. It is from these considerations that you need to choose a place for stamping.
If you decide to settle in the kitchen, the gas stove should be turned off during the manicure. Yes, and electric too. Open the window or sash slightly. Turn on the hood if you have one. Place all products in the refrigerator and cabinets or seal them in bags - acetone fumes are perfectly absorbed by bread, pastries, and sweets. Do not allow paint or solvent to come into contact with products - these are toxic substances. Cover the table where you decide to decorate your nails with paper or film. Drops of varnish, of course, can be removed with nail polish remover. But it can damage the varnish coating of the wood, the oilcloth pattern, and the plastic. After finishing work, provide the kitchen with strong cross-ventilation until the smell of varnish and solvent disappears completely.
All this is also true if you decide to work in the room. There should be no burning candles nearby (romance comes later). Provide fresh air. Remove allergy sufferers, asthmatics and (ideally) children from the room. Count all the tampons or wipes you've used so you can throw them all away and not lose a single one. The toxic properties of the liquids remaining on them remain for a long time, and someone may get hurt.
Stamping for nails. How to choose and where to buy
It is better to choose tools and materials for stamping in a specialized store. Starter kits are often found on sale - a stamp, scraper, 1-3 varnishes, a plate or disk. You can start with this. And then, after practicing, you will understand what you are missing and buy what is missing.
Pay attention to the assortment of the Nails Plus online store. Here, at quite affordable prices, you can put together a whole collection of necessary materials and tools. At the same time, you will be confident in the quality of the goods.
This store is very convenient to choose everything you need and make purchases. There is a customer support service where you can answer any questions. Fast delivery to any point in Ukraine is organized.
Source of the article: https://nailsplus.com.ua/polezno-znat/stemping
Stamping machines
The machine is equipped with a scraper, a place for loading the plate and a hole for the nail. The set includes: 5 colors of stamping varnish, 6 single plates, scraper, instructions for use, stamping machine.
How to use the stamping machine:
- To do this, just select the image on the plate
- fix the plate in the machine
- apply a little varnish to the drawing
- run over it with the scraper built into the machine
- print the image
- insert your finger into the hole and press to print the image
The operating principle of the machine is the same as regular stamping
, only everything is recorded in the typewriter.
Among the disadvantages it is worth highlighting:
- small range of plates
- high cost of the machine
- fragility
Doing stamping by hand will be much easier and faster.
Stamping - a list of my tools for it and other bells and whistles down to the smallest detail (part 1)
I was inspired to write this article by this phrase from my search -
Thanks to this phrase from the search, I realized that this is an excellent reason to photograph everything I use in stamping, from basic tools to additional, not entirely necessary little things.