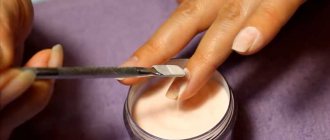
Acrylic for nails is a proven product for extending and strengthening natural nails, used by nail industry professionals. Acrylic is a two-phase product consisting of powder and liquid.
The procedure can be performed independently if you study the basic techniques and purchase additional tools.
Technology on tips
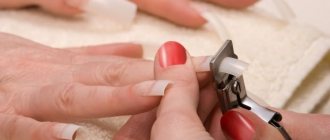
Nail extension with acrylic on tips involves a similar technology using all the components. The process will require plastic, transparent tips, glue, and tongs to shape the nails.
It’s not difficult to build up on forms, but on tips it’s much easier. You need to start by cutting the length of the platinum, processing the cuticle and removing the dermis film.
The next step is to apply glue to the tip and fix it on the nail. Tips are glued to the middle of the nail and trimmed to the desired length.
The surface of the nail plate and tips are cut off with a buff, forming a rough structure. Apply primer and begin laying out acrylic. In the process of moving from the nail plate to the free edge, forceps are used to give a perfectly even shape from the sides. Use a file to file down uneven surfaces and create a glossy finish. The final stage is design.
Extension to upper forms - step-by-step instructions
Undoubtedly, in your head, and maybe on paper, a scheme for designing marigolds and their configuration is ready. Start with a hygienic manicure, then proceed to extensions.
- Degrease the plate and spread the primer;
- using a brush, fill the silicone blank mold with an acrylic mixture - 3 balls are enough;
- apply the base to the nail, center the natural surface with the base;
- Press the filled blank against the nail plate with force, while the excess composition is squeezed out. Hold the base pressed for 30-40 seconds;
- Use a brush to form the shape of the extension and remove the workpiece.
Sand the free edge, treat the cuticle area with an oil composition. The method is relevant for beginners and home use.
Step-by-step video on how to do acrylic nail extensions
We invite you to watch a detailed master class on extensions. You will see how to prepare your nails, how to properly attach the form, how much acrylic beads to apply, and their even distribution.
https://www.youtube.com/watch?v=w0LqW-_xm0EVideo can't be loaded because JavaScript is disabled: Acrylic nail extensions. Master class on manicure from Evgenia Isay (https://www.youtube.com/watch?v=w0LqW-_xm0E)
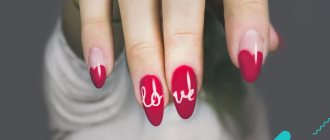
Here you can learn how to apply a French manicure to extended nail plates. The master shows how to draw a smile evenly using a brush.
https://www.youtube.com/watch?v=ydwS9gdtWzIVideo can't be loaded because JavaScript is disabled: French manicure for extended nails (https://www.youtube.com/watch?v=ydwS9gdtWzI)
Now you know what acrylic coating is and how to make it yourself at home. This procedure is considered expensive, so it may not be affordable for everyone. If you wish, you can purchase all the necessary materials and make such creations yourself at home. After all, now you know what tools are needed for this, and what the application process is like. Using the video for beginners and additional lessons, you can fully understand the basic secrets and tricks of acrylic nail extensions.
Correction
Artificial nail plates require certain care, including periodic correction. The procedure is virtually identical to extensions, but the use of thrips or forms is no longer required.
A step-by-step description of the correction process is given below:
- Initially, standard disinfection actions are carried out. In this case, it is necessary to refrain from using acetone-based products, since it will negatively affect the condition of the artificial layer.
- The usual hygienic manicure is carried out, which consists of removing cuticles and hangnails, as well as treating the skin around the nail.
- The overgrown part of the nail, which stands out against its general background, is removed using a file with a fine structure of the working surface.
- At this stage, disinfection is carried out again , after which you can use a napkin with no lint to sand the cut ends.
- The surface to be treated is moistened with a primer , after which acrylic balls can be prepared using the already described method, which are stretched over the entire area that needs adjustment.
- After the material has hardened, you can use files and a buffer to give the required shape and polish.
Acrylic extension: fly in the ointment for nails
Even if the instructions have been fully studied and followed, all materials are of high quality and tested, some things cannot be protected from. Disadvantages of acrylic extensions:
- Unpleasant odor during the procedure. It goes away quickly after the process is over.
- This is very harmful for nail psoriasis or other fungal diseases. Get treatment first.
- With prolonged extension, the consequences for nails are unpredictable. Under acrylic, the plate does not breathe and does not receive the substances necessary for growth.
- This procedure can only be performed at home under the guidance of a professional or after completing special courses.
- In case of an allergic reaction, you urgently need the help of a specialist! Don’t wait for it to “go away on its own.” Acrylic extensions are a very responsible process.
It will definitely be interesting to read:
- Step-by-step video instructions for correcting gel nails
- How to quickly restore nails after extensions?
- Step-by-step instructions for covering nails with biogel at home
Required materials and tools
The implementation of the procedure is preceded by preparatory work, which includes the preparation of all necessary materials and tools.
To carry out the extension, you will need to prepare the following minimum set of devices:
- Acrylic powder intended for the production of working mass.
- The monomer is in a liquid state, which is required to dilute the base material; without it it will not acquire the required consistency.
- Any product intended for disinfection activities.
- Primer.
- A cosmetic type of glue.
- A means for applying a fixing finishing coat.
- A special brush for working with the material, as well as means for cleaning it.
- A set of various files for surface treatment.
- Forms or tips depending on the chosen technique.
- Orange sticks.
You can also purchase ready-made kits, which include everything you need for extensions. People carrying out the procedure for the first time are recommended to use this option to eliminate the risk of purchasing products that are incompatible with each other or an unsuitable instrument.
Laser correction of ingrown toenails
A separate topic for many girls is the correction of ingrown nails with a laser device. This technique appeared relatively recently, but quickly became the most effective in solving this problem.
An ingrown toenail is an unpleasant and dangerous phenomenon. For example, if it grows into the leg, it can cause gait distortion or injury. For some time, a pedicure on the foot can save you from it, but often the effect lasts for less than 2 weeks.
How to perform laser correction of a toenail step by step:
The technology includes exclusively medical intervention. You shouldn’t expect them to give you a pedicure or file a plate – this is what beauty salons do. First, you will need to fill out some paperwork and choose a suitable painkiller, then, together with your doctor, decide on the type and strength of the laser beam; Pain relief can be carried out with lidocaine subcutaneously or using special creams (ointments); The skin ridge is removed first. It is this that is the main cause of improper growth of the plate. The doctor simply burns it out with a carbon laser; Under the ridge there is almost always a process, which is the main cause of ingrowth. It is adjusted using tweezers and supported with gauze turunda for fixation; The treated area will require special care for several days.
If it’s summer outside, it’s important to avoid dust and dirt, and also avoid swimming in open water; if it’s winter or autumn, it’s recommended to wear loose shoes.
The average price of laser correction is $10 per session. To find out exactly how much a procedure costs, you need to consult with a doctor personally, demonstrate the scope of work and choose the optimal treatment option.
For several years now, shellac manicure has been steadily gaining popularity. And all thanks to the natural appearance of the nails covered with it, reliability and durability. But this coating also has one small drawback - the need for periodic correction. How to make it at home?
Methods of acrylic nail extensions
We'll help you choose!
If you don’t know what to choose for extensions - gel or acrylic - read our article in which we described in detail the advantages and disadvantages of both methods.
There are several techniques for working with the material. When choosing, you need to take into account the fact that this is a quickly hardening material. Therefore, the procedure should be performed quickly and it is advisable to practice several times before you begin the “control” attempt.
Acrylic extension techniques:
- For tips;
- On the forms.
Extending nails with tips is a very fast way: you can get beautiful nails in less than an hour. Disadvantage - you cannot make thin, pointed claws. Of course, you can try if you want, but the process of cutting out tips will be long and painstaking. Most often, tips are used for wide, square-oval nails.
When extensions are applied to forms, you can get absolutely any type of nails.
Forms for extensions are:
- Upper. The material is laid out on the recess inside the form and then pressed against the treated nail.
- Lower ones. Small balls of acrylic are laid out with a brush, and a nail of the required shape and length is made.
The technique of laying acrylic on top of a mold with a brush is the most painstaking and time-consuming. If a beginner chooses this method, he will have to practice many times. An alternative is top forms. The technique is easier, the nails are smoother.
Extension instructions
We have already mentioned two methods of acrylic nail extensions. Now let’s take a closer look at the main steps that need to be taken to achieve a stunning effect when using each.
The technology using tips involves the following steps:
- Trim your nails short.
- It is necessary to remove the shine and make the surface of the nail rough (for better adhesion to the tip) by treating it with a nail file.
- Clean cuticles.
- Select the desired size and shape of the tips.
- Degrease the surface with alcohol.
- Apply glue to the tip of the tip and press it onto the nail for 20 seconds. Alternately apply glue first to one hand, then to the other.
- After completing the previous step, trim off the excess.
- Use a nail file to remove excess shine to give a natural look and even out the border.
- Remove dust with a brush if necessary.
- Treat the surface with primer and wait until it dries.
- Take a monometer, acrylic and a brush. First, dip the brush into the strengthening solution and then into the acrylic so that a ball forms at the tip of the brush, and begin applying the manicure from the little finger from the tip to the base. You can lay out three balls - the smallest one in the cuticle area (in this place you need to apply a very thin layer), the middle one - on the free edge area and the large one - in the stress area.
- When everything is dry, you need to smooth out all the unevenness and give the nail the required width and length.
- Coat your nails with oil to ensure shine.
These simple techniques will help you achieve no worse results than in a beauty salon. Just try it and you will be surprised how easy it is.
Popular articles Chamomile made from uninflated balloons
There are other ways to work with the acrylic component. We also remembered them. Now let's figure out how to work with them.
The technology of extension to lower forms is performed as follows:
- Wash your hands and clean with disinfectant.
- Use a nail file to file down the top coat of the nail to even out the surface. Then remove the dust with a brush or something else.
- Clean the cuticle, pushing it towards the base of the nail.
- Apply primer.
- Put the form on and bend it, secure it in the middle and press it.
- It is necessary to connect the ends of the form, but remember that the ends should not be closed to ensure the correct shape of the nail.
- Apply primer again. Place a white acrylic ball on the mold and distribute evenly.
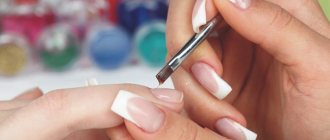
- We draw a smile, for which we use liquid in which we dip a brush.
- Place a pink ball on the natural nail so that the white and pink colors barely touch. The second ball must be applied to the cuticle area. The sides and entire surface must be level.
- Remove the form after the paint has dried, level and sand the surface of the nail with a nail file.
- Lubricate the surface with oil and apply clear varnish to enhance the effect.
You can also use another technology for working with forms - extension to upper forms, in the following stages:
- Clean the surface of the nail in the same way as when applying extensions to the lower forms.
- Choose the top shapes you want.
- Apply three balls of acrylic on them and distribute evenly along the length of the nail.
- Place the mold on a natural surface and remove any excess with a stick.
- Leave it for a few minutes (7-10) to dry.
- Remove the form and use a nail file to give the nail the desired look.
Try the following technologies for working with marigolds. You will definitely be pleasantly surprised by the result of your skills and abilities. You didn't even suspect that everything was so simple. Now you can easily open your own home beauty salon and give spectacular manicures to yourself and your friends.
Always be on top, dear women, because your beauty can really save this world!
Drying the primer
Those who are interested in how to properly dry primer on nails, in a lamp or in the open air, need to know that these preparations are divided into two groups. The first is self-affirming. There is no need to dry them in a lamp; just leave them in the open air for a few minutes, trying not to catch the coating with foreign objects. Such drugs include the popular Bluesky. Its affordable price and excellent properties have made the product popular with many beauties.
The second type is light-curing. This preparation is dried only with the help of a lamp. It cannot harden in air. The drying time of the drug can be found on the packaging in the manufacturer’s instructions.
There is no need to determine the time the nails are under the lamp by eye; it differs for each type of preparation. Prolonged drying can harm your nails, and a shorter period than indicated on the package will not allow the coating to fully harden.
Most of the products produced are self-curing. This is more convenient for those who do their own manicure at home. After all, not every girl has the opportunity to purchase a special lamp because of its cost.
Before purchasing a primer, be sure to carefully read the instructions. It indicates how to dry the drug - in the open air or under the rays of a lamp. You cannot experiment if it is indicated to dry without any impact - do so.
Be prepared for the fact that after the product dries, the nail may become matte. This does not happen with all means. For example, bluesky makes the coating shiny and transparent.
Some types of preparations take quite a long time to dry. You cannot apply gel polish until the base layer has hardened. Otherwise, instead of a perfect smooth finish, you will end up with an ugly manicure with folds, which will not give you originality.
The shelf life of the primer can be found on the packaging. It is not recommended to use an expired drug. It may become oily and very thick, in which case you will need to buy a new one. Store the product in a cool, dark place; sunlight has a detrimental effect on it.
Now you know what a primer is and whether it needs to be dried in a lamp. Don’t be lazy to read the instructions that manufacturers provide for each cosmetic product, then you will never have problems. Use primer and be proud of your beautiful manicure in any life situation and at any special event.
What you should pay attention to when choosing tips
The key points in choosing tips should be:
- artificial nail shape;
- the material from which they are made;
- color spectrum;
- features of the contact zone.
Tips forms
If a girl extends her nails at home, then the tips should be chosen in such a shape that they are as similar as possible to the appearance of the natural nail plate.
This will avoid the need to adjust the contact area, and will also significantly reduce the risk that extended nails will look rough or unnatural in combination with the length or thickness of a particular person’s fingers.
If the tips are selected for use by a girl in her professional activities (regardless of where she provides services - at home or in a beauty salon), it is necessary to buy artificial plates of various shapes.
The greater the choice of forms the master has, the higher the quality of his work will be (only thanks to correctly selected tips can you create a neat, natural-looking manicure). If it is not possible to purchase tips of various shapes, it is recommended to manually adjust artificial plates, cutting off excess plastic or nylon using special templates.
Material
Despite the fact that the most popular are tips made from ABS plastic, in the vast majority of cases nylon plates are more suitable for manicure.
Not only can they be used when working with nails of any length (plastic tips can only be attached when creating a manicure of minimal or medium length), but they also sit more firmly on the nail plate and are also of higher quality.
Popular Articles Get Ice? Instantly?
To check the quality of the tips, just bend them in half. High quality materials will not allow the plate to break, and when unbent, there will be no traces of mechanical impact left on its surface. Low quality samples will break or crack when bent, and after returning to their original shape, creases will remain at the bend site or local discoloration will form.
Color spectrum
Tips in their appearance should be as close as possible to the natural shade of the human nail plate. It is recommended to choose milky or light beige plates. Professional craftsmen in some cases also use transparent tips.
Although this type of consumable will look exactly like natural nails, it is not in great demand among professional nail technicians. This is due, first of all, to the high cost, as well as the lack of distribution of such goods in stores and suppliers.
Features of the contact zone
The contact zone of the tips is the area of the artificial plate, which is attached in close proximity to the cuticle. This part of the tips can be round, square, oval, and so on.
Despite the fact that it, like the free edge (the part of the tips extending beyond the finger and natural nail plate) can be adjusted manually, only experienced manicurists can do this efficiently.
If the contact zone is improperly filed, the tips will not fit tightly to the nail, which will make the extension process impossible. Correction of the contact zone should be carried out using a hard file or a special attachment on a machine for hardware manicure.
Advantages and disadvantages
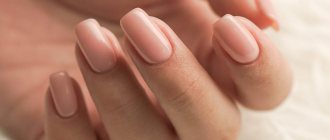
Acrylic extensions allow you to create natural-looking nails due to the elasticity of the material used. They will be thin, but at the same time persistent and able to last quite longer than the same gel. Acrylic extensions can be removed independently using a certain solution and any damage can be restored. In addition, this type of coating does not limit the possibility of using various techniques and implementing designs. Finally, it is worth mentioning that acrylic nails are not subject to temperature fluctuations, so there is no need to worry about them breaking when moving from a warm room to a cold one.
Unfortunately, acrylic also has some disadvantages. The nail does not reach the nail at all, but together with the extended edge it acquires a specific smell that is unpleasant to many clients. During the procedure, it may cause discomfort, but after a few hours the nails stop smelling. An allergic reaction is likely to occur; in addition, the natural healthy shine of the plate may temporarily disappear. Finally, the acrylic extension procedure is quite complex.
Advantages and disadvantages of acrylic
Acrylic nail extensions allow you to design your nails according to your own taste. This fact is especially pleasing to representatives of the fair sex who want to increase the length and change the shape.
Of course, this is not the only advantage that can be highlighted among the existing advantages; it is worth noting that extended nails have:
- natural and neat look;
- have increased strength;
- capable of filling microcracks on a natural plate;
- has an affordable price;
- can be easily repaired if damaged.
The material of artificial nails has a specific, unpleasant odor. Those with a sensitive sense of smell will find it unpleasant. However, the result that the girl will see after will certainly please her, and the one and a half hour period of extension will remain a thing of the past.
There is one more nuance that clearly confuses girls. It turns out that acrylic cannot be coated with varnishes. This is due to the fact that when removing the color coating, the acetone contained in the nail polish remover damages the surface of the acrylic artificial nail, and it becomes rough.
The main advantages of this method
Manicurists consider this technology very easy to perform. The main advantages of this nail extension technique are:
- You can use both gel and acrylic;
- there is no need for long-term filing;
- The procedure time is halved compared to traditional extensions;
- material consumption is reduced;
- technology is suitable for short nails and small plates;
- variety of final models and designs;
- the result is thin, as close as possible to a natural nail.
When using the gel, the nail can “breathe”, which allows it to grow and recover. The upper nails have the correct outline and the same size.
Positive and negative sides of extensions
Positive sides
Many girls doubt and think about how to extend their nails, because they can be done with acrylic or gel. Let's look at the positive aspects of acrylic coating:
- There is no need to paint your nails all the time.
- Acrylic holds tightly even when applied in a thin layer, making it look more natural.
- Removing the acrylic coating is quite easy and the nail remains intact and unharmed. A special liquid dissolves the composition.
- All cracks and irregularities are quickly eliminated without the need to replace them.
- You can apply any pattern or design to acrylic nails.
- Acrylic extensions are also done on the legs. As a result, much less money is spent on manicures and pedicures, since there is no need to do them too often.
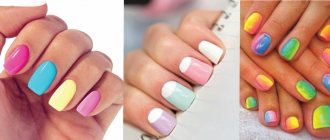
- Such material gives scope for fantasy and imagination. To carry out acrylic extensions, you should look at photos of various drawings, and you can implement one of them.
Undesirable consequences of extension
- If cheap materials are used for acrylic extensions, then the nails will have an unpleasant odor.
- After some time, the acrylic still comes off. The gel in this case is more durable.
- Some components cause allergies.
- Too much housework can cause the nail plate to become dull, which will force you to use additional glitter polishes.
Contraindications:
- Damage to the nail plate,
- fungus,
- intense sweating,
- treatment with hormonal pills,
- bronchial asthma.
Further nail care
Nail plates do not require special care after manipulation due to the strength of the composition.
To preserve your manicure for a long time, follow these rules:
- High humidity is the reason for artificial nails to peel off. Hand washing is accompanied by diligent drying with a towel, especially the nail plates.
- When handling household chemicals, use gloves.
- To give acrylic nails a natural gloss, they are coated with colorless varnish.
- Use preparations to remove varnish without adding acetone.
- Sometimes an allergy to a synthetic material – acrylic – manifests itself. In case of peeling, redness, itching of the epidermis of the hands, urgently visit a specialist and remove the acrylic coating.
- To maintain the flexibility of the nail, resort to oil baths daily.
Oil baths - healthy nails
- A balanced diet and quality sleep are important for healthy nails.
If you want to grow your nails, they prefer acrylic. The material is responsible for the strength, beauty and durability of the manicure. A beginner can handle the job. To get an impeccable manicure, the main thing is to follow the sequence of actions and accuracy.
How to make acrylic nails correctly
Artificial materials simulate the shape and size of natural nails. The choice of modeling (acrylic or gel) depends on the user’s experience, preferences and starting capabilities.
The creation of artificial nail plates from acrylic is performed on tips or forms, upper/lower.
Tips are plastic nails, forms are flexible plates. The first method requires the ideal condition of the nail plates: their strength and integrity. For bitten, thinned nails, it is better to stick to the second method.
Preparation
When planning acrylic nails, the extension technology requires a certain pattern.
Nails are prepared in advance for the procedure. Manipulations are carried out:
- Remove cuticle.
- The nail surface is polished with a file to adhere to acrylic and avoid peeling. Removes the shine of the nail, leaving a matte surface.
- Brush off the dust with a brush.
- Disinfect the plates.
- Primer is applied.
Make the transition to acrylic extensions. Choose a modeling method: on tips or forms.
Nail extension with acrylic on tips
The simplicity of acrylic extensions on tips for one-time use. It requires the correct selection of the dimensions of the template shape, attachment to the nail and fixation with acrylic.
If you work with tips, a step-by-step guide will be useful:
- Select the dimensions of the tips. When necessary, file the edges.
- Placing the overlays in the sequence for gluing will allow you to work comfortably.
- Trim the length of the nail to 0.5 mm and file the edge.
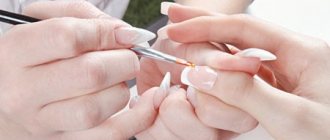
- It is preferable to remove the cuticle with cutters.
- A trim manicure is done several days before the planned extension.
- Nails are treated before manipulation, according to the preparation plan.
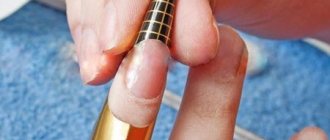
- Apply glue from the set with tips to the edge of your nail and the template at the fastening area.
- The form is placed at a slight angle and secured for 15 seconds. There should be no bends, gaps, backlashes or bubbles in the fixed part.
- Shorten the excess length with a tip cutter. Use a file to shape the edge of the nozzle and remove the thickness of the tips. This will give acrylic nails a neat look. They are freed from the thickness at the joint, the bulges on the side of the rollers.
- The top of the cover is sanded.
- Dip the brush into the liquid, squeeze out half of the monomer from one side, and pick up an acrylic ball with the other side.
- Place 3 balls: the largest one is in the middle, on the stress area, the second small one is in the growth zone, the third small one is applied to the free edge of the nail. Smooth out from the center to the edges using rubbing movements.
- When the brush grabs the material, it doesn’t hurt to wet it in a liquid liquid.
- Upon completion of the manipulation, the result is examined from the side, resembling a crescent in shape, with the most convex part in the stress zone in the center of the nail.
- The manipulations are repeated for the remaining nails.
- Then the shape and thickness are filed.
- They are freed from excess thickness of the side ridges, at the tips and along the length.
- Polish the length.
- Apply a base and colored varnish and decorate.
Acrylic extension technology on tips
Acrylic nail extensions on top forms
When performing acrylic extensions on the upper forms, follow the step-by-step instructions:
- Hands and tools are treated with disinfectant.
- Hands are prepared in the same way for the procedure as for tips.
- The nail plates are degreased.
- Forms are selected.
- Place 2-3 acrylic balls inside the mold with a brush.
- Press down onto the prepared nail and remove excess material.
- Hold for 7 seconds. Use a brush to shape the nail from the inside.
- Removal of the mold is carried out after polymerization of the acrylic.
- The free edge is processed with a nail file.
- The nail surface is polished with a buff until shiny.
- Lubricate the cuticle with oil.
Acrylic nails on top forms
Acrylic nail extensions are a painstaking and time-consuming procedure. Following the instructions and using high-quality materials and tools creates the conditions for a long-lasting manicure. It is up to the woman to decide which option for acrylic nail extensions to choose.
How do top forms differ from liquid tips?
Many people think that liquid tips and top forms are the same thing. In fact, this is a false statement. Because coating technologies are completely different. In liquid tips, only gel, that is, flowing material, is used as a material. In this case, the tip is not applied to the entire nail, but only to 2/3. The main difference is that after removing the upper forms there is no need to file the surface of the nail, because it is already ready.
With liquid tips, the master must do a lot more work, since the material does not cover the entire nail. That is, it will be necessary to lay out the gel in the cuticle area, as well as level the surface. In the same way as this is done with the lower paper forms, only here the already formed tip of the nail acts as a substrate using gel and liquid tips.
Upper forms
Most often, liquid tips are disposable, while the upper forms can be used several times in a row. As a result, the time spent on nail extensions using liquid tips and top forms differs significantly. Modeling nails using top forms takes approximately 60-90 minutes, while liquid tips will take much longer. Most of the time is spent on finishing and laying out the material after the formation of the substrate.
Liquid tips
Specifics of acrylic nail extension technology
There are two ways to grow nails - acrylic and gel. Each of them has their fans. Let's look at the advantages of acrylic, thanks to which girls prefer it.
Acrylic coating looks natural. It can be extended even onto the most problematic nail plates, thereby strengthening them.
- Acrylic promotes proper nail growth, which prevents ingrown nails.
- Acrylic coating is stronger than gel coating. The period between corrections is 2-3 weeks when the gel requires more frequent treatment.
- When removing acrylic, the natural nail remains virtually undamaged. This is due to the fact that acrylic is dissolved with acetone, so it can be easily removed. Thus, the nail plate is not susceptible to excessive filing, maintaining its natural structure.
- The product dries faster than gel. This mixture does not require additional drying in a UV lamp, which speeds up the entire extension process.
- Acrylic nails look natural, which cannot be said about gel nails.
In addition to the advantages, there are also some disadvantages that every woman should know about before undergoing the procedure.
The acrylic mixture has a specific odor
During the procedure, pay attention to hoods and open windows. A master who constantly works with this ingredient is required to wear a protective mask.
The smell disappears some time after complete decoration and does not reappear during wear. Acrylic, like many other coatings, does not allow oxygen to pass through. Natural nail plates can become lifeless and weak due to lack of oxygen.
- You should not use varnish to design such a coating, because it loses color and can deform the surface if the varnish contains acetone.
- This procedure is contraindicated for pregnant women. Due to hormonal changes, natural nail plates can reject any foreign material.
- This product may cause an allergic reaction. If you are prone to allergies, consult your doctor before the process.
- It is not recommended to do extensions if you have fungal nail diseases.
Pros and cons of acrylic nails
Gel nail extensions at home for beginners
When using acrylic for nails, the advantages are:
- the material provides elasticity and gives the manicure a natural look;
- the strength of acrylic nails - you can do housework without fear of breaking a nail;
- there is no harmful methyl methacrylate in the composition;
- the damage is easily corrected;
- acrylic is insensitive to temperature;
- will last longer than other materials - the coating lasts up to a month;
- if necessary, extended nails are simply removed: they are kept in a special solution;
- multilateral design is used: aquarium, artistic, volumetric.
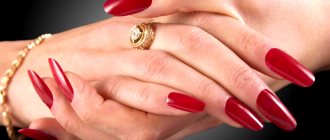
Variety of acrylic designs
The disadvantages of manipulation include:
- the nail does not breathe under the influence of acrylic;
- there is a dental smell;
- natural shine is temporarily lost;
- requires the use of a base varnish and then an acrylic material to give the required tone;
- after application it is necessary to level and sand;
- Sometimes an allergic reaction to the material occurs.
Attention! Girls whose nails are growing back soon will have to choose: make adjustments after 2-3 weeks or abandon the procedure.
The procedure is contraindicated if:
- the client suffers from diabetes;
- Herpes or fungal infection is present.
Technicians
If the decision was made in favor of acrylic rather than gel extensions, then you will also need to decide on the technique used, since there are different ways to work with this material. It must be taken into account that acrylic hardens very quickly, therefore, when carrying out the procedure at home, all actions must be distinguished by their efficiency.
All options for such extensions are discussed in more detail below:
- Extending nail plates with tips is the fastest option for the procedure, since it will take no more than an hour. This technique is ideal for those with square or fairly wide nails. The only drawback is the impossibility of creating a thin and pointed manicure, since the process of cutting out the desired shape will take too much time and take a significant amount of effort.
- Extension of nail plates on top forms. This technique involves laying out the working material in a special recess, which is located inside the mold, after which it is applied and pressed directly to the nail, ensuring uniformity and reliability of fixation.
- Extension of nail plates on lower forms. To carry out this procedure, you will need to use a brush, using it to lay out small acrylic balls. Using them as the main blank, you can make a whole nail of absolutely any shape and length.
Features of acrylic extensions
Nail plate extensions are a common cosmetic procedure today.
One option is to use acrylic, which is very similar to gel, but is able to dry naturally without exposure to ultraviolet lamps. Despite the fact that the use of this material was the very first of all extension methods, this method has not yet lost its relevance and demand, this is largely due to the ease of implementation of the procedure and its affordable price. The acrylic used for this procedure is in powder form, but when mixed with certain components it creates a mass with a thick structure, which is applied to the nail plates to build them up.
It is important to remember that this procedure is contraindicated for patients with diabetes, herpes, or those with lesions of various fungal formations.
Materials and tools for acrylic extensions
Materials for extensions
The material for extensions is acrylic powder, it can be either regular or camouflage. You will need the following tools:
The main material for extensions is acrylic powder
- liquid monomer (liquid);
- glue for tips;
- top;
- bonder (also called a degreaser);
- primer;
- cuticle remover;
- cuticle oil.
Tools for acrylic extensions
Nail extension mold
- cutter;
- tips;
- forms;
- a respirator, as acrylic has a strong odor;
- nail clippers;
- tweezers;
- buff with medium abrasiveness;
- brush to remove dust;
- container for acrylic;
- pusher or orange stick;
- clothespins to clamp the stressed part;
- paper towels.
Necessary materials
The following materials are used to carry out the procedure:
- gels: base, French, top coat without a sticky layer or acrylic;
- top forms for extensions;
- primer coupling;
- cuticle oil;
- top coating with gloss effect;
- liquid for removing sticky layer;
- brushes, files, wooden stick, degreaser;
The use of high-quality materials is the key to successful extensions and lasting results. The choice of professional products will ensure a strong adhesion between the extended and natural surface, and will also protect against detachments of the artificial layer.