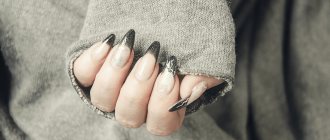
Polygel extensions at home
Step-by-step instructions for acrylic gel nail extensions will help you carry out the process at home.
To do this, you need to purchase a set for modeling nails with polygel. Professional equipment includes all necessary materials:
- 4 polygels (clear, white, light pink, camouflage pink);
- construction fluid for leveling acrygel; bonder, dehydrator;
- acid-free primer; classic finish gel;
- sticky layer remover;
- brush, spatula, clamps for squeezing polygel out of the tube.
Preparation consists of a thorough manicure, cleansing and dehydration of the nail plates.
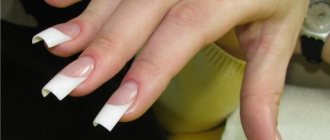
How to extend onto upper forms
The top shapes help you to grow your nails into the perfect shape without much effort. The duration of the procedure is reduced to 40 minutes. Process algorithm:
- Forms are put on the prepared nail plates and a base coat is applied.
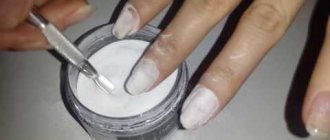
- A ball of acrygel is squeezed out of the tube, picked up with a spatula, and applied to the nail. The brush is moistened in a special anti-stick liquid.
- Begin to distribute the polygel from the cuticle, to the side rollers, over the entire surface. You can add material without worrying about noticeable transitions.
- The nail is dried in a diode lamp for 30 seconds.
- The mold is removed and the nail is clamped to create an arch shape.
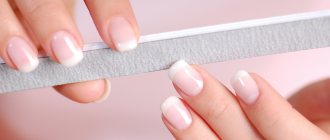
- It is given the ideal shape using a file (180-240 grit) and a buff.
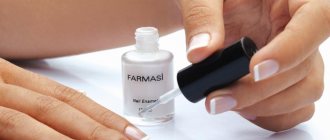
- Apply top coat or gel polish.
How to grow without forms
The nail is degreased, covered with a layer of primer and allowed to dry for 1 minute. If the nail plate is dry, then you can do without a primer. Step by step process:
- A little acrygel is squeezed out of the tube, a drop is removed using the flat side of a spatula. Apply to the nail.
- The brush is moistened in the construction fluid so that the bristles do not stick to the material. Acrigel is easily pressed onto the first third of the nail plate.
- The nail is formed by distributing the material according to the principle of a gel for extension.
- Dry in a UV lamp for 2 minutes or in an LED lamp for about 30 seconds. Remove the sticky layer, if any.
- The surface is smoothed using a file (180 grit).
- Before applying gel polish, the nail surface is coated with a primer. Then it is dried in a lamp, a layer of topcoat is applied, and dried again.
Nail extension with polygel on tips
How to extend nails onto tips with polygel? For this method, you will additionally need to prepare a set of suitable tips, wire cutters for cutting them, and glue for the tips. The nails are carefully prepared, the tips are laid out in order.
Procedure:
- On each frame, the edge of the contact zone is filed.
- The nail plate is degreased and glue is evenly applied to the contact zone.
- Holding the backing at an angle of 45 degrees, apply from the edge to the middle of the nail plate.
- The frame is pressed for 15 seconds until it fully adheres to the nail.
- After final fixation, adjust the shape of the tips using a tip cutter and file. The file is passed over the entire surface of the substrate to ensure better adhesion to the acrygel.
- An acid primer is applied and dried.
- Then apply an acrygel ball and distribute it evenly over the entire surface, starting from the cuticle. If necessary, add polygel again.
- Further steps for acrylic extensions are similar to the previous options.
Important! Removal of polygel is carried out using a router or using a file (160-200 grit). Independent attempts to tear off the coating or soak your nails in special. liquids will lead to damage to the nail plate, so it is recommended to contact a specialist.
Master class on application
Polygel nail extensions step by step is a process that may not be immediately clear to beginners. A detailed master class will help you understand all the intricacies. To work with polygel you should always stock up on a special degreaser. Sometimes regular alcohol is used instead. This is necessary so that the material does not stick to the brush and does not complicate the process of laying out the composition.
Today there are many known ways to use the tool under discussion. Most often it is taken for extensions (both on the upper and lower forms). But you can also use it to correct nail plates, strengthen them, and make prosthetics.
This is acceptable even if the extension was initially carried out using gel or acrylic. The materials interact well with each other, so there is no need to be afraid of detachments. Of course, if the nails have been properly prepared beforehand.
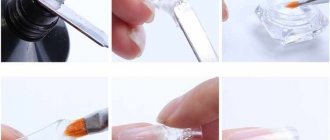
To properly extend your nails with polygel, you need:
- Perform a manicure according to the standard scheme. We accept both classic and hardware. The main thing is to carefully remove the pterygium at the final stage.
- Treat the entire surface of the nail plate with a degreaser, acid or acid-free primer. The choice of product for this stage will depend primarily on the degree of moisture in the nails.
- Immediately apply a thin layer of base. In this case, it is used not so much to level the nail plate, but as an adhesive layer. The base helps to securely fix the polygel on the nails. That is why it is applied with fine rubbing movements. It is not necessary to even out your nails and achieve perfect smoothness. It's okay if the plate turns out to be slightly ribbed.
- The base must be thoroughly dried. Only after this lay out the acrylic. To do this correctly, you should moisten the brush with clinser or alcohol, but not too much. Other special liquids are also suitable for this stage.
- Blot the moistened brush with a lint-free cloth. It should not be wet, but slightly damp.
- Using a spatula, squeeze out a small amount of polygel from the tube. Place it on the nail plate and spread. This should be done with the same movements as when using regular acrylic - gently patting the surface. The material easily stretches to the desired area, for example, to the side rollers or to the cuticle. Therefore, you should immediately place the drop in the very center of the nail, and only then level it up, down and to the sides.
- Pull the remaining composition that is no longer needed for work to the tip. Remove them with a brush. You can knead and stretch the material for a very long time until it is fixed in the lamp. Until this point, it will remain soft and can be adjusted endlessly. It is best to carry out extensions one plate at a time, so as not to accidentally touch the neighboring ones and spoil them.
Polygel nail extensions step by step.
- Secure the result with a lamp. If a high power hybrid device is used, 30 seconds will be sufficient.
- All that remains is to remove the sticky layer and file the extended nails. Processing polygel plates is very easy. The material is soft and plastic. You can quickly achieve the correct beautiful shape of the nail and the ideal smoothness of its surface. Experienced professionals advise treating the nail in a lamp for 10 seconds when applying extensions. in a loose form, then clamp it with tweezers and continue the process with the entire structure. This will allow you to achieve the correct shape of the plates and a perfectly even arch.
Polygel is used not only for nail extensions, but also to strengthen them. This process can also be carried out independently, following step-by-step instructions. To strengthen with polygel, first prepare your nails as standard. And then pull the brushes from the cuticle area to the free edge of the plate. This will allow you to achieve optimal nail thickness.
If the tip of the plate is cracked, it can be restored with polygel without cutting it low and without waiting for it to grow back. The discussed composition can also be used for nail prosthetics in case of fungal infection and in cases where the plate peels off and lags behind the skin. There is no need to take forms.
The material can be applied directly to the skin after preparation - filing, treatment with a degreasing composition, removal of the exfoliated part of the nail (if necessary). The skin must be treated with antiseptics, which destroy microbes accumulated under the nails. Next, the material is laid out and heated in a lamp.
Peculiarities
The material under discussion is a hybrid of gel and acrylic. Initially, manicurists had to mix them manually, carefully selecting the proportions. But now such a product can be bought ready-made, which makes the work much easier.
When preparing a polygel, a high-quality construction gel is mixed with a minimal amount of acrylic powder. The resulting product has a consistency similar to plasticine.
Main features of the material (in descending order of importance):
- The nail extension process takes place without a pungent aroma (unlike pure acrylic), and after treatment with a lamp the plates become very dense and do not break (unlike the usual gel).
The material does not cause allergies and is suitable even for people suffering from asthma.
- The polygel is easily leveled, and the remaining product is instantly removed and can be used further. As a result, the time spent on the entire extension process is significantly reduced.
- Initially, the material was intended exclusively for working with upper forms. But today it is successfully used to build up the lower ones. Interestingly, the product is laid out almost in the same way as acrylic.
Only it does not harden instantly, but retains its plasticity until processed in a lamp. The main thing is to properly prepare your nails.
- When working with the material correctly, various errors are completely eliminated. For example, detachments and “pockets” filled with air. These problems are common with acrylic.
- In sawdust, the material is harder than gel, but softer than acrylic.
- Polygel does not lag behind the nails in the free edge.
- Without polygel, it was difficult for the craftsmen to work with the upper forms. When regular gel was placed on them and transferred to the lamp, it began to flow out heavily. And then it could form unsightly bumps in the cuticle area that needed to be cut out, which severely injured the delicate skin.
Such problems do not arise with the new product.
Rating of the best funds
A detailed table will help the artist decide on the appropriate polygel for nail extensions. It contains the best modern means.
Grattol
Texture – enamel, dense on 1-2 layers. On sale you can find 5 shade options at once. Among them: beige in different tones, camouflage, peach. There is an option with glitter. Sold in miniature packages of 30 ml. Very economical to use.
After filing the material, it is recommended to sand the coating with buff (soft) to prevent the appearance of unsightly white spots
Bluesky
Texture: enamel. You can select different density levels. Coral and purple shades are also found in a wide color palette. The minimum volume of the tube is 8 ml. But you can also find 60 ml packages on sale. This polygel does not stick to the brush, so it does not require treating the accessory with a special liquid.
This is one of the few such compositions that can be removed with gel polish remover. The composition has a special fine-grained structure that prevents the formation of small bubbles.
Tnl
The thermoplastic product is thick and very easy to work with. Available in 11 different shades. Texture: enamel. Density – translucent. With a sticky layer. Sold in 18 ml tubes. The coating needs to dry for 1 to 2 minutes, depending on the lamp chosen.
To make working with the composition more convenient, you should use a reusable form for extensions.
Patrisa Nail
The texture of the composition is enamel. You can choose the density - translucent or dense composition. Various shades to choose from. There are also camouflage and beige in different tones. This is a high-quality, but expensive product. Sold in tubes ranging from 30 to 60 ml.
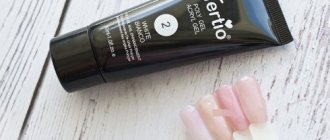
Tertio
Texture: enamel. The product is sold in 3 density options - translucent, dense in 3-4 layers, dense in 1-2 layers. Another inexpensive remedy. Sold in tubes of 30 ml. You can purchase different shades: white, camouflage, milky pink. The material is not picky about the bristles of brushes.
It can be used when working with both natural and artificial accessories.
All of the listed compositions differ from each other not only in their basic properties, but also in price. So, both budget and very high-quality options include, for example, Tnl, the cost of a tube is 350-400 rubles. But for a small tube of Patrisa Nail you will have to pay about 1 thousand rubles. Today, if you wish, you can grow your nails even at home.
The easiest and most convenient way is to use polygel for this purpose. This is a new unique product that combines all the positive features of both acrylic and gel.
The main thing is that it does not have an unpleasant odor, and the particles that are cut off are heavy and quickly settle on the table without flying through the air. Step-by-step detailed instructions will help you understand the features of the process.
Technology of applying acrygel to nails and features of use
Acrigel for nail extensions requires a manicure with preliminary treatment of the cuticle.
To lengthen your nail bed using gel, it is recommended to follow these steps:
- It is necessary to remove the glossy shine from the surface of a natural plate using a buff and remove dust. Then you need to place the extension forms. Afterwards the surface should be degreased.
- The nail plate must be covered with a primer without touching the skin. Due to this, the composition will better adhere to the surface, and you will not have to use a base layer.
- The brush needs to be soaked in liquid. This procedure must be repeated at the stage of laying out the material. This is required so that the gel does not get clogged into the bristles of the brush.
- The acrygel ball must be transferred to the nail plate. Using pressing movements of the brush, you should distribute the material over the surface of the plate and to the required length according to the shape. Near the cuticle, the layer of gel should be thin, since this area of the plate is more susceptible to detachments.
- Afterwards, the nail needs to be dried in a lamp. For LED it will take about 1 minute, for ultraviolet about 2 minutes.
- To strengthen the stress zone, you need to re-apply an acrygel ball to the nail. Then again you need to apply a small ball of gel, placing it on the surface of the plate for leveling. Next, the material needs to be dried in a lamp.
- After drying, you will need to remove the sticky layer and make a sawdust, achieving the desired shape.
- At the end, the surface can be covered with a topcoat or a design can be made.
This algorithm is considered basic, it will differ in the type of lengthening: for lower or upper forms, tips, a French manicure or standard strengthening without lengthening is required.
A popular procedure is to extend the upper forms as they are very easy to model and require little filing. When strengthening, you do not need to use forms. It is only permissible to lengthen the nail bed by a small amount and change the shape of the free edge.
Acrigel has few shades. Polygels are often available for sale in camouflage or to match the color of the natural plate. The design is carried out on top of the modeled nail with gel polish. The material can be mixed with colored gel to obtain acrygel with a tint.
What is polygel
One of the completely new materials on the beauty services market for nail extension and strengthening is polygel. This is a natural acrylic that allows you to create beautiful nails in a glossy or matte finish that will make all your girlfriends delighted and envious.
Acrigel combines the properties of two popular materials: acrylic and gel. High level of density, reliability, durability are just some of its advantages.
Acrylic is used for these purposes as an independent unit for nail extension. Simple gels of various compositions look attractive, but wear off faster and are less reliable.
Polygel is a mixture where acrylic is one of the key components. Working with the mixture is simple; it does not require special skills, preparation or conditions for application and strengthening. Polygel has a number of advantages , among which it is important to note:
- Polygel nail extensions are distinguished by their durable surface. It looks natural, and to make your nails beautiful, smaller amounts of the substance are required than, for example, acrylic alone;
- The substance does not have an unpleasant odor, no chemical odor, so after working with it you do not have to ventilate and thoroughly wash off any foreign “aroma”;
- Such nail extension products do not harden without special exposure to ultraviolet radiation, so you can take your time and give your nails any shape and appearance you like;
- Klenser is a liquid that simplifies application. It does not allow the polygel to spread over the nails, harden and makes the process of applying the substance uniform;
- The skin around the nails does not suffer, since the high viscosity of the substance does not allow it to get where it is not needed. Polygel in its hardened state is durable, so it is impossible to damage the extended nails with polygel.
Recommendations and tips
Polygel nail extensions step by step allow you to get the perfect manicure for a long time. But removing the material using a special liquid is possible only in rare cases - you need to choose a special, expensive composition. In other cases, it will only have to be removed with a file/ceramic cutter.
There is no need to be afraid that the jar of polygel will be exposed to direct sunlight. The material can only harden under a lamp. You can safely keep the jar open for the required amount of time.
When working with polygel, you do not need to use special separate brushes. Those bought for acrylic or regular gel are also suitable. For a uniform, dense coating, one thin layer of the composition is usually sufficient. Therefore, the product can be called very economical.
Additional reinforcement
The process of strengthening nails with polygel is simple and includes the following steps:
- It is necessary to carry out a clean manicure, wipe the nails with a dehydrator;
- Apply base and dry under lamp;
- Moisten the brush and spread the acrygel in a thin layer over the surface of the nail. Dry under a UV lamp.
All that remains is to file your nails and give them the desired look.
How to remove polygel
When new nails have turned into old ones and you want to remove them, then there will be no problems with polygel. Nails can be removed easily using a very ordinary 160-200 grit file or a special manicure cutter.
Polygel nail extension step by step
To create a beautiful and neat manicure, you need to use only high-quality manicure tools and consumables. We will tell you what kit you will need for the procedure.
So, to perform polygel modeling, you will need:
- Antiseptic.
- Primer.
- Acrigel.
- Disinfectant.
- Forms or types.
- Glue.
- Manicure scissors, files, orange sticks, brushes, buff.
- Led or UV lamp.
- Top and finishing coat.
Advice from experienced manicurists
A novice nail extension artist has plenty of opportunities to learn independently using video tutorials or articles on the Internet. It’s better to take real master classes from professionals. They can share their secrets and valuable information.
Here are some of the tips:
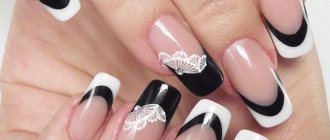
- To create a three-dimensional design, polygel can be mixed with gel polish.
- To avoid detachment, when applying the material must be carefully pressed against the cuticle.
- The impermeable film created by gels, varnishes, and acrylics serves as a breeding ground for bacteria and fungi. Therefore, disinfection is necessary when using decorative coatings.
- You need to file your nails after they are completely dry. A wet nail plate is very vulnerable to mechanical stress and may begin to peel off.
- Nails need to be given periodic rest to recover, and not even use nail polish.
All stages of the process, from nail preparation to extension and design, are similar to techniques for working with gels and gel polishes.
If you have the skill of building extensions with these materials, mastering the use of acrygel will not be difficult.
Advantages and disadvantages of gel extensions on forms
This type of extension makes it possible to:
- It is enough to lengthen short nails;
- give them the desired shape and elegance;
- improve appearance and match natural colors;
- to grow wide nail pads, although it is difficult to do on your own, only professionals can do it;
- quickly carry out the process, unlike, for example, when building up with tips.
The main thing is to get used to it. Disposable paper forms are quite suitable for the job. Although experts advise using Teflon or metal. The main thing is to thoroughly disinfect both materials and nails after each procedure.
The good thing about this method is that it is non-hazardous, does not cause allergies, and does not violate the integrity and structure of the nail plates. The gel stays on the nails for quite a long time after extensions, acquires a natural shade after drying and is odorless.
Nevertheless, artificial extended nails require careful handling. They can quickly break from an accidental blow and do not withstand mechanical stress.
On the other hand, artificial nails can always be restored; you just need to change the stencil and start the procedure again. The gel will give your nails elasticity and visual similarity in color to natural ones. The main thing is to choose a durable material for adhesion, a beautiful stencil, and skillfully apply the selected design.
Coating your nails with gel and adding nail extensions to forms is a simple procedure, but it will require skill and time to achieve the perfect manicure.
It is important to first prepare the nail plates, select high-quality materials for work, and not be distracted during the process. In the future, protect the nails from mechanical damage and contact with abrasive chemical elements.
Nail care at home and in the salon
Healthy nails look great even without an elaborate design. The use of various decorative means for decoration often leads to a deterioration of their condition, so taking care of the nail plates should become a regular habit. Home care is based on several rules:
- High-quality manicure tools are the main condition for healthy nails. For natural nail plates, glass, ceramic, and crystal files are the safest. They need to be filed in one direction.
Care products should include hand cream, cuticle oil, and strengthening product.
- Regular warm oil baths for hands made of olive, almond, castor oils with the addition of lemon juice. Dipping your fingertips into lemon pulp will help whiten your nails.
- Intake of nutrition from food containing vitamins C, D, B, A, E. Food requires a sufficient amount of zinc, iron, iodine, magnesium, calcium, biotin, folic acid.
- Salon nail care procedures: professional manicure, paraffin therapy, sealing, various types of extensions.
Nail preparation
Before the extension procedure, you need:
- Get your nails in order, trim off excess length and polish.
- Choose the right place for the procedure so that there is sufficient lighting.
- Wash your hands with soap.
- Treat the cuticles with antiseptics to prevent the gel from peeling off after hardening.
- Remove all small particles of skin from under the nail plates.
- Sand the free edges for gel extensions.
- Process with a nail file, starting from the edges closer to the center.
- Remove shine from nail plates.
- Clean your nails with a brush and sharpen them with a hard nail file.
- Degrease.
Next, you can begin to attach the stencil, apply a base layer of gel with a brush, lower it into an ultraviolet lamp to harden, and then file the nail to give the desired shape and length.
All that remains is to apply a layer of gel and the desired pattern with paints, varnishes, or you can use ready-made stickers as a stencil.
It is important to make sure that there are no contraindications for the gel procedure or allergies to gel materials.
It is not recommended to take antibiotics or other hormonal drugs the day before that can reduce the quality of work or the desired effect.
We must not forget that household chemicals are used, so it is necessary to carry out the extension procedure while wearing protective gloves.
In the future, it is necessary to carry out corrections every 2-4 weeks so that the nails always look neat and beautiful.
Preparation consists of:
- treating hands with antiseptics;
- removing the varnish coating and old gel layer;
- cleansing the surface of the nail so that air bubbles do not form under the new layer due to polymerization from exposure to an ultraviolet lamp;
- applying a fresh layer of gel;
- sawing off unnecessary parts of the stencil to give the desired shape to the nail.
Tips and tricks
In order for the manicure to be of high quality and allow you to enjoy beautiful nails for a long time, some rules and tips must be taken into account.
It is not recommended to apply cream to your hands before the procedure, otherwise the stencil will not attach well to the body, and the coating will not lie in an even layer.- It is necessary to treat the cuticles in advance; on the eve of the procedure, it is not recommended to take hormonal agents or antibiotics, which can only worsen the adhesion of the materials to the nail plate.
- The plates must be healthy, there should be no unnecessary wounds or cracks.
- You need to decide on the choice of forms for manicure and the lighting in the room in advance.
- Choose free time for the procedure so that nothing distracts you from work, so as not to be disappointed later.
- In order for your nails to remain graceful for a long time after extensions, you need to correct them in a timely manner, at least 2 times a month, and also protect them from blows and other mechanical influences.
- It is not recommended to use metal objects in work.
- You should wear gloves before working.
- Protect marigolds from water and hot air.
- Avoid carrying out extension procedures on critical days, or shortly before them.
- Before the procedure, thoroughly clean the cuticles and also treat your hands with antiseptics.
For extensions, it is recommended to use materials from manufacturers Creative, IBD, EzFIow, the production of which guarantees durable artificial turf.
Basic terms
Top forms are a soft plastic product that imitates a natural nail plate and helps create an artificial nail of the desired length and curve. Unlike conventional blanks, they are installed on the nail, and not under it.
The product is odorless and has increased density, which makes it an excellent material for modeling artificial nails. Available in tubes or jars with a lid.
Depending on the bend, there are 3 types of upper forms:
- Natural. Light bend, close to natural;
- Classical. More convex in the center of the structure;
- Standard. The most convex. The result is a nail with a slightly drooping tip.
The specific type is selected based on the data of the natural nail - the bending of the transverse and longitudinal arch is assessed, as well as the desired shape of the extension.
- A natural curve is used for the final result, a crisp or rounded square;
- For future nails, the “Almond” shape is standard;
- For an oval – classic.
But this relationship is conditional - you can use any bend, but in some cases this may increase the operating time.
A few important points:
- The upper forms have their own size range, which is determined by the numbers embossed on the plastic. The larger the number, the smaller its size. Depending on the manufacturer, the largest figure may vary. Common numbering of sizes is from 1 to 10;
- Depending on the manufacturer, it can be with or without printed lines. The marks on the plastic are intended to determine the length of the future nail and carefully lay out the material. Forms with markings are offered by dozens of manufacturers, for example, PNB, Formula Profi, Monami, Vogue Nails;
- There are small handles at the ends of the plastic blanks - they help separate the plastic without damaging the artificial nail. Find forms with handles from the brands Monami, Vogue Nails;
- On the upper forms, extensions are done with any type of gel. But most often it is polygel that is used, since it has a dense texture and does not “roll off” from the sides. When choosing a product, pay attention to the brands Canni, Vogue Nails or Patrisa Nail.
What are top forms? This is a revolution in nail extensions!
How to extend nails? How to grow nails quickly and painlessly? What to choose for nail extensions, acrylic or gel? Is it possible to do nail extensions yourself?
Top forms for nail extensions open up completely new possibilities in nail service.
How the top forms came to be
We all remember that happy, carefree time when, as small children, we played in the sandbox, filled various molds with wet sand, tipped them over and made Easter cakes. A simple game that is loved by all children. Even in childhood, it was clear to each of us that sculpting a beautiful and even figure ourselves is much more difficult than simply pouring sand into a ready-made mold and turning it over.
Now imagine how great it would be to transfer this method (with certain changes, of course) to the nail service, using something similar for nail extensions! Imagine how much easier the process of nail extensions would be if we had a mold prepared in advance for each nail, into which all we had to do was put the construction material (acrylic or gel) and turn it over, as if gluing the material onto a natural nail! And then, after waiting for the material to dry, remove the mold and get a finished nail, shiny and smooth! Is it possible? The Formula Profi company answers this question in the affirmative.
In 2007, the Formula Profi company introduced a new, unique nail extension technology that used the above-mentioned principle. The new technology is called upper forms. It is based on special plastic forms into which the material is laid out. In order to evaluate the pros and cons of the upper forms technology, we will try to understand how it differs from earlier, preceding technologies.
Upper forms - a new tool for working with familiar materials
Generally speaking, there are several nail extension technologies known in the world, but the most common of them are acrylic and gel technologies. The first uses acrylic as a construction material, and the second uses gel. The difference between acrylic and gel technologies is that the first uses a special powder (acrylic powder) and liquid (monomer, also known as liquid), which when mixed form a viscous mass. This mass polymerizes in air for 3-5 minutes. The monomer usually has a pungent odor, but the hardened material can be softened with a special liquid, which will facilitate the process of removing artificial nails.
The basis of another nail extension technology is a thick gel (also called building gel), which polymerizes under the influence of ultraviolet rays. The gel is odorless, however, nails extended with gel cannot be softened like acrylic ones, but can only be filed down. There is no fundamental difference between these materials, and acrylic and gel have a very similar chemical formula and composition.
It is important to note that both acrylic and gel have no fundamental differences when laying out (modeling) a nail; in both cases, either a paper form attached to the finger is used, onto which the design material is laid out, or a silicone plate is glued to the natural nail, repeating the arch of the natural nail ( tips), which is covered with a construction material along with the nail.
The paper (bottom) form is removed after the procedure, but the tip remains and is worn while wearing the artificial nail. Regardless of whether gel or acrylic is used, the technology for modeling (laying out) an artificial nail is the same: the design material is taken with a brush and applied to the natural nail plate and to the paper form (or tip) located under the nail, and after the material has cured, such a nail is filed , and subsequent treatment with a sealing coating. It should be noted that the process of modeling an artificial nail is quite complicated and requires certain preparation from the master, and the filing process is quite unpleasant and dangerous. Unpleasant because it produces easily volatile dust, which can even cause allergies. Dangerous because while working with a file, the master can touch the sensitive skin near the client’s nail, which can result in a cut.
Of course, such extension technologies have other pros and cons, which will be considered when comparing them with the technology of upper forms.
Operating principle of upper mold technology
Let's look at the principle of operation of the upper form technology using the example of acrylic extensions. First of all, it is necessary to carry out standard preparation of natural nails. After this, suitable sized top forms for each nail are selected. Take the first mold and place 2-3 acrylic balls into it; the viscous mass should have the consistency of sour cream. The form is then inverted and applied to the natural nail. The form is held with your finger near the cuticle for 30 seconds, after which it can be released. The polymerization process usually lasts from 3 to 5 minutes, depending on the monomer used and the consistency of the laid material.
While polymerization is in progress, you can move on to the next nail. After polymerization is complete, the upper mold is easily separated from the hardened material. The free edge is given the desired shape (you can create any shape: stiletto, oval, square, etc.). The resulting nail does not require filing; its surface is smooth, smooth and shiny. A beautiful voluminous arch has already been created and a stress zone has been formed. The nail is created this way thanks to the inner surface of the upper mold and is worn for 3 weeks before correction, which can also be performed using the upper molds. You can also apply extensions to the upper forms using tips, after gluing them to the nails and filing them.
With regard to acrylic extensions, we can also add that during polymerization, when the form with the material is on the nail, the participation of the master in the process is not required. This means that while the first nail is drying, you can work on the second, and then the third, fourth... By the time the form with the material ends up on the fifth nail, polymerization has already been completed on the first. You can move on to the next hand. As a result of this literally conveyor-belt process, fantastic time savings are obtained. With some skill, such acrylic extensions can be done in 30-40 minutes! It is also noteworthy that during the filing process in classical technologies (modeling a nail with an acrylic or gel brush), a certain amount of material turns into dust. By eliminating filing, you can protect yourself from such waste of material, thus saving not only time, but also money.
Nail designs on top forms
Separately, we should dwell on the possibilities of nail design, which are represented by the upper forms. Carrying out a design is always a complex procedure, requiring skill and patience from the master; it is a long and painstaking work. In beauty salons, you have to pay extra for a nail design, and often a lot of money. The technology of nail extension on the upper forms can significantly facilitate this work and expand design possibilities.
From now on, design possibilities are limited only by the imagination of the master! Large leaves, fabrics, dried flowers, broths - all this can be easily used to create a wide variety of designs. In classic extensions, it is very difficult to arrange such elements so that they follow the contour of the future nail arch: large leaves and dried flowers will always try to disturb it. Broths are lighter than the construction material, so they will always remain on the surface. It is not possible to make an aquarium design in such cases. With the upper forms, everything is different: thanks to the durable surface of the form, you can lay out almost any conceived design in several layers: dried flowers, broths, mica, silk, any other elements - everything will look perfect.
In the upper forms it is very easy to perform various constrictions and transitions from tone to tone. Inside the upper form, you can simulate any aquarium design, and due to the fact that all operations are performed not on the client’s nail, but in the uppermost form, it is always possible to demonstrate the future result to the client before making extensions. This way the client will always have only what he wants. These are just a few examples of how top shape technology can expand your nail design options and make it easier to complete.
Advantages and disadvantages of upper forms:
Advantages
- Eliminates the most unpleasant and dangerous extension procedure - filing
- The time of the extension procedure is reduced to 30 - 40 minutes
- Saving material reduces the cost of extensions
- The design possibilities are unlimited and execution is very simple.
- Possibility to demonstrate the design to the client before extension
- Perfect gloss
- Same shape for all nails
- Correctly formed stress zone
- Same arch on all nails
Of course, any technology has its pros and cons. Compared to classical technologies, top mold technology is not as versatile. In particular, there are restrictions on the length and width of the nail (it cannot be greater than the length and width of the upper form).
So, the disadvantages of the upper forms:
- Limitation on the length and width of the nail
- The need for training and purchasing a rotating lamp for gel technology
However, the length of the upper forms is designed in such a way that it is enough even for the most demanding customers. As for the width and shape of the nail, the Formula Profi company is currently working to expand the range of sizes of the upper forms in order to eliminate this drawback. But at the moment, there are few clients with non-standard nails, and the existing top forms are suitable for work in 90% of cases.
The Formula Profi company is confident that this technology is a revolution in nail extensions. The technology of the upper forms is so simple that now it seems surprising why it did not appear earlier! Are you already thinking about how you can buy top molds quickly and inexpensively? You can order them with delivery by courier in Moscow or by mail throughout Russia and the world, or by coming to our office.
The Formula Profi company has a patent for the upper mold technology.
In conclusion, it should be noted that despite its apparent simplicity, the technology of upper forms has its own characteristics, which sometimes only a professional can help understand. That is why, to begin with, it is recommended to undergo training in the technology of nail extensions on the upper forms. The teachers of the Formula Profi company are the founders of the original methods of nail extension with top forms of acrylic and gel, so those who want to master this technology have the opportunity to learn all the information first-hand. Formula Profi specialists are always ready to provide technological and consulting support to their clients.
The difference between the upper forms and the usual ones
The usual forms mean tips, liquid tips and disposable templates for extensions.
- The upper ones are reusable. After polymerization, the material separates effortlessly and leaves no marks on the workpiece, so it can be used until it loses its bending. Approximate service life – 2 years;
- The upper forms do not polymerize along with the coating, but are removed immediately after the material has hardened;
- The technique of working with forms allows you to save material and create nails that are close in thickness to natural ones;
- The extension procedure is halved and takes from 1 to 1.5 hours including decoration;
- The end result requires almost no modification. After polymerization, you only need to remove excess and polish the resulting nail;
- Unlike liquid tips, where the material is applied only to 2/3 of the natural nail, top forms involve laying gel over the entire nail plate;
- There is no need to add material after removal.