Metal elements are one of the most popular types of marigold decoration today. Manicure with foil has rightfully occupied a leading position for several years now, having once and for all won the hearts of beautiful ladies, thanks to a number of advantages:
- The technique is very simple to perform and does not require specific tools or skills. They successfully cope with the task, even when they pick up a nail design kit for the first time;
- the modern nail industry offers consumers a huge selection of different types and colors of products;
- the decor goes well with all known manicure techniques and their combinations, gel polish colors, as well as other types of decorations and designs;
- it’s easy to choose a suitable design for a festive dress or a casual look, for any season;
- details can be applied to the nails yourself, without spending time and money on a trip to the salon;
- The iridescent decor that shines in the light transforms the usual monochrome finish, creating a positive mood and a special, wonderful atmosphere.
By carefully measuring the quantity and arrangement of elements, you can easily create both modest designs for work, study and everyday activities, and dazzlingly beautiful ones for special occasions.
Step-by-step nail casting technique
The name “casting”, although it sounds intimidating, does not represent any difficulty. In essence, casting is the application of an additional layer of gel polish in the form of a designed pattern. The only thing that can be difficult for beginners who love home nail art is mastering patterns progressively, from simple to complex. Not everyone will be able to make the perfect monogram or flower the first time.
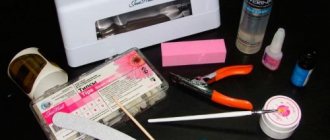
If you have experience covering your nails with gel polish and there is a standard set for this (degreaser, primer, gel polish, top coat, etc.), then in addition you only need to purchase foil.
It can be selected by transfer type or standard type of manicure foil. The difference between them is colossal: it is enough to lean the transfer against the sticky layer of gel polish and after that a foil mark will remain in this place. Before use, regular foil must be cut to the shape of the poured pattern, which is much more difficult.
There is nothing supernatural in the casting technique, but to be sure of a successful result, it is better to follow the step-by-step instructions:
Step 1. Prepare your nails according to the classic scheme (do the required type of manicure, remove the shiny layer of the nail with a buff).
Step 2. Degrease the nail plate, apply a primer, and, if desired, apply a layer of protective gel. Polymerize it. This can be done under the radiation of a UV lamp, but as an alternative, you can dry the coating in open sunlight (if available and the time of year allows).
Step 3. Paint your nails with a layer of colored gel polish (if the design calls for it, clear polish can also be used). Polymerize. If the gel polish is of insufficient color density, you can re-apply another layer and polymerize. Remove the sticky layer.
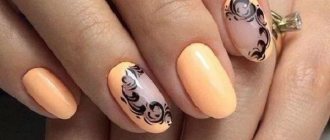
Step 4. Using gel polish of a different shade (to make the applied pattern easier to see, ideally black gel polish) make the intended three-dimensional pattern. This can be done with a special gel paint and a thin brush. Polymerize and do not remove the dispersion after this. In principle, the casting process is complete; then you just need to highlight the design using a special transfer foil (or regular one).
Step 5. Place a piece of transfer foil against the created pattern, pat it lightly with your finger so that the spraying is transferred well to the casting, then remove it. A shiny mark will remain on the surface of the nail where the casting pattern is located. If you use regular manicure foil, then you should cut out the desired pattern in advance and place it against the sticky layer of the casting.
Step 6. Secure the resulting nail design with topcoat and polymerize. If you need to get a matte result, then select a special topcoat. You can also initially use matte foil.
Upon completion of casting on one nail, you can begin decorating on other nails, if this is provided for by the planned design. In addition, you can decorate your nails with painting and decor.
The presented step-by-step casting can be used after nail extensions, on natural nails after coating with gel polish. If you use regular varnish, then the technology for decorating nails with casting is slightly different and the effect may not be as expected.
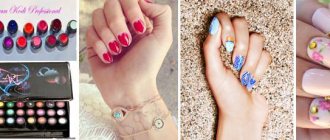
Foil Nail Design Ideas
Nail design with foil and pattern
Tags: nails
Market Analytics
- 10 most revolutionary scientific developments in the beauty industry in 2021
- Top 10 Best Beauty Products in 2022
- Global cosmetics market 2022: an unprecedented test for the global cosmetics industry
Convenient search for beauty salons on our website
Beauty salons in Moscow Beauty salons in St. Petersburg Beauty salons in Ekaterinburg Beauty salons in Novosibirsk
Latest blog posts on our website
- Naturecream / Properties of the “Sunny” oil itself
- Naturecream / “Sugar” wrinkles - or what glycation can do
- Naturecream / Esterified oils
- Naturecream / Arnica - the magical plant of alchemists
- Naturecream / Tremella Extract - Snow Mushroom Detox for Skin
- Prostye-sovety / How to visually enlarge your lips with makeup
- Naturecream / Apricot kernel oil for face
- Naturecream / MATRIXYL3000 - the best skin elasticity stimulator
- Naturecream / SPF in Natural Oils
- Naturecream / Geranium (Pelargonium) oil for skin health and beauty
Latest forum topics on our website
- Natalya / How to properly make a gelatin mask?
- Mrs._Smith / Badly sunburned! What to do?((
- Ice / Is it necessary to combine fitness classes with a diet?
- Antonova / What can be used for hair loss?
- Radio operatorKat / Who was on a protein diet?
Other articles in this section
| Drawings on nails Drawings on nails can be done with acrylic paints, gel polish or shellac using a needle, brush, toothpick, stamping, water, tape, sponge and newspaper. If you are tired of a boring, monotonous manicure, it's time to familiarize yourself with unique design options that allow you to create beautiful designs on your nails. Some of them require professional skill, but many of them can be learned on your own. |
| Medical pedicure The beauty of your legs is achieved through a good pedicure, however, if medical problems arise, a regular pedicure cannot help. |
| Moon manicure Nail design is performed using various techniques, of which there are many now. Back in the 30s, lunar manicure was invented, which is now at the peak of popularity. Christian Dior introduced this type of manicure at his fashion show. Performing this nail design at home is not difficult if you have some tools for a French manicure. |
| European unedged manicure An unedged manicure is a cosmetic nail care procedure that differs from a classic trimmed manicure in that the thin skin of the nail cuticle is not cut, but is moved and removed using special products containing fruit or lactic acid. Read our article about how unedged manicure is performed (it is also called European), what products and tools are needed for it. |
| Correction of ingrown toenails with plates and staples: what you need to know about the procedure An ingrown toenail (onychocryptosis) is a rather unpleasant phenomenon. Typically, the problem occurs on the thumbs and little fingers. A piece of the nail plate “cuts” into the soft tissue, and while walking, pain, redness, and discharge appear. If the problem is not corrected in time, suppuration and infection will occur. Everything can end sadly, including sepsis and bone deformation. Recently, in addition to the surgical method, nail correction using plates or staples has been used. The methods are relatively new, but have already proven themselves to be the best. What nuances you need to know about the procedures will be discussed in the article. |
| Hardware pedicure Every day our feet are exposed to a lot of physical activity. This especially applies to women and girls who prefer high heels and narrow shoes. When wearing uncomfortable shoes for a long time, you need to pay sufficient attention to the health of your feet. One of the ways to help restore the normal condition of the feet is a hardware pedicure. |
| Nail design Nail design is a modern type of aesthetic cosmetology that favorably emphasizes the beauty of women's hands, and also allows you to hide minor imperfections. The history of nail art dates back to Ancient China, where high-status fashionistas grew their nails up to 25 cm long and put tips on top to avoid damaging them. |
| Laser treatment of nail fungus: pros and cons of the procedure According to statistics, nail fungus is the most common dermatological disease. It is also called mycosis or onychomycosis. It is not always possible to cure with tablets and ointments. In the first case, intoxication of the body occurs and there is a large load on the internal organs. Ointments are not always able to penetrate into tissues. Therefore, such therapy is often ineffective. Laser treatment of nail fungus is a modern and effective method. Thanks to him, in 95% of cases it is possible to cope with the disease. In the article we will consider what nuances you need to know about the procedure, what to pay attention to when preparing, whether there are contraindications and side effects. |
| New Year's manicure On the eve of the New Year's holidays, fashionistas study magazines and horoscopes in order to find out what outfit to choose, what color to prefer, and what to refuse. A mandatory addition to a spectacular look will be a New Year's manicure, which can be performed using different techniques. |
| Classic edged manicure Classic (traditional, edged) manicure rightfully occupies an honorable place as an old-timer among other types of manicure. Initially, any manicure was performed using this technique, and only relatively recently did alternative versions appear - unedged European, Japanese and others. How to perform a classic edged manicure, what tools are needed for it and how to properly do such a manicure at home, read our article. |
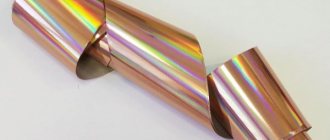
Types of foil
The casting technique directly depends on the type of foil; it comes in three types:
- translated;
- tear-off;
- based on glue.
When using any of these types, there are small features that should be taken into account to achieve the desired result.
When using transfer foil, material is applied to the design and once peeled off, it is transferred onto it like a sticker.
When tear-off foil is used, the required pattern is cut out of it and attached to a gel with an adhesive layer.
Foil with an adhesive backing is also easy to apply. To do this, you need to remove the bottom protective layer and press the foil onto the nail plate with the adhesive side. After which the foil is smoothed so that there are no bubbles left under it.
Foil comes in a variety of colors, from standard silver to gold, matte, hologram and mirror textures. Plus, foil comes in a variety of patterns, so any kind can be used to create a masterpiece.
How to make nail art with tear-off foil
Tear-off foil comes in the form of small rolls that are stored in a jar. To work, small pieces are torn off using tweezers. That's why it's called that. You can carefully cut the required shapes with nail scissors. To work with it you will need special glue.
— prepare your nails according to the usual pattern, do not forget to apply a base or colorless varnish to them;
- depending on the chosen pattern, apply glue either to the entire nail or only to its individual sections;
- after a few seconds, when the glue has set, carefully place the foil on the nail with tweezers, gently press with a cotton swab or orange swab;
- let it dry and at the end be sure to apply a fixative.
Use only special nail glue. Any other, including PVA, may not adhere, ruin the design and harm your nails. And there is no guarantee that the foil will hold securely.
Manicure with tear-off foil: photo
Manicure with tear-off foil: video
Unusual designs
Today's materials for nail art make it possible to create not only various designs, but also incredible color schemes.
Casting allows you to cover the nail plate either completely or partially, recreating any patterns.
Metallic shine gives the manicure a special look. In addition, it can be pastel shades, exquisite gold and silver colors, and any others at your discretion.
The mirror-like shine adds glamor, and if it is complemented with intricate curls or an entire composition, you will get a dizzying and unique manicure.
Using the casting technique, you can create not just a manicure, but a real jewelry masterpiece. With its addition, even an uncomplicated and simple design becomes sophisticated in appearance. And if you add other decorations, such as liquid stones, you will get a three-dimensional design that is perfectly suited for the celebration.
Popular ideas
The casting technique includes thousands of different designs. You can not only create a unique pattern, but also make mosaic ornaments.
Top molded designs include the following combinations.
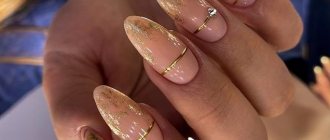
- Gold is the most popular of all, and if you combine it with a French manicure, this manicure will definitely outshine all the others.
- Metallic or silver color is suitable for lovers of discreet design. It is not as luxurious as gold glitter, but it adds its own sophistication and nobility.
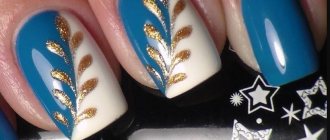
- Gold and silver are always in fashion, and therefore casting with such shades has become a real breakthrough in spectacular manicure design. You can safely use these shades either alone or in combination.
- A rather original solution for nail art is a combination of precious stones and foil . This manicure design creates a complete composition that stands out due to the imitation of jewelry. By combining two directions: casting and liquid stone, you can get a unique decoration in the form of a stone framed in a gold frame.
The meaning of this design lies in the application of a polymer to the nail, which creates an imitation of stones such as emerald or sapphire. Their advantage is their light weight, unlike real stones. Liquid elements do not create discomfort.
After complete drying, the special polymer takes on the appearance of a true gemstone. It becomes more voluminous and sparkling after coating with gel. To create a complete imitation, it is better to cover the nail with a special gel for sculptures.
This way the convexity effect increases significantly, creating the illusion of a natural mineral.
Choosing foil
Foil for manicure is produced in two types: transferable and non-transferable.
- Transfer foil is sold in sheets or strips and is often covered with a protective film. Her assortment is extensive, there is plenty of room for your imagination to run wild. It is used both for regular manicure and for extensions. With this foil you can create almost any design, from delicate to bold.
- Non-transfer foil is much more difficult to handle. This foil is denser than transfer foil and is sold in small rolls. When creating a manicure with its help, the design must first be cut out and then “planted” on a layer of varnish.
If you are striving for the highest quality manicure, then it is better to use E.Mi foil, which can leave imprints even on sticky skin. This foil is quite thin and flexible, and therefore is simply ideal for nail art in the art casting style.
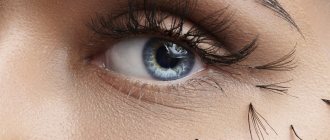
Moon design with foil
Moon manicure with a hologram effect is one of the trends of the season.
It is not very difficult to perform:
- carefully prepare the surface of your nails;
— next we paint the nail with colored varnish;
- then apply a thin layer of glue to the surface of the nail near the cuticle (called lunula);
- when the glue has set a little, put a small piece of foil on it (rounded on both sides), usually for such a manicure they use tear-off foil;
- when the varnish is dry, apply a fixative.
How to use nail foil: video
How to perform a lunar manicure with transfer foil step by step with photos, see on our website.
Impressive nail art is achieved by using contrasting colors of nail polish and foil. A manicure with foil at home is not that difficult. Sometimes it is much more difficult to come up with a truly interesting and unusual design. You can do this: apply glue in a disorderly manner (in whatever way you like - stripes, drops, without any sequence or symmetry), apply transfer foil, and then sharply tear it off. And you will get an absolutely unique pattern, which will be difficult to repeat exactly.
You can decorate with foil not only natural nails, but also extended ones. Moreover, it will stay on such nails much longer. The rules for performing a manicure are the same. The only difference is that in this case, instead of varnish, acrylic or gel is used.
Design Features
We have already mentioned that casting is performed only on extended nails and it is advisable to use transfer-type foil for this.
The process of performing such a manicure is as follows. Extended nail plates are covered with gel and baked in a lamp. Then we glue the foil to the drawing and polymerize the nails again. At the final stage, tear off the foil with a sharp movement. As a result, the top layer of foil “gives” your drawing.
The baking time for manicure in a lamp can vary and depends, first of all, on the materials used.
What to do if the foil does not fit well on the gel?
This problem occurs quite often, especially among beginners. There may be several reasons for this state of affairs.
First of all, pay attention to the quality of the materials you purchased. Perhaps the foil isn't good enough and just isn't sticking as well as it should. Maybe the reason is in the gel itself. After baking in the lamp, a sticky layer should form on it. If this does not happen, then there is simply nothing for the golden layer of foil to stick to. In this case, you can use special glue for foil.
It is also necessary to pay attention to the baking time of each layer in a UV lamp. Each gel has its own individual polymerization time. Take this into account when creating a manicure.
A manicure made using the artistic casting technique lasts about two weeks. It is not afraid of harmful environmental factors, so nothing can stop you from enjoying the beauty of your hands in the near future.
Casting on nails step by step
Photo step by step describing the process of creating gold casting on nails using transfer foil. Although, of course, in the video this technology is described in much more detail and better.
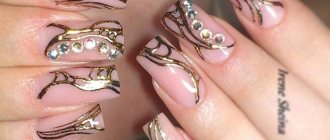
White French on long almond-shaped nails with gold casting. Typically, gold and silver are the most popular colors for this type of design.
To be honest, what interested me in this photo was not so much the casting as this blue and gold design with a cracking effect.
Very beautiful manicure. I note that very often casting on nails is done simultaneously with Liquid Stone. These are related designs and are often seen together.
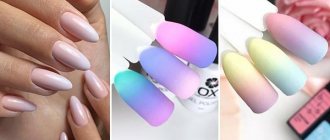
Gold casting on the nails plus an ombre effect in the transition from soft pink to soft blue.
Tips with red varnish and gold casting.
A very impressive slider design with gel paints with an owl design on the nails.
Nail preparation
Before you do a gel manicure with a foil design, you need to carry out a nail preparation procedure.
Materials:
- orange stick;
- nail clippers;
- nail polish remover;
- nail file;
- cotton wool discs;
- nail brush.
When everything you need is ready, you can start processing your nails:
- Using a cotton pad soaked in liquid, we remove the old varnish manicure (if a design with gel polish was previously made, it should be removed with special means).
- Using a stick, lift the cuticle.
- Using pliers we cut off the cuticle and burrs from the side rollers.
- Using a file, we shape the free edge of the nail and lightly file the surface itself. This is necessary to remove shine from the nail.
- Use a brush to remove sawdust and excess dirt. Degrease using nail polish remover.