What is gel nail paint
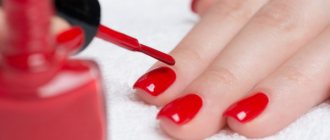
Gel paint for nail design is a gel-like substance with a thick consistency and bright pigmentation. This product does not spread or bubble when applied, maintaining a clear contour. To harden it, use an ultraviolet lamp for several minutes.
The consistency is very dense, viscous and thick, reminiscent of drying ordinary varnish. The wide range of colors is surprising: manufacturers offer various tones that can be mixed and used in unique shades if desired.
Bright and rich products are widely used by masters to create entire masterpieces of nail painting. There are two types: with and without a sticky layer.
Gel paint with a sticky layer
When creating a manicure using the casting and “velvet sand” techniques, colored gel nail paint with a sticky layer is used. After application, it does not lose its stickiness, so you can print foil or acrylic powder on it, which creates the desired effects.
These techniques are most often performed on artificial surfaces, but some masters are able to create casting on a natural nail plate.
Gel paints without sticky layer
These gel paints are used to paint artistic paintings on nails or a smile in a French manicure. They can also be used in one color over the entire surface as the main color.
Peculiarities
Gel paint is available in a different color palette, ideal for extended and natural nails. If there is no suitable tone, the compositions can be mixed together. Masters like to use this technique to create an exclusive manicure. The applied pattern can be adjusted before drying and during polymerization under a lamp.
The main advantage is the ease of application to the nail. The liquid structure does not spread at all. And one layer is enough to achieve rich color.
A finishing coat should be applied over the patterned layer. This way the manicure will last longer and will resist mechanical stress.
Which is better: gel polish or gel paint?
In fact, these funds have similarities only in the name, but there are many differences:
- Paints are more dense and pigmented in structure than gel polishes. The pigments in the latter constantly settle to the bottom of the jar, so they need to be stirred daily, while their competitors do not need this procedure.
- Due to its dense consistency, the paint is economical in consumption.
- To obtain a rich color, 4–5 layers of shellac are used, when it is enough to apply the paint once.
- Creating a pattern with gel polish is difficult.
- The paints come in a wide range of colors and can be mixed.
Is it possible to paint your nails with gel paint?
Initially, the product was applied only to create decorative painting in manicure. Nowadays paint is used to paint the entire surface instead of shellac.
Important! Covering your nails completely with gel paint is a serious procedure that is performed with a certain sequence. Otherwise, you may harm your hands.
Proper preparation is necessary. In addition to the basic gash, you will need:
- erasing gloss from the surface with a buffer;
- degreasing the plate with a fresher;
- primer with acid-free primer.
The painting itself takes place in several layers, just like with shellac.
There are two options for the arrangement of these layers:
- Gel polish base, color layer, topcoat.
- Basic product, acrylic powder, base, two layers of paint, top.
Each product will need polymerization using a UV or LED lamp. Without the layers drying completely, the tint may pool, crack, or chip, and the durability of the finish will be very low.
Attention! To paint the entire surface, use a flat brush. Apply the paint in a small amount, stretching it.
Preparing tools
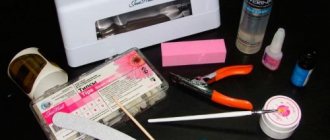
In order to get your nails in order and make an interesting manicure at home, you need to prepare certain tools and materials. It’s better, of course, not to choose the cheapest ones, otherwise a number of problems may arise and it will end up being more expensive. Everyone knows the saying “the miser pays twice.” It is recommended to carefully read the characteristics of the purchased tools and customer reviews. Next, we’ll tell you what tools you’ll need for a home manicure.
UV lamp (ultraviolet lamp) for drying nails. Nowadays, 36-watt lamps are mainly used in beauty salons and at home. They allow you to significantly speed up the drying process to 1-2 minutes. Some have a built-in fan, but this is not a required feature. The price range varies from 1100 rubles to 7000 rubles. There are also economical options of 9 watts up to 1000 rubles, but they dry one element much longer.
A manicure set that includes scissors, nippers, a double-sided cuticle pusher or orange sticks.
Polishing file – buff with a hardness of 900 grit. This file is used to polish the nail plate to improve the quality of adhesion to the gel polish.
Files for filing nails are often chosen in the shape of a boomerang. The gradation of hardness (grain) is important here. For natural nails, files with high abrasiveness, at least 500 and above, are preferred. For extensions, take more grainy files from 100 grit to 180. 4-sided files are very convenient. They are used for both grinding and polishing.
You can purchase an inexpensive manicure milling machine with various attachments for processing nails. Simple devices are suitable for home use, the price of which ranges from 1,700 rubles to 5,000 rubles. Power ranges from 18,000 to 25,000 rpm. Professionals use devices whose power ranges from 30,000 rpm. The most popular brand is Strong.
Thin, lint-free wipes are needed to remove excess material or sticky layer after drying.
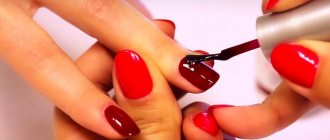
How to use gel paint
For work use:
- brushes (thin, flat or fan, depending on what design is intended);
- dots - another tool for drawing dots and patterns with gel paint on nails;
- a palette for mixing colors, it can be easily replaced with a piece of foil or thick polyethylene;
- ultraviolet lamp for polymerization;
- buffer or polisher for removing gloss from the nail plate.
- degreasing agent;
- base for gel polish;
- finishing coat (top).
The principle of operation is similar to the technique of applying shellac. Only with paint it is easy to draw patterns, taking your time and drawing every detail. Use gel paint on the natural nail and on the extended one. After the manicure, be sure to dry it under the rays of a special lamp.
How to dilute gel paint
If the product has dried out, even around the edges, then you should not try to revive it, it is better to throw it away. Such material is no longer suitable for work; it has lost its properties.
You can only dilute the paint if you want to get a less saturated color. To do this, use a transparent gel or 1-2 drops of acrylic monomer.
How to apply gel paint on nails
When working with paint, you can experiment with the design in every possible way. This can be patterns and lines, as well as painting a large area of the nail plate, for example, a French manicure.
Use the product as follows:
- First, use a base product, which must be polymerized using a UV lamp.
- Next, a colored layer is laid down (it can be one or several), they also need to be dried each.
- Now the design itself: apply a little product to a thin brush and carry out the intended design. You can correct the pattern with an orange stick or another clean brush.
- Polymerize.
- If the product forms a sticky layer, remove it with a cotton pad and an alcohol solution.
- Next, the entire pattern is secured with a top coat.
How to dry gel paint on nails
Dry paint designs on nails using a UV or LED lamp.
Each layer is held under the rays of the lamp, with the hand positioned horizontally. In a UV lamp, the polymerization time is 1–2 minutes, in an LED lamp – 1 minute.
It is worth paying attention to the manufacturers' recommendations; drying time may vary for each product.
Important! The master needs to find out the power of his lamp. If the coating does not last long when worn and becomes deformed, it means that it has not dried out, so it is time for the existing device to change the heating elements.
Do I need to coat the gel paint with a top coat?
Securing with a topcoat depends on the nail design made with gel paints:
- Convex lines and patterns are usually not covered with a top coat; it is used before making a three-dimensional design.
- With the “velvet sand” technique, the paint is sprinkled with acrylic powder and only then sent for polymerization. No topcoat is used.
- After hardening, flat designs and French manicures are best secured with a top coat to extend the life of the manicure.
How to remove gel paint from nails
Paint, unlike gel polish, is not susceptible to solvents. But this does not mean that it is not removable, because it is used together with shellac products.
First, the finishing coating is cut off. Afterwards you should use a remover - this is a special solvent for shellac. With its help, they wrap the nail plate, which is kept for 5 minutes, and if the top was not filed off, for 15 minutes. The surface must be degreased after removal.
But most often craftsmen remove paint by filing:
- file with abrasiveness 100/180 grit;
- using a machine, use ceramic or hard-fused cylindrical cutters.
Hand skin care
In order for the skin of your hands to maintain beauty and youth for many years, it is necessary to do skincare procedures. We will need:
- cuticle oil;
- hand cream.
At the end of the manicure, you need to apply cuticle oil. Place a drop of oil on the cuticle of each nail and rub in well.
Please note that there are mineral and natural oils. Mineral oil forms an invisible film on the surface of the cuticle
If you use this oil every day, you will get the opposite effect: the cuticle will begin to dry out. This oil is more suitable for masters: the client comes for a manicure once every 3-4 weeks, and mineral oil is ideal for single use. At home, on a daily basis, it is better to use natural oil, for example “Dadi Oil”, “Monami”.
After the oil, you need to apply a moisturizing or nourishing cream to the skin of your hands and cuticles.
NOTE! It is necessary to take care of your hand skin not only after a manicure! Before going to bed, smear your hands with a moisturizing or nourishing cream, and in the cold season, before going outside, with a protective cream. Once every 1-2 weeks you can scrub and perform paraffin therapy
To save time and money, you can purchase cream paraffin from “Aravia”.
Let's look at the technology for using such a cream.
- Thoroughly scrub your hands to remove dead skin cells.
- Apply a moisturizing or nourishing cream and rub it in well.
- Apply a thick layer of paraffin cream.
- We put on plastic gloves and do not take them off for 15-20 minutes.
- After the specified time has passed, remove the gloves and wipe off the remaining paraffin cream with a paper towel.
After the procedure, it is advisable not to wet your hands for two hours.
Be sure that after such care your hands will tell you: “Thank you!”
How to make French gel paint: step-by-step master class
Before doing a French manicure with gel paint, you should take into account that it will last a maximum of 7-10 days on natural nail plates, after which cracks and chips will begin. Therefore, this method is more suitable for artificial surfaces.
How to make French step by step:
- Steam your hands in the bath.
- Moisturize the skin with cream.
- Remove cuticle.
- Give the desired shape to the edge.
- Use a buffer to file off the glossy layer of the nail plate. Don't be too zealous.
- Apply base gel polish.
- Dry under an ultraviolet or LED lamp
- Apply the base shade of shellac. In a classic jacket, beige is used.
- Dry this layer.
- Gently dip the brush into the white gel paint, then start drawing a smile from the central axis, moving towards the rollers. The brush is applied with the flat part to the nail surface, the color is applied abruptly, constantly changing the angle, covering the previous stroke. With long-term training, the smile turns out beautiful and natural. You can always correct the line using an orange stick.
- Dry the resulting jacket.
- Cover with top.
- Carefully polish the manicure under the lamp. French is ready.
The advantage of paint over white shellac in French manicure is that it does not need to be applied in several layers. As a result, there is no step transition between tones that would have to be covered with several layers of top.
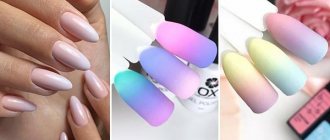
If desired, you can perform not only the classic French jacket, but also its other types shown in the photo:
How much does a gel manicure cost in Moscow salons?
Everyday chores not only take up time, but also force women to look for ways to maintain a beautiful manicure longer. If previously a nail service could only offer nail extensions, then with the advent of gel polishes an alternative appeared. A fashionable manicure on natural nails will last for several weeks if you apply gel polish as experienced nail technicians do in salons. Below are the prices for services of Moscow companies:
| Salon name | Address | Service price (rubles) |
| House of Beauty "MAYAK" | st. Tverskaya 29/2, in the Aquarium garden | 1 800 |
| "8 days a week" | m. Novoslobodskaya, st. Krasnoproletarskaya, 9, bldg. 2 | 3 000 |
| "Suzanne" | st. Upper fields, 36/2 | 900 |
| Nail extension studio | M. Taganskaya, st. Verkhnyaya Radishchevskaya, 9, building 4, office 317 | 800 |
| "CELEBRITY" | MKAD 66th km, Crocus City Mall, 2nd floor | 1 300 |
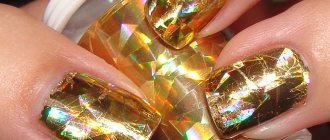
Which gel paint is best for casting?
The casting technique uses self-leveling colored paint with a sticky base. To make the decor voluminous, it is necessary to apply several layers, drying each one. When applied correctly, you get a perfect manicure that does not require additional polishing.
The most famous manufacturers of casting paints are:
- Cody. Not the most expensive gel nail paint, the best for casting techniques. This product has the right consistency, so the pattern does not spread.
- Masura. The manufacturer presents a whole collection with which you can imitate precious stones in manicure. The cost is high, but economical consumption.
- Toffee. The most budget option, however, is not inferior to competitors. True, the shades are all pastel and delicate, which is suitable for creating a business design or a classic jacket.
- AMY. German expensive gel paint in nail tubes, which is presented in the richest color palette. The quality of the products is excellent.
Important! Any casting paint can be used in other techniques.
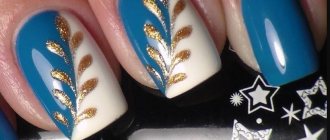
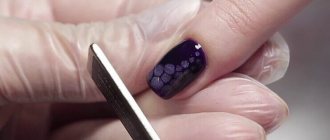
Draw flowers step by step
A popular element of manicure is flowers, especially roses. To apply the pattern you need to use a dots and a needle
Place a dot on the finished coating and carefully draw a line with a needle, twisting a kind of spiral. If you perform the technique on wet gel polish, the outlines of the colors will be more blurred, which will give a natural look.
Choose dark shades as the base color and paint on them with light varnish. You can also use the reverse technique - dark flowers on a light background. Try painting the leaves using a green tint. It is best to do this with a thin brush. Dry each layer separately so as not to smear the design when applying the next element.
Flowers pattern
Flowers are not considered the most complex pattern, but we recommend practicing on tips on which we paint with gel polish. The video of applying manicure is presented step by step below.
How long does gel paint last on nails?
The service life of the coating depends on the correct execution of the gel manicure. If the master did not make mistakes, then the artistic painting will last 2-3 weeks.
If the coating was deformed earlier, there may be several reasons for this:
- Poor quality material used in the work. If the product has expired, it will not last.
- Poor polymerization when performing manicure. Each layer requires complete curing. Otherwise, the pattern will begin to crack and deform.
- Incorrect plate preparation. If the master treated the nail poorly, did not remove the gloss from it or did not degrease it, then the coating will not last long for its owner.
Do not forget that manicure requires certain rules when worn:
- Gel nail painting should not be picked, chewed or subjected to other mechanical stress.
- On the first day after application, you should not take a hot bath or visit a bathhouse, sauna, do laundry or have long contact with water.
If you follow these rules, a beautiful manicure with gel paints will last up to three weeks.
Tips for Beginners
Those who decide to try doing a manicure with gel polish on their own need to stock up on the necessary equipment, and first of all this applies to special ultraviolet lamps. There are two types of such lamps on sale - UV and LED. It is best for beginners to give preference to the first option, as it has a lower cost and is easier to use.
You will also need special files of various sizes and a special file for grinding the nail plate - buff. In addition to the gel polish itself in various shades, you will also need a special base and fixer.
Particular attention must be paid to ensure that these two products are intended specifically for gel coating; those used for nail extensions are not suitable. After using them, the gel polish begins to crack within a few hours.
As a last resort, you can coat the gel with ordinary colorless varnish, but in this case you should not count on long-lasting manicure.
First of all, you need to undergo special training. It is preparation for further work that plays an important role. Not only its appearance and durability, but also the opinion of you as a specialist depends on how correctly the manicure is performed.
This can be done either at specialized courses or by asking a good specialist to show you a master class. It’s even better to take private lessons periodically, this way you can avoid many problems at work and, if necessary, immediately receive competent help. The instructions for working with gel polish itself are very simple, all the steps are accessible, understandable and described in detail, but it is still better to see once than to read or hear several times.
Simply applying gel polish to your nails in one color quickly gets boring. Therefore, it is recommended to constantly improve your professionalism. The easiest way is to purchase special stickers, rhinestones and stencils to create drawings and patterns.
Experienced manicurists strongly recommend that all beginners, even those who plan to apply gel polish exclusively for themselves, create a portfolio of their work. This will allow you to clearly see the progress of your activities or spot some mistakes.
How to make gel paint yourself
Many girls buy gel paints for nail design at home. It is not profitable to buy all the desired shades. When working at home, it is impossible to use all the colors, so most jars will have to be thrown away when they expire.
But there is a way out of this situation. You can buy transparent and white paints, as well as dry pigments in the required shades. They are significantly lower in price and have a very long shelf life.
To obtain a rich, bright color, white is used as a base; for calmer shades, transparent is used. Place a little product on the palette. The pigment is added in the same way as when working with regular paint: the more pigment, the brighter the resulting shade.
In addition, paints can always be mixed with each other to create unique shades. This is a great tool for experimentation!
Tools
The equipment of professionals is different from what women use at home. Of course, if you have the finances, you can get a device, but for beginners, a regular set of familiar tools is quite enough. Since all equipment will consist of hygienic and decorative manicure, it is worth clearly distinguishing between two sets of tools that may be needed in your work. To prepare your nails for working with gel polish at home, you need to ensure that you have the following tools:
- cutters and manicure scissors;
- orange stick;
- cuticle removers;
- soaking baths;
- pusher;
- files and soft sander;
- lint-free wipes;
- brushes for removing sawdust;
- special degreasing liquid.
To perform decorative manicure, depending on the type of technique, you may need the following tools:
- thin brushes with bristles of different lengths;
- drying lamp 24/48 W;
- rubber hoof;
- orange stick;
- lint-free wipes.
In addition, you may need a pusher to push back the cuticle before applying the varnish material. The approximate list of materials will depend on what kind of design is planned. A typical standard list consists of the following materials:
- base coat;
- finish(top);
- pigmented (colored) gel polishes;
- primer;
- decorative elements.