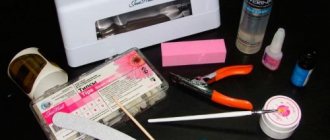
Necessary materials
The shopping list may immediately seem quite impressive. Therefore, if you decide to do your own gel polish coating, first think about whether such expenses will pay off for you in comparison with regular trips to the salon. If you still want to master the procedure yourself, you should purchase the following materials:
- Set for manicure and nail treatment,
- Equipment (lamp and, if desired, some others),
- Consumables,
- Base, top, primer and gel polishes,
- Materials for nail design.
To clarify, let's look at each point separately.
Tools
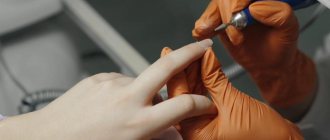
It is better to purchase tools in a professional store for manicurists. This way you will be sure that it is new and well sharpened. Nowadays it’s very easy to do this online: you can buy everything in one place, choose a palette, read reviews, look for cheaper prices and get your order delivered.
To perform a manicure you will need the following tools:
• Cuticle pusher (also called a spatula or scraper). This tool is needed to lift and push back the cuticle. An orange nail stick is often used as an alternative to a pusher. Its price is much lower, but it is a disposable tool, which is more likely to be consumable.
• Mills. They are needed only for hardware manicure with gel polish and removing long-term coating using a machine. For classic manicure, cutters are not used. A set of attachments along with the device is rarely purchased for independent use at home, since training is required to use it correctly. And the cost of the device is not so small.
• Nippers and/or nail scissors. They are used in classic and combined (using a machine) manicure to cut off raised cuticles. What is better to use, wire cutters or scissors, you can only determine by trying both at work - the choice is individual.
Thus, the only mandatory tools for processing the cuticle when performing a manicure followed by gel polish coating at home are a pusher and nippers/scissors. Don’t rush to buy cutters with a machine at the initial stage. Even experienced professionals recommend first learning how to perform a classic edged manicure.
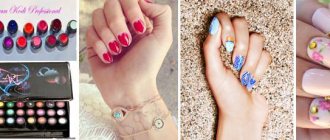
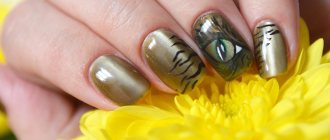
What manicure is fashionable in 2022?
Short nails are not just a monochromatic manicure. Despite the small coverage area, you can make interesting designs on it.
In 2022, manicures using bright colors and combining them on one surface are considered fashionable. It is also worth paying attention to gold and metallic shades. You can see a photo of a manicure on short nails in this style.
Equipment
To apply gel polish at home you will need the following equipment:
• Hybrid, LED or UV nail lamp. Without it, there is no way to dry the gel polish. UV lamps are currently fading into the background, and users are increasingly giving preference to hybrid lamps when purchasing. For personal use, you can buy cheaper equipment, for example, a Sun 5 48w hybrid lamp. To work with clients, you will need more powerful equipment.
• Machines for hardware manicure and pedicure. If you decide to master hardware technology, you need to buy a router. The power of the machine is determined by the number of revolutions of the cutter. Simple devices for home use usually perform 20,000 revolutions, the strongest ones - about 45,000. However, when choosing a router, other criteria are no less important, but this is the topic of a separate article.
• Desk lamp. Even when applying gel polish at home, you need to have good lighting. So if you don't already have a desk lamp on your desk, it's definitely worth getting one.
The equipment also includes devices for sterilization. These are an ultrasonic washer VGT 2000, glasperlen devices, ultraviolet cabinets and dry heaters for manicure instruments. Expensive disinfecting equipment is usually not purchased for personal use. However, if you are going to do a manicure with the same tools not only for yourself, but also for others, then be sure to take care of good disinfection.
Review of sterilizers
Consumables
For the shellac procedure, you must have various consumables. If you are going to do your own manicure on an ongoing basis, then it is most profitable to buy materials in large quantities. This way, the cost of each product will be much cheaper and you won’t have to spend a lot of time going to the store.
List of consumables:
- Files and buffs of various abrasiveness for correcting the shape and length of nails and removing gloss.
- Lint-free wipes will be needed to degrease the nail plate and remove the sticky layer from the top coat.
- Orange sticks can be used as an alternative to a pusher when pushing back cuticles or for performing a European manicure.
- Cuticle softener. It will be required if you are doing a European or classic manicure when processing the cuticle. You can replace it with a warm bath with soapy water.
- The degreaser is used to prepare nails for applying gel polish.
- Cuticle oil. Rub in after finishing the procedure of covering nails with gel polish to nourish the base of the nail.
- Sticky layer remover. Often comes 2 in 1 along with a degreaser, which allows you to save a little.
- Acid-free primer. Used to improve the adhesion of artificial coating to the nail bed. This allows you to extend the wear life of the coating.
When purchasing liquids, it is best to purchase products from trusted companies. These include popular manufacturers such as Kodi Professional, Severina or Domix.
Bases, tops, primers and gel polishes
These are the main components of a three-phase nail gel polish system.
• Bases
. There are rubber, regular and biogels. For thin and weakened nails, it is better to use biogel: it is thicker and more elastic. Regular bases will work for good nails. Rubber bases are easier to work with and self-leveling easily, but cost a little more.
• Tops
. Tops can be thick and flowing, with or without a sticky layer. The consistency should be chosen based on ease of application. Tops with a sticky layer are used to secure designs, sliders and other accessories. The non-stick topcoat is suitable for any other topcoat.
• Primers - enhance the adhesion between the nail plate and the color coating, respectively. The average wear of gel polish increases.
• Gel polishes. In order to choose the right gel polish brand for you, you will have to try some of them. They differ in thickness, fluidity, and color palette. We recommend reading reviews before purchasing.
There are also 3-in-1 or single-phase colored gel polishes. They do not require the application of foundation and top, as they are already included in their composition. Such materials have not gained much popularity, since they are still inferior in properties and brilliance to the three-phase application system.
Review of rubber base for gel polish
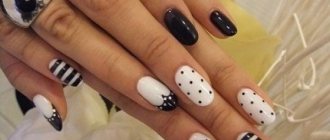
Blue and white manicure with a sprig
To complete this simple design with gel polishes, you will need to perform the following manipulations.
- Decorate the nails on the little fingers, index fingers and thumbs in a blue tone.
- Then, on the nail plate of the ring and middle fingers, apply white varnish over the base with a thin brush, placing it as shown in the photo.
- Before the white coating spreads, it must be dried.
- Then fill the remaining area with blue varnish.
- Now all that remains is to decorate the borders of the two shades with a twig. For this you need glitter and a thin brush.
- When the drawing is completed, it must be dried, covered with topcoat and removed from stickiness.
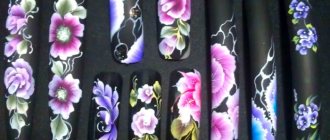
Materials for designs
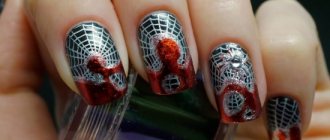
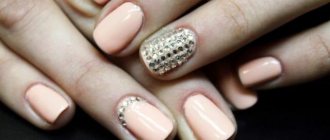
Materials for nail design are not required to be purchased, but you will most likely quickly get tired of wearing a single-color coating. To do this, you can purchase different decor that will decorate your manicure and make it individual. Here are just some of the possible options:
- Sliders.
- Kamifubiki.
- Rhinestones.
- Ribbons.
- Foil.
- Spider gel.
- Gel paints.
Every day something new appears on the market, so it’s simply impossible to list everything!
A little advice that I would like to give to novice craftsmen is not to use cheap Chinese materials. This is especially true for liquids that come into direct contact with the skin and nail plate. Chinese materials very often cause severe allergies and can cause serious harm to the body.
Tools for performing the procedure at home
Manicure accessories are in every lady's cosmetic bag. To do your own manicure, you don’t need to purchase anything special, the following tools will be enough:
- antiseptic or ordinary hydrogen peroxide;
- nail scissors and nippers;
- a set of files to shape the nail and polish the surface;
- manicure spatula;
- special means for influencing the cuticle;
- a bowl of warm water where you can steam your hands;
- nail polish remover;
- cotton wool;
- towels;
- nourishing cream.
Applying gel polish at home
Having dealt in detail with the list of necessary equipment, materials and tools, let’s move on to the step-by-step procedure for applying gel polish. Please note that you should not apply cream to your hands first, otherwise the coating will come off the nail plate very quickly.
The procedure includes:
- Preparing the nail plate (or performing a manicure).
- Application of materials.
When preparing the nail plate, it is important to follow each step and perform it efficiently, otherwise the coating will not last long and detachments or chips will appear.
Nail preparation is performed in different ways, depending on the chosen manicure method.
Next we will look at the classic version, which consists of several stages:
1. Remove the old coating from your nails using nail polish remover or gel polish, depending on what you had on your nails.
2. Give the free edge of the nail a uniform and even shape using a nail file. If necessary, the side ridges around the nails are also processed with a nail file.
3. A softening agent is applied to the cuticle area, which must be left for a while (read the instructions for your remover) so that the skin becomes more pliable. Usually it does not exceed 1-2 minutes. You can also soften the cuticle in a bath with warm soapy water.
4. Push back the cuticle using a pusher or an orange stick.
5. Wipe off any remaining product with a lint-free cloth.
6. Cut off the raised skin with nippers or scissors.
In hardware manicure, cuticle processing is performed using a cutter. Carefully, at 10-15 thousand revolutions, we pass the device over the cuticle from right to left, lifting it.
Then we switch the reverse and work in the opposite direction - from left to right.
It is important to perform cuticle removal very well. Since if there are at least some protruding parts of the skin, hangnails or pterygium on the nails, it will be difficult to apply gel polish very close to the cuticle, it will flow and lie unevenly, which will lead to rapid peeling of the material.
Gel polish application technique
1. Remove the natural gloss from nails using a buff. This will improve the adhesion of the material to the natural nail.
2. Degrease the nails with a lint-free cloth soaked in a special liquid.
3. Apply a thin layer of primer to the entire surface of the nail plate and wait until it dries in the air (about 1 minute).
4. Apply the base and dry in a UV (LED) lamp for 30-60 seconds.
5. If necessary, use a second layer of base to level the nail plate. It is convenient to use a rubber base for this. Before drying it, the nail must be turned over for literally 30 seconds to self-level.
6. Apply the color coating in two thin layers. Dry each layer in a lamp for 30-60 seconds. If the gel polish is highly pigmented, applies evenly and without bald spots, you can apply it in one layer.
7. The desired design can be made on top of the color coating.
8. We cover the nails with a finishing topcoat and also polymerize it in a lamp.
9. Remove the sticky layer, if there is one on your top.
10. Apply nourishing oil to the cuticle area and rub it in with massaging movements.
Gel polish manicure is ready. After the procedure, prolonged contact with water is not recommended for two to three hours. Correction should be carried out when the coating becomes unpresentable or the nail grows too long. The most optimal time is three weeks.
Summer manicure with cherries
A more complex design, but also doable for beginners, is the one shown in the main photo. In this case, a flirty cherry is applied to the nail of the ring finger after the base and main varnish. The most convenient way to create a drawing is with a thin brush and a polka dot tool. The technology consists of the following steps:
- Applying a red spot to the tip of the nail.
- Intermediate drying.
- Applying a black outline, shadow and stick.
- Another drying session.
- Fixing the pattern with a top.
- Final drying.
- And removing stickiness.