In this article we will look at methods for leveling the nail plate.
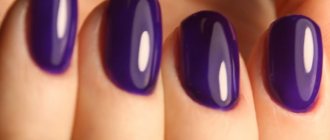
A perfectly smooth coating that attracts with beautiful highlights is a dream that has become a trend in modern manicure. This effect is achieved by adding additional volume of the base coat and finally trimming the existing nuances with a top fixative. Therefore, we will share with you the basic secrets and rules of such application, and also consider some more ways to level the nail plate yourself.
When you need to level the nail plate using external means: indications for leveling
There are some cases when you need to straighten the nail plate not just out of whim, but out of necessity.
Comparison
These include:
- springboard nails . They tend to move upward. They are also called take-off nails
- trapezoid nails . This is also the structure of the nail when they are very wide and even on the free edge. Their arch is not bent, but straight
- nails that are curled or bent on only one side. Arch asymmetrical
- deformed nails in case of vitamin deficiency or mechanical trauma
- thin, weakened nail plates
- mechanical work with hands
Important: Sometimes it is necessary to strengthen nails affected by fungus with gel. But it’s still better not to cover your nails until they are completely restored. The only thing you can do is remove the exfoliated parts and polish the nail well! In this case, completely cut off the free edge.
1 - equal nails, 2 - trapezoidal, 3 - curled on one side
Causes of irregularities
Ideal nail art is unthinkable on unkempt fingers, and sometimes to eliminate problems and align the plates, you should contact doctors rather than beauty salons. The reasons for the occurrence of unevenness can be different.
*Mechanical damage: impacts, pinching, improperly performed manicure. An injured nail may heal over time, and the plate will become even and smooth as before, but a serious injury can deprive a woman of neat nails for a long time.
*Bacterial or fungal infections. Diseases of the skin and nails often lead to deformation of the nail plate, as well as its thinning and detachments.
*Diet imbalance. Longitudinal grooves on the surface of the plates may indicate a lack of iron or protein, and fragility may indicate a deficiency of vitamins. Refusal of strict diets and proper intake of vitamin complexes will help restore the beauty and healthy appearance of your nails.
How to level a nail plate with a base: detailed leveling steps
If you decide to straighten your nail plate at home and want quick results, then you should use salon products.
Leveling should be done even before applying gel polish! If you still have small irregularities, you can hide them with a top coat. But remember that it is very liquid, so you need to work quickly and with a small amount! But the algorithm for the base and top is the same.
Algorithm
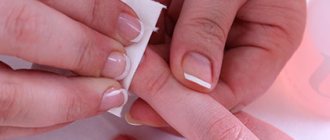
- Our leveling begins by removing the old material! If you didn’t have one, then skip this step. If you remove old gel polish, then use a cutter to create the most even surface possible, without bumps, leaving a very thin layer of the old base. If there are detachments, we remove them.
We remove exactly the old material
- If there are any unevenness after cutting, they can be polished with a file, performing long rounding movements.
And remember -
the thickness of the nail plate along with the coating should not exceed the thickness of a plastic card. - We do a manicure and shape it. You will also find the article “How to properly make almond-shaped nails: tips and secrets of proper filing”
The end should not be thick!
- Clean, manicured nails need to be buffed - in a circular motion, lifting the scales well, but without pressing. Although you can skip this step only after removing the old layer.
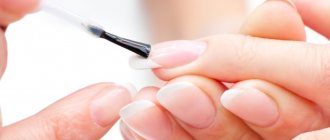
- Carefully remove the dust with a brush and a lint-free cloth soaked in degreaser. We wipe the entire surface of the nail well, paying special attention to the area near the side ridges and cuticle. Next we apply the primer.
We make the sawdust with light movements, and be sure to wipe off any dust from the nail!
If there are any severe deformations on the nails (cuts, grooves or a very pronounced nail spring), it is better to strengthen them before straightening. Because in places where the base layer is significantly larger, subsidence may occur!
- Strengthening is done with a base mixed with acrylic powder in a ratio of 1:5. Apply to a grease-free nail with a brush, filling in any unevenness and creating a more even base layer. Dry in a lamp for 1 minute. Please also note that at this stage we repair nails in case of breakage. Finally, we file and sand the repaired areas.
It will also be appropriate for you to read the article “How to fix a broken nail at home?”
We eliminate all defects on nails
- Let's start leveling. You need a base with a brush. We cover the nails with a thin layer of base, do not dry it, but for now check that everything is covered. Otherwise, there may be buns on the sides, along the side ridges. And another important point - it should be close to the cuticle, but not go under it! Otherwise, the leveling layer will flow! Apply the base evenly and close to the cuticle, but with a slight indentation.
The base under the cuticle leads to streaks!
- Visually divide the length of the entire nail into 3 sectors. Take a drop of base onto the brush. Depending on the length of the nails, the size of the drop varies from a lentil grain to a pea. Place it exactly in the center of the nail in the upper third.
Let's put a drop
- Let it spread over the nail a little (half a second). Raise the brush a little, but do not lift it away from the drop.
Don't touch the nail!
- Using the edge of the brush, carefully touching only the top layer of the material, use longitudinal movements to direct the base towards the tip of the nail. It should be remembered that at the tip we have the minimum thickness.
Pull to the edge
- Next, using long zigzag light strokes , we even out our layer, achieving maximum smoothness so that the drop is evenly distributed over the nail.
We distribute
- Turn your hand palm up. It is important to strictly follow the direction so that the volume of the base does not shift to the side. Hold it for 5-7 seconds and see if the edge at the bottom border of the coating is even. If unevenness or sagging is visible somewhere, use the edge of a brush/toothpick/thin brush to direct the material in the opposite direction.
Correcting
- When you like the result, turn the pen over straight and quickly look through it. In perfect alignment, before sending it to the lamp, you should have a perfect mirror highlight throughout the entire nail, the reflection from the lamp does not break anywhere. Dry for 30 seconds.
But don’t delay looking at your nails!
As a result, you should end up with a nail with the correct architecture, when viewed from the side - there is a slight rise in the upper third and a smooth descent towards the tip. No subsidence, beautiful rounded smooth line.
Creating the right apex
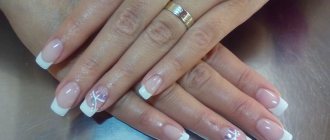
- We cover with color, it is better to do 2 thin layers, drying each of them well.
- We complete the coating with top. We cover it similarly to the base. However, the amount of top type needed is three times less, because it's more liquid. And dry it for 1 minute.
And don't forget to check the glare
- We carefully go through the ends with a file, removing any roughness.
- If you are using a top coat with a sticky layer, at this stage we thoroughly remove the stickiness with a napkin soaked in 3 in 1 degreaser. Your perfect manicure is ready!
Tip: After coating, it is better to save the new manicure until the material has completely cooled - about 30 minutes.
Laying out material. Sculptural zones of the nail.
To facilitate the modeling task, you can conditionally divide the nail into three sculptural zones.
This is dictated by both the structure of natural nails and the rules for constructing artificial ones, and allows you to build a properly balanced, strong nail.
Zone 1 - located from the free edge of the nail to the smile line. This would set the tone for the entire structure. It is very important in this zone to maintain the thickness that will ensure the necessary strength of the entire structure (Fig. A).
In the middle of the smile line, the layer of material should be quite thick. Its size is directly related to the shape of the nail: the flatter it is, the thicker the layer. However, towards the sides and tip the layer gradually thins out. If you look at the nail from the client's side, you can see an arch that is high in the middle and tapers off on the sides. It is shaped like a crescent. Very often you can hear that the thickness in this area should be the same both in the middle and on the sides. This is fundamentally wrong. The thickness on the sides also leads to an increase in the thickness of the material that is placed near the cuticle. This, in turn, does not allow for a smooth transition from artificial coating to natural nails. A step is formed in this place, which is the reason for the peeling of materials on the sides.
How to level a nail plate with biogel, gel: detailed description
Many girls choose biogel to straighten the nail plate. It is easy to use, additionally strengthens nails and lasts a long time. In addition, it also nourishes nails with vitamin complexes and improves their growth. The principle of operation of gel and biogel is the same, so we will not consider them separately. The only difference is that the gel requires a base layer of base. To work you need a brush No. 2-4.
Tip: Don't throw away old jars of gel polish brushes. They are much more convenient to apply gel or biogel. Simply pour the liquid into an empty bottle and store your clean brush there.
- First, as with the base, we clean the nails, buff and apply primer. If you apply biogel immediately after the old coating, then polishing your nails is not necessary.
- Now, before leveling, we apply a thin primer layer of biogel. Rub it well near the side rollers and secure the end. Be sure to dry it in an LED lamp for 30 seconds and 2 minutes in UV. As a tip: BSG brand Glossy gel can be used as a primer for any nails. It will be better to hold on this way.
Apply a base coat and secure the end
- Now we take a drop of the required size and also place it in the third part of the nail bed, about a millimeter from the cuticle. We slightly push the maximum volume towards the cuticle. But we don’t get it under the cuticle! Do not clutter this area; the gel itself will lie smoothly in this area.
Important: If there are streaks, remove them with an orange stick.
- Now we pull the gel down, then grab the drop again and stretch it along the side rollers. We do not touch the brush to the nail - this can disrupt the integrity of the dispersion layer and disrupt the uniformity of distribution! Using a brush, we only gently stretch the gel, without pressing.
Stretch the drop
- To form a longitudinal line, turn the nail on its side and lightly stretch the gel from the bead to the tip of the nail in long strokes. Near the side rollers, the thickness should be minimal. Also in the center there should be elevations about 1/3 from the cuticle. If necessary, add gel to some places, and apply it with very light movements, barely touching the top layer of the nail.
We distribute
- It is not necessary to turn the gel over, but if you have liquid materials, then this is also necessary. Moreover, in this situation, the biogel can make up for your mistakes. In terms of time - enough while you secure the end.
Just wait until you secure the end
- You can dry it upside down for half the required time, or at least until the material sets. Dry the note in the usual position. Let us repeat that liquid gels require this.
Glare
Important: Thin nails are often baked in an LED lamp. This is due to the fact that at a high polymerization rate, the material heats up, and thin nails are more sensitive. In this case, you should interrupt the drying, wait a couple of minutes until the gel cools and continue. If you are patient, you may burn the top layer of your nail. And this can even lead to onycholysis!
Afterwards, you can cover the already flat plate with color, make a pattern, or immediately cover it with topcoat.
Life hack: how to make perfect highlights
After we have learned how to level the nail plate, we should learn one more secret. You won't get the perfect highlight without a round lamp. Its appearance directly depends on the light source. With a regular lamp it will be anything: square, angular or oblong. But a beautiful round glare can only be obtained from a round lamp. In its absence, forming it will be very problematic.
In order to get it, a regular round table lamp will do. After applying the strengthening, the nails can be held under a regular lamp for 20-30 seconds, and then sent to polymerize.
How to level a nail plate with acrylic powder: step-by-step instructions
Yes, you can not only perform extensions, but also level the nail plate without lengthening it with acrylic powder. At the same time, you will be provided with high strength and wear resistance of the material.
The scheme is as follows:
- We do a manicure and clean the nails of dust
- Bafim if necessary
- Apply primer. If your nails are strong, then it is enough to just cover the free edge and near the side ridges. If the nails not only go in waves, but are also very thin, then we cover the entire nail, but without affecting the cuticle!
- Apply a thin layer of base
- Before it dries, immediately generously sprinkle acrylic powder with a manicure spatula. Be sure to rotate the nail so that it is evenly distributed.
Sprinkle generously
- We shake off the excess and set it to dry in a lamp for the usual time for base.
- Afterwards, remove loose particles of powder with a brush.
- If you used high-quality materials, then the surface should already be smooth. But if necessary, you can use a polishing file.
- You can already apply colored varnish on top of the acrylic layer - this way it will neither spread nor shrink! Finally, secure everything with a top coat.
What is it for
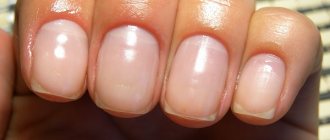
The nail plate of different people has its own characteristics - some are lucky to have naturally smooth and strong nails, while others know first-hand what tubercles, peeling and other problems are. In addition, even on healthy and smooth nails, unevenness may appear over time, since frequent treatment with aggressive agents, physical impact and drying in a device negatively affect its condition.
Nails without waves and dents
Leveling your nails with gel polish allows you to remove waves, bumps and dents, which otherwise would become more noticeable after applying a colored coating. But this is not the only advantage of the procedure.
Alignment has a number of advantages:
- The nail plate becomes stronger;
- The quality of the manicure improves - it will delight its owner not for several days, but for more than two weeks;
- The procedure is quick and takes about 10 minutes;
- Protection of the nail from mechanical influences;
- Aesthetic beauty – gel polish applies to smooth nails without streaking, forming an ideal surface.
Aesthetic beauty of nails
In other words, leveling is a procedure that will help create a beautiful manicure for a long time and strengthen the nail plate, making it less sensitive to various external influences.
The creation of nail architecture is carried out using specialized means. On the shelves of cosmetic stores you can find three types of suitable products:
- Biogel;
- Base for gel polish;
- Gel for extensions.
The use of each substance has its own characteristics, but they are all united by one important rule: the product must be thick, otherwise it will not fill the recesses on the nails and it will be impossible to construct the desired shape.
Applying the base
Which is the best base, biogel, gel to level the nail plate: review of companies
Now there are a large number of varieties of base coats on the market that can be used to level the nail plate:
- Base Coat is a standard base coat of very low viscosity, available in the brands PNB, Tertio, MnM. For minimal leveling of dense nails, achieving ideal smoothness of manicure.
- Rubber Base (rubber base) is strong and has increased resistance to stress. Medium viscosity, does not sag, good for salon and home use, ideal for beginners as it self-levels. Provides long wear and easy application. It is easy to mix with powder, obtaining additional density.
- X-Coate is an updated version of the rubber base. More suitable for fast working craftsmen or during cold periods. It is less dense, but more comfortable to dry due to less burning.
- The gel base is thick and very dense. For 100% durability, it is better to use a primer and a rubber base. It is similar to extension gel, but has a high degree of burning in the lamp. Although it self-levels perfectly, in a cool room it will have to be additionally heated for more convenient operation.
- Pigment (Cover) Base – primer is a must! It has high viscosity due to pigmentation. Ideal during hot periods!
Don't get lost in the choice of materials
Base brands should be chosen only from trusted manufacturers. Komilfo, Kodi, Lovely Base, NeoNail and Adore Professional have proven themselves very well
It is worth paying attention to the following biogel companies: Bio Stretch Gel (BSG), Atica TM, Creator, Yoko and El Corazon. The BSG company has two gels: Glosse for brittle, thin and problematic, curved nails, and Clear for normal, non-problematic nails as a strengthener.
Among manicure gels, it is worth noting the following companies: Cosmoprofi, Kodi, CNI, Irisk.
What is apex?
The apex is a kind of top of the artificial nail plate, which is formed when applying a modeling substance to the natural nail and is the point where the coating is thickest. This thickness creates the strength necessary to support the nail. It should be remembered that the longer the artificial nails are, the denser the top is constructed.
Without building the apex, modeling strong nails is impossible. A correctly constructed apex should rise smoothly and flow from the stress zone towards the cuticle , without reaching it. In this case, the apex should be a couple of millimeters further from the stress zone itself (towards the cuticle), which will make it possible to increase the strength of the nail and prevent its deformation under load.
Errors when constructing an apex
When constructing a vertex, the following typical mistakes are made:
When growing, the stress zone grows along with the coating, it moves to the free edge further than the natural nail, and it turns out that most of the material is suspended. An imbalance arises, as a result of which, during any work, the free edge outweighs and, as it were, loosens the adhesion of the material to the natural nail, gradually tearing it away from the nail. Only a correctly constructed apex will hold the nail and serve as a kind of counterbalance that will help maintain the integrity and strength of the nails until the next correction (normally after 2.5-3 weeks).