How to make an igloo out of snow with your own hands
One block must be placed tightly against the other by tapping with a knife. In this case, snow plays the role of cement. First you need to sand the horizontal seam, and then the vertical seam. Seal the chips with snow and fill the cracks that form during the construction of the igloo with your own hands with snow crumbs. It is very difficult to cut an exit without damaging the structure
In order to make a snow igloo durable, it is important to carefully approach the details.
When the process of laying snow slabs begins, a hole will form at the top. To prevent the last top slab from sliding off from above, it is placed in the form of a wedge. Such a snow brick seems to jam the ceiling hole. It is made larger than the hole so that it does not slip through.
In winter, at sub-zero temperatures, a snow igloo can last from 3 to 5 months. Eskimo housing is capable of maintaining a more or less stable temperature inside. In such a room the temperature ranges from -6° to +2°. If you light a candle, you can heat the room to +16°. But the Eskimos heated the igloos with lamps containing deer or seal fat. The temperature in such a dwelling rose to +20°, despite the fact that there was a frost of -40° all around. It was hot to sit in clothes, and they undressed. A small corridor also emerged from the snow. To protect against attacks by polar bears, the igloo was covered with a large block of snow at night.
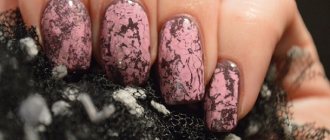
Technology of painting on nails with a needle
Depending on the chosen technique, different results are obtained. Drawing on nails with a needle is done on wet varnish, when the coating has not yet dried and it can be combined into a single composition. Drawings and diagrams will help you with this.
The scheme was developed by specialists in the nail industry, in which the use of a needle when creating a manicure is an important point.
Lace-up design
Drawing a lacing pattern is done using two contrasting varnishes. They should be clearly defined, for example, white and black will do. You need to paint the plate in two colors: make half light and the other half dark. Following these actions, dots are placed on the surface of the nail. Where the varnish is light, we will make three dark drops vertically, and where the varnish is dark, we will make white dots, respectively.
The needle moves from side to side. Like a pendulum, the instrument swings from one point to another. When the needle is located in the middle of the point, it is necessary to make a curl similar to the tail of a figure eight. Natural movement of the tool is performed on wet varnish. Connect all the dots at once, moving towards the bottom edge.
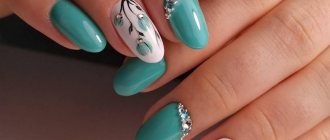
Floral pattern
To create a floral design on your nails you will need at least three colored polishes. The first base is the background, the main color that covers the plate completely. The second color will be responsible for the petals. As a rule, the color is selected based on personal preferences. The third varnish is responsible for the middle, the core of the flower.
You can learn how to do floral nail art from the photo, since the design scheme is quite primitive. To achieve beautiful art, along with patience, you need to have basic knowledge of how to draw on your nails with a needle.
Paint your nails with background polish, put a bold dot in the middle, and place future petals around the core. There are 5 or 6 dots, if you count individually. While the varnish is still wet, you need to connect 5 dots into one circle and the drawing will instantly transform.
Technique for drawing the sun
Nail designs can contain not only a floral theme and lacing, but also be made in the shape of a sun. This does not require complex manipulations. It is enough to draw two arcs parallel to each other in the corner of the nail. Then you need to draw lines from one point in different directions. The presented diagram will give you an idea of what the sun should look like.
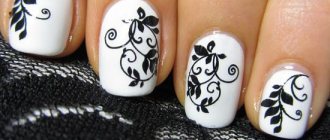
Sprig varnish drawing
This may come as a surprise to some, but with a needle you can even draw a twig with flowers. Of course, you need to try for this. To understand the diagram, you need to try to draw figure eights on a piece of paper that are connected into a single pattern.
The action of the needle resembles an infinity sign. On one drop you need to draw a figure eight and connect it with the bottom drop. After the nail is coated, paint quickly with a needle so that the polish does not have time to dry. The drawing is made using two or three varnishes, depending on what composition you want to achieve.
Complex abstract and fantasy drawings
Having tried several simple designs, I want to create a more complex pattern with several elements on my nails. However, how to accomplish it remains a mystery. Every girl wants to apply her knowledge and create original art. To do this, it is enough to bring to life a simple braid that looks very similar to an abstract drawing.
A cunning scheme can confuse your friends as to exactly how the drawing was made. Take the main background and two auxiliary varnishes, which will merge into a single composition after work. You need to connect primitive points with a figure eight, draw an infinity sign at each point and go lower and lower.
Zigzag pattern
Using a needle, you can make not only simple designs on your nails, but also intricate patterns. Zigzag is vaguely reminiscent of lacing; to complete a zigzag you only need two polishes. Cover half of the nail with the first color. It is desirable that it be contrasting with another tone. We will use the second varnish of the opposite color. We cover the second half of the nail with it. Take a needle and start drawing a zigzag from the root part, as if connecting two halves, in straight lines to the edge of the nail.
How to make patterns on nails: colored varnishes and acrylic paints
There are no particular differences between creating a design with colored varnishes and acrylic paints.
The latter material can be applied with any available tools - a needle, a toothpick or a special brush. Naturally, colored varnish already has a brush. It should be thin so that the drawing can be made clearer.
There are a lot of options for patterns that can be made using these tools. Therefore, we will look at the technology for performing tiger manicure. It is lightweight, which is quite suitable for a novice master.
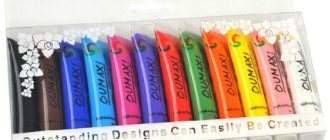
You will need:
patterns on nails photo Varnish – brown, orange and black. The last one you will paint and therefore it should be with a thin brush. You can use acrylic paint instead.- Transparent varnish for the protective layer and sponge.
Technology:
- Shape and lengthen your nails as desired.
- Make them smooth if necessary. This is especially important if you paint with acrylic paint.
- Apply a base coat of brown polish to the entire surface of the nail plate.
- Once the polish is dry, apply the orange polish applied to the sponge using a blotting motion. This layer of varnish is applied only to the middle of the nail plate.
- Next, you should draw black stripes in as many as you like.
- The final step is to coat your nails with clear varnish. If you apply it to a dry coating, you will get a clear pattern; if you apply it to a wet coating, it will be more natural.
It is not at all necessary to use this particular color scheme of varnishes. They can be any color. The final result will not suffer from this and may look much better than the manicure we suggested.
Top
Preparing nails for decoration
Even the most beautiful design will lose its charm on unkempt nails. That is why, before painting your nails and drawing on their surface, you need to put them in perfect order. Of course, for this purpose you can visit a nail salon or make an appointment with a professional. But to save your precious time and save money, you can do all the work yourself.
- First of all, you need to remove the previous coating using acetone or a special nail polish remover.
- Then use a nail file and manicure scissors to make the desired shape of the nails.
- Then soak your hands in a warm, vitamin-enriched bath, which will not only moisturize the skin of your hands, but also strengthen your future manicure as much as possible.
- After the water procedure, you need to push back the cuticles with an orange stick or use a cuticle remover.
- To make your hand skin velvety and soft, after manicure procedures you should make nourishing masks or apply traditional hand cream.
Materials and nails - tools for manicure design
In addition to traditional manicure procedures, do not forget about the necessary nail materials, which for convenience should always be at hand. Therefore, before starting work, you should prepare all the materials to beautifully paint your nails, and the necessary tools for decorating your manicure. Namely:
- Varnishes of several colors, gel varnishes or acrylic paints. As a rule, this criterion depends on the technique of manicure and its decoration.
- Sequins, rhinestones, small beads, bouillons and any other nail decor you like.
- As tools you can prepare the simplest toothpicks, manicure tape and a sewing needle.
- Thin brushes for painting on the surface of the nails, and it is not necessary to purchase professional brushes, you can buy ordinary ones.
The list can be continued or, conversely, shortened, it all depends on the manicure design technique. Therefore, before painting your nails, you need to carefully consider the future design, prepare all the necessary materials and, if necessary, apply patterns to paper with a toothpick, brush or needle.
Design with adhesive tape
Materials and tools
- base and fixer;
- varnishes of three colors: graphite, white, neon yellow;
- adhesive tape of any color;
- scissors;
- tweezers;
- thin brush;
- acetone and cotton pads.
Execution technique
- Cover your nails with base coat and dry the coating.
- Apply white polish to your pinky and ring finger nails. On the rest we apply a graphite color coating.
- After the white color dries, glue the tape. It will not be used on black nails. We glue a strip in the middle of the nail, and also make divisions in the form of a herringbone: three strips on each side. Glue the tape so that it extends beyond the border of the nail. This will make it easier to remove.
- Soak a cotton pad with acetone. Wipe off the brush.
- Drop a little varnish in yellow and graphite shades onto the palette. Fill them in a checkerboard pattern into the cells created with adhesive tape. Work with graphite color first. Then wipe the brush and fill the cells with yellow. Wait until the varnish dries a little.
- Use tweezers to remove the adhesive tape.
- Apply topcoat.
Nail design using a needle
Rules for drawing with a needle
In order for needle drawings on nails to turn out beautiful, you need to follow the following rules:
If you are just learning this manicure, then it is better to do it with a less active hand. This way you will master the technique faster. You need to perform a manicure from your little finger. This way you won’t accidentally touch the rest of your nails, and you won’t have to redo the design. If you are not very comfortable working with a needle, you can insert it into an automatic pencil instead of a lead. Then the process will become easier. When you make drawings with a needle on your nails, you should not press it very hard.
In this case, you need to be careful. Otherwise, you can easily damage your nail.
These are the rules you need to know before you start manicure.
Technologies of drawings with a needle on nails
This manicure can be done in two ways, namely:
- Drawings with a needle on the nails are done after the background varnish has dried. In this case, a drop is applied to the main color, which is then stretched in different directions with a needle. This is how the drawing turns out.
- Drawings with a needle on nails are done when the polish has not yet dried. Moreover, in this case several different colors are used. This method is recommended for those who are just learning how to make drawings with a needle.
Once you decide on the manicure method, you need to prepare everything you need to perform it.
Video
Tools for drawing with a needle on nails
So, in order to make drawings with a needle on your nails, you need:
- A set of needles of different sizes.
- Varnishes of several colors.
- Nail polish remover.
- Cotton pads or simple pieces of cotton wool.
Next, you can start doing your manicure. Let's look at several ways to do it.
Multi-colored manicure
This is a simple manicure and is suitable for those who want to “fill up” their hands. To perform it, take varnishes of three colors. Then apply the polish you chose for your base color to the entire nail. Next, without waiting for it to dry, draw two parallel strips on the side of the nail. To do this you will need the remaining varnishes of different colors. After that, take a needle and draw lines with it as follows: from the side of the nail from the center to the opposite side at an angle. That is, they should be located on the nail like an open fan. After this, apply a clear varnish to make the manicure last a long time. Please note that in this case you need to act quickly enough. Otherwise, the polish will dry out and the nail design will not work. To create such a manicure, you can show your imagination and experiment with colors and the direction of the lines. Move the needle from one side of the nail to the other and back at a right angle, and you will get a completely different design.
colorful lines
phased implementation
Twig on a colored background
This is also a fairly simple manicure that can be performed even by those who are just learning how to make designs on their nails with a needle. Take two contrasting polishes. It is also advisable to use a fixative so that the manicure will please you longer. After this, apply the base varnish to the nail and, without waiting for it to dry, apply another contrasting varnish along the edge of the nail in a semicircle in the form of small circles. They should turn out neat and be located 2-3 mm from each other. Next, take a needle and draw bows or hearts on these circles. Please note that you need to do a manicure quickly, and only then will it work.
white twig
Black and white stripe
This manicure is somewhat reminiscent of the previous one, but there are still differences. Take three varnishes: a base of any color, white and black varnish. Then apply the base color to the nail and, without letting it dry, apply alternating circles of black and white polish on the side in a semicircle. After this, take a needle and draw it from the base of the nail to the opposite side of the strip that will connect these circles. This is how you can easily make a beautiful manicure. After this, apply a fixative and it will remain on the nails for several days.
There are also other designs with a needle on nails, but these are the easiest to practice, but at the same time very beautiful and unusual. For those who have already dealt with similar nail designs, we can offer the following options.
red manicure with gold pattern
purple manicure with gold stripes
brown manicure with black stripes
black manicure with white stripes
Using varnishes
Simple designs on nails for beginners can also be done with varnish, choosing, in addition to the base, a special product with a thin brush. True, this option has a significant drawback - a beginner may encounter some problems directly in the process of painting on nails.
After all, most products have a fairly long brush, which is not very convenient to work with without at least some skills. And in order not to constantly harm your nails with acetone, repeatedly washing off the designs and applying them again, it is better to practice on an artificial nail or even a piece of paper.
The step-by-step instructions for painting nails with this polish are extremely simple and unpretentious. You will simply need to dip the brush into a bottle of nail polish of the chosen color and apply the desired pattern. Don't forget to apply a base coat in a contrasting shade first.
The easiest way to use this method is to make drawings in the form of flowers, hearts or lines.
Step-by-step design instructions
Manicure design using wet polish is carried out in just four stages.
It is necessary to apply a base - a colored varnish that will serve as a background for the drawings. It needs to be completely dry. If you are making a design with simple varnish, wait the necessary time. When working with gel polish, use a special lamp.
Cover the plate with a second layer of varnish of the same color. But you don't need to dry it!
Apply stripes or dots of a different color to the wet base. Confidently create beautiful designs with a needle, dots or brush by mixing shades directly on the plate. After creating the images, you need to dry everything thoroughly.
Cover the plates with a clear sealer.
Dot design
The simplest pattern in manicure is polka dots . To create it, dots , which draws dots with a clear outline. With its help, you can create points of different diameters, thereby making the design more interesting.
Dots resemble a knitting tool in appearance, but instead of a hook there are small balls at its ends. To make the dots easy to work with, it is equipped with a plastic or wooden handle.
What do you need
- varnish coating in white and black colors;
- dots;
- fixer and base.
Draw step by step
- Apply base and white polish.
- Place a black dot in the center of the cuticle. On the right and left sides you need to draw black dots, decreasing in size.
- Fill the middle with large and small dots.
- Apply topcoat.
This design can be done in two or more shades. To make the drawing expressive, use contrasting colors. The dotted design can be created on one finger or on all of them. It all depends on how bright you want your manicure to be.
Preparing for a manicure with a needle
The preparatory stage, which precedes the application of the original design, involves performing a regular manicure, giving the nail plates a beautiful shape, removing or pushing back the cuticle using an orange stick.
It won’t be superfluous to degrease your nails. This will ensure good adhesion of the material to the top layer of the nail plate. Clean your hands from sawdust residue. In general, in preparation, do everything that a standard nail care routine would suggest before applying polish.
The main element that makes this manicure stand out is the drawing with a needle. In order for it to turn out well the first time on your nail, it is better to train your drawing abilities. Glass can serve as a test site. On it, using a corner or a toothpick, it’s worth trying your hand at it. When simple patterns come out well, you can move on to implementing more original ideas.
Schemes of drawings with a needle
Beginners can draw on the nail using such improvised means as a needle, nail polish brush, tape or toothpick. You can also experiment with acrylic paints and a brush. Let's start with the first option - easy drawings with a needle.
To do this manicure you will need several varnishes of different shades and a regular needle. Please note that when choosing a color you should choose, if not contrasting, then as different shades as possible. Otherwise, the patterns on the nails will merge.
Next, for beginners, we will describe the process of creating a design step by step:
- Cover your nails with a clear polish to protect them from possible damage from needle handling.
- After it has completely dried, apply a varnish of the selected shade, which will serve as the base and set the overall tone of the manicure.
- Depending on which image you have chosen, place several dots or draw lines on the still wet varnish.
- Using a needle, make a pattern, carefully mixing the varnishes together or, conversely, drawing clear lines.
- After complete drying, cover the finished manicure with a base.
Acrylic paints will decorate your fingers
This method of applying patterns is also suitable for beginners; in terms of complexity, it is equivalent to painting with varnish using a thin brush. Some beginners may find it even easier to do. For example, you can draw a branch. For this you will need yellow and green paints. It is carried out in the following stages:
- A varnish of some dull color is applied.
- From the left to the top, two curved lines are drawn with a brush - these will be branches. The lines are drawn with bright yellow acrylic paint.
- Using the same brush, small leaves are drawn on the branch.
- The middle of the leaf is tinted with lighter paint.
- Everything is coated with colorless varnish to secure it.
Feng Shui manicure - when the design of the ring finger is different from others
Black and white manicure
Multi-colored dots resemble confectionery powder
Features of French manicure
There is an opinion that acrylic significantly harms natural tissues. But it should be understood that any harm from anything is associated with improper use. Regular hand cream can be harmful, but understanding what it is for and how to use it eliminates its potential danger.
acrylic french extension
Acrylic extensions can also be done on the feet, lengthening the natural nails if they do not seem attractive enough. French manicure on the legs does not require frequent corrections, since the nail plate grows much more slowly. This modeling technology is also used to correct the defect of uneven nails. This allows you to correct the growth of the natural plate; the procedure is also useful in case of significant curvature and ingrowth of the nail into the skin.
note
There are absolutely no restrictions on the length of the nails and their shape; needle designs will look great on both long and short nails, be they square, oval or pointed.
The process of drawing with a sewing needle has some features, ignorance of which can significantly affect the final result. In order for the drawing to be successful the way it was intended, all actions must be carried out carefully but quickly, otherwise the varnish will thicken.
It is also necessary to ensure that the varnish layer is thick enough, in this case the needle will glide well over the surface, creating the necessary pattern or design. A needle is a small and sharp tool. Working with it requires some practice and skill, because everything will have to be done quickly.
How to draw
Different techniques for making patterns have their own specifics. Let's look at some of them.
Stamping
The stamping kit is a kit for creating a pattern on the nail surface, which includes a metal disc with applied
on the surface with engraved patterns, paint to fill in the engraving pattern, rubber stamps, a scraper needed to remove excess paint.
By and large, stamping serves to apply a stencil design to the surface of the nail.
Let's look at how to use a stamping kit to get a beautiful design on the nail plates:
- choose your favorite pattern on a metal disk;
- Apply a special thick varnish from the kit to the surface of the engraved disk, remove excess using a scraper;
- Press the rubber stamp firmly onto the disk with the applied varnish;
- Having achieved an imprint of paint on the stamp, transfer the design to the nail plate, pressing the stamp to its surface;
- In order for the design to last for a long time, you need to cover the nail with a clear varnish.
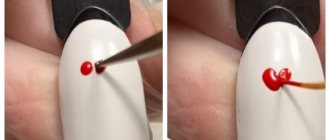
Drawing with sewing needles
- You need to prepare varnish bottles of several contrasting colors and sewing needles;
- Apply a colorless base to pre-treated clean nails, and then base varnish;
- dry the varnish surface;
- grab the varnish on the tip of the needle and apply it in the form of a drop on the nail surface;
- drops can be applied randomly or in accordance with the intended design;
- Without waiting for the drops to dry, they are distributed using a needle, creating patterned lines. At the same time, you cannot press hard on the surface of the nail with a needle;
- You can complement the picture with shiny dots applied with neon or silver varnish, as well as with rhinestones and beads.
Drawing with dots
This is a tool that consists of a rod with balls at the ends of different diameters. With the help of dots, you can apply dots, forming different patterns from them, from simple application of individual dots in the form of peas to complex compositions.
Let's look at how a simple pattern is made using this tool:
- Apply a dark-colored base to the surface of the nail and let it dry;
- using dots, apply dots of different sizes with white varnish;
- after the white peas have dried, apply dots of a different color in the spaces between them, you can partially overlap the previous ones;
- When the drawing dries, fix it with colorless varnish.
Manicure technique with tape
Prepare your hands for a manicure using tape in the classic way. Next, follow the following steps step by step:
Manicure process with tape
- Apply a base colorless composition under the varnish. Let it dry completely.
- Next comes the main color varnish. Make sure this layer is thoroughly dry. To speed up the process and ensure reliability, use a hair dryer.
- Use tape to create your design on the plate. Avoid applying tape to the nail edges and cuticles. In these places the strips do not adhere well to the surface.
- Paint the open part of the plate with another varnish. Give the varnish time to dry completely.
Beautiful manicure done with tape
If you perform a manicure with gel polishes, then initially the nails with tape are dried in a lamp for about 10 seconds, then the tape is removed from the nails, and the coating is polymerized in the lamp for the remaining prescribed time. Carefully peel off the self-adhesive strip and secure the design with a fastening base.
A manicure using tape is ideal if more than two hours pass between the first and last stages of applying traditional varnish.
If you want to not only make, but also decorate a manicure using tape, pay attention to the video tutorial:
Tips and tricks
Before you start creating a designer manicure using drawing on the plane of the plate, you need to consider the following:
- It’s better to start with simple patterns in the form of stripes, circles, droplets, stars, etc.
- Before performing a colorful design, you must definitely put your nails in order: align the edges, remove or push back the cuticles, degrease the surface of the plate.
To create a more impressive look, it is good to use rhinestones, special stickers, and varnishes with sparkles.
- When choosing a design, you need to consider its appropriateness. It should suit the clothing, the situation, the time of year, etc.
- Any design made on the nail surface requires fixing; this can be done with a colorless varnish coating.
- When doing work on your nails, you should not limit yourself in creativity; you can always bring your own ideas into the design of the drawings, not forgetting the basic rules for their implementation.
- When all the subtleties of a designer patterned manicure are mastered, it will constantly delight the girl with its unusualness and variety.
Other methods for creating simple nail designs
In addition to drawing with your own hands, you can use ready-made drawings - stickers, stencils, stockers, template plates.
Stickers
Choose a specific color for the base. Paint your nail plates with it.
Once completely dry, stick your chosen sticker on top. They come with an adhesive base.
Stickers for nails
These need to be cut according to the shape of the nail.
There are also those that need to be placed in warm water before gluing. After 10 seconds, it is taken out, the figure is carefully grabbed with tweezers and transferred to the nail.
Another type of stickers
Decorative decorations
There are a lot of manicure decorations on sale. An ordinary background layer can be decorated not only with a pattern of your own making, but also with all sorts of decorative elements:
- glitter flowers;
- broths;
- beads;
- rhinestones.
Attach them to the still damp background layer and hold until the varnish is completely dry.
Manicure created using broths
Blurred pattern
It is done very simply. On top of the still wet background layer of varnish, a pattern in the form of a wave, spiral, circle, or even random strokes is applied with a brush. Use a toothpick to remove errors.
Example of a blurry manicure
French manicure
A design that never goes out of fashion is acceptable in any life situation and suits every look.
Execution technology:
- Apply the base and wait until it dries.
- Apply your chosen background layer. Dry properly.
- Select the edge shape of the nail from ready-made patterns, of which there are many in stores, glue it and cover the end of the nail plate, as shown in the photo.
- Cover the part that remains open with white varnish.
- Let it dry, remove the pattern.
- Cover the top of the nail with a fixative - transparent varnish.
Original French options
Water manicure
The drawings that are obtained by mixing varnishes of different colors in water amaze with their originality, uniqueness and inimitability. How to make it?
Prepare a shallow but wide vessel, pour a little water into it, so that it is not too cold. Its temperature should be slightly above room temperature.
Prepare several colors of varnish. Preferably from the same manufacturer, so they will interact better with each other.
Add the varnish drop by drop into the water: first, one, it should spread over the water in the form of a large circle. Add a different color in the center, it should do the same, but not overlap the first layer. Then the third, fourth, and so on as long as you want. In principle, you can use 3 colors, alternating them with each other.
The result will be a film on the water in the form of a rainbow of different stripes.
Very quickly, before it has time to dry, use a toothpick or needle, starting from the center, draw a line in any direction. Don’t finish it all the way, otherwise the drawing will reach for the toothpick and get ruined. So, be sure to lead all other lanes from the center. You can also move them in the opposite direction, so you get something like sharp petals from a flower.
Then wait 20 seconds for the film to dry, dip your nail in the water in the area of the design that you prefer to print on the nail.
Before the procedure, in order not to stain your finger, wrap it with tape around the entire perimeter.
When the design sticks to the nail, remove the tape.
Drawing using water and different colors of varnish
Drawings using template plates
If you don’t have time to paint your nails, but you really want to surprise others with an unusual design, you can use a simpler solution. There is a special kit for creating drawings on sale. It consists of one or several plates on which small details are applied in the form of individual flowers, figures, animals, and so on. There are also more advanced designs in the form of lace, French manicure patterns, and fabric textures.
A special stamp with a silicone insert and a scraper for removing excess varnish is sold for the plate.
It's very easy to work with:
- The nail is covered with a base.
- Then the basis - the background.
- A pattern template is selected and painted over with varnish, directly on the plate.
- The excess is removed with a scraper, the plate remains figuratively clean, the varnish remains only in the groove of the pattern.
- The stamp is adjusted to the design and pressed so that its imprint remains on the silicone.
- Transfer this print to the nail plate where you think it should be located.
Stamping on nails
Toothpick designs on nails for beginners
Drawing "Heart"
The simplest option. We cover the nails with white varnish. After it has completely dried, dip a toothpick into pink varnish and place 2 dots on the surface, which we then connect to form a heart.
Drawing "Strawberry"
Step 1. Cover the surface of the nail with red varnish in several layers.
Step 2. Without waiting for the coating to dry, take a toothpick and, with gentle movements, press the dots at the same distance from each other, as shown in the picture.
Step 3. Apply a thin strip of green polish to the area near the cuticle.
Composition of gel polish
Gel polish contains molecules that react and turn into a polymer, that is, they harden. They are called monomers and oligomers. The composition contains special photoinitiators. These are particles that actively absorb UV radiation and help the gel polish become hard.
Also, the gel contains the following substances:
- solvents;
- coloring pigments;
- fragrances;
- formaldehyde;
- methylisothiazolinone;
- dibutyl phthalate;
- toluene.
The last 4 substances on the list are considered toxic in large quantities and can cause allergies. In gel polish their concentration is so low that it does not pose a health hazard.
Necessary materials
To master even the simplest techniques, you need high-quality materials. Your kit should contain:
- Acrylic paints
- Watercolor paints
- Base and top coat
- Gel polishes of different shades
- Set of brushes
- Tips
- Palette
- Training cards for beginners
- Napkins and towel
- UV or LED lamp
- Stamping kit
- Dehydrator, degreaser, stick remover
- Files and buffs
- Additional sets for individual artistic painting techniques (optional)
- Rhinestones, sparkles, stucco molding, foil, melange, flock, acrylic powder for additional decor
This list is comprehensive for those new to nail art. With increasing skill and mastering new nail art techniques, the list will expand and be supplemented. Fashion trends in nail design, which are often based on the emergence of new materials, are also of great importance. Stock up on what you need and start exciting experiments.
What you need for home nail art
If a person is not going to become a professional and do manicure as a core activity, then it is absolutely not necessary to buy everything. It is enough to acquire a basic set of things that will be useful for drawing and developing designs.
To do your own manicure at home, you will need the following things:
- Scotch. It will help you create geometric shapes and do a French manicure;
- Dots. This element is a small plastic or wooden stick with a ball at the end for making dot patterns. Using this device, if necessary, you can also draw;
- A set of brushes of different diameters. The choice should be made in favor of products with natural bristles;
- Gel polishes of different colors;
- Glitters, sequins, rhinestones.
- Toothpicks, cotton swabs for pattern correction;
- Manicure corrector or gel polish remover;
- Fixative. This is a means to extend the life of the coating.
Attention! You can’t start your business with professional and expensive materials. At the first stage, you can try to apply drawings using ordinary watercolor paints, which are easily washed off. The main rule is to avoid overdoing the design.
How to draw a simple pattern on your nails
There are several compositions that will help you draw a beautiful pattern or amazing shapes.
Acrylic paints
The advantages of using acrylic are the following:
- Wide range of colors. You can mix shades to create new tones.
- The pigment composition is easy to apply, making patterns is not difficult.
- The use of acrylic eliminates drying in lamps. It will harden in air in a few minutes.
- Acrylic can be applied to any coating, even gel polishes.
After creating patterns on your nails with acrylic paints, you must apply a finishing coat, otherwise the manicure will soon deteriorate.
Shellac
Nails decorated with shellac acquire a varnished surface. The product is easy to distribute over the surface; even an inexperienced girl can cope with the task. But there are other advantages:
- Easy to remove cover. It is enough to soak the composition with a nail remover and then remove it. Residues are cleaned off with an orange stick.
- Shellac is allowed to be used by women who have contraindications to acrylic or gel polish.
- Remains on nails for a long time. He is not afraid of washing floors, dishes, and laundry.
- Dries instantly, no need to wait.
- It has no pungent odor and is hypoallergenic.
- Has a caring effect - strengthens nails.
Applying shellac yourself is easy. However, to create a manicure you will need an LED lamp. To polish your nails, use a glass nail file. It is suitable for natural and extended plates. The procedure for applying shellac is long, but the result will please any woman.
Gel polish
Gel polish and available products will help you create a beautiful manicure, suitable for everyday wear and for an evening out at a restaurant.
What you will need to create patterns:
- gel polish in your favorite tone;
- needle;
- dots.
Step-by-step instructions on how to draw patterns on nails:
- A light-colored base varnish is applied to the plates.
- Using dots, draw several dots in one row. If desired, choose different shades and alternate them with each other.
- Using a needle, draw lines through all the points without breaking away. The result is an elongated, attractive pattern.
The advantage of a manicure done with gel polish is that it is difficult to damage or scratch. With a manicure they wash dishes, clean carpets, prepare food. But removing it at home is problematic; you need a special liquid and foil. The patterns will last about 2 weeks.
Photo: marigo20, shutterstock (10/23/2019)
by shadows
It's easy to make beautiful patterns with shadows. To do this, take a transparent varnish and paint your nails with it. Then each one is dipped into crumbly glitter shadows, the excess is removed by simply blowing off.
other methods
In addition to the above methods, patterns and pictures on nails are made using sand.
- First apply the base varnish and wait for it to dry.
- Then stripes, lines, circles are painted on with a different shade and sand is sprinkled on top.
- The remains are blown off and painted with a fixative.
The next option is to make simple patterns on your nails using rhinestones. They are fixed with superglue or laid with tweezers on freshly applied varnish. Experts recommend using lightweight products so they will last longer on your nails.
Drawing with rhinestones
Materials needed
- rhinestones;
- base and fixative with drying;
- pink polish;
- needle or dots.
How to paint on nails with rhinestones
- Cover your nails with base and pink polish.
- After the polish has dried, cover the ring finger nail with a drying sealer.
- Lay out the heart from rhinestones.
- Apply sealer around each pebble using a dotting agent. Try not to get the rhinestone on the surface, otherwise it will fade.
- Cover nails without rhinestones with a sealer.
Konad kit: everything you need in one package
The easiest way is to purchase all the tools and supplies in one fell swoop. This opportunity is given, for example, by Konad. It is especially recommended to use it for beginners who may have difficulties with the technology. Experts say that all components of the set are of very high quality. These are the kits that will help you hone your stamping technique. You definitely won't be able to create a complex, beautiful design the first time, but you can be sure that you're using the right products. It remains to correct errors in the work. But we will try to give you the maximum number of tips that we overheard from the nail service masters.
The Konad set consists of five metal plates, each of them has 4-7 small drawings. The scraper has a smooth working surface without nicks or cracks. There are no complaints about the quality of the stamp either. The set also includes three polishes
The density of the products is optimal for work! And this is very important! Konad Stamping – your ideal training base
If you want to expand your design capabilities (or the varnish runs out), then, if necessary, replace these products with others. To keep clear, beautiful patterns on your nails, use thicker varnishes. Images will not bleed or fine lines will break.
Tools can also be purchased separately. If you are tired of drawings on records, look for new ones in the store, experiment and create!
Materials and tools
Before you start drawing on your nails with a needle, you should prepare all the necessary tools and appropriate material. To make your manicure beautiful, you need to give preference to high-quality cosmetic products.
Regardless of the complexity of the drawing, some attributes will be required for the job.
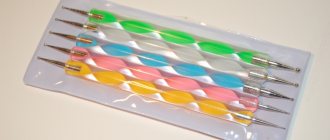
- Needle. It can be purchased either in a specialized store, or you can take a regular one, which is used for sewing. If you plan to use a sewing needle, you need to choose the right thickness and diameter, and also attach it to a plastic handle using plasticine for convenience.
- Varnish in different colors. For the main coating, it is advisable to choose bright and saturated colors, since the pattern on them will be clear and expressive. In addition, stylists recommend purchasing varnishes of the same brand - when mixed, they will be more durable and provide good adhesion to each other.
How to make patterns on your nails using a sponge and water
There are 2 ways to create a gradient design using a sponge. For example:
Method 1.
- Apply base polish to your nails.
- Drop a little colored polish onto foil or plastic wrap.
- Dip a sponge into colored polish and apply it to the nail using blotting movements.
Method 2.
- patterns on nails photo Apply base varnish to the nails.
- Apply colored polish directly to the sponge.
- Using blotting movements, transfer the colored polish from the sponge to the nail.
In any case, it is advisable to cover the pattern with a protective layer of transparent varnish. You can use several colored varnishes.
In the first method, each color must be applied separately. In the second - everything at once.
A manicure using water can be done in this way:
- Drop a small amount of varnish into a container of water at room temperature. Moreover, you can use several colored varnishes.
- Use a toothpick to gently mix everything.
- Using a needle or toothpick, apply the resulting mixture to the nail.
In some cases, you can simplify the task and dip the nail itself in a vessel with mixed varnishes in water. It all depends on personal preference here.
Top