Where to start - materials and tools
Before covering your nails with varnish, you need to do a high-quality and neat manicure:
- Remove any remaining varnish.
- Pull back or trim cuticles.
- Give the nail plate the required shape by filing carefully.
- Sand your nails.
Nail designs for beginners can be done using simple available tools.
For this you may need:
- Cotton swabs (to carefully remove any polish that protrudes beyond the nail).
- Nail polish remover.
- Sponge
- Bamboo (wooden sticks).
- A needle (it is better to choose a safety pin - a needle with a ball at the end).
- Skewers or toothpicks.
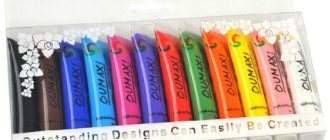
- Varnishes of different colors with a standard and thin brush.
- Foil for manicure.
- Rhinestones or small beads.
- Sponge or piece of foam rubber.
- Scotch.
- Stickers for nails.
- Special glue.
Tip: You can buy or make your own manicure box or box with compartments of different sizes. This way, all the necessary tools will be in one place and nothing will get lost.
The above list is basic. Later it will be possible to purchase special brushes and dots. Dots are a manicure tool, shaped like a pen, with a tip in the form of a ball of various diameters.
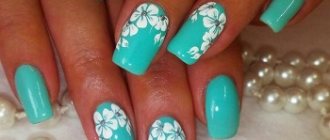
Monogram
You can create such a miracle using white varnish and a thin brush. Apply the base coat first, then use a brush to scoop up a small amount of white polish and paint the interlocking pattern. Its shape and direction depends on your flight of fancy. It seems that applying such a pattern is as easy as shelling pears, but this is not so. To get a good result you will need a lot of patience and perseverance. Monograms on nails, made in different colors and decorated with rhinestones, look original.
Light monogram manicure
Popular manicure techniques: “abstraction”
An abstract nail design is perfect for beginners. It does not require special skills or a lot of time. This manicure can be romantic, extravagant, discreet, flashy. Everything will depend on the chosen colors and pattern.
For this manicure you will need:
- Varnish base.
- Several varnishes of different colors.
- Needle or toothpick.
- Cotton swab.
- Drying.
It's better to start with the simplest pattern. You will need two varnishes that are similar in color, for example, pink and lilac, white and blue, purple and red.
Before you do a spot manicure, you need to practice a little and choose the right tool.
Technique:
- The nail plate is covered with one of the varnishes.
- Without letting it dry, apply 3-4 dots in the center (depending on the length of the nail).
- Now these points are connected with a needle in one direction (from the edge to the hole, or vice versa). You can alternate. Make one finger from the edge, the second from the hole.
- The finished drawing is covered with a fixative.
There is another option where it is better to choose varnishes in contrasting shades. For example, black and red, black and white, yellow and green, blue and white.
The technique for doing it is as follows:
- Mentally draw a vertical line that divides the nail plate in half.
- Each half is coated with a different varnish.
- One color (black) should be applied to the ring finger.
- On the middle one - another (red).
- Three red dots are placed on the black half, and black dots on the red half.
- Now you need to draw a line with a needle from the middle of the point to the center of the nail, slightly lowering the line. And so on for all 6 points.
The fastest and easiest option would be:
- Cover the nail with base polish.
- Place dots of different sizes and colors in random order.
- Using a toothpick, connect all the dots (mix all the colors).
Tip: To make the abstract design look neat, all nails should be the same length.
How to draw a pattern on your nails with a needle or toothpick?
In fact, drawing with a needle is very simple and easy. People have been painting with toothpicks and needles for a very long time, since the first nail polishes appeared. In those days, they did not yet know that gel polishes and ultraviolet lamps would one day appear. Drawing with a needle can easily be called “the basis of painting on nails.”
The secret to beautiful and neat needle drawing is painstakingness and patience. Therefore, do not rush, find the most convenient place to work and always “feel” what you are drawing.
There are several basic secrets of drawing with a needle on nails:
- The needle loves to paint on fresh and liquid varnishes. Such designs turn out very beautiful, flat and have subtle curls.
- When applying a drop to a layer of varnish, make sure that the drop is from fresh varnish. Dried varnish will be difficult to turn into a beautiful design.
- Apply a few drops to one point and then you will get multi-colored patterns that look much more impressive
drawing on nails with a needle
Practice drawing with a needle on a work surface to improve your skills and understand which curls you do especially well. In addition, over time you will be able to understand that by dipping a needle into slightly dried varnish, you can also draw monograms and curls, sprouts and leaves.
Secrets of drawing with a toothpick:
- It is impossible to draw such thin lines with a toothpick as a needle can do.
- A toothpick is necessary to leave dot patterns on the surface of the varnish.
- However, if you want a larger wave, you can use a toothpick
- The disadvantage of a toothpick is that it quickly dulls its tip and, depending on the color of the varnish, toothpicks should be changed often
drawing a dot pattern with a toothpick
Point technique
Before you do a spot manicure, you need to practice a little and choose the right tool.
For this type of manicure you will need:
- base or foundation (which will level the nail so that the polish lays more evenly);
- varnishes of different colors;
- dots;
- fixative;
- foil.
For beginners, instead of dots for drawing on nails, you can pick up tools from home equipment.
Well suited for these purposes:
- safety pin;
- hairpin;
- pencil;
- pen;
- cotton swab.
It's better to practice on a piece of paper first. This will make it easier to understand what diameter circle each tool produces and how it will look on the nails.
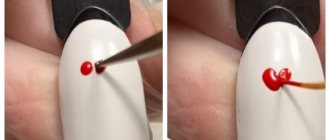
To make nail art for beginners you will need certain tools.
The procedure will be as follows:
- The base is applied. It must dry completely.
- The nail is covered with white varnish. Can be replaced with soft blue, light pink or beige. It should also dry well.
- You need to drip red varnish onto a piece of foil. Using a dot or other instrument, dots of different sizes are applied at the bottom of the nail plate, repeating the shape of the hole.
- The tip of the tool must be wiped with a napkin to remove any remaining varnish.
- The same procedure must be repeated with varnishes of other colors up to the tip of the nail.
- After complete drying, the drawing is covered with a fixative.
How to draw patterns on nails with dots?
Dots are a modern tool for painting on nails. Literally, the word “dots” is translated as “dots”. The fact is that this tool has a small metal ball at its end, which leaves perfectly even and proportional balls on the nails. Clever craftswomen have learned to draw not only dots, but also very attractive patterns.
Buying dots is not difficult, it is not expensive and is often sold in cosmetic stores. The varnish is very easy to clean with acetone.
set of dots tools
The “dots” tool set includes tools with balls of different volumes and sizes, sharpness and width. Such as are needed to create a variety of patterns.
Using Dots you can draw:
- Polka dots on any contrasting varnish
- Flowers
- Wavy lines
- Curls and monograms
- Various dot patterns and gradients
drawing with dots
A few ideas for a beautiful manicure using dots:
drawing a gradient with dots from multi-colored dots: red and blue on white varnish
floral pattern and polka dots drawn
black and white polka dots using dots
pattern on nails drawn with dots
moon manicure in dots style
Using a sponge
There are two techniques for painting with a sponge. They differ from each other in the degree of complexity and the final result.
For this manicure you will need:
- Base coat. Better with strengthening function.
- Varnishes of different colors, but similar shades.
- A piece of foam rubber.
- Foil.
- Cotton swab to remove unevenness.
- Nail polish remover.
- Toothpick.
- Finish coating.
The first method is perfect for those who decide to do such a manicure for the first time. It is easy to implement.
Technique:
- Any manicure begins with applying a base coat.
- Then the varnish of the color that will be the main one is applied. This should be the lightest shade. You must wait until it dries completely.
- You need to drip a different color of varnish onto the foil (darker or any opposite color, in which case the manicure will turn out brighter and more extravagant).
- Dip a sponge into the polish and apply to the base of the nail. Press down, but not too hard. Remove sponge.
- If several shades are planned, then the next color is applied overlapping slightly higher than the previous one.
- The third or fourth color, if desired, is applied to the tip of the nail.
- It is necessary to remove excess nail polish (on the cuticle and sides) with a cotton swab dipped in a special solution (nail polish remover, acetone).
- Secure the design with colorless varnish.
The second option at first glance seems easier than the previous one, but, in fact, requires more concentration:
- The nail is covered with a manicure base.
- 3-4 colors are applied to a piece of foil.
- Using a brush or cotton swab, transfer all the colors right next to each other to another piece. If there is free space between them, you can simply connect the layers with a toothpick.
- The sponge is dipped into the palette and pressed against the entire length of the nail.
- Remains of varnish are removed with a cotton swab dipped in liquid.
- After drying, the finishing coat is applied.
Advice! It is better to choose a sponge of small thickness and dense texture. A good option would be a regular eyeshadow applicator.
Schemes of patterns on nails for manicure
A novice master will definitely need detailed diagrams that will help him apply varnish to the surface of the nail in order to obtain a beautiful pattern.
Simple and clear patterns for drawing on nails:
Schemes of patterns for drawing on nails with dots or a toothpick, dot patterns
patterns for drawing on nails with a needle
This scheme involves the spot application of varnish on the nail and its subsequent transformation with a needle into a pattern. You can do the same with drawn thin lines (second row).
DIY nail painting schemes
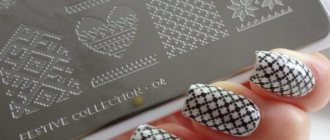
Using tulle
A wonderful option for beginners would be an openwork design on the nails. A very beautiful, delicate, romantic and elegant manicure is obtained if you use a piece of ordinary tulle or lace.
In addition to the standard things (base and topcoat), for such a pattern you will need:
- Varnishes in two colors.
- A piece of tulle or lace with a small finished pattern.
It is better to cut several strips with the same or similar patterns. This way, the remaining polish after the first application will not spoil the design on the next nail.
Technique:
- After the base has been applied and dried, the base varnish is applied.
- You need to wait for it to dry completely and only then start applying the drawing.
- To make the pattern neat, it is better to take a piece of fabric that is thin and long so that it can be comfortably held with your side fingers. If it is possible to involve a second person, it will be easier.
- A piece of lace is pressed against the nail plate and polish is applied on top of it. It is quickly removed so that the varnish does not have time to set, otherwise the design will be smeared.
- After drying, a fixative is applied.
Advice! It is not necessary to cover all your nails with the same pattern. On one nail it may be larger, on the second it may be smaller. Some nails don’t need to be decorated with a design, but simply left colored in a single color.
Execution technology
If all the necessary materials and tools are at hand, then you can begin to perform a manicure. The master class presented in the video will tell you how to make nail designs and drawings with shellac. The main steps look like this:
Shellac coating
- Prepare your nails for a manicure. Push back the cuticle, trim the free edge and polish the plate thoroughly. The smoother it becomes, the better and more durable the manicure will be;
- Degrease your nails;
- Apply primer. Thanks to it, the scales of the plate will open slightly and the adhesion of the coating and the nail will be stronger;
- Next, as shown in the video lessons teaching how to perform shellac - design, apply a transparent base. It protects the plate from contact with coloring pigments. Dry the base under a UV lamp for the time specified in the instructions;
- Apply colored shellac. Dry under a UV lamp. If necessary, apply another coat. Polymerize it too;
- Now do the drawing. If you use shellac, as in the video, then the design must be carefully thought out in advance and the stages of applying the design must be determined. Since before each new layer you will need to polymerize the previous one. When working with acrylic, such scrupulousness may not be required, since it dries quickly and is easily removed from the coating;
- As the video tutorial shows, after the shellac or acrylic has dried, you need to apply a protective (top) coating. It will give your manicure shine and durability.
Before you start painting with shellac, spend a little time learning with our videos. After this, you can easily complete a simple design yourself. In the future, you can improve your technique and complicate patterns and designs.
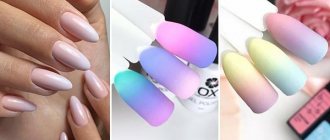
Decorating nails with a gradient
Gradient manicure is a gradual transition from a dark varnish color to a lighter one. This technique is often called amber.
The simplest gradient option is to cover each nail in a different color. To do this, you will need 5 varnishes of different colors (for example, from white to blue). If this is not possible, then you can use only two colors of varnish: base (for example, red) and white, and by mixing yourself achieve the desired result.
For a design on nails for beginners Hearts You will need 2 colors of varnish, a base, a toothpick and a fixative.
Procedure:
- The first nail on the thumb is covered with the main color.
- On a piece of foil you need to drip varnish of the main color and add a drop of white.
- The resulting shade is applied to the second nail.
- A little more white is added to the remaining mass and the third nail plate is covered, and so on until the last.
You can perform a gradient manicure using a sponge.
Advice! When making amber, shades can be applied not only horizontally, but also vertically.
What is shellac
Often a manicure with shellac and gel polish means the same thing. But this is a slight misconception. Shellac manicure is the use of original products from the American company CND called Shellac. In 2010, the American company CND created a new product that combined varnish and gel at the same time, calling it Shellac. Gel polish began to become popular, and the Shellac brand began to be used to name similar products from other manufacturers, as well as the type of manicure itself. Gel polish or shellac is a plastic, damage-resistant gel designed to cover nails. It is practically odorless and dries very quickly on nails in a special UV or LED lamp. Suitable for manicure and pedicure. The color palette of gel polishes is very rich, which allows you to choose a polish to suit any look and always look stylish.
In addition to the listed advantages of gel polish, you need to add about its composition, which is harmless to health. But, if the shellac application technique is not followed, frequent contact of the liquid composition with the skin can provoke an allergic reaction. Masters still recommend taking a break after using shellac for six months so that your nails can rest. As a rule, this is a salon procedure, but due to the ease of implementation, some women practice applying gel polish at home. True, you will initially have to spend money on the necessary materials and equipment, as well as get a master class from a professional.
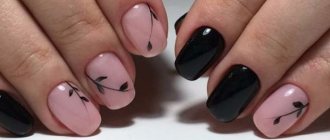
Toothpick design on nails: “Hearts”
For beginners, it is better to use the simplest nail art techniques. To perform them, you need good lighting and precision movements.
You will need 2 colors of varnish, a base, a toothpick and a fixative.
The technology is very simple, you can do it the first time:
- The base for the manicure is applied.
- The nail is covered with varnish of the main color.
- Separately, varnish is applied to foil or a small piece of paper, which will be used to draw the heart.
- 2 dots are applied to the nail plate parallel to each other.
- From each point, use a toothpick to draw down strips at an angle so that they can be connected at the end.
- The result is a neat heart.
- Cover the top with a fixative.
Patterns using shellac and their advantages
Shellac is a combination of varnish and gel coating, which combines only the positive characteristics of these two compositions. Thanks to this feature, the product has become so popular both among professional manicurists and among women who want to get long-lasting and attractive nail decor. Shellac can be used not only as a base coat - thanks to it, even novice craftswomen can create complex patterns and various techniques.
The original shellac nail designs, which can be seen in the photo, are distinguished by their magnificent shine and color saturation. To cope with their implementation, a beginner does not necessarily need to attend specialized courses.
You just need to watch the detailed master class and take note of the advice of experts.
Using shellac, beginners can paint a wide variety of patterns on short and long nails: spiral, geometric, floral, ethnic and many others. To make the result look more festive and impressive, the design can be additionally decorated with rhinestones, dried flowers, sparkles, or use acrylic paints. You can also display a traditional French jacket, but in more contrasting colors.
Painting with a brush: Watermelon design
Brushes can be purchased separately in specialized stores, or you can buy ready-made sets: varnishes with a special, sophisticated brush specifically for applying a design.
There are two ways to make the Watermelon pattern.
First option:
- The nail plate is covered with pink or red varnish.
- A green stripe is drawn with a brush near the hole.
- A thin white stripe is drawn above the green one.
- Dots imitating watermelon seeds are drawn along the entire nail plate.
- The top of the design is coated with colorless varnish or fixative.
The second option is similar in execution technique to the first. Only green and white stripes are drawn not near the hole, but at the tip of the nail plate.
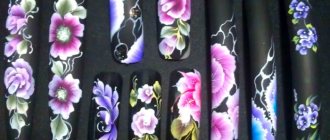
Black patterns on nails, manicure photos
Black patterns look most impressive on any nails of different lengths. You can draw black patterns with a dots, brush and needle. A black pattern will look best on light varnishes: white, pink, turquoise and so on.
Manicure ideas with a black pattern:
black and white monograms on nails using a brush or dots
black flower pattern on nails with tassel
beautiful lace pattern with a brush and a needle on the nails
beautiful black pattern on nails with a brush
zebra pattern on nails with black polish using a brush
Nail art using tape: “Geometry”
Before starting this type of manicure, you need to carefully think through the details and carry out preparatory work.
In addition to the standard set (base and topcoat, varnishes of different colors) you will need:
- masking tape.
- nail scissors (to cut out the desired shapes).
- tweezers.
- thin brush for drawing.
It’s easier to start with the simplest geometric shapes and patterns (stripes, triangles, squares).
Technique:
- After the base is applied, the nail plate is covered with one light color.
- Shapes of the required shape are cut out of scotch tape with scissors and carefully glued onto the nail using tweezers. They press tightly. To make it easier to remove the tape later, it should protrude beyond the nail plate.
- The top of the nail is again covered with a darker varnish.
- If desired, the entire procedure can be repeated, but with a different ornament and varnish of a different color.
- After the varnish has dried, the tape must be removed.
- Cover with fixative.
Materials for design
Nail design with
shellac Shellac coating does not involve applying just one tone. In fact, shellac manicure can be almost as complex and varied as one done with ordinary varnish. Let's talk about how and with what to draw drawings on shellac, such as those presented in the video. Most often, two types of material are used to apply the pattern.
- Directly shellac. It has a fairly thick and viscous consistency. Therefore, not all drawings can be done independently. However, for example, stamping is as easy to do with it as with regular varnish. In addition, this consistency helps to create interesting abstractions using the needle;
- Acrylic paints. After the shellac nail coating has completely dried, as the video tutorials show, you can begin painting with acrylic. It is performed in the same way as with any other varnish. Covering it with a shellac fixative will allow the manicure to last a long time.
When making drawings with shellac, it is worth remembering that each new element must be polymerized under a lamp before applying the next one, overlapping it. On the contrary, when working with acrylic paints, by mixing colors and shades on a plate and adding water, you can achieve an interesting “watercolor” effect. Our instructional video will tell you how to draw designs with shellac on nails.
[yandex2] [google2]
Feng Shui manicure
For those who are interested in the teachings of Fei Shui, it will be interesting and useful to know what laws and rules must be followed in manicure. Feng Shui experts advise starting to do manicure in a calm, peaceful state .
Quiet, relaxing music or sounds of nature should be playing in the background (for example, the sound of the sea, like the element of water), a candle should be burning (help of the element of fire), the window should be open (element of air).
First, you need to decide which area of life needs to be activated; the color scheme, and even the fingers, which will need to be given special attention, will depend on this.
It’s easier to start nail art with the simplest geometric shapes and patterns (stripes, triangles, squares).
Those who dream of attracting love into their lives need to focus on the middle (new discoveries, flirting, falling in love) and ring (meeting, acquaintance, new connections) finger of the right hand.
itself in pink tones (activates femininity, youth, tenderness), and on the indicated fingers to make soft, smooth designs in red (happiness) and gold (spiritual and physical strength) tones.
Patterns on nails with acrylic paints
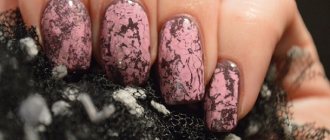
Acrylic paints for painting nails are easily available at beauty and craft stores. They are very similar to the most common paints, only they are resistant to liquids. But such material should definitely be coated with a fixative varnish because it can peel off. Acrylic drawings turn out to be very delicate and slightly voluminous due to the beautiful play of shades.
The advantage of acrylic paints is that they can be mixed with each other and get a beautiful blend of color shades.
Manicure options with acrylic painting:
acrylic painting on nails
acrylic nail painting options
How to create rhinestone patterns on nails?
You can also create a beautiful pattern using rhinestones. To do this, they must be attached to freshly painted varnish so that the rhinestone is securely attached. It is best to know the outline of your preferred pattern in advance so that your design turns out stylish and interesting.
Rhinestone designs on nails:
rhinestone design on nails
floral design with rhinestones on nails
rhinestone bows on nails
How to make patterns on nails with foil?
A modern nail art store can also offer you such an interesting decoration material as foil. The foil is glued to fresh varnish, and then covered with a fixing varnish to ensure that it adheres. The foil shimmers in many colors and adds shine to the manicure.
foil on nails
Foil designs on nails