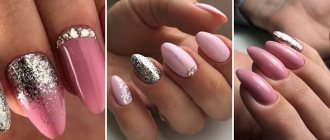
The main rules of a manicure with fire Ideas for a fire manicure: 20 great options How to choose the right manicure color
Long or short nails + bright color = the perfect solution for the most daring. Nail design with fire is just one of those, so if you have been wanting to try it for a long time, it’s worth doing it. Fire manicure on nails looks beautiful if everything is done carefully. So be prepared to take the time to make sure everything looks as planned.
General recommendations for manicure design in a fiery style
A manicure with fire involves creating a design with a shape and pattern that visually resembles a flame.
Depending on the chosen technique, the following can be used to perform it:
- glitter;
- pigments;
- foil;
- gel polish
The patterns of this design go perfectly with any nail shape. The vertical arrangement of the pattern visually lengthens the nail.
Fire design can be combined with techniques such as:
- gradient;
- aquarium;
- stamping.
A manicure with fire on your nails can be done using stamping.
The choice of palette and combined shades depends on the desired result. For a smooth transition of colors, it is worth choosing shades that are close in tone. When combining contrasting gel polishes, the design looks more expressive and catchy.
In the classic version of a fiery manicure, several shades of gel polish are used:
- black;
- red;
- burgundy;
- orange;
- yellow.
To complete the fiery design, you will need at least three shades of densely pigmented gel polish. The cost of such a set can exceed 1000 rubles. A more economical option is to use pigments. The cost of a small container with one shade varies between 30-50 rubles. This material is a finely ground powder that resembles powder. It has a wide palette of shades and is applied on a white base. Stickiness is required for the material to adhere to the surface.
Fashion trends in 2022
The classic version of the fire manicure does not lose its relevance today. This is due to the popularity of the black shade of varnish. The contrast created with varnishes of brighter colors attracts the eye. Due to the speed of execution, preference is given to marble technology this year. Recently, designs with alternative shades have become increasingly popular. Manicurists, experimenting with different colors of gel polish, breathe new life into it.
The tongues of flame, made using milky shades, are particularly charming. Such glossy designs can be stylishly combined with crystal chips or marmalade. They complement pastel shades perfectly. To successfully complete a fire design, you must consider the availability of materials, skills, available budget, and appropriate technique. For beginners, nail technicians recommend practicing the technique on an artificial tip. This will speed up the technique when performing manicure on natural nails.
Techniques and methods
Drawing a pattern, even for experienced craftsmen, takes time. Therefore, when choosing materials, it is necessary to take into account their drying speed, composition and design technique. Varnishes designed to dry outdoors are solvent-based. When applied to the nail and in contact with air, the composition immediately begins to dry. The varnish becomes covered with a film and thickens.
This process does not make it possible to distribute the material over the surface in the intended composition. Moreover, when applying the next layer, the solvent acts on the already dried varnish, worsening the adhesion to the natural nail plate.
Gel polish and other artificial materials for strengthening and modeling nails have a different chemical formula. It allows you to apply and distribute the material without fear of drying out. The material is fixed in an ultraviolet or LED lamp by polymerization with the release of heat.
There are three main methods of performing fire manicure:
- wet technique;
- intermediate drying method;
- use of ready-made designs (sliders, foil, stickers, film).
Each method has its own difficulties and nuances in implementation and requires more detailed consideration.
The choice of the appropriate method is individual and depends on many factors:
- materials handling skills;
- artistic abilities;
- mastery of tools;
- knowledge of the features of using decorative elements.
Decor ideas
The popularity of using decor in nail art is due to many factors:
- availability;
- price range;
- Possibility of use with various materials;
- a wide range of;
- ease of use.
There are four types of decorative elements that can replace drawing flames by hand:
- sliders;
- stickers;
- foil;
- film.
The listed elements have similar characteristics. They allow you to expand the variety of available techniques, but not all of them are easy to use.
Features of the use of this decor are described in the table:
| Name | Description | Features of application |
| Stickers | Drawings and patterns of various sizes are made on transparent film with an adhesive base. | The sticker does not require preliminary preparation. Using tweezers, the design is separated from the paper base and placed on the nail. Using pressing movements of a finger or a silicone brush, press firmly onto the surface of the plate. |
| Sliders | Images printed on the thinnest transparent film. | Before use, the section of paper base with the slider is cut out. It is placed on a napkin moistened with water. After 3-5 seconds the image moves away from the base. Using tweezers, the slider is transferred to the nail covered with topcoat. A wet slider is very fragile and does not tolerate friction and pressure. Use a silicone hoof to remove air for better adhesion to the surface. |
| Foil | Foil images printed on film. | The method of application requires practice. A special glue for foil is applied to the nail. Its layer should be thin for uniform drying. After drying the composition in the open air, a piece of foil is applied to the nail. Use a silicone brush to smooth it out until the film base moves away from the design. |
| Film | The drawing is printed on thermal film. | Before application, the thermal film must be heated with a special lamp or hairdryer. When exposed to heat, it becomes more flexible and pliable. Maintaining symmetry, the design is placed on the nail. Holding the film near the cuticle, stretch its free edge and press it to the surface with stroking movements. Using a stick with a silicone tip, firmly press the material in the cuticle area and lateral sinuses. The excess film remaining on the free edge is carefully cut off with a soft file. |
To protect the described decor from damage and abrasion, it must be covered with a topcoat and dried in a lamp.
Manicure with fire can be combined with other decor:
- glitter;
- mica;
- Blix;
- shavings.
Flat and iridescent decor are most often used when performing fire design in aquarium technology. It is applied to a substrate in shades visually similar to fire and sealed in a transparent material (acrylic, gel, polygel) in compliance with the architecture.
A fire pattern is applied to the surface in any convenient way, leaving areas with decor open. You can draw with a brush, using stamping, or by placing a sticker/slider. Designs with alternating patterns and three-dimensional decor look original. On each finger of one hand you can make different designs in the same theme.
Most often, craftsmen use the following types of decor:
- marmalade;
- sand;
- crystal chips;
- pixie;
- rhinestones;
- stones.
Using a combination of designs and decor with different characteristics, each nail becomes unique. However, there is an important point. Don't overload your hand with using everything at once. Leave one or two nails plain and free of design. This will relieve the manicure and add lightness.
Wet design
A manicure with fire using this technique is considered an express design. It does not require drawing clear lines, which means it is accessible to beginners. The main condition for its implementation is the preliminary application of gel polish of a suitable shade to the surface of the nail. Its moist consistency allows the main pattern to be distributed without difficulty.
If there is no gel polish of the required shade, it can be replaced with a transparent one.
There are two main ways to perform designs using wet gel polish:
- gradient technique;
- marble technique
Stages of performing a fire manicure using the gradient technique:
- Coating the plate with a base layer of gel polish.
- Applying selected shades to the surface of the varnish by analogy with a gradient (transverse lines).
- Distribute the material using a thin brush, using long wave-like movements in the direction.
- Polymerization of the result in a lamp.
- Applying finishing coat and drying.
After each movement, the brush must be cleaned of any remaining material. Otherwise, the colors will mix, creating uneven dirt. It is more practical to divide the drawing into two stages. The first pass draws the flames. Direction of the brush from the free edge to the cuticle. The second is to finish the gaps by moving from the middle of the nail to the free edge.
A special feature of the marble technique is the mixing of several shades on the palette. After which this composition is applied to the nail using a gradient brush.
A manicure with a depicted fire using the marble technique is performed according to the following scheme:
- Applying the base layer of gel polish.
- Creating a pattern on the palette.
- Transfer of the composition to the nail, distribution.
- Finishing with a thin brush (if necessary).
- Covering with top.
Options with patterns and designs
Considering the small size of the nail plate, it is not possible to place a fire pattern and any pattern on it at the same time. A more suitable option is to alternate patterns on the fingers. On each of them you can create different designs of the same theme. Often nail technicians use various decorative elements in such cases. Manufacturers of nail art products have made it easier for beginners to create designs and designs. The stamping technique allows you to apply a print in one touch.
Required set of tools and materials:
- plate with engraved pattern;
- stamp for imprint;
- stamping paint;
- scraper;
- stamping liquid (solvent).
The selected shade of stamping paint is applied to the plate. Use a scraper to remove excess material, leaving only the pattern. Using a rolling motion, the stamp is pressed against the plate. The design should be imprinted on its surface. At this stage, you can remove excess elements with an ear stick dipped in a paint-dissolving liquid. After which the design is transferred to the nail plate.
The basis for such a design can be a coating melted using the gradient technique. The smooth transition of black, orange and yellow varnish visually resembles the flame of fire. Using stamping paint, you can create not only patterns, but also full-fledged designs on a stamp. The print in this case plays the role of a contour.
To perform and subsequently use a drawing in this technique, you must follow the presented sequence of actions:
- Transfer the outline of the fire from the plate to the stamp.
- Using paints of suitable shades, paint with a thin brush. The color should not go beyond the outline.
- Apply transparent stamping varnish, going 2-3 mm beyond the contour.
- After complete drying, gently pressing on the surface of the stamp, remove the design with tweezers.
- We place it on the surface of the nail, press it to the surface with a silicone brush, removing air bubbles.
- Applying top.
Experienced nail technicians recommend using a rubber topcoat. It has a thicker and more elastic consistency and is less susceptible to chipping and cracking.
Intermediate drying method
Carrying out a design using this technique will require the following skills from the performer:
- mastery of a thin brush;
- knowledge of the characteristics of colored coatings (thickness, drying, interaction with each other);
- knowledge of the execution sequence;
- artistic abilities.
The main difficulty is the miniature nature of the patterns. A steady hand and clear, practiced movements are required. Manicure with fire on nails can be done using the intermediate drying method.
Sequence of performing the intermediate drying technique:
- Applying the main shade.
- Drawing flames with a thin brush (each shade is applied separately).
- Top coating.
Each previous layer after application goes through an intermediate drying stage. This is due to the fact that gel polish or gel paint gradually spreads over the surface of the nail. The edges of the drawing become blurry and lose their clarity, which is unacceptable for this technique. As a rule, the lightest shade of fire (yellow) is applied first, and the darkest (burgundy, brown, black) finishes. Using pigments, the fire pattern is created with thick white gel polish. Against its background, the pigment will look brighter.
The design in this technique is carried out according to the following scheme:
- Applying the base shade of gel polish.
- Drawing fire (with white varnish), intermediate drying.
- Application of pigments of various shades.
- Full drying cycle.
- Applying a topcoat with a sticky layer.
To fix the pigment, stickiness is necessary, so after drying the white varnish is not degreased. The powder is applied with sweeping movements using any convenient brush.
How to do it?
A manicure with a hazy effect can be performed in various ways, each of which differs in the choice of material and the technique of applying patterns.
For beginning craftswomen, a design option that requires regular nail polish, a saucer of water and a small object with a sharp end is suitable.
This can be either a needle or a toothpick. With this water manicure you can create an even and beautiful smoke effect on your nails. Colored drops of varnish are placed on the plate, then the finger is dipped into water and original stains are formed there.
In addition, you can draw wavy lines from varnish using special brushes. At the same time, a thin brush allows you to apply lines of any width, and a flat one helps to fix their sizes, so it is usually used for shading.
For girls who prefer to do their own manicure at home, the idea of creating a smoky design using beautiful stickers is also suitable.
Typically, this method is chosen by those craftswomen who have little experience in “nail art” or do not have free time to create a manicure. Original sliders and stickers allow you to achieve a clear smoke effect. To do this, it is enough to decide on the color background and size of the image.
A regular base is applied to the nails, after which the sticker is applied and smoothed over the surface, and it is secured with a special finishing agent.
Classic technique
Don't be afraid to experiment - you will definitely succeed! Despite the external complexity of the design, this manicure is quite simple to do, so be patient and tune in to the result. Let's look at the first implementation option.
- Perform a standard hygienic manicure. Remember that well-prepared nails are already half the success.
- We remove the old coating, carefully work on the cuticle area, removing it in any way convenient for you - by cutting or using a remover and an orange stick.
- We give the nails the desired shape and lightly sand their surface with a manicure buff.
- Evaluate the results: if you think that your nails look perfect, then proceed to apply a decorative coating.
- Cover your nails with a base coat for a neater manicure that lasts longer. Dry it in a lamp.
- A smoky manicure looks incredibly beautiful on a black background, so that’s what we’ll use. Paint your nails with black gel polish, dry in a lamp and remove the sticky layer. This can be done using a special product or regular alcohol applied to a napkin.
- Now take white gel polish. Its brand does not matter - you can use the decorative coating of your favorite company.
- Dip a thin brush into it and draw a random line diagonally on the nail. It should be a little thicker on top and thinner on the bottom. Don't draw too carefully - it simply indicates the direction of the future "smoke".
- Dip the brush into gel polish remover and begin to blur the line with light movements. Do not erase, but rather wash away. You will see how the design takes on the shape of smoke flowing over the nail.
- Dry the gel polish in a lamp.
- If desired, the manicure can be left in this form, simply covering it with a top coat. But we will make the design more interesting.
- For this we will need stained glass gels in blue and green colors. Using a brush, cover the lower part of the “smoke” with a very thin layer of green stained glass gel, and make the upper part blue.
- That's all - all that remains is to cover it with topcoat and put it in a UV lamp for 30 seconds.
Nail art with acrylic powder
We looked at the first option, but the manicure can be made even more expressive if you use acrylic gel powder.
- Repeat all the procedures described above until the white line is blurred, but this time you do not need to remove the sticky layer.
- We'll experiment with pink and orange acrylic powder. Using a brush, rub orange powder into the lower part of the “smoke” stream, and pink powder into the upper part.
- If there is any pigment left on the black background, carefully remove it with liquid to remove the sticky layer.
- We fix the result with a top layer and dry it in a lamp.
- With acrylic powder, the “smoke” takes on even greater volume and expressiveness. Be sure to try this design - it will not disappoint you.
- Design with colored gel polishes
- A beautiful design can be achieved using additional colors of gel polishes. We will not describe the initial procedures, since they are completely identical in both the first and second cases. Let's start making a new design right away.
- Use yellow gel polish to carefully paint the upper part of the “smoke.” Decorate the bottom in blue. It is better if gel polishes are liquid. If they are too thick, it is better to add a little topcoat to get a more sheer coverage.
- Dry in a lamp.
- Apply top coat, dry again in the lamp and remove the sticky layer.
As you can see, this design can be done in many different ways, none of which can be considered complicated. Smoke effect nail art is very easy to learn and looks amazing.
Blazing manicure
When they talk about fire, they immediately draw yellow, orange, and red tongues. The image can be realistic, when colors harmoniously transform into one another in chaotic flashes, or stylized, as in an animated film: with soft wavy or, on the contrary, sharp tongues.
They can be made with any color or design of fire. There is nothing special in all variants of the designs, except for one essential detail: the fire “blazes” on the nails. The direction of the tongues, both from the edge to the hole, and the opposite.
The imagination of nail art masters did not stop at natural colors. White, pink, green, and black fires “blazed” on the nail plates (photo).
Moreover, the fire became “cold”, acquiring shades of the corresponding blue, purple, and silver palette. With them, fashionable designs are created no less spectacular than with other tones.
The design is applied using the stamping technique, with an airbrush or brush, and is supplemented with rubs, glitter, sequins, and rhinestones.
Fashionable checkered manicure 2019-2020: a classic pattern that is always in fashion
Fashion trends and tendencies are rapidly replacing each other and sometimes even avid fashionistas cannot keep up with stylish new items. Among this dynamic fashion cycle, there is one constant classic - the checkered pattern. The cage is not afraid of fashion trends and trends; it always looks laconic and stylish.
If you want your look to always look appropriate and stylish, then be sure to add checkered items to your wardrobe. Just look at the iconic trench coat from Burberry, which is in the wardrobe of almost every fashionista. These are the things that speak of a girl’s good taste.
As for checkered marigolds, they can also be classified as a classic decor option. Checkered nail art is a real treasure trove of imagination, because the color and arrangement of the stripes can be absolutely anything. Let's look at several main types of checkered patterns that will be relevant this season:
- Scottish cell
- gingham
- chess square
- tweed
- quilted pattern
- houndstooth
- Burberry and others
Matte manicure
A manicure with fire goes harmoniously with matte finishes. The matte effect is achieved through the use of a special topcoat. It can be used as a basis for a future design or for contrast. In the first case, a topcoat is applied to the colored coating to create a matte finish. After which a design is made on its surface. Using a thin brush, apply a glossy topcoat to the flame to add shine. As a result, fire on a matte surface looks even brighter and more saturated.
This design can only be done using the intermediate drying technique. This is due to the need to use both matte and glossy topcoats.
Nail technicians have found the opportunity to combine wet techniques with a matte topcoat. For this, a popular technique is used in which the fire design is present on one or two fingers of the hand, creating an accent. The rest are painted with contrasting gel polish or a similar shade, followed by matting.
Nailspiration.net
Advertising:
The flame manicure is not inherently new - it was most often a black and white design, and many liked to wear it on long nails. But. This year, nails with flame designs, either on the tips or at the base of the nail, have suddenly become all the rage. Now these are beautiful curls in different shades and with different decorative elements and decorations. Girls do such nails in classic dark shades, red for Valentine's Day, and nude, with white flames for a wedding - in any situation such a design will be appropriate.
We've collected 75 cool flame nail designs from top nail artists. Don't forget to follow the pages that you like - there are a lot of fashionable designs there. Let's see what the nail fairies have prepared for us this year. Choose your option and call your favorite master. It's time to spruce up your nails to the fullest!
1. Manicure with white flames. Just a top new product - a nude base and white flames on the tips of the nails. This design will be a great addition to any holiday look.
2. Marshmallow pink manicure with red flames. Looking for a manicure idea for a romantic date or Valentine's Day? Here she is!
3. Glittery manicure with black flames. A square manicure with silver sparkles and black streaks will look especially good in looks for a party, a concert or any other active event.
4. Pastel colored manicure with black flames. For lovers of long nails, oval shape. Against the background of a pastel base, black stains look mega-impressive.
5. Pastel manicure beige with fire. A nude manicure with a matte finish and white flame streaks look feminine and stylish.
6. Nude matte manicure with flames and white jacket. Another nude design that will take your breath away. Beautiful! I have no words.
7. Bright flames on the nails. Classic yellow and orange flames look great on a neutral base. A contrasting blue outline only adds interest to this manicure.
8. Matte-glossy manicure in black. Designs made with contrasting matte and glossy textures are always a good idea. They look unpretentious and neat.
9. Manicure with hearts and flames. Manicure with flames inside hearts is an idea for Valentine’s Day and any other romantic mood.
10. Pastel manicure with flames. That moment when you can’t choose one shade and combine both in your manicure. Manicures on different hands are trendy, so feel free to ask the master to repeat this move if you like non-standard designs.
11. Pastel nail design with flames. It’s barely noticeable, but all the flame tips are painted in different shades - yellow, soft pink, and blue. Due to the pastel color it is almost unnoticeable, but the effect is amazing.
12. Black manicure smoke and flame. It combines elements of many popular manicure designs: smoke on transparent nails, a matte finish, flames, and hearts.
13. Flame manicure with stones. A nude pink manicure with white flames and stone embellishments will be your signature look at any event. Choose decorations to suit your taste. It is not necessary to take large ones - you can use small rhinestones or small crystal pixies.
14. Short manicure with white flames. Do you think flames won’t look so cool on short nails? And you surrender yourself into the hands of your master and you will see that everything will work out! Even the shortest nails without extensions can be decorated effectively.
15. Blue and silver design. Soft pink flames combined with a blue tint and silver polish, plus summer designs - and you get a cool, stylish manicure for the holidays.
16. Manicure “cherry on fire.” The red flame just begs to be accompanied by fruit. At least craftsmen and their clients like such designs. Of course, instead of a cherry there can be strawberries, raspberries or any other berry.
17. Nail design “heart on fire.” Updated version of the heartbeat design. Beautiful, stylish, always relevant
18. Manicure with fire in the shade of cappuccino. The original idea is to make the flame on each finger in a different shade, and thus create an ombre effect.
19. Black flame manicure with marble. As you can see, flame manicure can be combined with other designs. For example, with the same marble.
20. Black manicure with green flames. Flame is not always about the color red. Green flames on black nails look cool and youthful.
21. Flame with a heart. Love is in the air and you want romance? What if not a romantic manicure will help maintain this mood for as long as possible.
22. Long nails with flames. The advantage of the flame manicure is that it is universal - it can be repeated on short, medium and long nails, on a dark and light background, in a rocker style or in a classic style.
23. Red and black manicure. Manicure of a person who is slightly tired of external circumstances.
24. Pink flames on nails. Pastel, delicate, feminine. The kind we want for a date, for a wedding, for school, or just for a walk with friends.
25. Black and pink flame manicure. A glamorous and feminine combination of black and pink colors, stones and good length.
26. White manicure with a pink tint. White and pink designs are still breaking records in popularity among modern girls. Which of us has not at least once made ourselves such a tender treat on our hands?
27. Flame of fire with silver varnish. A manicure in a silver shade will appeal to those who love classics and discreet designs.
28. Hot pink manicure. A little sparkle doesn't hurt in any girly design.
29. Pink with pink. It turned out like a Barbie style. Two shades of pink will be a godsend for lovers of this color of all ages.
30. Purple manicure with flames. This color has not yet been included in the selection! Beautiful and original, isn't it?
31. Nude nail design. Looks like a second skin - with tattoos.
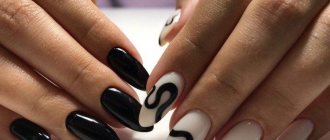
32. Black and white manicure with a heart. Flame manicure in achromatics in a new interpretation.
33. Pink fiery manicure. On one accent nail, ask the artist to draw any design - and nail art with flames will immediately become personalized, suitable for a specific event or your life period.
34. Manicure imp. For those who have two sides of me coexist inside, the good and the bad.
35. Orange and yellow nail art with flames. The ombre effect came into fashion many years ago, and it will never go out again - it is so beautiful, multifaceted and versatile.
36. Oval manicure with fire. Add a little color to your design and the flame will immediately sparkle with new colors.
37. Golden flames. Here comes a combination with fashionable stripes and nude.
38. Red short nails. Stylish, classic, feminine. To suit any outfit and mood!
39. Long transparent manicure. The snake in the style of tattoos has become a frequent guest in manicures over the past couple of months. With flames and a light French version, the result is a very interesting nail art.
40. Pink nude and white flame. A cool addition to candy pink outfits.
41. Blue ombre nails. If you like a lot of color and details, this is just the thing for a good mood.
42. Manicure in Playboy style. Bunny, flames, butterflies - a fiery manicure for a stylish it-girl.
43. Yellow flame with butterflies. A beautiful combination, isn't it?
44. Black and white nail art with flames. On one hand there is a black flame, on the other there is a white one.
45. Burgundy flame. Burgundy flames on a soft pink background look amazing.
46. Gray ombre with fire on nails. The flame is convex and this is even more unusual than the usual flat design.
47. Almond nails with black flames. Flesh nude + black flames combine like yin and yang.
48. Golden nail art. A gold manicure with black flames will be your trump card in your look.
49. Glitter flame. Flames with sparkles on a multi-colored background.
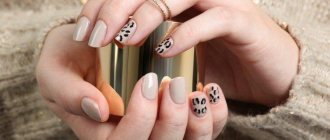
50. Leopard manicure. Leo manicure with multi-colored flames at the base of the nail.
51. Leo manicure with pink flames. It would seem that what else can you come up with within the framework of a fiery manicure. Leopard print and flamed pink tips make for a look you can't miss.
52. False nails. If you don’t want to do a bright fiery manicure on your own nails, you can buy a ready-made set and stick it on your coolest parties.
53. Long caramel nails. A shiny manicure in a caramel shade and with beautiful black and white flames.
54. Black matte nel art. Black matte manicure for short nails + golden flames = beautiful nail design for any look for every day and for loud parties.
55. Peach manicure with fire. Matte peach base with black designs.
56. Long ballerina manicure. Coffee nail design combined with black flames and white highlights will definitely fit into your arsenal of manicure ideas in case you “don’t know which design to choose.” Haven't you got yourself such a piggy bank of ideas yet? Then get one urgently, it may come in handy before going to your manicurist!
57. Manicure with burning hearts. Hot design that will make you feel like the queen of this world.
58. Black French. A beautiful stylish version of French manicure in black.
59. Leopard flame. The leopard print is not in the background, but in the main role - like a pattern of the flame itself. Extraordinary!
60. Colored flame. Well, after all, multi-colored flames on your nails look beautiful!
61. Golden flames on the tips of the nails. The camouflage base, transparent nail tips and gilding create a wow effect in the manicure.
62. Matte beige and black nail tips. Another option with black flames, but now with a more ornate pattern.
63. Anti-Valentine manicure. Have we already said that you can make any design on one accent nail? One like the one in the photo is also possible, especially if you don’t really like Cupid’s day.
64. Black flame with a heart outline. You can make the flame in this design black or white. What is your mood color?
65. Inconspicuous design. Such faded flame outlines will appeal to conservative girls who do not like brightness on their nails, but love to try trendy, fashionable designs.
66. White flame with a heart. Black or white, which option will you choose?
67. Brown nail design. This one is for Christmas, but you can do nail art in this color scheme at any time of the year.
68. Yellow design with fire. The sunniest manicure from the entire selection!
69. Manicure “different hands”. Try a stylish idea - make the background one tone on one hand, the flames another, change the colors on the other hand! You'll like it!
70. Manicure with black kamifubuki. The base is a matte white polish with black circles, and on top, like a cherry on the cake, is a beautiful purple flame.
71. Unicorn style manicure. Unicorn manicure is a mix of different pastel shades. Add black flames to these candies for a cool fashion statement.
72. Purple pink fire design. Glamorous nail art for lovers of everything bright in life.
73. Pink glitter manicure with fire. Take your favorite shiny nail polish and create beauty; a thin brush will help you draw the contours of flames and other designs.
74. Leopard and yellow flame. The lemon-yellow version of the flame on the nails looks beautiful against a background of leopard spots.
75. Manicure with purple flames. A black background + the right shade of purple is the key to the success of your new design.
If you see your nail design in an article and do not agree with its placement on our website, please contact [email protected] to remove the photo or make any other changes.
Well, how did you like the nail designs with flames? Would you give yourself such a fiery manicure in 2022? Or maybe you’ve already done it and are ready to share your idea? Visit us often and read about new products, we will be glad to see you!
Advertising:
Bonfire on nails
In order for the beauty of an unusual picture to be noticeable and bright, a fairly large canvas for drawing is required, such as on long nails shaped like an almond or a cat’s claw.
But this does not mean that owners of short nails are left out of the fashion trend. An unusual design will suit them, if you tame the fire and make it laconic. Masters use small, often monochromatic tongues along the edge or hole of the nail. So the French and moon manicure on short nails got another original design.
Fashionable fire manicure: beautiful design ideas
A classic fire manicure consists of flames, sparks, and the drawing of a fire on the nails. The ideal background is black, burgundy or dark red varnish, while flames and sparks are painted with lighter varnishes.
A fashionable fiery manicure is a smooth transition of colors from dark to light or vice versa plus a cage. A manicure with fire, gradient and checkered is an incredibly attractive and stylish manicure option.
Creative fire manicure is the use of a completely atypical spectrum of colors for this element, for example, green or purple, to draw a flame.
Fire with stripe and checkered pattern
What can unite the chaotic nature of the flame and the strict geometry of stripes and cells? Manicure! Samples of nail art with designs of such different characters are a special trend of the season, suitable for energetic and extraordinary individuals.
The coexistence of fire next to stripes (longitudinal and transverse) and cells can be relatively modest. Each design is given one nail plate, and the rest are painted in a single color: one or several colors in a color scheme that unites the entire manicure.
In a fiery manicure covering all fingers, stripes and checks are often awarded the status of single elements. Moreover, the most popular color palette for them is black and white. Does rhythmically alternating black and white cells remind you of anything? Right! It looks like a field for famous board games. So fire and chess in manicure are not mutually exclusive phenomena.
However, the cage can also be colored, echoing the palette with shades of flame. In any version, fire design is a bold experiment that has gained its right to exist with popularity. If you are not afraid to experiment, then choose a manicure with fire.
Try other original nail design ideas that you will find on my website. And in order not to stay away from new, emerging trends, subscribe to updates on blog materials.
#4 Famous Burberry Pattern: Best Plaid Design Ideas
Fashionistas like the Burberry pattern not only because of its stylish and original look. The Tartan (Burberry) checkered pattern can be present in several elements of a woman’s look, which helps the girl create a holistic and complete look. For example, in addition to manicure, the Burberry pattern can be present in the decor of a handbag or scarf. The most successful combination is an identical or similar print on a skirt or dress.
The main shades of the Tartan pattern are:
- black
- red
- green
- beige
- grey
Combine shades as you wish. The Burberry pattern looks especially attractive in winter when combined with a warm sweater or a poncho made of rough woolen fabric with a checkered pattern. A stylish and cozy look is guaranteed to you.
Manicure with fire and cage
An extremely current trend is a manicure with fire and a cage:
- two separate types of design should alternate on different nail plates;
- In order not to overload your nail art, you can use the following solution. It is recommended to apply a fiery design on one of the nails, and a cellular design on the other. It would be advisable to paint the remaining nail plates with a single-color coating;
- A manicure with fire and chess is popular, when the cells are drawn using a black and white color scheme;
- the cage can be multi-colored; a very organic design solution would be the option when it echoes the tonality of the color of the flame.
Video on the topic
About Feng Shui manicure to attract money and love in the video:
As you can see, manicure, according to the laws and rules of Feng Shui, is far from just a beautiful coating of nails with the varnish you like, as it might seem at first glance. In fact, it is a complex ritual that, if done correctly, will help you achieve many of your goals in all areas of your life.
Therefore, the next time you want to please yourself by updating your manicure, consider each point. You will see that the process itself is not complicated, and the result will amaze you: one by one your wishes will begin to come true in some magical way. Take the risk of turning your life upside down.
Black manicure with fire
A black manicure with a fire design looks impressive, deep and mysterious:
- Any colors look incredible against a black background. These can be bright, saturated colors, as close as possible to the fiery color scheme. To do this, take a yellow, orange, red tint in a single copy or create a multi-colored mix of these tones.
- A black manicure with fire can be either warm or cold. In the latter case, colors such as violet, blue, silver, and green are selected to depict the flame.
Yellow manicure with fire
A stylish yellow manicure with fire is one of the most natural types of fashionable nail art:
- the flame can be exclusively yellow or shaded with some other colors, such as orange or red;
- yellow fire can be depicted against a bright background, which is recommended to be selected in a similar color scheme so that the colors harmoniously overlap with each other;
- A yellow manicure with fire can be applied over a clear coat; this is a win-win solution to make nail art more consistent and versatile.
Peculiarities
Manicure with streaks is a modern technique of applying a pattern, thanks to which you can create compositions in the form of a volumetric haze. In addition, this design allows you to give your nails an unusual and bizarre shape, and the interesting combination of a translucent background and puffs of smoke favorably emphasizes the beauty of the hands.
Patterns can be either multi-colored or plain.
This “nail art” on a black base looks special; it is most often chosen for an evening look, since it is ideally combined with long outfits. Suits and other formal attire complement this manicure well.
You can decorate nails of any length and shape with “smoky” decor. To create an unusual pattern, you need to use gel polish of various colors.
Blurred lines in manicure are done using alcohol or regular nail polish remover.
White manicure with fire
Lovers of laconicism and elegance will be able to create a beautiful manicure with fire, made using white:
- this design variation is typical for the original French or lunar design;
- the snow-white shade can be taken as the basis on which the flame is drawn. It is recommended to use not too bright colors, for example, fire can be depicted in soft pink or gold;
- The flame can also be made white on a transparent background; it can be effectively shaded with the help of silver or golden sparkles.
Which fingers should I paint?
The basis is always a regular manicure, which every representative of the fair sex does. The most important thing is the choice of color and which finger is painted with which shade.
Which tones to choose? This question is quite difficult to answer unambiguously, because the answer depends on two factors: your belonging to any natural element and the desired result, that is, that aspect of life that you want to influence and radically change.
It is known that each finger of the hand is assigned its own special meaning, but not all women take into account that there is a significant difference between the fingers of the right and left hands.
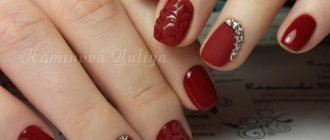
Red manicure with fire
For young ladies who prefer to look irresistible and invariably attract everyone's attention, a manicure with a flame of fire, made in a traditional red color scheme, is perfect:
- red flames can be depicted on different backgrounds: on a transparent coating, on white or black, on bright orange or yellow;
- the flame can be depicted either natural or abstract, in the latter case it is characterized by rounded smooth lines;
- red can also serve as a background, and the flame can be depicted using any shade that will be in harmony with the main red.
Raising money
Tired of lack of money? Do you want to live without denying yourself anything? Your goal is clear - to attract material wealth. When you do your manicure, highlight the color on the thumb and middle fingers of your right hand.
Gold and silver are rightfully considered the most correct colors for what you want. Also, according to the rules of Feng Shui, all bright, rich shades attract money.
Manicure with fire and rubbing
You can use the rub to make a bright manicure with fire even more expressive:
- The rub can be applied to all fingers on which the fiery design is located. In this case, it will acquire an indescribable pearlescent shine.
- An effective and original solution would be to use a shiny metallic rub, which is applied only to certain fingers. At the same time, the rest have a fiery manicure, which is made in cold colors, for example, purple, blue, silver. In this case, a metallic effect rub will organically echo this design.
Meaning of fingers
If you decide to create a design in which several nails are highlighted, in this case you need to take into account the Feng Shui significance of each finger.
Right hand
- Big. Responsible for health, physical and mental activity.
- Index . Affects inner strength of spirit, as well as a sense of power over others.
- Average. Attracts wealth, focuses attention on the instability of the psychological state and low sexual activity.
- Nameless. Adds vitality, attracts love, increases sexuality.
- Little finger. Helps to find harmony and gives psychological balance.
Left hand
- Big. Responsible for anxiety and various misunderstandings.
- Pointing. Provokes the emergence of self-criticism and self-doubt.
- Average. Attracts good luck.
- Nameless. Symbolizes loneliness.
- Little finger. It is associated with gossip, deception and depression.
Manicure with colorful fire
Nail art can be made extremely bright and catchy if you use a rich and varied palette of colors:
- For example, a manicure with pink fire can be combined with any other colors that are used to draw the background or to shade fiery highlights;
- You can take either a similar color scheme or a contrasting one. The last option will help you create a catchy nail art that is richly saturated with a variety of colors and attracts everyone’s attention.
- Fashionistas who prefer this design solution should be prepared for the fact that they will have to carefully think through their wardrobe. In this case, nail art will act as the main accent of the image, and the clothes should be plain and made in neutral colors. This is necessary so that the image does not come out overloaded and clumsy.
How to draw fire on nails: step by step
- We do a manicure, adjust the length and shape of the nails.
- We degrease the nails, apply and dry the base.
- Next, paint your nails in the shade that will serve as the base for the fire.
- Take a thin brush and begin to draw the elements of the flame.
- If you want a flame of several shades, do not forget to dry your nails to avoid careless mixing of colors.
- If desired, decorate the flames with sparkles, rhinestones, and a gradient.
- Dry your nails and apply topcoat.
Fire on short nails
Even short nails will not be an obstacle to the implementation of the planned design if a girl wants to please herself with a fiery manicure. To make this design look as advantageous as possible, it is recommended to follow a few simple rules:
- laconicism is the key to a spectacular embodiment of fire on short nails;
- If you don’t want to make the heat too high, decorate the tip with it, creating an extraordinary resemblance to a French manicure;
- do not overuse flashy decor. This can visually overwhelm your nail design.
Nail design with fire: photo ideas
Alternating fire and cage on the nail plates is a hit for the coming season. You can decorate all your nails, or decorate two fingers on each hand, and leave the other three plain.
You can also try yellow fire on a bright or transparent background. This is both a fashionable and natural type of nail design.
If you prefer elegance, combine fire with white. And don't be afraid to combine fire with stripes or rubs - it's one of the fast-growing trends, just like multi-colored fire.
Sources
- https://lifegirl.ru/manikyur-s-ognem-na-nogtyah.html
- https://irina-kozina.ru/manikyur/s-ognem.html
- https://glavred.info/fashion/10114232-modnyy-ognennyy-manikyur-samyy-yarkiy-osenniy-manikyur-s-ognem-30-foto.html
- https://womanadvice.ru/manikyur-s-ognem-originalnyy-dizayn-dlya-sovremennyh-modnic
- https://alice-journal.ru/ogon-na-nogtjah
[collapse]