Simple patterns for beginners
Simple designs on nails that even a beginner can do at home should not have complex designs.
To get started, you should try options such as:
- heart (at the tip of the nail plate or in the middle);
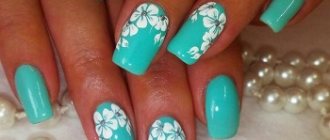
- flower;
- water drop;
- snowflake.
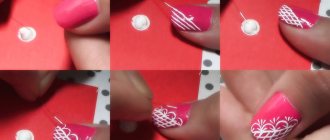
The simplest option is a heart. To apply the design, you will first need to completely cover the nail plate with white varnish. To continue working, the base must be completely dry. Then, using red, pink or another bright shade, you can begin to apply the pattern.
Using a toothpick, apply 2 dots, which are then carefully connected, giving the shape of a heart. If desired, it can be completely painted over or left as an outline.
Options for drawing a heart. Photo:
What is stamping?
Stamping is a nail decoration technique in which a design is imprinted from a special plate onto the nails using a stamp. Comes from the English word stamp - stamp. Craftsmen value technology for the simplicity and speed of design creation. And clients love stamping because it can help bring the most creative ideas to life. Because of its simplicity, stamping is also appreciated by lovers of home manicures.
This technique has many undeniable advantages:
- Using stamping, you can reproduce the smallest details and lines of an image. Sometimes it is impossible to make such lines with a brush;
- if the image is applied to several nails, then on each of them it looks the same;
- the market offers plates with the widest range of images;
- You can choose any colors to apply the image. For example, this cannot be done when using sliders;
- saves time - the procedure takes only a few minutes;
- The technique is used not only in manicure; you can apply designs to other surfaces, for example, on the back wall of a mobile phone.
In order to stamp, you need to follow 3 simple steps:
- apply special paint or varnish to the design located on the plate;
- print the drawing on a stamp;
- transfer the design from the stamp to the nail plate.
https://youtu.be/https://youtu.be/Ekk2N2Zi7b8
_
Step by step diagrams
The following tools are needed:
- acrylic nail paints;
- varnish (applied with a brush);
- tweezers;
- toothpick or thin needle.
Step-by-step implementation does not require special knowledge and skills; the average time it takes to paint is 20 minutes.
Rhinestones, crystal chips, sparkles or dried flowers are used as an additional decoration element. For beginners, it is recommended to use ready-made stencils.
Step-by-step diagrams. Photo:
Before you start drawing patterns, you need to complete the basic part of the manicure: process the cuticles, give the nails the desired or fashionable shape for the season, apply a transparent coating to the nails.
6 patterns for beginners. Video:
Instructions for creating beautiful designs with gel polish
Constant experimentation with applying designs to nails will be excellent practice for novice nail artists. Before the girl has time to look back, ideas will be born in her head instantly, and the result will exceed all expectations. Let's try to analyze step by step the options for beautiful drawings for beginners in this creativity.
Option one
With this method of application, all the work will be done using an ordinary needle (you can use a toothpick).
You can also apply drawings to a helium surface using acrylic paints:
Cover your nails with a base coat.
After drying, decide on the choice of background and cover all nails.
Use a needle to mark the dots of the future design or other patterns using the wet varnish.
Using a needle, carefully begin painting, mixing colors; if the design provides for clear lines, then do them with great care.
Dry the finished manicure under the lamp and secure with top coat.
Option two
This application system is ideal for beginners, and the tool used is the same needle and several shades of coating:
- Apply a colorless base to the nail plate and dry.
- Complete the background using a matte shade.
- While the varnish is still wet, make spot applications of a different color.
- Using a thin needle, begin to make circular connections of drops, based on the idea of the future drawing.
- Dry the drawing and secure with topcoat.
Option three
This method is performed using ordinary tape. No matter how surprising the method may seem, the drawing turns out to be very original:
- Cover the nail plate with base and dry well.
- From tape, cut out small geometric shapes and glue tightly onto the nail plate.
- Cover your nails with any color.
- After drying, carefully remove the tape with smooth movements.
- For added effect, cover the entire manicure with a clear coat.
Option four
With such an easy creative process, an example of applying patterns with various varnishes will be given.
Painting called nail is distinguished by its simplicity and justified result:
- It’s worth starting again with a basic application.
- Apply a background in any color scheme.
- Make any drawing using painting varnish, which has a special thin brush.
- Use the finishing coat to secure it.
Option five
The means at hand often come to the rescue. For example, an ordinary helium pen is capable of miracles. With its help you can create a masterpiece on your nails
An important feature is the fact that you do not need to learn to be confident in mastering such a tool.
In this application method, the drawing will be done with helium-based acrylic paints:
- Tweak your nails and correct any imperfections with several coats of clear gel.
- Squeeze several colors of acrylic paints onto a piece of foil, it will act as a palette.
- Use your imagination and start making the same designs on each nail plate, and finally secure the composition with a finishing agent.
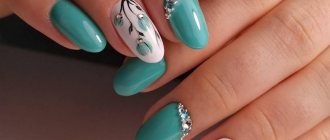
Design for the more experienced
Complex patterns are suitable for those who have experience in creating nail art.
Before starting the main work, you will need to prepare the nail plates. For this purpose, you can apply a stencil with the desired image option on them or cover them with a base color and let it dry completely.
Depending on what you have in mind, you can apply up to 2-3 different colors and shades, but each of them must be dried until completely hardened. Then, if stencils were used, you need to carefully peel them off, then paint over the empty spaces with varnish of a different shade; if not, apply the desired pattern with a toothpick.
In any case, the final stage will be the application of a fixing layer. It is recommended to use regular clear varnish for this purpose.
Drawing monograms. Master class on video:
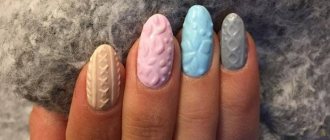
Gel polish
The technique of working with gel polish requires attention and accuracy. This coating option will allow you to create designs of any complexity, suitable for summer or winter manicure.
If you don’t have enough experience or you have chosen a complex pattern, you can use glitter - they will correct mistakes and make your nails attractive.
It is important to apply them no less carefully than the main coating, since a mistake at this stage can ruin everything.
Techniques for working with gel polish for beginners. Video:
Some manicure options with a pattern can be done simply and easily.
For painting you will need:
- gel of desired shades;
- glitter (optional);
- lamp (UV);
- base coat;
- protective covering.
You will also need a toothpick or a thin needle for application, a tool that allows you to remove the sticky layer. At the initial stage, you need to prepare the nail plates - the work involves removing the cuticle and polishing.
Then a base coat is applied to the prepared plates (it must dry completely before further work; there is a special UV lamp for this purpose). Then a colored gel is applied - the shade is selected as desired or to match clothes and accessories.
It is important to remember that it does not need to be dried. Using a needle or toothpick, collect the required amount of glitter. They need to be carefully distributed over the surface, but not pressed against it. Excess glitter must be carefully removed so as not to visually spoil the manicure.
The next step is to dry your nails under a UV lamp. To complete the work, you will need to apply a final protective coating, which also needs to be completely dry. You can then use a stick remover.
This option is suitable for any season. It can be used for both daily and holiday use.
Acrylic paints
An excellent design and manicure option is delicate pink and white.
Stages of work:
- Cover the plate with a colorless coating (you can use a beige base, which is used for French manicure).
- You need to drop a little varnish onto the sponge and then press it onto the nail for 5-7 seconds.
- Using a thin brush, you need to apply white acrylic paint and draw any designs along the edges (this could be waves, curls).
Then you need to apply the finishing coat. Additionally, you can use a small amount of glitter.
Painting with acrylic paints. Video:
Painting nails at home
How to beautifully, easily and correctly paint your nails at home?
Everything is very simple here: all you need is a good supply of time, a little patience and endurance, as well as the necessary tools and means for manicure. The process of painting nails will become more pleasant and of high quality if you sit comfortably in a chair or chair, place a small pillow or roll of rolled fabric under the hand being painted, adjust the lighting, turn on your favorite music and get down to business with all the confidence and desire. The emotional mood in this event is no less important than the quality of the varnish and the set of necessary accessories.
A big challenge for girls who do their own manicure is the procedure of applying varnish to their right hand. How to paint the nails on your right hand correctly, with two colors, one, and even learn how to make pictures and drawings? Here are some small details:
- In order for a right-handed person to paint his nails unusually and beautifully on his right hand, like a skilled master, you need to carefully examine the nail plates of your hand;
- then you should choose one of the nails and focus on it;
- Having dipped the brush in the varnish, you need to begin to carefully and carefully apply it to the plate, starting from the right side and gradually moving to the center, and then to the left side;
- After allowing the first layer to dry, you should paint the nails with the same care with the second layer of paint.
How to paint your nails
How to paint the nails on your right hand
Paint your nails with red polish
Carefully paint the nail
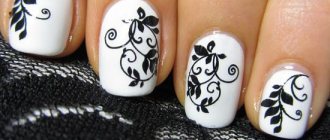
Flowers with a needle
Any variations of images on nails can be made with a needle - floral motifs are simple for beginners.
For this option you will need:
- light varnish as a base;
- any shades suitable for creating petals;
- a contrasting shade to create the center of the flower;
- thin needle;
- nail polish remover;
- cotton pad or cotton swab.
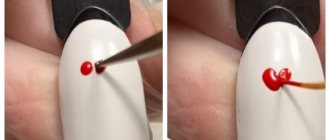
The work will require simple steps. First you need to paint your nails with a light color and let it dry completely. Then you need to dip a thin needle into the varnish (used to create the center of the flower) and place a dot in the place where the flower will be located.
The needle will need to be cleaned using a cotton swab dipped in nail polish remover. Then it needs to be dipped in the varnish that will be used to outline the petals in order to apply the contour points. You can decorate the entire nail with these flowers or paint several pieces just along one edge.
Simple drawings with a needle. Video:
Technique for applying colored nail polish
So, your nails are the same length and desired shape, can you apply the first coat of polish?
Stop, before you start painting, you need to make sure that your nails are clean and there are no traces of hand cream or other greasy cosmetics left on them. Such products can interfere with the even application of the varnish and contribute to its rapid peeling. To clean your nails, you can use nail polish remover, regular acetone, alcohol, or simply wash your hands thoroughly in warm water and soap, and then dry them well. The varnish will last a long time and will lie more evenly on a completely dry surface.
Applying base coat for varnish
The next step in learning how to paint your nails neatly and beautifully involves applying a basic base to them. The base coat allows the polish to go on smoother and more beautiful, as it fills in all the unevenness and roughness of the nail surface, and also protects the nails from the negative effects of the aggressive components of the base coat.
Usually the base has a transparent color and is applied before the first layer of colored varnish. It contains various useful substances: talc, silk, etc. As a base, you can use a varnish with a strengthening effect - the main thing is that it is transparent and does not affect the color of the main coating. In addition, the base prevents the colored composition from penetrating deep into the nail and giving it an unsightly yellowish tint over time. Therefore, a light or transparent varnish on such fingers will look more impressive.
Applying color coating to nails
[yandex2] [google2]
Finally, comes the most interesting and creative process - painting your nails with colored varnish. How can you paint your nails in the most beautiful, original, correct and bubble-free way?
First of all, you should pay attention to the quality of the coloring agent. Only a high-quality product with a valid shelf life and not diluted with acetone and other means can turn the painting process into an exciting experience. A good polish will stay on your nails for a long time and will not start to come off within a couple of days after painting.
After choosing the color of the paint composition and the intended design, you can begin painting. To do this you need to do the following:
- Warm the polish by holding it in your fist or placing it in a warm place. This way the product will acquire a homogeneous consistency and lie smoother, without bubbles.
- Adjust the direction of the incident light. For right-handers, it should fall to the left, from above, for left-handers, on the contrary - to the right, from above. The wrong direction of the light will not allow you to determine how the nails are painted - correctly or not, whether there are flaws in the manicure, etc.
- It is recommended to start coloring with the little finger, gradually approaching the thumb.
- You should not try to paint the entire plate with one stroke - smearing a small amount of paint will cause gaps to appear and will apply unevenly.
- You should start applying varnish to the nail from its middle, gradually moving to the base and then to the sides.
- How to properly paint short nails with polish? To do this, you need to take a small portion of the coloring agent with a brush and distribute it evenly on the nail plate. If you want to lengthen short nails, then you do not need to completely paint over them from the sides. A video or a detailed photo report can tell you more about how to beautifully paint short nails.
- The consistency of the coloring composition should not be too thick, but it should not spread over the plate like water: the thickness should be medium.
- In order to paint your nails simply, quickly and beautifully, as experienced masters do, you must always apply two layers of colored coating. It is in this case that the color of the varnish will be more saturated, intense and bright. Each layer should be given time to dry.
- If during the painting process the coloring composition gets on the skin, and it is not possible to wipe it off completely without touching the nail, you can remove only the largest strokes. Small ones will disappear on their own during the day if you wash your hands several times with soap and water.
- During the painting process, you should make sure that the varnish does not get on the cuticle, otherwise the whole impression of cool nail art will be ruined.
- After applying two layers of the base coat, it is important to apply a fixative - it will prevent the beauty from quickly disappearing from the nail plates.
- After applying the fixing agent, it is important not to get down to work for at least half an hour - the paint should dry well.
A toothpick is also an option.
Using varnishes of various shades and a regular toothpick, you can create an elegant option.
For work you will need the following materials and components:
- varnishes (shades can be chosen independently);
- toothpicks (2-3 pcs);
- paper napkin;
- fixative;
- base for the main shade.
The sequence of creating the selected pattern assumes that the base will first be applied and allowed to dry. Then you need to apply the main shade.
There is no need to wait for complete drying. Using other colors, apply the desired pattern using a toothpick. The fixing composition is applied at the end, when everything is dry.
Master class on video:
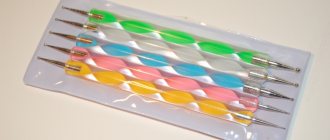
What brushes can I use?
Using brushes, you can create different decoration solutions based on a combination of lines. These can be marine themes, multi-colored compositions of varying degrees of complexity.
There are several types of manicure brushes, the main ones are:
- thin (liner);
- fan (straight or beveled).
Also, brushes can be of different sizes in height.
They should be selected based on what pattern should be obtained at the end of the work.
Video tutorial on drawing thin lines:
Dot designs on nails with gel polish
Flower
On the base varnish we place several dots of acrylic paint so that we get a flower. The points should touch tightly. The center of the flower can be made with acrylic paint of a different color.
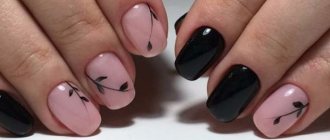
Flower with elongated petals
Cover the nail with the main color of gel polish. We put a dot with dot, and then stretch it out so that we get petals.
Rows of dots
- Using dotters with tips of different sizes, you can make a series of dots in which each subsequent dot will be smaller than the previous one.
- With the help of a dotter, you can make a variety of drawings, the outline of which will be dots.
Shellac
Shellac is a new product, a new generation product. It successfully combines the usual varnish and gel used for extensions.
This combination allows the product to last for a long time, without chips or abrasions. The technique of working with it is similar to creating drawings using the usual method, but to speed up drying it is recommended to use a lamp.
Tips for saving a drawing
To ensure that the beauty of your nail patterns lasts longer, you need to adhere to the following recommendations:
- Use high-quality tools and objects in your work.
- When applying and choosing a design, focus on the size of the nail plate.
- Don't use multiple solutions at once to avoid awkward manicures.
- Geometric designs are the best option, suitable for any event.
- Be sure to apply the base at the beginning of work and the fixer at the end.
Thus, there are many options for creating an unusual and stylish manicure. For beginners and experienced people, it’s easy to choose designs for any event.
Using gel polish
Gel polish is a nail coating that is very popular. After all, thanks to its use, the surface of the nail is strengthened, so it does not break for a long time. So, a manicure done using gel will last for several weeks without changing its external characteristics. Depending on the manufacturer, there are varnishes with varying degrees of stickiness and viscosity.
With its help, you can draw designs on both natural and extended nails. The gel needs to be dried only using a special device - LED or UV lamp. The first option is considered better because the nails dry within 30 seconds rather than 2 minutes.