What do you need to draw dots on your nails?
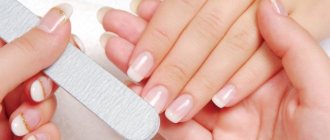
Manicure with dots has been one of the most popular and relevant for several seasons in a row. You can do it not only in the salon, but even without difficulty at home. This does not require any special skills, abilities or materials. You will need regular nail polish, a toothpick or a special dots tool.
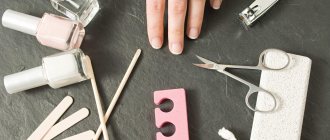
Dots (from English “dots” - dots) are a small stick with a wooden handle and an iron tip on which there is a small ball, comparable to that of a ballpoint pen. If you purchase a set of dots, you get about six sticks with balls of different diameters.
dots tool kit
set of dots for painting on nails
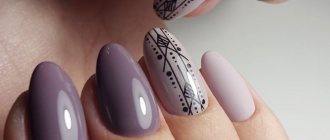
Dots leave a neat ball on a varnish base with a different contrasting varnish color. Some technologies also involve drawing various patterns and monograms with dots.
In the absence of a tool such as a dots, you can also use either a toothpick or a regular needle. Of course, these tools do not leave such a clear pattern, but nevertheless, they are necessary. To do this, they are also dipped in varnish and an imprint is applied to the base.
dots drawing on nails
How to use Dots: step-by-step instructions
Dots for nail design (step-by-step instructions explain how to use to make a spectacular design) can be used at home:
- To draw a dot, you need to carefully put varnish on a metal ball and press it to the nail plate.
- To make a line, you need to draw the dots in the desired direction along the nail. The varnish should be applied carefully so that the excess does not form blots. It's better to start with straight lines. After several experiments, you can switch to waves, zigzags, steps. At the end, the line always fades out because there is less varnish left on the ball. The slower the dots moves, the less pronounced the attenuation is. When painting slowly, the paint is used more evenly.
- The most convenient way to fill the space inside the outline is with strokes, drawing parallel lines located close to each other. This will give you a smooth and uniform texture.
- While painting, you should regularly wipe the tip with a soft cloth or cotton pad to remove particles of drying varnish.
Drawing with dots is similar to drawing with a regular pen. You just need to monitor the amount of varnish on the ball. If there is not enough of it left, the pattern will not be visible. Excess can lead to unsightly blots.
The thickness of the lines and the size of the dots depend on the diameter of the ball. For a beautiful manicure you will need dots of at least two sizes.
It is convenient for small ones to draw lines and small dots, and for large ones it is convenient to make large peas and fill large areas inside the contour.
Dipping dots into a bottle of nail polish is inconvenient. It's so difficult to regulate the amount of polish applied. In addition, there is a high risk of staining the handle, and then all the objects lying nearby. It is more convenient to use a palette. You can make it yourself from a sheet of paper or a piece of foil, or buy it at an office supply store.
When drawing with dots, you must not forget about the following rules:
- Before starting a manicure, you must apply a base;
- if the plans do not include mixing colors, each layer should dry well;
- When the drawing is finished, be sure to cover it with topcoat.
Using dots, you can make a dotted pattern - an analogue of ombre.
You just need to put peas in a row, gradually changing the tone of the varnish from light to dark or vice versa. The easiest way to do this is by diluting the selected shade with white varnish.
Drawings on nails with dots step by step at home for beginners
No matter how difficult it may seem to you, drawing with dots is very simple. For this you will need:
- dotting tool (or toothpick)
- two contrasting varnish colors
- fixative varnish
Step-by-step drawing of dots on nails:
- Paint your nails after a thorough manicure with the base color of the polish, choose any color you like
- Wait until the base coat of varnish is completely dry; if necessary, apply a second layer of varnish and also wait for it to dry completely.
- On the work surface (a piece of paper, plastic or oilcloth) apply a drop of varnish of a different color, contrasting with the base one.
- Dip the dots into a drop of fresh varnish and transfer it to the base layer, making an impression
- As a result, you will get an even circle, each of which can be placed in a clear or chaotic order
- Using dots you can create polka dots, flowers, lace patterns, fades and much more.
- Also, by changing the diameter of the dots, you can make a variety of drawings, each of which will be different in size
If you draw dots with a toothpick, then you should know that this tool quickly wears out: the tip of the wooden stick becomes flat, soft and saturated with varnish. For this reason, it is necessary to constantly change toothpicks.
dots drawn
dots drawn with a toothpick
Execution nuances
In the process of creating a stylish and attractive appearance for your nail plates, you will have to make your choice between regular varnishes and coatings with a gel base. Each of these products has its own advantages and disadvantages. To make an informed choice, you should find out as much information as possible about each of them. Next, we invite you to consider the features of the products, based on the fundamental selection criteria that are significant for the consumer.
Structure of gel polishes
Conventional varnishes are substances designed to create a special color coating on the surface of the nail plate. Products with a gel base have more universal properties. Their structure contains a large number of useful vitamins and microelements.
Consequently, the coating not only does not harm the structure of the nail, but also takes comprehensive care of its health . Thus, it is not surprising that gel polishes can be used almost constantly, without interruption, while conventional care products require additional care.
How to apply
To evenly distribute regular polish over the surface of the nail, you will need a good brush and a couple of minutes of personal time, while with gel polishes you will also have to use an ultraviolet lamp. Without targeted thermal influence, the polymers that are part of the helium compounds will not be able to strengthen, and you will not get the necessary resistance indicators.
Note! The cost of such lamps is quite high, which negatively affects the popularity of using gel polish at home.
Removal from surface
Conventional coloring compounds are removed from the surfaces of the nail plates in just a couple of minutes. Moreover, for this it is enough to have ordinary solvents at hand. With gel polishes, it’s not so simple . It is possible to harmlessly neutralize the effect of the formula only with the help of special compounds that should soak the dense polymer structure and release your plates. In other words, it will take you an order of magnitude longer to neutralize helium structures.
Benefit
As you might have guessed, the composition of gel products makes them one of the most beneficial for marigold health.
. Conventional coatings cannot boast of such properties. Due to the fact that they do not contain nutrients and completely block the plates from receiving natural vitamins, a negative effect appears in the form of increased fragility and weakness.
How long can you wear it?
Even if you choose expensive varnishes in branded stores, their durability cannot be compared with the effect that gel-based coatings provide. Regular products will delight you with the attractive appearance of your nails for 2-3 days, while gel structures can pamper you with unsurpassed stylish results from 1 to 4 weeks. It all depends on the skill of application and the quality of the base.
Note! The main emphasis in the process of implementing pea manicure is on perseverance and attention. To implement the technique, you do not need a large amount of varnish, but you will have to acquire patience.
Drawings on nails dots schemes
To draw a beautiful design on the nails, both a novice artist and a professional master need not only desire, but also knowledge of some particularly advantageous patterns. Using such schemes, you can create a stylish and very beautiful design that will surprise others.
Scheme No. 1 for drawing with dots
Scheme No. 2 of applying dots to nails
Dotted patterns should only be applied with fresh varnish. This will give you a clear, even and very round dot. If the varnish has dried out, it is better to apply a new drop to the work surface. If the varnish has dried on the working tool (dots), wipe it with a cotton swab dipped in nail polish remover and continue working.
Technique for applying dots with a hairpin or toothpick
Simple toothpicks or a hairpin - why not a tool for creating the most reckless and daring manicure? Using such improvised tools is no more difficult than using a dots gun.
Spot manicure using a pin and toothpick
The main condition is not to overdo it with the amount of paint on the instrument. The toothpick should be dipped into the dye no deeper than 2-3 mm. Otherwise, there is a risk of making a big “blunder” on the nail. The hairpin is dipped in the same way as dots - the entire ball is on it, and the method of applying dots is similar. The technique for applying dots with a toothpick is as follows:
- apply a base coat, make the background a plain or colored coat (varnish, gel polish), dry;
- With a light touch of the sharp tip of a toothpick, touch the surface of the nail (painted or not - depends on the idea). A small dot will remain. If you need to make it larger, then you can expand it with circular movements. If necessary, you can add a dye;
- Apply the design to the end, dry and cover with top coat.
Having mastered the technique of drawing with dots, you can create designs of varying complexity. If you can’t come up with something on your own, the World Wide Web can help!
Nail design with dots, ideas and options for dotted manicure
With the help of dots, you can create a very diverse and beautiful manicure every time, which will easily match any style and occasion. Try to choose colors for the drawing wisely: contrasting and bright.
dots manicure version “reptile”
Black varnish is an excellent base for applying designs with light varnish colors. You can change the shades of varnish and apply them completely randomly with tools of different sizes.
drawing with dots and a needle “flowers”
chaotic dots drawing
dots drawing, design options
dots pattern "polka dots" multi-colored dots pattern lace dots pattern
original spot manicure
feminine dotted manicure dotted manicure “Mickey Mouse”
Manicure for spring 2022 photo dot design
Black, dark red and dark blue shades are a thing of the past. New manicure ideas are in fashion now. In spring, more than ever, we want bright and rich colors around us, including on our nails. Spring is a time of romance. That is why pink spring manicure has been declared a new trend of the season.
You can safely choose a variety of coating shades: from bright, flashy to pale pastel tones. And remember that it is already difficult to surprise anyone with an ordinary monochromatic coating. Rhinestones, flowers, stripes, gold and silver ribbons, all kinds of heart patterns and manicures with photo designs are popular. The gradient technique is considered fashionable this spring, namely the smooth flow of one shade of varnish into another. A mix of pink and gold is also popular.
French manicure with dots, photo
You can make a beautiful French manicure (that is, a “French manicure”) in a completely unusual way, using a dot pattern. Use the tool that is convenient for you: dots or a regular toothpick. The dots should be applied on the usual part of the nail - on top, where there should be a white stripe.
Such dots must be applied close to each other so that at a distance your manicure is perceived as an ordinary French manicure. You can vary the diameter of the circles and change their location, as well as the color palette. You can also do a beveled French manicure or a moon manicure.
the simplest version of French manicure with dots
black and white original French manicure using a dot pattern
beveled French using a dot pattern
unusual French manicure made with a dot pattern
Ideas for patterns with circles
Circles of the same or different sizes can be combined in different designs, of which there are many in modern nail art. By combining contrasting colors, light and dark shades and using sophisticated patterns, you get unique nail design options and, accordingly, a beautiful manicure. You can decorate your nails with dots using special tools, both professional and improvised.
Polka dots
A simple, but at the same time easy-to-perform dotted type of manicure is a polka dot design. Traditionally, dots of the same size are used, they are placed in a certain sequence (diamond, cage shapes); chaotic placements of balls of the same and different diameters are also acceptable.
Among the favorite color combinations are the following:
- classic (using “classics”: black, white, red);
- tint variations (pastel shades: pink with mint, blue with peach, etc., dark and light shades of the chromatic circle);
- classics + shades and non-standard colors (white and marsala, black and turquoise, etc.).
People do manicures with polka dots for various occasions, but they should not decorate their nails if an official event is planned or a strict dress code is required.
Polka Dot Nails
Semicolon figure
Starting from the point, you can make its continuation - a comma. This technique is typical for creating small monograms that can be easily combined into one beautiful pattern. Creating a comma is not a complicated process, but rather is similar to how this punctuation mark is written on paper. When pointing the dots at a point, you need to slightly “move” off it in the desired direction. Then you can add one comma to another, a third, etc.
"Commas" in manicure
Round gradient
Gradient design is always interesting and unusual. By combining shades with a smooth stretch of color, an unusual effect is obtained, which is complemented by painting and decor. But in the case of a dotted design, the gradient is created a little differently. There can be several options for this nail design:
- one large point (circle) in which the gradient transition is performed. In this embodiment it is called radial;
- many dots that are made in one color, but the shade transition occurs vertically on the nail plate.
In a certain design, the effect will be original and unique, and for the best effect you should choose a contrasting background for a point gradient.
Round gradient
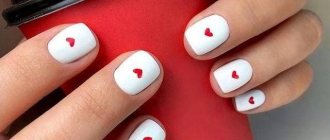
Heart made of dots
Combining dots of different sizes into one heart-shaped figure is a very good solution for an unobtrusive and romantic manicure. It is difficult to create a heart-shaped figure with dots of the same size, so circles of different diameters and possibly different shades are used.
It is acceptable to draw one large heart on the nail, as well as several small ones. Accordingly, the size of the dots in such images will be different. To clearly see the design on your nails, it is better to choose contrasting color combinations. This manicure is suitable for both study and leisure.
Hearts made of dots
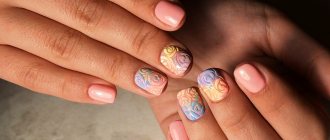
Flowers
A dotted manicure with flowers looks at least extraordinary, and at maximum – incredibly impressive. Therefore, you should decide on such a design if you want to change your usual flowers to something more unusual.
To create spot flowers, you can use simple colors and shades to make the images seem realistic, or you can go the clip art route and paint flowers in one color. It is popular to place flowers on the nails in a section (half a flower or a certain part of it), as a whole, or several pieces on one nail.
A trendy design in a floral style for everyday manicure. If you use chromatic colors, then flowers in this design can decorate even the most austere and laconic manicure.
Spot flower manicure
Mosaic
A dot mosaic on nails always looks mysterious and interesting; it can recreate a complex pattern or simply imply a simple, uncomplicated pattern (diamonds, circles, stripes, etc.). For mosaic design, dots of the same diameter are used (any, but most importantly - the same).
Mosaic often uses variegated colors, combined with more laconic ones - black and white. On short nails it is better to make a dot mosaic with small circles, and on long nails you can use larger diameter balls (dots).
Dot mosaic on nails
Manicure with stripes and dots
A very fashionable manicure in different styles can be created with stripes and dots. By intertwining these geometric elements in one design, you can create different patterns and achieve different visual effects. Contrasts in color are welcome; if necessary, foil tapes can be used; playing in shades will also add boldness and extravagance to the manicure.
With the help of stripes and dots, it is convenient to create patterns on the tips of the nails, throughout the entire nail, using techniques in the difference in the diameter of the circles and the thickness of the lines.
Manicure with stripes and dots
Bitmaps
Any image can be applied using dots. The bitmap contains basic shades for realism, and can also be done in one color. It is popular to depict dotted faces of animals, flowers, symbols, letters, etc. They look impressive against a contrasting background, but similar shades also look original in a manicure.
Bitmaps
Zodiac signs
Depicting a purely symbolic zodiac sign on a nail is stylish and interesting. The dotted application technique is especially relevant for this topic, as it resembles small stars that create constellations. To guide the theme of zodiac signs, appropriate color schemes in the “space” style are popular: purple, dark blue, splashes of yellow, white, etc.
Zodiac signs dotted
Pink manicure with dots, photo
Pink manicure is always distinguished by its special femininity and tenderness. When making a bitmap, you should decide on the color policy of the design in advance. Pink nail polish goes best with:
- white
- black
- blue
- beige
- burgundy
It is best, of course, to choose a light base and draw pink dots on it, but pink can also serve as a base color on which you can draw white and black dots. You can decorate such a manicure with fixative varnish, silver or gold sand, and rhinestones.
dotted manicure in pink contrasting pink and white manicure with polka dots avant-garde dotted manicure in pink tones
Summer manicure 2022 photo dots manicure
Summer is the time for light outfits and stylish accessories. This is the perfect time to show off your tan and highlight it with color accents. Therefore, a bright manicure for the summer is an integral part of a stylish look. Nails with multi-colored coating are still in fashion.
Bright, rich and even neon shades can be used wisely in nail design. You can use both a monochromatic and contrasting palette. For example, apply hot pink on your thumb nail, then gradually dilute the tone to a light transparent shade. Or combine different colors, while observing the rules of comparison. A similar manicure for summer would look best on short nails.
Red manicure with dots, photo
Red polish is a classic color for manicure. He gives the hands a special femininity and always speaks of the lady as a passionate person. One of the most successful dotted manicures is white polka dots on a red background. He always looks very advantageous and attractive. This manicure can easily be called summer. It should be combined with the same elements in the wardrobe and image, complementing:
- scarf or handkerchief
- hair tie
- dress
- beads and bracelets
- red lipstick
- shoes in the same style
red manicure with blue dots
red manicure with white dots and rhinestones
red manicure with small and large dots, very feminine red jacket with polka dots
Spot manicure combined with design techniques
By taking your favorite manicure technique as a “base” and complementing it with a dotted design, you can achieve a stylish nail design for any occasion. Modern nail art has no limits in its implementation, so experiments are the best way to independently come up with your own unique design style.
Paint point
A dotted manicure with a high degree of detail under the interesting name paint point can increasingly be found on the nails of modern fashionistas. The essence of the technique is to apply an image (most often an abstraction with geometric and ethno elements) with dots of small diameter. Moreover, the peak of popularity is the complete filling of one or two nails with dots, and the rest are partially filled.
Manicure paint point
French
Making a dot design based on a French jacket in any color scheme is a stylish solution for every day, which is suitable for any nail length. For example, you can make a classic version of a French manicure and decorate it with a white dot pattern. Such an image will not stand out too much on the nail, so it will serve as an excellent option for a manicure for any purpose. It is also important to draw a line of dots along the smile line.
Spot French
Lunar
Similar to the dotted French manicure, the lunar manicure can be an excellent option for everyday wear. The color scheme is purely personal preference. You can develop a unique dotted nail art on any background. You can also edge the hole with dots, and by also emphasizing the smile, we get a chic double manicure that combines a French manicure and a lunar design.
White manicure with dots, photo
White varnish is the best base for applying any tones and colors. Both light and dark shades go well with white. White polka dots will look just as good on any dark nail polish color (or even bright one). The neatest pattern is one that consists of small peas, so try to choose a tool with the smallest ball diameter.
white dotted manicure options
white manicure with large black dots
white manicure with multi-colored dots original white manicure with a snowman dot pattern
delicate manicure with a pattern of multi-colored dots
With stripes and other patterns
Dotted manicure goes well with various ornaments and designs. It looks especially impressive with stripes, hearts, and stars. This manicure is suitable for both an everyday look and a festive one (everything will depend on the additional decor and color of the base coat).
Dots that smoothly transform into a pattern look elegant and romantic. Many people like to add a design or design to their manicure with dots in a minimalist, nautical or beach style.
Adding rhinestones or stones to the ornament will help turn an everyday look into a festive one.
Black manicure with dots, photo
Black polish is another classic solution for a manicure base color. Almost any shade will look great on it. Apply peas using a dot or toothpick of any diameter, draw patterns and repeat patterns.
black and white jacket with dots
simple black manicure with white dots
black manicure with multi-colored dots
How to draw simple dot patterns with dots
The simplest pattern that can be made using dots is dots or polka dots. To do this, you will need at least two shades of varnish: for the main coating and for the design. The dots can also be made in different colors, but it is not advisable for beginners to use more than 3-4 colors. It will be very difficult to draw peas beautifully and neatly.
Simple nail design, which is most convenient to use with dots
Colors can be:
- Contrasting. The safest option is white with any trendy shade.
- In one color scheme. Then one polish should be pastel and the other bright. For example, pastel and bright yellow, powder pink and fuchsia, sky blue and blue, peach and bright orange.
Dots for nail design (how to use to create a dotted manicure is described in detail below) is suitable for creating any image:
- Treat nails: move cuticles, shape, polish.
- Apply the base coat in one layer and let dry.
- Apply the base varnish in one or two layers. Dry each layer well.
- Place a drop of dot varnish on the palette. Dip the dot tip into the polish and gently press onto the nail. Repeat for each intended pea.
- Let the drawing dry.
- Top with finishing coat.
The dots can be the same or different sizes. For identical peas, you need to add varnish each time. If you draw several elements in a row, each subsequent point will be slightly smaller than the previous one. This makes it convenient to draw a “fading” series. And the easiest way to vary the size of the peas is to take dots of different sizes.
Manicure autumn 2022 photos beautiful examples of dots
You probably know that the most popular colors for manicure in 2022 and 2022 will be pastel shades such as pink, peach, cream, milky, beige, gray, mint, lavender, as well as wine and berry colors. However, the seasons also influence the choice of color for both outfits and manicure.
Tochechnyj_manikjur_ (76) Tochechnyj_manikjur_ (77) Tochechnyj_manikjur_ (79) Tochechnyj_manikjur_ (80)
With the onset of autumn, there is a desire to surround yourself with sun and warmth, as well as to get a manicure in tune with the splendor of gradually fading nature. That is why chocolate, terracotta, coral, coffee, olive come to the fore. Purple, black, dark plum, and marsala will also be in demand.