- 787
- 02-12-2021
- Author: Mysekret Team
- 0
Many people associate a beautiful manicure with a design exclusively with an expensive master. But you can also draw a simple design on your nails for yourself if you choose the right design.
We tell you what available tools, techniques and nuances will help you decorate your own nails for the holiday or please yourself on an ordinary day.
Simple drawings for new masters
At first, not everything will be as smooth as we would like. It's because:
- firstly , you are worried, afraid that you won’t succeed;
- secondly , you have not yet gained experience and dexterity - it is a matter of time and diligence;
- thirdly , you probably don’t quite understand what you can use to draw and how exactly it’s done.
Drawing with golden varnish
If you follow the main rules, the self-learning process will be more effective:
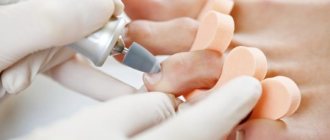
- Before work, you need to remove the cuticle from the nail plate. A simple warm bath in which your hand is placed for 10 minutes will help with this. This way it will be easier to lag behind the nail.
- Using a wooden stick (or a toothpick) and nail clippers, cut off the rough dermis (skin) around the nail plate.
- Next you need to polish the nail plate. By the way, this should be done not only before applying a manicure, but also for prevention, at least once a month. Instead of polishing, if you don’t have a special nail file at hand, simply degreasing with nail polish remover will be sufficient.
- In principle, the marigolds are ready to be painted. But there is one caveat. Before painting, you should apply a base. The drawing fits more neatly on it, and the drawing process becomes easier. The manicure as a whole will look neater.
- After applying the base, wait approximately 20 minutes.
Now that’s all for sure, you can safely start drawing.
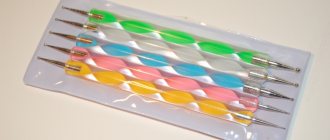
Manicure accessories
Stylish manicure in minimalist style
Stripes, polka dots, minimalistic nude designs and bright accents of varnishes of other shades make manicure fashionable and stylish at any time of the year in the 2022 season.
We have selected for you stylish manicure options for short and long nails in various designs that will allow each girl to choose a design to suit her taste.
What tools and materials should be on hand
Before the drawing procedure, prepare materials and tools for work; their list and varieties will depend on what you plan to work with, what material you know how to use best, decide on the theme and color parameters.
Nail polishes
You will need the following in your work:
- clear nail polish;
- fortified;
- medicinal;
- varnish fixative;
- glitter;
- glitters;
- decorative powder;
- several different shades of varnish.
You can paint different patterns with nail polish
Tools
It is impossible to imagine drawing without tools, so everything will be listed below that may be useful in one case or another:
- stickers;
- ready-made stickers;
- template plates;
- brushes;
- needles;
- toothpicks;
- ordinary or decorative tape;
- foil;
- dots;
- acrylic paints.
Nail design with stones and rhinestones: trends 2022
Stones can be of different colors and sizes, as well as different shapes, which allows you to create quite unusual and original patterns. Stones in a manicure create an accent, so there is no need to apply them to every nail.
In 2022, manicure with stones will be an undeniable trend in nail art; see the photo below for the most interesting options:
Glitter is considered the most versatile decoration for nail styling. Sequins are tiny reflective flakes that shimmer and glow when exposed to light, and can be of various shapes, sizes, solid or multi-colored. In general, sequins are divided into types:
The simplest drawing ideas for beginners
Having prepared your nails for work, you can apply a design on them using any tools, even handy ones - those that every girl absolutely has at home.
Working with a needle
Original and even simple drawings here and there can be created using a needle. How to use it:
- You don’t need to draw on your nail right away, try doing it on paper. Firstly, you will understand how it works, and secondly, this way you can choose the proportions as close as possible to your nail.
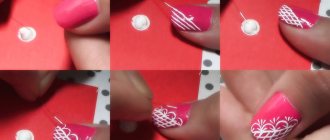
- Apply the base (transparent base) to the nail plate, wait until it dries completely. The base is always applied in 1 layer.
- After the first base layer has dried, you will need to apply another layer - the background layer. Choose the color of polish that will accent the nail, for example, white.
- There is no need to wait until the second layer dries. You can continue working right away.
- Somewhere in the middle of the plate, drop three small dots of, say, red varnish onto a white background, forming a triangle or alternately one after another along the nail.
- You can draw with a needle by immediately poking it into the middle of the highest point, stretching it to the bottom, and so on to all of them, one by one. The result will be an ornament like the one in the photo.
- You can drop, for example, the same white varnish into the center of a red drop, then when stretched, a white stripe on a red background will follow the needle.
- You can stretch the varnish from side to side, and then you get an unusual pattern.
Drawing on nails with a needle
The color palette in such simple drawings has no specific boundaries. The author himself decides what to combine with what.
You don't need to work on all your nails at once. Draw them in order from the very beginning to the victorious finish. Otherwise, you definitely won't succeed.
Painting with a brush
This drawing technology is a little more complicated, but with a great desire, any novice master will cope with this task.
Practice, for starters, using artificial nail plates - this will be a very good workout. If you don’t have them at hand, draw a nail on paper that is approximately the same size and shape as yours.
Drawing technology:
- First, as always, a base coat of clear or medicated varnish is applied to prepared nails.
- Leaves the nail to dry. In this technology, all layers must dry completely as they are applied.
- After the base has completely dried, apply the background layer. The color in this technique should be chosen so that it contrasts with the future painting. First, in one step, the brush is moved from the center towards the cuticle, then the left side of the plate is painted, then the right. If you notice, you should only get 3 strokes of the brush.
- Further work will require a very thin brush. Dab it into the varnish, be sure to remove the excess. And, as they used to do at school, start drawing an element of the pattern or the drawing itself.
- The final step should be the fastening procedure. That is, the nail is completely covered with colorless varnish, along with the design.
For clarity, here are photos of simple drawing ideas.
Brush painting technology
This technology uses a different number of colors. First, try drawing hearts, simple flowers, lines and other geometry. If you feel the strength to draw a more complex pattern, feel free to get down to business.
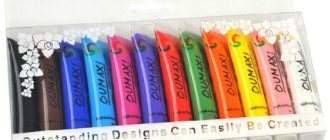
Simple painting on nails with acrylic paints
These paints are respected by professionals and those who know how to paint with them. Their peculiarity is that they do not spread during operation, are easy to apply, dry fairly quickly, and last a long time. In addition, they are not dangerous to human health. On sale:
- colorless;
- translucent;
- opaque (overlapping the previous layer);
- pasty.
Can be diluted with water without any problems. They mix easily with each other. After drying, you can safely apply another design on top of them without fear of damaging the original layer. The coating is breathable and looks very attractive and bright.
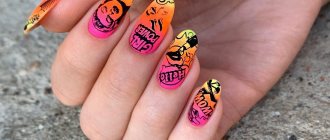
Bright and cheerful designs on nails
According to the drawing technique there are:
- Oily. It is used in paste and undiluted form. They are called that because they resemble paintings done with oil paints.
- Pasty. The consistency is similar to liquid dough. The composition is not diluted and is used in the form in which it was purchased. You can only add pigments to it if the idea of the drawing requires it. Paint in the form of thick strokes. When the paint dries, the appearance is similar to gouache painting.
- Watercolor. Water must first be mixed with the binder, only then watercolor is added. The drawing in its pure form is similar to a watercolor pattern. Characterized by high quality.
- Sliding. You can mix this composition with structural nail gel. The difficulty here is that it will be quite difficult for a novice master to predict the end result. But after a few trainings you can learn this too.
- Glazing. You need to work with this material carefully. All layers that will be applied must be very thin, almost invisible.
Simple nail art
You can paint with any type of brush that you know how to work with. For training, it is enough to purchase 6 basic shades and white in order to correct any mistakes in time. To understand them in action, you must first draw a checkerboard-shaped field on paper.
For 6 colors you will need 6 squares of approximately 2x2 cm. Apply the purchased paints to this field one after another (alternately) - paint the entire square with one pigment, then draw them with horizontal lines of a different shade, and finally with vertical lines of a different color. You should end up with 36 colors.
Painting with a brush using acrylic paints
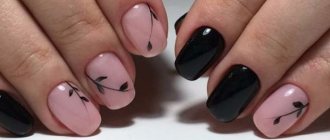
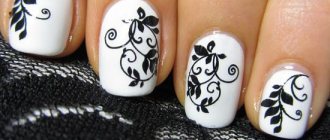
Paint a twig with acrylic paint:
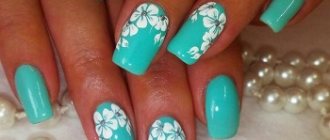
- Choose a very light color for the background (then choose a dark color for the drawing) or vice versa. In our example, it is lilac.
- Draw curved lines in yellow. Choose the location at your discretion, not necessarily exactly as shown in the photo.
- On this arc, draw leaf-shaped figures of the same tone using curved lines.
- Make the veins inside the leaves lighter.
- Secure the result with a transparent fixing layer.
Leaf drawing
If this drawing seems too easy for you, try recreating these simple ideas. In the first photo the drawing technique is depicted in pictures.
Step by step drawing of a rose on nails
Learn to draw with dots
From the simplest designs to very complex patterns, professionals draw with dots. The simplest techniques are a combination of dots, commas, rulers, and so on of different sizes. The tool needs to be soaked in paint or varnish and begin to paint with it as with a regular brush. During the work, the amount of coloring agent decreases, this can be seen in the ingredients on the nail ornament, which makes the design more natural and realistic.
Dots drawings
You can draw your nails with dots however you like. With it you can draw:
- flowers or animals;
- modify the traditional version of French manicure;
- It’s easy for them to create New Year’s motifs;
- personify the seasons on your nails;
- You can draw very stylish abstractions using dots.
Bright dot pattern
Drawings using regular tape
Regular household tape can greatly help in creating nail designs. With its help you can make very different shapes, drawings and even compositions. Geometry is the easiest to do - it is based on lines, and cutting them out with tape is very easy. The cut strips can be applied to the nail plate in any order or sequentially if you want to create a specific shape.
Techniques for working with tape:
- As in all previous cases, the nail is first prepared.
- The first layer is the base layer.
- After drying, apply the background - at your discretion.
- While the varnish is drying, cut a few thin strips from the tape (about 1 mm wide, it can be thicker if you want it yourself), the length should be greater than the size of the nail, so that later there will be no difficulties in removing the strips.
- If the background layer is dry, apply the tape sheets to the nail the way you want it.
It is very important that it is thoroughly high. Otherwise, when removing the strips, you may damage the background layer if it has not dried well.
- On top, cover the entire surface of the nail with varnish of a different shade or several - this is also your prerogative in choosing.
- Allow a few seconds for the polish to begin to dry, but not completely dry.
- Peel off the pasted strips and see what you got.
You can leave everything as it is, or you can further refine the drawing with a thin brush or dots. Adding sparkles, circles and other elements with a different color of varnish.
Grilles made with adhesive tape
Today there are many types of decorative tape on sale; it can also be used to create drawings. Here there is no need to cut the strips yourself. It can also be used in terms of decoration. Glitter on nails always looks beautiful, and with decorative tape it looks excellent and unique.
Toothpick drawings
Simple but unique patterns on your nails can be made with a regular toothpick. It is an indispensable attribute of every home, always at hand, and can always help in creating a complete image. If you have already learned how to work with a needle, then there will be no problems with applying designs with a toothpick. The drawing technique and sequence are similar here, only the drawings are slightly different.
Leopard pattern with toothpick
Other methods for creating simple nail designs
In addition to drawing with your own hands, you can use ready-made drawings - stickers, stencils, stockers, template plates.
Stickers
Choose a specific color for the base. Paint your nail plates with it.
Once completely dry, stick your chosen sticker on top. They come with an adhesive base.
Stickers for nails
These need to be cut according to the shape of the nail.
There are also those that need to be placed in warm water before gluing. After 10 seconds, it is taken out, the figure is carefully grabbed with tweezers and transferred to the nail.
Another type of stickers
Decorative decorations
There are a lot of manicure decorations on sale. An ordinary background layer can be decorated not only with a pattern of your own making, but also with all sorts of decorative elements:
- glitter flowers;
- broths;
- beads;
- rhinestones.
Attach them to the still damp background layer and hold until the varnish is completely dry.
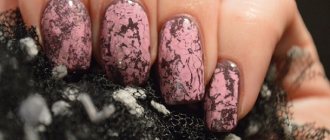
Manicure created using broths
Blurred pattern
It is done very simply. On top of the still wet background layer of varnish, a pattern in the form of a wave, spiral, circle, or even random strokes is applied with a brush. Use a toothpick to remove errors.
Example of a blurry manicure
French manicure
A design that never goes out of fashion is acceptable in any life situation and suits every look.
Execution technology:
- Apply the base and wait until it dries.
- Apply your chosen background layer. Dry properly.
- Select the edge shape of the nail from ready-made patterns, of which there are many in stores, glue it and cover the end of the nail plate, as shown in the photo.
- Cover the part that remains open with white varnish.
- Let it dry, remove the pattern.
- Cover the top of the nail with a fixative - transparent varnish.
Original French options
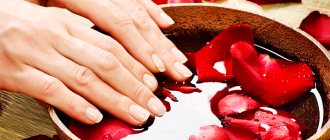
Water manicure
The drawings that are obtained by mixing varnishes of different colors in water amaze with their originality, uniqueness and inimitability. How to make it?
Prepare a shallow but wide vessel, pour a little water into it, so that it is not too cold. Its temperature should be slightly above room temperature.
Prepare several colors of varnish. Preferably from the same manufacturer, so they will interact better with each other.
Add the varnish drop by drop into the water: first, one, it should spread over the water in the form of a large circle. Add a different color in the center, it should do the same, but not overlap the first layer. Then the third, fourth, and so on as long as you want. In principle, you can use 3 colors, alternating them with each other.
The result will be a film on the water in the form of a rainbow of different stripes.
Very quickly, before it has time to dry, use a toothpick or needle, starting from the center, draw a line in any direction. Don’t finish it all the way, otherwise the drawing will reach for the toothpick and get ruined. So, be sure to lead all other lanes from the center. You can also move them in the opposite direction, so you get something like sharp petals from a flower.
Then wait 20 seconds for the film to dry, dip your nail in the water in the area of the design that you prefer to print on the nail.
Before the procedure, in order not to stain your finger, wrap it with tape around the entire perimeter.
When the design sticks to the nail, remove the tape.
Drawing using water and different colors of varnish
Drawings using template plates
If you don’t have time to paint your nails, but you really want to surprise others with an unusual design, you can use a simpler solution. There is a special kit for creating drawings on sale. It consists of one or several plates on which small details are applied in the form of individual flowers, figures, animals, and so on. There are also more advanced designs in the form of lace, French manicure patterns, and fabric textures.
A special stamp with a silicone insert and a scraper for removing excess varnish is sold for the plate.
It's very easy to work with:
- The nail is covered with a base.
- Then the basis - the background.
- A pattern template is selected and painted over with varnish, directly on the plate.
- The excess is removed with a scraper, the plate remains figuratively clean, the varnish remains only in the groove of the pattern.
- The stamp is adjusted to the design and pressed so that its imprint remains on the silicone.
- Transfer this print to the nail plate where you think it should be located.
Stamping on nails
Tips and tricks for a novice master
Absolutely every girl can create her own nail design, even if she doesn’t know how to draw very complex patterns, but really wants to look attractive. You just need to choose for yourself a technique that she can thoroughly master and use in practice. Over time, experience, dexterity, precision in performing work, and even your own personal innovations will come. To ensure that the drawing you create turns out well and lasts for a long time, rely on these tips:
- Buy high-quality material that lasts a long time and is characterized by high durability. Pay more attention not to cheap varnishes, but to those that have been tested by time and experience.
- When creating a design, take into account its size and the proportions of the design in relation to the nail. Don’t try to cram a bunch of different elements onto short plates - it will look pretentious and tasteless.
- If the drawing doesn’t work out the first time, you don’t need to despair and quit. This time try changing the position with simple geometry. Next time everything may turn out differently.
Don't be afraid to experiment, even very bold ones. There are no restrictions in nail design. Any design in the form of a drawing, simple lines, circles, and so on is also art and also has the right to exist. At the same time, any decorative element on the nail changes the image.
Stylish manicure with inscriptions
Inscriptions for manicures have become very popular in 2022; they can be just funny words or even a quote with meaning.
Inscriptions and words are applied to nails using:
- stamping;
- sample;
- Zip fastening;
- Brush.
The most popular words are “love”, “angel”, “sweet”, “love”, “soul”, “happy”, “love”, “oh everything” and many others. It is better to do the inscription on a monochrome coating; all nude light shades will be an excellent basis for such a manicure. The lettering itself can be romantic and sophisticated or bold and provocative.
Check out our photo booth for the best manicure ideas with captions: