List of necessary things for home nail art
If you are not going to become a professional, you don’t have to buy everything; get a set of irreplaceable things that will be useful for drawing, and create as much as your imagination allows.
It’s easy to do an original manicure yourself if you want.
You will need:
- Dots - a small stick made of plastic, metal or wood with a ball at the end for dot drawings (it’s also convenient to draw with)
- Scotch tape - you can use it to create geometric shapes and make French tape
- A set of brushes of different diameters - choose ones with natural soft bristles
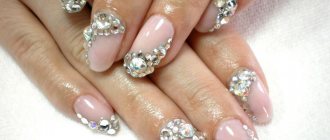
- Glitters, varnishes, gel polishes of different colors, rhinestones and sequins - everything you can imagine
- Nail polish remover and/or manicure corrector
- Cotton swabs, toothpicks
- Fixer - will extend the life of the coating and add additional shine
Advice: you don’t have to experiment with professional materials right away; at the initial stage, practice painting on your nails with simple watercolor paints - they wash off easily.
The main thing is not to overdo it with the design
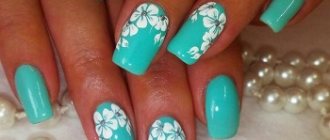
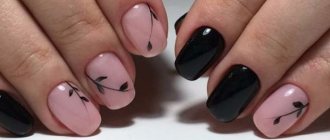
Drawings with dots
Dots can be called not only the easiest to make, but also a very favorite pattern among girls. To create neat dots of different sizes and colors on your nails, it is enough to have just one tool in your arsenal - dots. Outwardly, it resembles a pen, but instead of an ink refill, it has a metal pin with a round head. By dipping dots into gel polish or paint, you can create beautiful dot designs on your nails.
Note : if you don’t have a dots, you can replace it with bobby pins, an empty pen refill, or fabric pins with tips of different sizes.
Drawing with dots is a simple matter. Take a piece of foil and drop the selected shade of gel paint onto it. Dip the tip of the dot into a drop of paint, then touch the tool to the nail where you want it, and voila! The neat point is ready. With dots you can create both the simplest polka dot design and more interesting nail art:
- cover 3 nails on your hand with black gel polish, and 2 with base, and dry the coating;
- take a thin brush and black gel paint;
- carefully trace the contour of the nails covered only with the base;
- take dots and black gel polish;
- place 3 large dots in the center of the nail, then 2 more closer to the side ridges, in a checkerboard pattern;
- then using a dots with a thinner tip, place 3 small dots between the large ones, connecting them in a line;
- after drying the drawing, the last step remains - applying tinting to the nail;
- to do this you need to take black gel polish and a transparent glossy top coat and mix them to get a light gray shade;
- Cover the nails with the design with the resulting top and dry them.
Tip : you can create an interesting dew effect on your nails using a transparent base and dots. On a nail covered with a matte top coat, use a dot to place randomly small drops of base, then dry it in a lamp. As a result, voluminous dew droplets will appear on the nail.
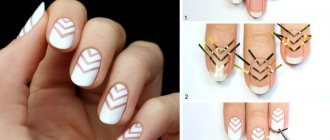
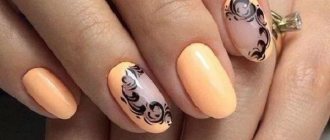
Nail patterns for beginners using tape
There is nothing easier than making French or colored blocks of different lengths and shapes. To do this, you can use either regular tape, which is found in every home, or buy special self-adhesive strips - they are sold in a cosmetic store.
Design using tape - what could be simpler?
The simplest lines are performed as follows:
- Apply a transparent base to the nails, then a layer of varnish of the same color
- After complete drying, glue the strips
- We cover the desired part of the plate with a layer of varnish of a different color/colors, depending on the idea
- When the coating is dry, remove the strips and secure with a transparent topcoat.
It is important to follow the sequence of actions.
Using the same technique, it is easy to create patterns with semicircles, rhombuses, triangles and other geometric shapes.
Let's look at several options for beginners in more detail:
Design with an accent: a yellow manicure with a couple of bright details looks fresh and bright in a summery way Self-adhesive strips will come to the rescue Three-color design using tape Bold and bright manicure Now you know how to make a moonlight manicure yourself
Single-color geometry step by step This decor can be achieved using semicircles rather than straight lines Any girl can handle triangles Another extremely simple and effective manicure in the 2017 season trend Matte finish is still in fashion A combination of classic black and white and metallic Lacquer-matte French with using adhesive tape
How to draw patterns on nails for beginners using dots - use the dot technique
Mastering the dotting technique
Dots are the most suitable tool for dotting techniques. If you don’t want to buy professional tools, replace it with a hairpin, a toothpick, or a wooden stick with a pointed end.
A few simple dots can make a manicure expressive and noticeable.
Using devices of different diameters, you will get completely different designs: images of animals, figures, flowers.
If drawing with your left hand is uncomfortable, limit yourself to selecting one finger
Apply a few drops of varnish with a brush to a palette - a piece of cardboard or foil. Dip the tip of the tool into the coating and gently apply to the nail in a drip motion. To create a curl or a straight line, start drawing with the tool as if you were writing with a ballpoint pen. Stretch a drop of varnish into a pre-conceived pattern with a smooth movement.
Yellow is one of the most popular shades of the season Floral dotting pattern step by step A variant of the laconic dot technique French oval manicure using tape and dots Colored dot coating Cute hearts made using the same technique This manicure is literally created to charm you For a contrasting design you will need polishes of several colors A perfectionist's dream
Flirty polka dots
The cutest yet simplest nail design is undoubtedly the polka dot design. The tool invented to create this print is called a dots. However, if you don’t have one, don’t be discouraged, just improvise! To create dots in a manicure, a variety of tools can be used: toothpicks, pins, bobby pins, empty ballpoint pens and much more.
Cute polka dots can sit proudly on every nail, or they can be a stylish accent on just a few toes. In this manicure, size matters - small dots look cute, and large polka dots look bright and expressive.
The sequence for this simple design is very simple:
- First, coat your nails with a base color and wait for it to dry.
- Then choose a contrasting shade and arrange the dots as you please.
- After the polka dot design has dried, ensure the durability of the manicure with a transparent base.
Nail patterns for beginners step by step - photo of working with a brush
Painting with a brush is also not difficult.
For girls who are taking their first steps in home nail art, the technique of painting with a brush may seem the most difficult. But this is a misconception. Start experimenting with simple geometric patterns. To create a spectacular finish, you will need a base color, two more for the design and a varnish fixer. Next we proceed, looking at a simple step-by-step guide:
Start with the simplest
Tip: do not forget that each layer of varnish must dry thoroughly. Only after this can you apply the next one, so as not to spoil the entire drawing.
Choose classic light patterns
Of course, with the help of a brush, professionals create real miracles, and it is quite difficult to learn all the subtleties of the craft at home, but everyone can master a few basic techniques.
Add variety to classic red Tartan Check Pastel Check Accessible Geometry
Simple nail designs for beginners using a sponge
Ombre
This manicure is called a gradient or ombre, and any representative of the fair sex can handle it. To work, you will need a sponge/fine-pored sponge, varnish of several colors, a transparent base for a colored coating, a fixative and liquid latex.
Two color gradient
It is important that the chosen sponge does not absorb the varnish too actively, and that it itself is not thickened, otherwise nothing will come of the idea. Before practicing on your own nails, try to achieve the desired effect on a piece of cardboard.
Three color gradient
Step-by-step ombre coating technique
First way
- Get a manicure and apply a protective base to your nails
- Cover the nail with one of the colors in a thick layer
- Apply the second color to the sponge - one part should be thicker
- Press the sponge against the plate with quick movements; start from the middle to the free edge, making the color denser
Shades of red
Second way
It is considered more complex, but the color transition is smoother.
- Cover the palette tightly with varnishes of three colors and carefully blend the borders with a needle
- Apply liquid latex to your finger around the nail.
- Dip a sponge into the polish and cover the nail plate with it.
- When dry, remove the latex layer
- Secure your manicure with a top coat
Ombre can be emphasized by highlighting a couple of fingers with stickers. Rich blueberry Ombre in combination with a moon manicure.
To make the drawing beautiful
The simplest manipulations can be practiced at home, especially if you have minimal artistic skills.
For those who are not familiar with this process, you can use regular varnish, adjusting as necessary as you go. It’s also a very good idea to buy ready-made stickers.
By placing them on the nail plate in random order, the top coat will give the design the necessary durability and strength. A photo of Oriflame lip balm can be found here.
Video: dots and brush, nail design with patterns and dots
The main points of the correct execution of the drawing:
- It is best to take as a basis a colored varnish of a darker tone, on which the design will appear brighter.
- Each layer must be dried well in a special lamp.
- A good help would be to use a palette to mix colors.
- It is better not to take more than three primary colors, otherwise the manicure will look sloppy.
- An excellent idea is to design each finger in a special technique, as well as make arbitrary variations.
- If a stencil is used, it must be removed only after the applied layer has dried. A video on how to paint your lips with a pencil can be found here.
It is very convenient to mix colors on a piece of foil.
In order not to spend too much on expensive materials, it will be enough to buy the basic colors of the solar segment, and then, according to the laws of color combination, mix the necessary tones.
Video: drawing flowers on nails
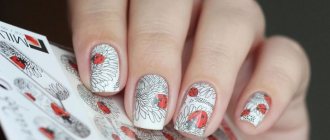
How to make easy patterns on nails for beginners using stamping
Nail design using stamps
Stamping - also a way of transferring a design onto a nail using a stamp - is another simple technique for adding variety to a boring monochromatic manicure. To master it, you will need a little patience and a set of tools:
- Flat metal plate with engraved patterns
- A stamp with a silicone or rubber base for transferring the design from the plate to the nail
- Scraper to remove remaining varnish from the disc
Stamping saves time
Advice: the advantage of the stamping technique is the speed of execution. A pattern that would take a craftsman up to two hours to create can be drawn in 15 minutes using a stamp.
You will need a set of stencils and stamps.
Stamping scheme step by step:
- Degrease the nail surface and apply a base
- Paint your nails with your base color and let dry thoroughly.
- Apply the second varnish to the stencil
- Leave the varnish only in the recesses, remove excess with a scraper
- Transfer the image to the rubber surface of the stamp
- Select places on the nail for the stamp and press firmly onto the nail.
- If the design is imprinted on the skin, carefully remove the excess with acetone
- When the design is dry, cover your nails with top coat.
Stamps can be completely different Combination of tape and stamping Eternal classics Multi-colored stamping Fun black and white decor using stamps Stamping and gradient
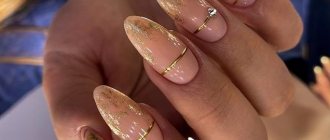
Options for using gel polish in nail design
Gel polish can be used in the traditional way , that is, choose the desired color and apply it to your nails. The brighter the shade required, the more layers will need to be applied before finishing.
A French manicure can be achieved perfectly using gel polish if you cover the nail plate with a colorless or light base and apply white or colored gel polish to the regrown part of the nail.
The combination of matte and gloss is an original nail design idea. The main plate is coated with glossy gel polish, and the regrown part is given a matte effect. One shade or a combination of two colors is possible.
Technique based on the 3/2 principle , when three fingers are painted in one shade, and the remaining two are painted in a contrasting color. This manicure looks very beautiful, but it should fit the overall style of appearance.
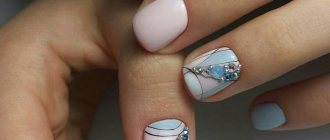
The use of stencils , stickers, and drawings on a plain background of gel polish is quite popular. Drawings make hands attractive and original.
How to make patterns on nails at home for beginners with a needle
This type of drawing technique is considered outdated today, but the photo clearly shows the principles of working with a needle.
Another relatively simple and popular technique is painting on nails with a needle - tools for such nail art can be found in every home.
Start practicing by applying the simplest elements and shapes Pastel Sea Wave
As in previous cases, the first thing we do is manicure, apply a base coat of polish and wait until it dries. Then we make dots with a needle and, smoothly moving from one to another, we form a pre-thought-out pattern. When you are done with painting, let the polish dry and cover your nails with top coat.
Flirty cats Summer sea breeze Black and white classics Predatory print Coping with a web pattern is not difficult even for a beginner
There are thousands of options for a simple and beautiful home manicure. If you happen to have a fan brush, it won’t be difficult for you to come up with a cute two-color manicure using varnishes that you can find in your home palette:
Fan brush design
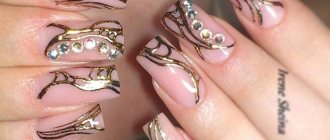
Don't forget about rhinestones and beads too. In this matter, the main thing is not to overdo it with accents:
To prevent your manicure from looking tasteless, decorate one finger with stones and beads
You can purchase special stencils:
Coating with a stencil
Or use foil:
Covering with foil
Gradient motifs
A beautiful ombre manicure only at first glance seems like a real work of art. In fact, he pleases with elementary technology! This photo cheat sheet is perfect for nail art beginners and shows you how to create a simple gradient nail design.
- Cover your nails with white matte polish. This trick will increase the brightness and color saturation. If you want to create a more subdued design, you can skip this step.
- Cut a small piece of porous sponge.
- Apply stripes with the colors you want to appear in the gradient.
- Stamp the image onto your nail by moving the sponge slightly.
- Remove excess varnish.
This design exudes a summer mood and sea breeze! If you want to experience it yourself, repeat this manicure on your nails.
- According to the previous instructions, create an ombre effect using white and blue nail polish.
- Once this layer is dry, use a thin brush to paint wavy white lines.
The gradient design combined with sparkles looks great.
Interesting: Almond-shaped manicure 2019
An ombre with one color will be no less expressive - the embodiment of the fashionable “negative space” technique.
Simple nail designs for beginners using gel polish
Gel polish coating extends the life of your manicure.
To make the coating last longer, use gel polishes instead of regular ones. Although they are more expensive, they last more than two weeks. True, in addition to varnishes, you will have to fork out for a UV lamp for drying. Drawings and patterns are performed in the following sequence:
- We treat the plates with a buff - a special rectangular file and degrease them using a primer
- Apply the base and dry in a lamp
- We make the pattern using the chosen technique
- Dry in a lamp
- Cover with topcoat and dry again
- Remove the top sticky layer with acetone
In addition to the varnishes themselves, you will also have to spend money on a lamp for drying.
You will also find a simple way to make beautiful patterns on your nails in this video tutorial for beginners:
Glitter stretch
The most impressive design is made using shiny gel polish.
What you will need:
- gel polish with glitter;
- fan-shaped manicure brush.
First, choose where the shiny stretch will come from: from the base or edge of the nail. In this place the concentration of sparkles will be greater, and then will disappear. A strip of shiny gel polish 1-2 mm wide is applied to the selected beginning of the design. Then, using a fan brush, stretch this strip to the other side of the nail and dry the layer. Repeat these steps about 3 times. Each time, apply the strip thinner and stretch it less and less.