Manicure “liquid stone”
“Liquid stones” on nails is a manicure technique that is not new, but still common. It is mainly used to create evening and New Year's designs. If you make a small “liquid stone” and use a light base, then this option can be easily worn on weekdays. It could be a classic French jacket with a stone on one finger.
Design technology with beautiful “liquid” stone
In order to create this unusual beauty on your nails, do not forget about the very first steps. We put the nails in order: apply the base layer as the first layer and dry this layer, apply color with the second and third layers. Next, we apply the top coat, preferably without a sticky layer at once, so as not to degrease the nails again later. Let's move on to the most interesting part.
Creating a manicure with “liquid stone”
- Take black gel paint and a small thin brush. We take a small amount of paint onto the brush and draw the outline of the stone, it should be oval. Then dry for about 2 minutes.
- Next, take a small piece of colored foil and degrease it on the back side so that it can be better imprinted on your finger.
- Then we apply the back side of the foil to our finger, press it tightly and tear it off. The result is not yet a voluminous stone.
- In order to add volume to our stone, we take any extension gel. We collect the gel on a thin brush and place it evenly on the surface of the foil, first carefully filling the edges, and then adding a large drop for volume. You can also turn your hand over and hold our stone down for a more voluminous shape and even distribution. Dry our pebble for 2 minutes.
Framing the stone with rhinestones
- We prepare the rhinestones and pour them into the lid.
- Take the base and apply a drop of the base onto the foil or palette.
- Next, we take a thin brush and carefully move along the perimeter of our stone with a brush with a base on which we will plant our rhinestones.
- Next, using a stick or pencil, we begin to lay out rhinestones around it. And between the rhinestones we add silver broths. Dry for 1-2 minutes (depending on the type of lamp you have).
- The final finishing touch is to apply top coat to the decorated finger. Place a drop of topcoat on a thin brush and coat the space between the rhinestones. The rhinestones themselves cannot be covered with a top coat, as the edges of the rhinestones will merge and they will no longer sparkle so beautifully. Just as carefully, with a thin brush, coat the stone itself with topcoat and polymerize it, a little longer than usual. We use the top without stickiness!
Important point
Before creating a “liquid stone”, the surface of the nail must be thoroughly degreased, since the technology uses transfer foil, which during operation should be transferred only to a given part of the nail, and not to its entire surface.
With the help of such simple manipulations, you can create a beautiful French manicure decorated with stones yourself. It can be easily done even on short nails, only the pebble itself will need to be made smaller, and the smallest rhinestones or just broths will need to be used for framing. Also, a liquid stone can be cut by casting - a design made with thick black gel-color with an imprint of metallized foil in gold or silver.
The step-by-step photos below briefly show the technology for making a design with stones.
Materials
Before you start mastering a new technique, you need to prepare special materials and tools. The main components are gels. The following options apply:
- Protective gel without dispersion.
- Colored for French.
- Gel paint for creating contours with non-oil dispersion.
- Stained glass gel.
- Sculptural composition of thick consistency.
You will also need special brushes. For a basic French coat, use an angled brush. Creating contours is done using a hair. And with the help of the base one a large number of layers are applied.
Before you start mastering a new technique, you need to prepare special materials and tools.
The main components are gels
A special type of foil is used for manicure.
A special type of foil is used for manicure. With its help they make casting technology.
To speed up the drying process, you will need special UV lamps that help harden the stones.
For the first time, experts recommend trying your hand at artificial nails.
Advice! For the first time, experts recommend trying your hand at artificial nails. In this case, you must follow the step-by-step instructions.
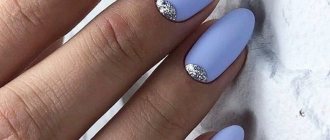
Nail design “moonstone”
At the beginning of this year, another no less beautiful design appeared with imitation of natural stone. It was called moonstone manicure. The essence is almost the same as in the previous design creation technique, but with minor innovations. The moonstone is slightly cloudy, and instead of a backing, metallized kamifubuki are used instead of foil. This design is best combined with light shades of gel polish: beige, light pink, peach and pale blue. The stones themselves on the nails can be laid out both vertically and horizontally (see example in the photo). Translucent stone also goes well with broths and modeling.
Technology for creating a “moonstone” design
- We prepare the nails in the standard way. We apply a top coat to the already finished color coating, but do not dry it, but lay out golden kamifubuki and only after that send it to the lamp.
- To create the pebbles themselves, you need to mix the material. Composition: a very thick rubber top coat, a little white gel polish and a very small drop of blue or dark blue.
- We spread the resulting mass on kamifubuki. You should get round pebbles. If the top is still not very thick and does not hold its shape well, try making the pebbles in 2 stages with additional drying. Or take a base or any gel to strengthen your nails.
- Once the moonstones are ready, use a thin brush to apply topcoat to finalize the design.
Useful tips
The following tips will help you make the perfect cast on your nails:
- Before using the top coat, you need to dry the nails with decor in a lamp.
- The foil should be pressed tightly against the nail and torn off with a sharp movement.
- Don't be afraid to re-apply foil to a specific area until you get the desired result.
- Nails must be covered with a fixative.
The foil should be pressed tightly against the nail and torn off with a sharp movement.
Don’t be afraid to re-apply foil to a specific area until you get the desired result.
Before using the top coat, you need to dry the nails with decor in a lamp
Advice! You can remove the decor using a special liquid in which all layers are softened. A special sawing machine or nail file is also used. You should not tear off the stones, as this can seriously injure the nail plate.
You can remove the decor using a special liquid in which all layers are softened
Stylish and practical design liquid stones - an excellent solution for nail decoration
By choosing the appropriate design, you can create an original and feminine look for any event.
Stylish and practical design of liquid stones is an excellent solution for nail decoration. By choosing the appropriate design, you can create an original and feminine look for any event.
Do not tear off stones, as this can seriously injure the nail plate.
Marble or quartz manicure
This gorgeous deep stone pattern has replaced the classic marble manicure. It is already done in several layers for greater realism. This delicate and truly nude design is in demand at any time of the year. It can be combined with gold stripes or some small flat metal decoration (for example, diamonds or quadrangles from Artex).
Let's see how to create a stone effect on your nails.
Quartz design technology
- Apply a thin layer of light pink camouflage base to pre-treated nails. It is better to use a thin flat brush for this. Next, directly over the wet camouflage layer, we apply a texture in the form of wide chaotic stripes using translucent milky camouflage. The pressure on the brush can be varied so that the line is “alive”. Let's dry it.
- Apply a second thin layer of camouflage and draw the stripes in the same way. We’re just giving them a different direction.
- The third thin layer of camouflage already comes with thinner and brighter veins, which we paint with a thin brush dipped in white gel polish.
- At the end, we cover the resulting pattern with the texture of the stone with the thinnest, almost rubbing, layer of camouflage. Let's dry it. We finish traditionally with a top.
The result is very stylish stones on your nails, which you can wear to the office or to an event. They look great on almond-shaped and oval nails. Also, this translucent pink manicure with a light texture will suit absolutely any fashionable outfit.
Manicure with stone texture
This is another new design of bright summer nails, which is done on a wet layer. In general, textures have become very popular. They do not require much time, which is important in the work of any master, and do not require special artistic painting skills. These designs are a real find for beginners in the nail industry. Check out the simple technique for doing manicure with stones and feel free to offer it to your clients.
Technique for creating stone texture on nails
These stones look most impressive on a white or black backing. It is also recommended to use camouflage. You can cover the nail completely with the design, or you can only partially, as shown in the photo above. In the latter case, casting, chromatic gel polish or thick glitter are suitable for framing the stone.
To create a stone-colored manicure, you need to choose the appropriate shades. To do this, find an illustration of a stone cut on the Internet and select several shades of gel polishes.
- Drop the main color onto the palette, then drop all the previously prepared colors into the center of this drop, one by one. You will get color circles. Take a toothpick and swipe randomly over the colors several times to create a pattern.
- Using a flat brush, scoop up the resulting mixture, moving from right to left. A brush is like a “spatula”. The gel polish should be on top of your brush.
- Place the brush on the nail so that the gel polish is on top and, using light pressure, transfer the colors onto the nail. Help them spread out and complete the design with a thin brush, moving it over the wet color layer so that the design looks like a cut of stone.
Important point
For convenience, we recommend using a gradient brush. Make sure that the “color mass” is transferred from the brush evenly and that the layer does not turn out to be too thick. Let this design dry a little longer than usual.
This bright summer manicure can be created without much effort or time.
Using stained glass gels
With the help of such components you can create an aquarium effect for a transparent jacket or use it for liquid stone technology.
Don't use too many decorations. It will look tasteless and bulky
This material greatly simplifies the creation of stones. Everything is done according to the same scheme, but after applying the foil, a drop is immediately formed, which polymerizes under the light of the lamp. If you add a drop of black paint to the composition, you get the effect of glass with shimmer.
Advice! Don't use too many decorations. It will look tasteless and bulky.
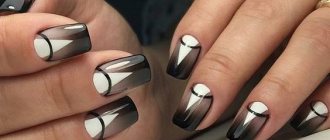
Manicure with large stones and rhinestones
Volumetric 3D manicure with large stones and cone rhinestones is very popular in the summer months and in December, when New Year's evening designs are in demand. In autumn and most of winter, fingers decorated with stones and rhinestones are not relevant due to the fact that they simply do not allow you to put on gloves freely. A large stone can get caught on clothing and come off. But in the warm spring and summer, when our hands are “free,” such a luxurious design comes in very handy. Pebbles with an interesting cut shimmer very beautifully in the rays of the sun and attract attention.
The photo shows a luxurious red manicure inlaid with stones of different sizes. Additionally, you can use broths and pieces of tear-off foil.
In order for such a design to please its owner for a long time, the stones on the nails need to be well strengthened.
How to securely secure large stones?
- You can lay the pebbles on a mixture consisting of fine acrylic powder and a rubber base. A fairly large drop of such material should be placed in the center of the nail and the largest pebbles should be placed on it. Next, the first part of the composition must be dried well.
- Then, with a brush dipped in a thick base, we outline large stones and frame them with small rhinestones, pixie crystals, bouillons or pieces of tear-off foil. Let's dry it. To ensure that everything is firmly fixed, we additionally outline each pebble with a top coat.
In this simple and quick way you can lay out a beautiful composition of rhinestones, stones and any additional metal decor. Inlay with voluminous stones is most often done on long nails, because on short nails it can look bulky.
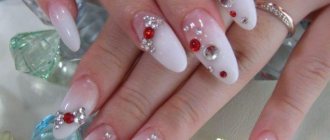
Manicure with sparkles and stones
Another express option for decorating nails with sparkles and stones can be useful for novice nail artists. It can also often be found in salons. Almost every craftsman has glitter and rhinestones in his arsenal. So, based on them you can make a “brilliant” manicure in the literal sense of the word.
The photo shows a manicure with stones and rhinestone decor of different diameters.
You already know how to attach rhinestones, so let’s take a closer look at performing light stretching with sparkles.
Design technology
Apply color. Cover your nails with a thin layer of top coat. Carefully place a strip of thick gel polish with glitter on the edge near the cuticle or at the end. Use a thin brush to stretch the glitter over the wet layer of top coat using vertical movements. Due to the “wet” layer of top, they should be well distributed over the surface. Dry the resulting result and cover it with a finishing layer of glossy topcoat, immediately laying out the rhinestones.
The versatility of this design lies in the free choice of the main color of the gel polish. Black, blue, red shades are perfect, as well as brighter summer colors - yellow, orange and coral.