The fashion for nail design that came a few years ago is updated with new ideas, techniques and tools every year. One of these innovations was a stick with a spherical tip, which creates amazing designs on the nails. By dipping the ball into the paint and applying it to the nail, you can get a print in the form of a circle. Thanks to this image, the tool got its name “dots”, which literally translates from English as “dots”.
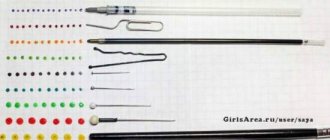
Dots usually have a wooden or plastic handle and a metal tip with a ball. Usually one dots is equipped with a pair of tips on both ends with balls of different diameters. If you are seriously interested in nail design, then it is better to immediately purchase a set of tools, which will include tips with a ball from the smallest to the largest possible.
Despite the simplicity of the design, dots are not demanding to use compared to tassels. True lovers will appreciate their unique capabilities after the first few manicures.
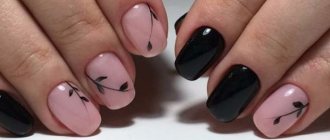
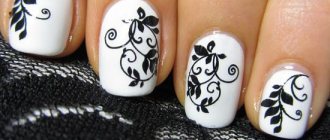
Dots are not the only drawing that Dots is capable of, although many variations of circles can be drawn with this tool. Any drawings that require a smooth transition from thick to thin lines are available in dotsu. For example, these could be flower petals, intricate squiggles or oriental patterns. Moreover, nail art can be made voluminous if you take a large drop of paint with the tip.
The most common dots design is considered to be a line of dots, each of which is slightly smaller than the previous one, as well as various variations on this theme.
When using the tool, you must remember that the paint on the ball can periodically dry out and mix with other shades, so the dots must be wiped with a lint-free material until the paint is completely removed. One of the important advantages of this tool for nail art is the ability to paint not only with acrylic paints, but also with regular varnishes.
Secrets of using Dots
For beginner manicurists, dots are simply the perfect tool. Learning to use it is much easier than using a brush. Therefore, it is better to start creating small masterpieces on your nails with dots.
Mastering the skill of drawing with the help of dots is accessible even to girls who for the first time decided to do nail art on their own.
To master the art of drawing with this device you will not need any special skills, and even a representative of the fair half of humanity who has never had a craving for art can make the simplest drawing in the form of a daisy with five dots.
The main secret of using Dots is experience, which will only come with time. First, you need to try out all its capabilities in order to know what kind of picture you will get in the end. You can start painting dots and commas on your own nails with varying amounts of paint. It is its consumption that will help you acquire the first skills in the capabilities of the tool.
What is dots? Photos, drawings and diagrams of dots for manicure
Beautiful well-groomed hands, a fun, high-quality manicure are no longer just a luxury, but a necessity, part of the image, and sometimes even a source of pride when it comes to an original, unusual manicure.
And if earlier in the master’s arsenal there were only brushes of different sizes for drawing out designs, various stickers and applications, today among his capabilities are dots - a specific tool for creating beautiful images on nails.
What are dots for manicure?
A dots is a handle that holds a metal rod ending in a ball, and the size of this ball, or rather its diameter, can vary depending on what kind of pattern is being created: from a large ball to the smallest inconspicuous one.
The pattern can be very different: from small circles to large dots and more complex patterns with curls. Let's note the advantages of dots:
- easy to use;
- Nail design will require a minimum of time;
- the ability to create an attractive dots design using only dots;
- the ability to apply a design to the nail plate with varnish or acrylic paints;
- the opportunity to create a delicate manicure at home on the occasion of a wedding;
- Possibility of reusable use of the tool.
Dots are very easy to use and literally after the first training you will be able to create real masterpieces of fine art on such a small canvas as a nail plate.
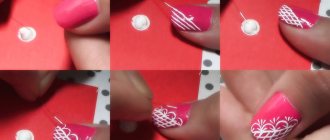
The photo shows step-by-step dots manicure schemes from simple to complex
Types of dots
Dots mainly differ in the diameter of the ball with which the design is applied. At the same time, the same dot handle can have balls of different diameters on both sides - this is very convenient during work. Some dots have a ball so small that it is almost invisible - such a tool is needed for applying thin details.
Dots designs on nails can be very elegant, almost “jewelry-like,” or, on the contrary, they can be deliberately large, in a naive style. This tool is also used to apply rhinestones to a nail or design.
Experienced masters use dots to create something like mehendi, but only on nails. The dosom patterns turn out to be very delicate and neat, which is difficult to achieve with a brush, even the thinnest one.
In addition to the diameter of the ball, dots also differ in the design of the handle: there are the simplest one-color plastic or wooden ones, and there are also those for lovers of glamor: with rhinestones, shiny, multi-colored.
Price of dots for manicure
So, as we found out, dots are produced in different configurations - a plastic handle or a wooden one, with two balls or with one, with or without additional decorations, in a set or one piece at a time - all this needs to be taken into account when buying a dot for painting nails.
So, a dots with a plastic handle will cost at least 70 rubles, with a wooden one - 75. A set of dots for nails can be bought for 300 rubles with a plastic handle, the same set, but with additional decor on the handles in the form of small rhinestones, will cost 550 rubles.
Note that the price is influenced by many factors: the material of the product, the company, the region, the popularity of the online store, the configuration of the dots itself. Buying it is not difficult, so choose carefully from what is available.
How to use Dots?
The tool is so easy to use that dots are suitable for beginners ; even a child can master painting techniques using this tool.
Of course, it’s better to practice first and not apply dots designs to your nails right away. This can be done, for example, on paper. Start with elementary dots, practice how you will hold the dots in your hand, it should not be tense, dip the tool in varnish and try to leave dots .
You can make both large and small circles with dots of the same size, just place dots without dipping the tool into paint each time. And when you “fill up” your hand, practice putting neat, consistent dots, you can start doing a dots manicure. To do this, try to do the following:
- prepare the field of activity: remove the cuticle around the nail, give it shape, polish it;
- apply a protective base to the nail;
- carefully cover each nail with varnish: multi-colored or transparent, depending on what kind of dotted nail design you have in mind;
- then onto the palette - it can be anything - drop a little suitable varnish or acrylic paint;
- dip the tool in paint;
- leave the dots on the nail at right angles, then they will not spread and will turn out smooth and beautiful;
- then apply smaller dots; you can even create flowers with dots ;
- the art is finished - apply colorless varnish to your nails;
- Don't forget to clean the dots so you can apply an interesting design again next time.
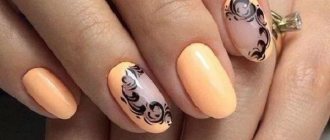
Dotsom flowers in manicure
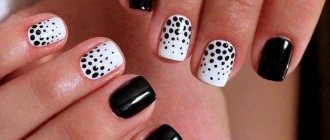
A manicure using dots can be as simple as it is original. For example, chaotically placed black dots of various sizes on a white background look attractive. Moreover, the design can be alternated, for example, white dots on a black background, gray on black, black on gray or white, and so on.
Options for black and white manicure done with dots
White dots on a French manicure look very gentle; this manicure is suitable for a wedding. Wedding dots drawings, photos of which you can always find on the Internet, look very gentle and romantic. Dots can be used to apply not only dots, but also various plant patterns; this will come with experience.
Dots wedding manicure options
On the Internet you can find diagrams by which the drawing is reproduced using access. Photos are posted by both masters and lovers of bright manicures, there are a lot of positive reviews of dotse and recommendations for its use and even in pedicures.
The photo shows a pedicure using dots.
Some craftsmen even offer options on how you can make dots with your own hands, using a match, cotton swabs, a hairpin, a pencil and even a nail from a comb.
On forums, girls discuss the technique of applying nail polish with dots, give their own examples and nail designs, and exchange useful information about the quality of the offered dots.
What can replace dots?
If necessary, an alternative to dotsu can be any items that come to hand. The only selection criterion should be a ball, thanks to which the resemblance to a nail design tool will be identified.
Dots duplicates can be:
- hairpin with teeth-droplets;
- ampoule for pens without ink;
- invisible with spherical tips;
- bead or seed beads strung on a pushpin with a plastic handle.
Perhaps homemade dots will not be able to create the same designs as professional ones, but in their absence they will become excellent substitutes for nail art at home. After all, in fact, to draw points and curves, you only need the presence of a ball, and the presence of a pen is designed only for comfortable work.
Any available objects that have a spherical shape can duplicate the capabilities of the dots.
Dots manicure ideas
In this part of the material we will look at manicure and dots nail design in photos and videos step by step. Preparation of nails for design is standard. It is necessary to perform a manicure, cover the nails with a transparent protective base for varnish and a colored background varnish. The background can be different - French or lunar manicure, one tone, gradient, etc. And after applying the design, the plate will need to be coated with a fixative to impart a mirror shine and stability.
[yandex3] [google3]
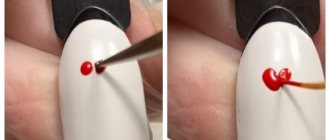
Before making a drawing, mentally break its creation into several stages. This will greatly simplify the work. For example, a manicure with flowers looks interesting, in which a dark core is first applied, and then petals of the same color. After this layer has dried, a dot of a slightly smaller diameter of a different, bright shade is applied to the petals. This way you get interesting petals with edging.
Dots designs on nails as complex as those shown in the video are done step by step, carefully following the pattern. Even the simplest option for beginners, “Confetti,” which is simply a collection of colored dots overlapping each other, must be done in stages and in layers. This way he will be more careful.
Dots drawings
At first glance, a simple tool for nail design, in fact, has quite good abilities.
Dots is not as simple as it might seem at first glance, and dots are not the only pattern it is capable of.
You can create several variations of drawings with Dots:
- Dots. A strip of dots decreasing in size is not the only option available to dotsu. Small dots can create an ombre effect on your nails when using two shades. An oriental pattern with dots in several bright shades or an imitation of Turkish cucumbers in one color look very colorful on the nails. Using dots on your nails, you can paint a dotted canvas or create a confetti effect.
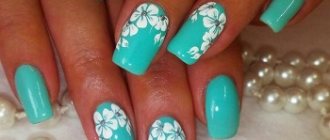
- Flower theme. Chamomile petals are the “horse” of dots. They can be of any size and color, and can be drawn individually or cover the entire surface of the nail. Also, the depiction of flowers in the style of ceramic painting with a smooth transition of line thickness is quite accessible to dotsu.
- Animals. The convex image of the eyes, ears and paws of animals is subject only to dotsu, so this nail tool is used even when almost the entire drawing is ready.
- "Ladybug". The circles on the wings of this insect are just begging to be painted on the nails with dots.
What is dots
Dots for nail design (how to use is described below), or dotter, is a tool for creating designs on nails. It looks like a pen with a small metal ball at the end.
Most often, dots are made double-sided, with two balls of different diameters at different ends.
What is it needed for
Initially, dots were created to make polka dot manicures. This is evident from the name. After all, “dot” translated from English means “point”. In addition to points, they are comfortable drawing straight and curved lines, making contours and painting the space inside them.
Dots are easy to use to create military or leopard print nail designs. With proper skill, they can be used to paint openwork lace and other complex patterns on nails.
Types of instruments
The only significant characteristic of the dots is the diameter of the ball-tip. The size of the picture depends on it.
All dotters are divided into three groups:
- With a small ball. It will allow you to draw thin lines, draw an outline or put a small dot.
- With a medium ball. It is used for drawing various details of the picture: the centers of flowers, curls, small dots.
- With a big ball. This tool is useful for filling an outline with color or for drawing a large pea.
It is better for a beginner to start with two dotters: large and medium. Most often, dots are made double-sided. Therefore, it will be enough to purchase only one tool, choosing the most suitable tip diameters.
Rating of the best
Dotter is a very simple tool. Therefore, the brand does not play any role. A tool ordered through a well-known Chinese resource will work the same as one purchased from a specialized nail art store.
Below is a rating of seven reliable dots sellers on a well-known purchasing resource:
- Shop3187002 Store.
- Makeup Store.
- Stylish Bueaty Store.
- MintSun.
- Beautifully Store.
- Born Pretty Co.,Ltd.
- BeautyLadyNailArt Store.
For those who are just starting to paint on their nails, one double-sided dot with balls of different sizes will be enough.
Those who want to achieve perfection in nail art will need a set of several tools. As a rule, the set includes 5 dotters with different tips: from smallest to largest. A variety of sizes will allow you to bring to life the most intricate patterns.
Don't miss the most popular article in the section: How to draw monograms on nails step by step for beginners. Instructions with photos.
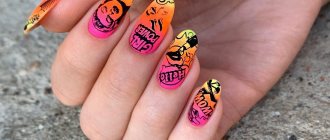
Bright manicure ideas using dots
An incredibly bright manicure can be achieved by using paints of several rich shades at once. A peculiar scattering of confetti on the nails will be relevant during the holidays and summer.
In addition, you can draw a whole string of transverse arcs in catchy tones on a black or white background, and also imitate a French manicure using small dots in the smile area and the arc of the tip of the nail.
Dots in contrasting shades will make the manicure as attractive as possible.
Unusual ideas
Before applying the drawing, it should be divided into several stages. This step will greatly simplify the process of performing a manicure.
Flowers
The manicure, which is performed with different colors, looks quite interesting. To perform it, the nail is covered with the dark base of the flower, but the petals can be painted in any other color (the color palette depends entirely on the owner’s imagination). Next, our flowers need to be given time so that they can dry completely. Then, a smaller line is applied to the petals. The result is a flower with an interesting border.
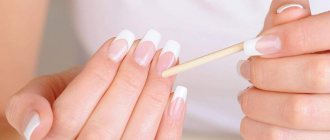
French
This style will probably never go out of fashion, because... A large number of girls love him. Of course, a French manicure can be supplemented with various designs, rhinestones or stickers, but a French manicure remains a French manicure. The nails are decorated with a line made in the shape of a smile, which is drawn in a classic white color, while the rest of the nail is covered with transparent varnish.
If you don’t have stickers used to create a manicure, you can replace them with dots. In order to complete the line you just need to pick up the ball.
In addition, the tips of the nails can be decorated with bright varnish and dots. For example, a manicure looks very beautiful, in which the base is covered with a pale pink tint, and the stripe is drawn in white. Several dots (of any color) are applied to this strip, which become the main decoration of the nails.
In addition, to decorate your nails you can use various rhinestones and sparkles, which are placed on the nail plate, again using dots. By improving your skills, you can create a wide variety of drawings - from the simplest to the most complex.
To do a manicure, you don’t have to graduate from art school. It is quite enough to use a dots, which will help you perform an unusual and quite fashionable type of manicure. In addition, using this device you can apply various rhinestones to a wet layer of varnish. Experiment, and then your manicure will definitely attract the attention of enthusiastic guys.
Drawings on nails with dots at home
Many girls and women can do a monochrome manicure at home, but drawing a picture will require some skill.
Any fashionable new items in nail design are mastered by smart girls without fail.
The simplest nail art can be done using dots in the form of dotted patterns, which are not particularly complex, but will still help diversify a simple manicure.
How to use Dots?
Even a child can master the technique of drawing with dots.
But, first, it is advisable to practice on one of the volunteers or on plastic tips in order to “fill up” your hand .
Decide how it is more convenient for you to hold the handle of the tool; the brush should not be tense. Then dip the tip of the dot into the varnish and simply place dots.
When you learn to control their size and they turn out clear and neat, then you can begin to implement your manicure ideas. At the same time, do not forget about the sequence that should be followed:
- First of all, prepare your nails: adjust the shape, polish, remove or push back the cuticle.
- Apply a base that will protect the nail plate from pigmentation and extend the life of the manicure.
- Cover your nails with colored or clear polish and wait until it dries completely.
- Take a palette (you can use anything for this purpose - even a tea saucer), drop a little varnish on it or dilute acrylic paint to the desired consistency.
- Dip the tip of the dot into varnish/paint. Try to coat the “ball” with varnish evenly.
- Place the main points that will serve as the “framework” for your drawing. Hold the tool at a right angle to the nail plate, then the dots will be smooth and beautiful.
- Make sure that the paint on the palette does not dry out and renew it on time.
- Add the remaining "secondary" dots to complete the design. As a rule, these points are smaller in diameter.
- When the drawing is ready, wait until it dries and cover your nails with colorless varnish.
- Get the tool in order - remove any remaining paint from its surface using a cotton pad and nail polish remover.
- Enjoy your new manicure!