Do you admire when women's manicures are made with different designs? What if we tell you how to create nail designs yourself, even if you are new to manicure. Simple designs on nails with gel polish for beginners to make money at home
Do you admire when women's manicures are made with different designs? What if we tell you how to design your own nails. Yes, first you will have to figure out the easy options. But remember that they look no less impressive than complex patterns. Today on Manicurchik.ru you will learn how to make simple drawings with gel polish that even beginners can easily do. Each of them will be supplemented with a list of necessary tools and materials, as well as instructions for implementation.
What you need for drawings
Before painting on your nails, you should acquire special equipment, tools, and materials.
List of necessary materials for any design:
- Everything for gel polish: primer, base, top.
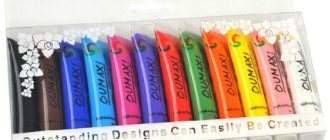
- Colored gel polish: You may need several colors.
- Lamp for drying the coating.
- Brushes, dots and other tools.
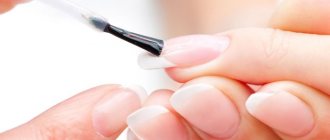
Before you draw a pattern, you should do a manicure. Then the nail is treated with a primer, a base and the main color gel polish are applied. Each stage, except for applying the primer, is dried in a lamp. Then you should choose the simple design you need. After applying it, the layer is dried and the top is applied. It should also be polymerized in a lamp.
on this topic:
How to apply gel polish at home: step by step (PHOTO)
What is the difference between gel and regular polish?
Nail gels vary in purpose. Among them are means for lengthening the nail plate, as well as strengthening biogels that help prevent delamination. The purpose of gel polish is similar to ordinary nail polish - it is used to decorate nails.
The main differences between gel and simple varnish can be seen in the table:
| Distinctive features | Gel polish | Regular varnish |
| Application | Preliminary preparation of the nail plate is required (filing, degreasing, applying a base). | Before you start, just degrease your nails. |
| Drying | Dries only under a special lamp for 2-3 minutes. | Air dries in 5-10 minutes. |
| Wearing period | The manicure remains beautiful for about 3 weeks. | Nails look untidy after 2-4 days. |
| Removal | Dissolves with a special liquid in 15 minutes. | Easily wiped off with a cotton pad soaked in nail polish remover. |
Another distinguishing feature between gel and regular varnish is cost. Gel polish is more expensive. And since the application procedure requires certain skills, they also pay separately for the services of the master.
Points
The simplest patterns are dots, peas and circles. They can cover the entire nail or create a simple pattern.
What additionally you will need:
- dots or needle;
- gel polishes.
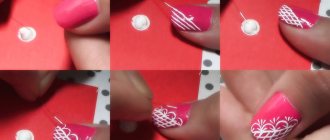
A minimalist pattern with a dot looks great. For this design, it is enough to place 1 dot on the nail, preferably at the base. The most convenient way to do this is with a dots, or a needle. The technique of working with dots is very simple.
Manicure step by step with simple dot designs
- Drop a little gel polish onto a jar or surface.
- Dip the tool into the drop and transfer the dot to the nail.
- Another option is to make a pattern of dots.
- Using the same principle, dots are applied all over the nail or in the form of any pattern.
also interesting:
What is a rubber base? How to apply rubber base
Delicate manicure: fashionable design ideas (photos)
Manicure SUMMER 2021: fashionable nail design (PHOTO)
Red manicure: 50 fashionable ideas (PHOTO)
Video “Simple drawings for beginners: painting with dots”
Dots drawing
Dots are used as the main design tool, creating drawings using the dot technique - these are beautiful patterns of dots of different colors and sizes.
Basic dot design options:
- semicircular dotted lines of different colors located in the area of the nail hole;
- lines of rays from points diverging from the center;
- polka dots in a checkerboard pattern;
- multi-colored polka dots of different shades and sizes, arranged in random order.
In addition, with dots you can draw patterns reminiscent of lace , which look especially beautiful in black and white, or make smaller dots on the dots with gel polish of a contrasting color.
- Several varnishes are poured onto the palette. It is convenient to use a palette with indentations so that the dot ball is completely immersed in the paint.
- Having collected the paint, put dots on the nail. The first dot may turn out larger than subsequent ones due to the large amount of paint on the dot.
- Experts advise drying the drawing in a lamp several times during the drawing process.
Stripes
If you are new to manicure, drawing from stripes can be done easily and simply. At the same time, there are many variations of designs with stripes that every girl will like. Using stripes you can create a checkered pattern.
What additionally you will need:
- fine brush: number 0, 00 or 000;
- gel polishes;
- adhesive tape: the required width (optional).
A pattern with parallel stripes can be drawn freehand with a brush. To make the drawing more colorful, alternate matching colors, and also make lines of different thicknesses. If you cannot accurately draw an even line, then resort to using adhesive tape.
To do this, after applying the main background color, remove the stickiness from the gel polish with alcohol or a degreaser. Apply the tape and apply gel polish over it. Then dry the drawing and remove the tape. This can be repeated step by step many times.
Simple designs on nails with gel polish for beginners
Simple designs on nails with gel polish for beginners
Simple designs on nails with gel polish for beginners
Video "Stripes"
Original ideas for nail designs
Here are a few examples of current drawings made with gel polish, which can become the basis for your training.
Mixing shades
This design can be made by any novice craftswoman.
Manicure made with mixing gel polishes
- Prepare your nails according to the basic rules of manicure and apply the first layer of the main shade.
- Dry the surface under a lamp or in a chamber. If you need to make the shade brighter, repeat the procedure.
- Choose a second color. Apply it not to the entire plate, but, for example, only to the right side, filling part of the nail.
- Dry the gel polish. If you want to brighten the color, apply a second coat. At this time, you can make an original monogram using the wet gel using a brush or dots and adding additional color as desired.
- Finally, apply glass beads in any shape. Dry the coating and secure with a base coat.
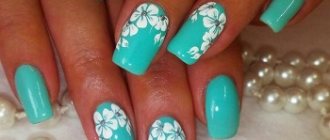
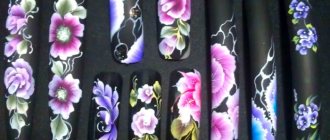
Volumetric drawing in the form of flowers
The initial stages of a gel polish manicure are similar to the classic options.
Volume manicure
- After applying the main color, we begin to create a 3D design using acrylic powder, which is sold in specialized departments. Choose several shades to make the flowers bright.
- Using a thin brush, pick up a small ball of powder and gently place it on the nail plate.
- Wait until the gloss turns into a matte state. Start using your brush to form the petals of the flower. The shape of the petals can be round, elongated, with a torn edge. It depends on the flower: chamomile, lily, cornflower.
- Carefully continue to form the flower in a circle. To begin with, you can apply only one volumetric design in the center of the plate.
A voluminous manicure with flowers can be done without sculpting using velvet sand:
Classic jacket with monograms
Manicure with monograms
- We perform French manicure according to the standard scheme, choosing a white color or a bright shade as a base.
- Before the base coat, apply gel polish of a contrasting shade, for example, white on a transparent base, and draw a jacket in any shape: a classic crescent or original curls or dots. This design can be done on all nails or selectively.
There are many methods for nail design using gel polish. Fashion changes and offers new options. By learning simple drawings, you can diversify your manicure. Gel polish will strengthen the plate, and the manicure will last a long time.
More interesting articles:
Patterns
A pattern with simple patterns of elongated dots can be either an everyday option or an evening one.
Monograms on nails: beautiful patterns step by step
What additionally you will need:
- dots;
- needle;
- gel polishes.
Several dots are applied in a row onto the main color of the gel polish. This should be done using dots. You can put dots of different colors, and also add a small dot of a different shade to one large dot. Then draw a continuous line with a needle through all the points. This creates a beautiful elongated pattern.
Video “Simple Dots Patterns”
Simple and beautiful nail design with gel polish for beginners
Nail design for beginners should be easy to do. You can learn to create simple drawings, which are the basis for creating more complex patterns. Below are descriptions of the most popular nail design options.
Dot patterns
The dots can cover the entire surface of the nail or form a specific pattern.
Patterns are applied using dots onto a dried base or onto a colored layer:
- Select a suitable shade of varnish for the dots to match the main color of the nail.
- The instrument is placed into the open bottle after pre-treating it with a degreaser.
- To get a big point. You need to submerge the entire tip in the gel. To create a fine dot, just touch the varnish with a ball on the end.
- The dots are pressed against the nail for 1-2 seconds, the varnish flows off, forming a perfectly round spot.
- The pattern is dried in a lamp for 1-2 minutes.
To set even points. You need to practice on plastic tips or training cards.
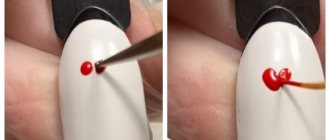
Hearts using a toothpick
You can draw mini hearts on your nails without using brushes:
- Using a dot, place 2 drops of gel on the dried base, placing them at the same level, close to each other.
- Use a toothpick to carefully connect the drops in the middle, leaving two round tops.
- Towards the bottom of the drop you need to stretch it a little to get the end of the heart.
The drawing needs to be dried in a lamp and secured with a topcoat.
Drawings using stencils
Using stamping is considered one of the simplest design options:
- Select a pattern from a plate with drawings and fill it with gel polish.
- Using a plastic spatula, remove excess from the plate.
- The silicone stamp is pressed tightly against the design, and then the design is transferred to the nail.
- Dry the layer in a lamp.
It is important to work with the stamp carefully, preventing it from slipping either from the plate or from the nail. Otherwise the drawing will be smudged.
Abstraction
The most popular type of abstraction on nails is brush strokes:
- On the dried base you need to apply small strokes in different directions using a flat brush.
- If you are planning a pattern of several colors. Then the strokes of each color are dried separately.
Abstraction can be done using foil, stamping and self-adhesive strips.
Stickers
To transfer a design to a nail, you need:
- Apply base and main color.
- Peel off the film protecting the sticky layer from the sticker.
- Place the slider in the desired part of the nail and press gently.
- Place some water on the sticker and press it down gently.
- Remove the slider after 1 minute.
- Secure the design with a finishing coat and dry it.
There are non-transferable sliders. They are simply placed on the plate and secured with topcoat.
Nail art geometry using tape
Geometric patterns are easy to create using tape:
- The adhesive tape is cut into strips or other shapes.
- Glue pieces of tape onto the dried 1st layer and cover the nail with varnish.
- Remove the tape with tweezers and dry the coating in a lamp.
If the varnish applied over the tape is liquid, then it is recommended to dry the nail for 15 seconds and remove the tape.
Broken glass
This effect is achieved using foil:
- The material is cut into small pieces.
- “Glass” is laid out on the dried base.
- Cover the plate with a finishing coating.
They sell pre-cut pieces to create this effect.
Painting Watermelon with a brush
This summer manicure is very easy to do:
- Red is chosen as the main color. The layer is dried.
- The French is painted in green and dried again.
- The border between red and green is emphasized with a thin white line.
- Black gel is used to add dots that imitate seeds.
- Dry the layer and secure the design with a top coat.
You can use only green color in 2 shades and draw stripes, like on the rind of a watermelon.
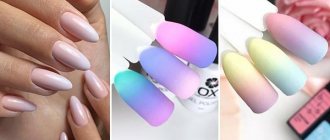
Gradient
The gradient can be made using a foam sponge:
- A light gel polish is applied and dried as a base.
- Apply 2 colors of gel to the sponge.
- Using wetting movements, the colors are transferred to the nails.
- The colored layer is dried and then the base is applied.
It is important to choose matching colors.
Lunar manicure
This effect is very simple. On the main color, using a brush, draw an even hole near the cuticle. You can use different colors, the main thing is that they match.
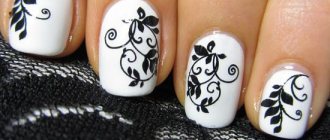
Monograms
This is what we call ornate patterns. They are applied using thin brushes. Before creating such a design, you need to practice using stencils.
French
French is called French manicure. It will be difficult for beginners to draw it smoothly, so it is worth purchasing special templates. French can be not only white, but also colored, shiny or black.
Flowers
To draw a simple flower, you will need dots and gel polish in 2 colors:
- Dots apply a central drop onto a dry base. This will be the middle of the flower.
- After cleaning the instrument, dip it in a different color and place several drops around the first at the same distance.
The flower petals can be left round or stretched to the sides with a needle.
Flowers
Drawing beautiful flowers on your nails is quite easy. They can be built based on dots and patterns.
What you need:
- gel polishes;
- dots;
- needle.
You should start drawing flowers with the petals. To do this, rather large dots are placed in a circle. They will form the basis of future flowers. Afterwards, from each point you should draw a strip with a needle to the center. Do this for each point. Then, from each point, draw the needle outward from the flower to pull out the petals. Next, the drawing is dried in a lamp. After polymerization, do not forget to place a dot in the center to imitate the middle of the flower.
Video “Simple flowers for beginners”
How to draw flowers
A simple translucent flower.
To make a flower you need a thin brush, dots, as well as a base, top, gel polish for the background and multi-colored varnishes to complete the design. The drawing is created according to the instructions below, using plum, black, pink gel polishes.
- On the base, dark plum is combined with a drop of top coat to make the final color translucent.
- The base tone – pink – is applied in two layers and dried.
- With a brush, the petals are drawn with a diluted plum topcoat: the first one is drawn out completely and dried, and the rest, on the sides, are placed as if they were behind the first one, then dried.
- Saturated plum is used to outline the outline with barely noticeable lines, barely touching the borders, and fill the intersecting areas. This technique helps make flowers airy and natural.
- To add an artistic touch, add a couple of stripes to the center of the petal and hold it in the LED lamp for a few seconds.
- At the base of the petals, a dot is drawn with black gel polish and the stem is drawn in a wave in one movement to make the design elegant.
- Intersecting lines will complement the design, but before applying other lines on top of those already applied, the first ones need to be dried so that they do not smudge.
- After drawing the stems, cover the nail with topcoat and dry for 60 seconds. Removes stickiness.
Nail designs with gel polish in this style can be complemented by unopened buds. First, a separate petal is created with a diluted top gel polish, and then the first petal is covered with the second one using an undiluted tone of varnish.
Branches with buds.
You will need gel polish for the base coat, black gel polish, and top coat. This option uses beige, black, light green, white, dark green colors.
- Beige is applied twice and each layer is dried in a lamp.
- Using a brush, draw two branches of different lengths: one from the edge of the nail and almost to the base, the other adjacent to it. Smaller ones are drawn from them and dried.
- On all branches, buds are painted with light green gel polish. They should be distributed evenly over the nail and dried.
- Next, the edges are drawn with a dark green color: for those larger buds, on both sides, for those that are smaller, it is enough to line one side and dry.
- Use black to connect the bud with the branches, darken the base of the bud, and dry it.
- The tip of the bud is marked with white and the design is dried in a lamp.
The design is covered with topcoat and placed in a lamp for 60 seconds. Removes stickiness.
Stencil rose.
To create a stencil rose you will need any light gel polish and a thin brush.
- The nail is coated with the base tone twice. Each layer is polymerized in a lamp. Then they are coated with a fixative.
- Roses are painted with a black gel paint brush. They start drawing the design from the center, making a half ring. Then it is surrounded by petals, making each new petal larger than the previous one.
- Another rose is drawn just below. It is necessary to leave gaps between the details of the picture so that they do not merge. If the gel paint is liquid, you can dry the drawing in a lamp.
- Then draw leaves on the free areas.
- After drying the drawing, cover it with topcoat and remove the sticky layer.
This is the lightest rose option. If you wish, you can master other techniques, for example, rose on wet gel polish.
Glitter stretch
The most impressive design is made using shiny gel polish.
What you will need:
- gel polish with glitter;
- fan-shaped manicure brush.
First, choose where the shiny stretch will come from: from the base or edge of the nail. In this place the concentration of sparkles will be greater, and then will disappear. A strip of shiny gel polish 1-2 mm wide is applied to the selected beginning of the design. Then, using a fan brush, stretch this strip to the other side of the nail and dry the layer. Repeat these steps about 3 times. Each time, apply the strip thinner and stretch it less and less.
Video "Glitter Stretch"
Decorative patterns
How to learn to draw various decorative but simple patterns on your nails? After all, in addition to straight lines, waves and peas, you want to somehow diversify your coverage. Let's see how to implement the best ideas on your nails.
As easy as pie
Flowers can be painted using brushes of different thicknesses. They help to draw the various curved lines and texture of the petals. The core of such a flower can be decorated with rhinestones, sequins or a drop of shiny varnish. And if you outline the petals with acrylic paints, they will stand out in the overall composition. Flowers are usually located in the lower corner of the nail near the cuticle. The shape of the petals can be round or curved.
Elongated drops, wavy curves, stars, lettering nail designs, abstract patterns can be made using a needle. But you need to draw with a needle very quickly, before the varnish dries. Of course, if it's regular varnish. To begin with, you can practice on the palette.
Monograms
Monograms are royal, elegant designs that look quite aristocratic. It is simple monograms that can add status to your image. They can be painted with either a dots or a thin brush. It is better to use thick varnish, colored gel or acrylic paints as a material. The main thing in monograms is symmetry. Both sides should mirror each other.
How to learn to draw monograms on your nails:
- Cover your nails with a base coat and colored nail polish in several layers.
- Place polish/gel/paint on a brush and place a drop on the tip of the nail near the cuticle.
- Carefully stretch the monogram, drawing a smooth arc to the tip of the nail.
- Repeat a few more “branches” of the monogram.
- To add volume, you can apply a second layer of paint or gel.
The best place to place the monogram is the lower corner of the nail plate near the cuticle.
Symbolism
You can see how to draw simple drawings in the video below.
Flowers
The girls' favorite elements are floristry. It is she who sets a special mood not only for the entire manicure, but also for the image as a whole.
How to learn to draw flowers on your nails:
- Apply base and colored polish to your nails in 1-2 layers.
- While the varnish is not dry, you need to draw semi-twisted short strokes on the nail plate with a thin brush, which you need to scoop up the second shade of varnish.
- Since the wet varnish has not yet dried, the second varnish will slowly spread over the surface and create unusual patterns.
- After drying or polymerization, cover the nail design with a finishing topcoat.
Now you know how to learn how to paint on your nails. All techniques and methods are quite simple and do not require much investment of your time or money. Feel free to experiment and move from simple drawings to complex ones, constantly improving.
How can you make it easier to apply a design using stamping?
It’s easier to make any design using stamping. A large selection of patterns that can be made in a few minutes.
What additionally you will need:
- plate with a pattern;
- gel polishes;
- stamp;
- scraper.
Place a drop of gel polish near the pattern on the plate. It is stretched across the plate with a scraper. Then they lean the stamp against the pattern on the plate to transfer the gel polish. The design from the stamp is applied to the nail simply by applying it.
How to do nail art at home
To make a beautiful and durable manicure yourself, you need to stock up on the necessary tools and carefully study the instructions for its implementation.
Required materials and tools
To make nail art, you need to prepare the following:
- degreaser;
- file;
- bond – composition for drying the plate;
- primer - a composition that ensures good adhesion of the varnish to the nail plate;
- transparent base;
- colored shellac;
- finishing coating;
- special lamp - this device is used to fix the layers.
Application technology and step-by-step execution
To perform a beautiful and neat manicure, you should follow a special sequence of actions:
- First you need to do a manicure. To do this, use a file to shape your nails. You also need to remove the cuticle. To better bond the polish to the nail plate, you should file its surface - this will help make it rougher.
- After this, you need to degrease the nail plate. To do this, you need to use special smooth napkins - this will help avoid the appearance of excess lint on your nails.
- Now it’s time to start applying additional products – bonder and primer. All these stages must be followed. Due to this, shellac will stick better to the nail.
- Finally, the nails need to be coated with a base. It may also include a topcoat - this product is amazingly convenient and economical.
- The gel polish itself resembles a regular nail polish. To apply it, use a regular brush. It is very important to try not to leave the boundaries of the nail plate and not affect the cuticle area.
- After applying varnish, you should not touch your nails - they should be immediately placed in a special lamp and left for about half a minute. As a rule, such devices are equipped with a timer for a couple of minutes - this is the usual period for polymerization of gel polish, but drying the base requires less time.
- Then you can apply the colored gel in 2 layers. It is recommended to do this in a thin layer. An overly thick coating will not be durable. At the same time, you shouldn’t skimp on the varnish either, otherwise you won’t be able to apply it evenly. If you make a mistake, it must be corrected immediately, because the shellac will be liquid before it enters the lamp.
- After applying the first layer, it must be fixed using an ultraviolet lamp - it is recommended to do this for 2 minutes. After applying the next layer, the varnish must be fixed again. After drying, it is not recommended to touch your nails, as they have a sticky surface. In this case, they may accidentally get lint or fingerprints on them.
To make your nail design more interesting, you can use applique. To attach a polymer clay design, you need to use a transparent base and fix the composition in the lamp.
A top coat should be applied over the varnish. Be sure to seal the end. For this purpose, you need to varnish not only the nail itself, but also the cut of the plate. Finally, you should go through the polymerization procedure again. Then you can get rid of the sticky surface using napkins, which should first be moistened in a degreaser.
Finally, you need to moisturize the cuticle with a special oil. This is not necessary, but this procedure will help make your hands more beautiful and well-groomed.
Video: DIY water manicure
To make a beautiful water manicure yourself, you need to cover your nails with a base product and dry it. Then treat your nails with white gel polish in two layers, each of which must be dried. The cuticle needs to be treated with a special film. Then you need to drop white and black varnish into the water, make a pattern with a toothpick and lower each finger there in turn. More detailed instructions are presented in the video: