Do you want to learn how to properly extend nails, the nuances and subtleties of working with gel and acrylic using different technologies? Read step-by-step tutorials that will help you grow your own nails and give yourself a cool manicure.
In this article we will tell you:
- What is nail extension?
- What do you need for nail extensions?
- How to prepare nails for extensions?
- Types of nail extensions
- How to extend nails with gel on forms?
- How to extend nails with gel on tips?
- How to grow nails using tips?
- How to extend nails with acrylic on top forms?
- How to extend nails with acrylic?
- How long does the extension procedure take?
- Which type of extension is better?
- How much does nail extension cost?
- How long do nail extensions last?
What do you need for nail extensions?
Here is a basic list of materials and tools that will be useful for any type of extension:
- Buff;
- File for natural nails (180-240 grit);
- File for artificial nails (100-180 grit);
- Pusher;
- Brush for brushing away nail dust;
- Degreasing liquid;
- Lint-free wipes;
- Set of brushes.
To apply nail extensions you will need: a buffer, a file for natural nails, a file for artificial nails, a pusher, a brush for brushing away nail dust, a degreasing liquid, lint-free wipes, a set of brushes.
How to prepare nails for extensions?
First you need to do a hygienic manicure: remove the cuticle and clean the pterygium - a thin skin film that grows as the second layer of the cuticle.
Treat the area with remover, wait a few minutes, and carefully push back the cuticle with an orange stick or pusher.
Shorten all nails to the same length, about 2-3 mm. There is no need to shape the free edge, just slightly round it with a nail file. Then buff the entire surface of the nail, removing the gloss.
Pay special attention to the sides and the area around the cuticle. This will make the surface rougher, and the material will be able to adhere to it better.
Finally, brush off any nail dust with a brush.
What do you need
Everything you need to carry out the procedure for strengthening the nail surface can be purchased in specialized stores. Thanks to this, work can be carried out at home. To begin with, you will have to spend a large amount, but in the future it will pay off. You should buy quality products, even though they cost more. Poor quality material will only damage your nails.
Tools and materials
The first thing to prepare is the gel itself. To perform a helium manicure you need to purchase:
- sticks (metal or orange) for moving the cuticle;
- nail file, buff, polishing the nail surface, giving them the desired configuration;
- cuticle remover for unedged manicure;
- nippers intended for trimming manicure;
- primers that remove excess moisture - acid-free or acidic for normal or wet nails, respectively;
- synthetic brush for applying polymer;
- ultraviolet lamp for drying the material;
- cleaners that degrease the nail surface and remove the sticky layer;
- products for nail decoration (varnishes, rhinestones, sparkles);
- cotton pads, lint-free wipes.
Acrylic powder: types and techniques of application
Before purchasing materials and tools, you need to make sure the quality of the product. It is recommended to purchase products from trusted brands, based on user reviews.
Gel selection
When applying the polymer, three layers are formed: base, modeling, finishing. Each of them has its own functions. The base is the base on which subsequent layers are applied. Modeling – forms the nail plate, is responsible for the strength of the material. Finish – designed to protect against negative external factors. Therefore, special attention must be paid to the choice of material.
Getting beautiful, healthy nails largely depends on the quality of the material. There are several types of gels:
- single-phase;
- two-phase;
- three-phase;
- biogels.
The “phase” of the base indicates the number of polymer layers formed.
Single-phase gels
It is better to use a single-phase product for beginners who are practicing helium treatment on their own for the first time. It is a mixture that includes all three polymer layers. The liquid consistency makes it easier to distribute the substance over the nail plate. In addition, the load on the natural nail is not so significant, since the single-phase layer is thin. Due to its low density, the nail plate “breathes” and does not dry out. The advantages of the system include saving money and time.
But the single-phase product has its drawbacks. Low viscosity makes it difficult to form the apex (the point where the greatest thickness of the plate is concentrated). A single-phase product does not have a protective layer, so the service life of such nails is shorter. A single-phase polymer is not suitable for those who want to decorate the nail surface with three-dimensional figures or stickers, since it does not contain a sticky layer.
If there is an urgent need to attend a festive event and you need to quickly get a beautiful manicure, a single-phase option will be a good solution in this situation. Otherwise, it is better to use another material.
Biphasic gels
The two-phase polymer option includes 2 products. The first contains the base layer, and the second jar contains the modeling layer. The structure of this layer is more viscous than in a single-phase system, so it is easier to model the shape of the plate. The application of each layer is alternated with drying.
Nail baths for growth and strengthening, with salt, iodine and other recipes
The disadvantage of this system is that the protective coating is a gel that is not intended for this purpose.
Three-phase gels
The most suitable for treating nails is a three-phase system. The set consists of a base product, a structural layer and a protective coating.
In this case, the modeling substance may have a different composition:
- imitating the surface of natural nails;
- colorless;
- pigmentary.
Each of the polymer layers performs its own function. The task of the base coating is to ensure reliable adhesion of the horn plate to the gel. The thick consistency of the material allows you to give the plates different shapes. The top protects against chips and damage and ensures the safety of the material.
Although the three-phase product takes longer to apply, it has many advantages:
- adhesion between the material and the nail surface is much stronger;
- the thickness at the end of the plate can prevent breakage;
- the coating lasts a long time;
- It is possible to decorate the horny surface with any design.
The procedure is labor-intensive and requires a large investment of material resources, but the quality of the coating is much higher than when using a one- and two-phase system.
Biogel
Biogel is often used to strengthen nails. This is a polymer that contains rubber resin. Very often it is used to improve the health of nail plates damaged after poor-quality extensions.
The material is very elastic, so it is not used to lengthen the plate. With its help, you can only extend the corners to give shape or restore the plate.
The advantages of this tool include:
- environmental safety;
- no allergic reaction;
- natural looking nails;
- protection of nails from damage;
- strength and durability;
- does not require filing of the nail plate.
Biogel is an excellent option for women with a thin horny plate. It will help heal the nails, strengthen them, and give them rigidity. Biogel can be coated with any varnish.
How to extend nails with gel on forms?
You will need:
- UV or LED lamp;
- Gel for extensions - transparent and camouflage;
- Primer;
- Base;
- Liquid for removing the sticky layer;
- Flat brush with hard bristles;
- Forms – metal or paper;
- Reverse tweezers or special clamp.
To apply gel nail extensions to forms you will need: UV or LED lamp, extension gel (transparent and camouflage), primer, base, adhesive remover, flat brush with hard bristles, forms (metal or paper), reverse tweezers or special clamps.
The essence of the method: a form is placed under the edge of the natural nail, onto which the gel is laid out, forming the tip of the nail of the required length.
Forms for extensions come in two types: disposable and reusable.
The first ones are good because they are inexpensive and easily take the desired shape even when applied to non-standard nails. This option is just for beginners.
Reusable forms are usually made of metal. They are more expensive, but more durable.
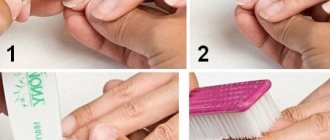
Step-by-step instructions on how to extend nails with gel:
- Apply acid primer to the prepared nail plate using rubbing movements. Give it about a minute to absorb. The primer will lift the nail scales and remove excess moisture from the surface.
- Apply a thin layer of base and dry in a lamp.
- Now you need to install the extension form. Do this closely so that there are no gaps between the form and the nail. The free edge should be located above the form. The direction of the shape should continue the direction of the nail and run parallel to it, not at an angle.
- Place a small ball of gel on your brush and place it in the center, on the border between the free edge and the form. Pull the gel to both corners of the nail. It is important that they are immersed in the gel, otherwise the extended nail will quickly break, unable to withstand the load. At this stage, you can outline the shape of the future nail. Send your hand into the lamp.
- After 30-60 seconds (depending on the power of your lamp), remove your hand. An under-dried nail should be pressed from the edges with tweezers or a clamp. This is done to give the nail an arched shape - this extension looks more natural. Now you can send your nails to dry.
- Apply a second layer of gel, thicker. The bulk of the material should fall on the stress zone - the border between the natural and artificial nail. Try to do everything carefully so that you don’t have to spend a lot of time filing.
- Dry the layer in a lamp.
- Now you can remove the forms. File the edge of the extended nails, giving them the desired shape. You can also run a nail file over the entire surface of the nail, smoothing out any unevenness. It is important here not to overdo it and not to saw through the material.
- Wipe off dust from your nails and degrease them.
- Now it's the turn of the leveling layer. You will need a camouflage gel of medium viscosity. Place a drop of gel on the brush and place it in the center, near the cuticle. Then stretch the gel over the entire surface of the nail, trying to create as smooth a surface as possible. At the end, turn your finger over for 10-20 seconds, and you can dry it in a lamp.
- You can leave your nails as is or apply colored gel polish.
- Complete the extension with a layer of top coat, which also needs to dry. Remove the sticky layer.
Do you want to watch a video about how to grow your nails?
Extension options
There are two ways to do nail extensions
Tips - similar to artificial plastic nails. They are glued to the surface of your nail using a special glue, and then its shape is adjusted depending on your preference.
On forms - Thanks to such forms, the master models the nail directly on them, and then, when the gel has cooled under the lamp, removes them and files them.
How to extend nails with gel on tips?
Extension tips are special polymer plates that are attached to the native nail and form an ideal coating.
What you will need to apply gel extensions to tips:
- Set of tips;
- Tip cutter;
- UV/LED lamp;
- Glue for tips;
- Primer;
- Base;
- Acrylic Powder;
- Gel for extensions.
To apply gel extensions to tips you will need: a set of tips, a tip cutter, a UV or LED lamp, glue for tips, primer, base, acrylic powder, extension gel.
How to grow nails using tips?
1. Choose a suitable tip for each finger. The artificial nail should be so wide that it completely covers the natural one and is like a continuation of it on both sides. If you cannot find a suitable tip, simply file it to the desired size.
2. Degrease prepared nails and apply primer to them. Apply a little glue to the contact area (small notch at the end) of the tip.
3. Distribute the primer and press the tip onto the nail, starting from the tip. The pressing force should be directed downwards. Make sure that there are no air bubbles left under the surface of the tip, otherwise the extended nail will not last long. Let the glue dry for 30-60 seconds.
4. Shorten your nails to the desired length using a nail cutter. Now you need to file down the surface of the tip to even out the border between natural and artificial nails. When you run your finger, you should feel a smooth surface without “steps”.
5. Give the desired shape with a file and degrease the nails.
6. Apply a thin layer of base and dry in a lamp.
7. Then reapply the base coat and dust each nail with acrylic powder, shaking off any excess. Leave to dry.
8. Brush off excess acrylic powder from dry nails with a wide brush or brush.
9. Cover your nails again with a thin layer of base and dry them.
10. Take a small amount of gel onto the brush and start applying it to the nail from the cuticle area, moving towards the free edge.
11. Place in a lamp, then remove the sticky layer.
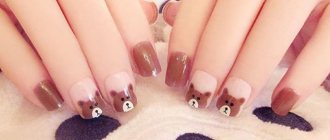
12. Create a design on your nails to suit your taste or simply cover them with a layer of colored gel polish. The last layer to be applied is the top coat. Remove the sticky layer and the manicure is ready.
Acrigel
Nail extension with tips
Acrigel (combigel, acrylic, polygel) - all these names belong to a universal material created on the basis of acrylic and gel. The material has absorbed their best qualities: gel plasticity and acrylic strength, and even surpassed them.
Extended nails are distinguished by their elegance, natural appearance, and effectiveness, on par with a professional salon manicure. The procedure allows you to quickly increase length. At the same time, the coating is very durable. The best polygel manufacturers are Irisk Professional, Bluesky Pudding Gel, Tnl Professional, Soline Charm.
Acrigel
Benefits of acrygel for nail extensions:
- The elasticity is superior to hard gels, the strength and lightness are higher than that of arkyl. There is no effect of squeezing the nail plate. Despite the high degree of density, the material is not felt on the nails and does not weigh them down, so it can be used on weakened nail plates.
- The dense and viscous consistency of the material allows you to give surfaces the correct architecture and ideal shape, thereby reducing material waste and saving time on the filing process.
- Acrylic causes 50% less burning when polymerized in a UV lamp, even when modeling very long and dense nails. There are no harmful fumes.
- Acrygel does not spread, so there is no risk of accidental contact with skin. This sets it apart from regular gel.
- The dust created when filing acrylic materials is 30% heavier than regular gel or acrylic. When working, it does not fly apart, but settles on the skin and table. This property reduces the risk of contact and respiratory allergies of the nail artist and the client.
- Unlike acrylic, acrylic does not require the artist to follow strict proportions of combining powder with monomer.
- Excellent adhesion of acrylic with primer and base, as well as any type of varnish, allows you to avoid peeling.
- Acryl Gel can only harden under a lamp. Therefore, you should not be afraid of sunlight hitting an open jar of acrylic. This is its advantage over acrylic.
- Combigel is very economical. One layer of material allows you to obtain a uniform and dense coating. There is no need to purchase separate brushes. Those used in working with gel and acrylic are suitable. The absence of an unpleasant odor allows the master to do without a separate office.
Note! The correct shape is created both by directly applying the material to the nail plate and by using accessories: regular or liquid tips, reusable forms. Combigel lasts until correction is required due to overgrown natural nails.
How to extend nails with acrylic on top forms?
Acrylic has several advantages over gel.
Firstly, you don’t need a special lamp to polymerize acrylic: it hardens in air.
Secondly, it is much stronger than gel. The disadvantage is an unpleasant pungent odor.
Acrylic extensions can also be done on lower forms or tips, similar to gel extensions. But, since these methods have already been described above, let’s consider extensions using upper forms.
What is it: the top forms are very similar in appearance to tips. The only difference is that they do not have a recess for gluing at the tip, and they have small “antennae” on the sides.
The technology is as follows: a small amount of material is placed inside the mold and leveled with a brush. This design is then applied to the nail.
After the acrylic hardens, the mold is removed and can be reused. The result is an extended nail with a perfectly smooth surface. This technique is quite simple, and even a beginner can handle it.
What is required for nail extensions on the upper forms?
- Acrylic Powder;
- Monomer (liquid) is a special liquid that starts the hardening process at the moment of mixing with acrylic powder;
- Primer;
- Brush;
- Set of top forms for extensions.
To apply nail extensions on top forms you will need: acrylic powder, monomer, primer, brush, a set of top forms for extensions.
Basic rules for extensions
Image from Pixabay
Acrylic, tips and gel negatively affect the client’s natural nails, so experts do not recommend doing extensions regularly. However, there are ways to help keep your nails healthy and strong while remaining beautiful and attractive. The main thing is to follow the generally accepted rules for manicure:
- before extensions, be sure to remove the cuticle;
- one day before the procedure, do not use cosmetics on your hands (otherwise the materials will lie unevenly or “air cushions” will form);
- exclude for manicure the day before menstruation and the entire time during menstruation (these days a woman’s body is especially vulnerable, it may not accept extension materials);
- If you have a fungus and are treated with antibiotics, do not do a manicure (first you need to completely cure the disease, and then put your nails in order).
During pregnancy, doctors also recommend against such a procedure. This can cause problems not only for the expectant mother, but also traumatize her baby.
How to extend nails with acrylic?
- Choose proportionate shapes for each finger. The shape should be slightly larger than a natural nail and touch the side ridges on both sides.
- Degrease prepared nails and apply primer to them. Pour monomer into a glass and open a jar of acrylic powder.
- Take a brush, dip it in the monomer and press it lightly against the side of the glass, giving the tip a flattened shape.
- Dip the bottom of the brush into the powder, wait a couple of seconds and remove it, tapping the handle lightly to shake off excess material. You will see that a ball of acrylic has formed on the brush.
- Transfer the acrylic ball into the mold and smooth the surface well with a brush, thickening the layer towards the free edge area. Immediately set the required length. Do not forget to wet the brush in monomer and periodically wipe it on a napkin, otherwise the acrylic will stick to the hairs. If necessary, add more material to the mold.
- Take a small ball of acrylic and spread it over the nail plate with rubbing movements. Meanwhile, the layer in the mold has already dried slightly. Place another small lump of acrylic on top of it on the area that will be in contact with the nail and rub it into a thin layer.
- Place the shape on your nail, starting at the cuticle area, then press down the rest of the way. Hold the form in this position for 10–15 seconds. Then turn your finger over and use a pusher to remove any bumps and excess acrylic that have come out under the nail. Complete polymerization will occur in 1–2 minutes.
- Remove the form, file any irregularities that might remain on the free edge.
Do the same manipulations on the remaining nails.
What to combine fiberglass with?
Fiberglass can be safely combined with any nail plate design products. Porous fibers are well impregnated, and when polymerized they form a perfectly smooth fabric.
- Fiberglass + classic varnishes or weekly gel varnishes Usually these materials are combined when the plate needs to be strengthened or repaired before coating, to be sure that the nail will be safe and sound.
- Fiberglass + gel polish or shellac Gel polishes with fiberglass are used when nails are fragile and thin. Since both materials are durable and flexible, the manicure is durable but light.
- Fiberglass + biogel This combination is suitable for clients with health restrictions (allergies, bronchial asthma). Using biogel with fiberglass overlay, you can level the surface of the nail and strengthen it. As a result, you get more well-groomed, healthy nails, and their growth also improves.
Fiberglass in general allows you to reduce the costs of the master, but to work with it you need to purchase certain tools and accessories. However, if you have been interested in the field of nail art for a long time, most likely you already have much of the list of materials.
Which type of extension is better?
It is impossible to say in advance which type of extension is right for you. The best option is to try working with both gel and acrylic using different techniques and decide which is closer to your liking.
Is it really possible to learn how to do nail extensions on your own or do you still need to take a course?
Many self-taught people often spoil their nails out of ignorance. The courses will tell you what is not on the Internet. Also, the need for training depends on the technology in which you plan to work. For example, salon modeling is easier and quite realistic to master on your own. But you can learn arch technique only in courses.
As part of the course, you will receive a large amount of theoretical knowledge about extensions. You can also practice under the guidance of an experienced master who will point out all the mistakes.
An important detail: after completing the training, a certificate is issued confirming successful completion of the program.
It will come in handy if you decide to make manicure your profession. Most clients trust their hands only to certified craftsmen.
Nail care at home and in the salon
Healthy nails look great even without an elaborate design. The use of various decorative means for decoration often leads to a deterioration of their condition, so taking care of the nail plates should become a regular habit. Home care is based on several rules:
- High-quality manicure tools are the main condition for healthy nails. For natural nail plates, glass, ceramic, and crystal files are the safest. They need to be filed in one direction.
- Care products should include hand cream, cuticle oil, and strengthening product.
- Regular warm oil baths for hands made of olive, almond, castor oils with the addition of lemon juice. Dipping your fingertips into lemon pulp will help whiten your nails.
- Intake of nutrition from food containing vitamins C, D, B, A, E. Food requires a sufficient amount of zinc, iron, iodine, magnesium, calcium, biotin, folic acid.
Salon nail care procedures: professional manicure, paraffin therapy, sealing, various types of extensions.
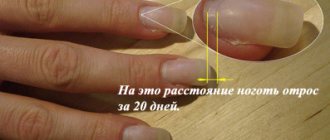
How long do nail extensions last?
The durability of your manicure depends on the correct execution of each stage during extension. And also on how you will care for your artificial nails after the procedure.
After all, despite the fact that they are quite thick, there is no need to test them for strength once again. On average, nails extended using the technology last about 4–5 weeks.
It is not so important how you decide to extend your nails - with gel or acrylic, on tips or forms.
Do you want to learn how to do a stylish manicure and nail extensions at home? Take manicure and nail extension courses to learn all the intricacies and learn how to create a strong and stylish manicure.
Manicure courses last from 1 to 40 lessons. Such courses cost from 2,000 rubles to 60,000 rubles. The cost of courses depends on the duration and program of classes.
During the course you will be told about disinfection and sterilization, workplace maintenance, nail structure and rules of communication with clients.
You will consolidate the knowledge gained in theory in practice. The school will provide a model on which you will practice manicure and coating techniques. During the training you will receive an equipped workplace, a full arsenal of tools and materials.
It's good if you have the opportunity to personally communicate with graduates. This way you can find out first-hand what they think about the manicure school and the teacher.
CourseBurg portal presents the best courses from the best organizers.
The main thing is to be patient and perseverant, and also try to perform all stages of the procedure correctly and carefully. Then you will definitely be able to master all the intricacies of this matter and create real masterpieces on your own hands. And if you learn how to do nail extensions quickly and efficiently, you can make money from it!
This training may be right for you:
- Best Online Manicure Courses from 1,000 Rubles
- 10 Best Manicure Training Courses in Moscow
- 10 Best Manicure and Pedicure Courses in St. Petersburg
- Best Nail Extension Courses in Moscow from 1,000 Rubles
- 10 Pedicure Training Courses in St. Petersburg
- 10 Best Nail Extension Courses in St. Petersburg
Choose the best manicure training courses in your city: Yekaterinburg , Krasnodar , Nizhny Novgorod , Novosibirsk , Rostov-on-Don , Voronezh , Krasnoyarsk , Perm , Omsk .
Strengthening nails
The composition of many gel polishes, in addition to the main substances that give it its characteristic properties, may include vitamins, minerals and other complexes that help strengthen natural nails.
A variety of designs can be created on artificial nails, and after strengthening your natural nails, you can choose a design for them.
During periods of rest from extended manicure, let your nails rest: take warm baths, adding essential oils, chamomile infusion, sea salt, etc. Rub the pharmaceutical preparation "Aevit" into your nails and cuticles, it moisturizes and strengthens them.
Don't forget about useful hand masks, which also strengthen your nails. They can be purchased at a cosmetic store or made at home by finding useful recipes on the Internet.
To summarize, we can say for sure that if you choose the right nail artist, nail extensions with gel polish are a fairly safe procedure that will help you always maintain the aesthetic beauty of your manicure.
@master_nails_g23_
@s.barantseva
@linaa.nails
@master_nails_g23_
@yurtaeva_nails
@nogotochki.dizayn
@ina_nail_volkovysk
@alena6604
@nail.bar.kzo11
@master_nails_g23_
@usharal_nailss_aigerym