Summer is coming, and are you still dreaming of beautiful, well-groomed legs and soft, baby-like pink heels? Or do you dream of looking perfect down to your toes at any time of the year? Or maybe you want to become a pedicurist and make money from it?
In this article we will look at all types and nuances of pedicure. And also where and how to learn this skill. Go!
In this article we will tell you:
- What is a pedicure?
- What tools are needed for a pedicure?
- Types of pedicure
- How to do a classic pedicure at home?
- How to do a hardware pedicure yourself?
- How much does a pedicure cost?
- How long does a pedicure take?
- How often should you get a pedicure?
- How to become a pedicure master?
- Useful tips and tricks for pedicure beginners
Types of pedicure
There are several types of pedicure. Let's look at each in more detail.
- Medical. Who needs a medical pedicure and why? People suffering from certain foot and nail diseases often seek help. It is provided by a podiatrist.
The medical pedicure procedure is aimed at preventing and getting rid of problems such as ingrown toenails, calluses, heel spurs, etc.
- Classical. It is divided into edged and European. They differ only in the way the cuticle is processed. In a classic trim pedicure, the legs are first steamed and then the cuticle is carefully removed with rounded manicure scissors.
- Dry. There are several names for this type of pedicure: European, French and unedged. With a dry pedicure, your feet do not need to be steamed - the entire procedure is carried out without water. It is replaced by special disinfectants (keratolics), which make it easy to treat the feet from the remnants of old dead skin.
The cuticle is removed using cosmetics or the film is pushed back with an orange stick to the base of the nail. The advantage of a dry pedicure is that it eliminates the possibility of infection with fungal diseases, as, for example, with a classic pedicure.
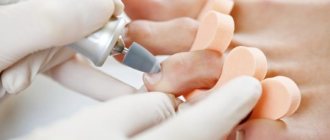
- Hardware. A pedicure is done with a special device with several attachments. They have different purposes. For example, a diamond cutter is used to cleanse the foot of old and rough skin. Silicone ones are designed for polishing nails.
During a hardware pedicure, cutting objects are not used, and water for steaming is also not needed. The keratinized skin is removed with special cosmetics, and the cuticle is simply trimmed with a nozzle.
Despite the universality of the pedicure procedure, it is extremely important to choose a good and trusted specialist whose tools are always sterilized and whose work area is neat and clean.
If it’s too expensive for you to contact a professional, you can learn pedicure for yourself or read the step-by-step instructions in this article and carefully apply the knowledge in practice. Read on!
Also, some types of pedicure are contraindicated for pregnant women and diabetics.
Actions for sore fingers
In some cases, finger inflammation occurs after a pedicure. Unpleasant symptoms appear the very next day. This is due to the fact that an injury was sustained during the procedure, although it may not be immediately noticeable. The skin of the thumb is most often affected.
To prevent the infection from spreading to other areas, do not wait for swelling and accumulation of pus.
It is recommended to consult a specialist who will examine the finger and prescribe appropriate treatment. This is a course of antibiotics, applying bandages with antibacterial agents, using a medicinal foot bath, taking vitamins to increase immunity.
At home, they effectively relieve inflammation and draw out purulent contents using a bandage with aloe, honey, potatoes, and celandine. Starting treatment from the first days will allow you to quickly cope with the problem without subsequent contact with a surgeon.
How to do a classic pedicure at home?
Step 1. Getting ready for a pedicure.
- First you need to steam and soften the skin of your feet. Prepare a bath with warm water.
- Add soap solution and a little sea salt for better effect. Soak your feet in the water for 5-10 minutes.
- If your feet are very neglected, then you can make the water hotter and keep your feet for about 30 minutes.
- After the skin on your feet has steamed, pat them dry with a towel and proceed to the next step.
Step 2. Tidy up your nails.
- Focusing on the natural shape, cut your nails with clippers in a straight line.
- There is no need to cut them too short, otherwise there is a risk of inflammation. Afterwards, use a file to go over the cut of the nail and trim it.
Attention! The nail shape should be square with no rounded corners. Otherwise, the nail may grow into the skin.
- Then use an orange stick or a special spatula to carefully push back the cuticle. You can remove it using a special cosmetic product, which you need to apply, wait 5 minutes and remove the residue with a cotton pad.
- Using a manicure spatula, remove dirt from under the nails and polish the nail plate with a buff.
Step 3. Process the feet.
You will need a double-sided grater. Using a coarse grater, remove rough skin from your heels, feet, and big toes.
- Go over old calluses and corns. Using a fine abrasive grater, carefully smooth out any small imperfections in the skin on sensitive areas of the foot.
Step 4. Moisturize and care.
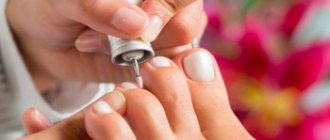
- After all manipulations, apply a colored, transparent or protective coating to your nails. It can be colorless or any other varnish. You can paint with gel polish. Choose according to your taste.
- And lastly, but most importantly, don’t forget to lubricate the skin of your feet with a nourishing cream!
It is best to moisturize your feet daily. Then the legs will be soft and well-groomed, and the number of cracks on the heels will be reduced.
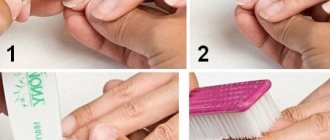
How to prepare for application
Before you do a nail pedicure with gel polish, you need to prepare for it. To do this, steam your legs, then remove the cuticle using tweezers or move it with a manicure spatula.
Steaming legs
Nails must be treated with a buff or file. This will ensure high-quality adhesion of the coating to the surface.
Finishing nails with a file
How to do a hardware pedicure yourself?
The hardware pedicure procedure cannot be called fast. It lasts about an hour and is considered the safest and most gentle.
During the procedure, there is no damage, cuts or pain, as, for example, with a classic trim pedicure. However, this type of pedicure requires skill and practice. It may not work the first time, so proceed carefully.
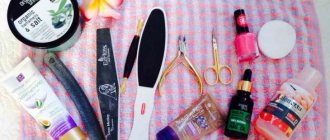
For a hardware pedicure you will need:
- Disinfectant. It is best if it is a product that does not require the use of water.
- Remover for removing dead skin. This cosmetic product penetrates rough skin and exfoliates it.
- Pedicure device with a set of cutters.
- Foot cream.
Step 1: Prepare and soften the skin on your feet. First, disinfect the skin of your feet and apply remover. This product softens and exfoliates the skin.
Step 2: Treat your feet. Clean the skin on your heels and then on your feet using a machine.
Pay special attention to the skin on the outside of the thumb. After general treatment of the foot, gently sand the cuticle.
Step 3. Give your nails smoothness and the desired shape using cutters.
Step 4. Cover the nail plate with colored or clear varnish and apply a moisturizing or medicinal cream to your feet.
Applying gel polish in stages
After preparing the nail plate, it is necessary to degrease the surface. This will prevent peeling.
Pedicure is done in several stages:
- if you purchased bondex or primer, treat your nails with them;
- Apply the base, trying to do it so that it does not come into contact with the skin. If the product gets on the cuticle, carefully remove it with a wooden stick. Dry the base in a lamp;
- Apply colored gel polish using the same technique. Dry in a lamp. If several layers are needed to obtain an even tone, each is dried separately;
- a topcoat completes the pedicure. The top is also dried in a lamp. If you are using a finish with a sticky layer, remove it with a degreaser;
- After that, you can apply a little base oil to the cuticle.
Applying gel polish
How to become a pedicure master?
You can become a good specialist yourself by watching lessons on YouTube and reading articles on the Internet.
Online lessons can teach you how to do a pedicure for yourself, and with due persistence, accuracy and diligence, you can do it just as well as a professional.
However, to work in a good salon, you will need a certificate to prove your qualifications.
If you decide to start making money from your skill, you should take specialized courses.
You need to do this not only for the certificate, but also in order to understand the nuances of the procedure at an even higher level, as well as learn the basics of working with clients.
To avoid regretting wasted time and money, pay attention to the number of hours devoted to theory and practice.
- There should be either as much practice as theory, or an order of magnitude more.
- Find out how many people are studying in the group. In overcrowded groups, the teacher will not be able to devote enough time to each student and you personally.
- The optimal option is 5–10 people in a group. Smaller is certainly better.
- Read reviews about the school, look at the work of former students: do you like the quality of everything?
- Please also pay attention to the course instructor. How competent is he, do he have awards and certificates of advanced training, how long has he been teaching.
After completing a full pedicure course, you will gain the knowledge and practical skills necessary for your work. But don't stop there!
Attend seminars and advanced training courses, track pedicure trends on the Internet, read magazines, specialized blogs and don’t be afraid to experiment.
Useful tips and tricks for pedicure beginners
To keep your legs looking beautiful and well-groomed for longer, you should follow some recommendations.
Remember that keeping your feet hydrated is key to making your pedicure last longer. It is necessary to moisturize the skin with creams and care for the cuticle every day. To keep your heels smooth and soft for a long time, exfoliate with sea salt.
The professionalism of the master, regular pedicures once every 2-3 weeks using the right enzymatic cosmetics will make home care easier.
Anna Korovaeva
So, anyone can do a pedicure at home. The main thing is to arm yourself with the necessary arsenal of tools, to be careful and attentive. And then your feet will become soft, well-groomed and beautiful. Good luck!
This training may be right for you:
- Best Online Manicure Courses from 1,000 Rubles
- 10 Best Manicure Training Courses in Moscow
- 10 Best Manicure and Pedicure Courses in St. Petersburg
- Best Nail Extension Courses in Moscow from 1,000 Rubles
- 10 Pedicure Training Courses in St. Petersburg
- 10 Best Nail Extension Courses in St. Petersburg
Choose the Best Courses in Your City: Yekaterinburg , Krasnodar , Nizhny Novgorod , Novosibirsk , Rostov-on-Don , Perm , Krasnoyarsk , Voronezh , Omsk .
Features of the procedure
The pedicure procedure has features that largely depend on the condition of the feet, skin structure, etc. Regular foot care at home extends the period between salon visits.
The frequency is also affected by the rate of nail growth, since as the nail plate grows, pressure from shoes occurs, which can result in ingrowth into the skin. Complex and deformed nails can be partially or completely changed only in a salon setting using modern technologies by experienced specialists.
But you should not abuse the constant effect on the skin and nail plate. Frequent sanding and polishing can lead to cuts, large detachments, increased skin sensitivity and other unpleasant problems.