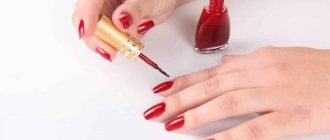
Nail preparation
The first step is to prepare the nail plate and cuticle for further processing. To get started you will need:
- Tweezers, trimmer;
- Scissors;
- File;
- Scrub, oils, cream;
- Degreaser (you can use alcohol or face lotion).
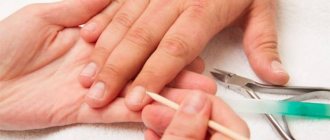
To learn how to do a cool European manicure, you need to remember that the most important part is preparation. In this step, the old coating is removed, the cuticle is trimmed, the nails are filed and their surface is leveled. To carry out the procedure, you can use a special apparatus or several files and hand tools (they must be sharpened before use).
Manicure at home
Step-by-step instructions on how to prepare your nails for a manicure at home:
- The old varnish is erased. Immediately after this, the marigolds are soaked in the bath. We recommend adding a little sea salt and iodine to the water - then the plate will become thicker and stronger;
- After 5 minutes of “soaking” the nails, you need to take out one finger at a time and check the cuticle. If it is easily deformed, then it can be cut. Using a file or a special stick, the peel is carefully brought to the hole itself, after which it is cut off. Depending on your experience, you can use a trimmer (for professionals) or tweezers (for beginners). The action is repeated with each nail;
- After trimming, you need to lubricate the cuticle with oil. Most often, spas use cocoa or shea for this purpose, which have excellent antimicrobial and regenerating properties;
- Next, the plate is leveled and the desired shape is given to the nails. For rough processing - shaping, hard tools are selected. For example, with diamond or mineral coating. For soft - cleansing the nail from growths and irregularities, more gentle - silicone or wooden;
- When the treatment is completely finished, all that remains is to degrease the surface and hole, remove any remaining oil from the cuticle;
- If everything is done, then the instruments must be sterilized. If a manicure is performed using a machine, that is, the main work is carried out with machines, then they are disassembled and washed in a special solution. Hand instruments are rinsed in Chlorhexidine.
Photo - Preparing for a manicure
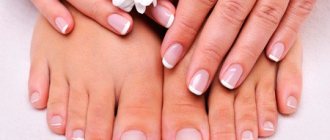
In exactly the same way, trimmed pedicures are performed at home. After this you can start designing.
Unedged or European manicure is carried out without tools - it is easiest to do it yourself. The plate is cleaned of varnish and fat, then a special gel is applied to the cuticle. It is noteworthy that when using the unedged technique, you do not need to soak your nails.
After applying the softener, a few minutes should pass, then you simply move the skin closer to the hole. The cuticle is very pliable and soft. You do not need to use any trimmers or scissors to remove it. It can even be removed with an orange stick. All that remains is to wipe the plate with remover and cover it with a base for further coloring.
Read the material on the topic: pedicure at home: step by step for beginners + photos of results.
Features of applying conventional varnish
No matter how correctly the nail is processed, and no matter how correctly the color scheme is chosen, the main condition for a good manicure will be the correct application of varnish on the nail.
Here are the main recommendations from nail industry gurus:
- Base coat is a must! The base allows you to level the surface of the nail plate and create a perfectly even coating; moreover, with the base, any coating will last longer. Often, after removing budget colored polishes, the nail plate acquires an unhealthy yellow color; the presence of a base coat can eliminate this problem.
- It is important to paint the nail carefully, without bald spots or painted cuticles. The algorithm for proper painting is simple: the first trajectory of the brush with varnish starts from the base of the nail, the next two are carried out along the nail ridges.
- Only after thorough drying of the first layer is it possible to apply the second. To get the color “like in a tube”, you will have to paint the nail in 2-3 layers. When working with short nails, do not put too much polish on the brush.
- A top coat is recommended. It allows the polish to stay on your nails longer, but you should apply it in a thin layer, otherwise the nail plate will appear too thick.
- At all stages of painting, you should seal the end side of the nail, since the varnish coating begins to chip and peel off from the free edge of the nail.
Simple edged manicure with regular varnish
The easiest way to do a manicure on short nails at home is with your own hands. In addition, it will look most advantageous on small plates. All points are carried out in the same way as written in the section above. After giving the desired shape and degreasing, the plate is covered with a base - it will fill the cracks and become a strong and even base for the paint.
You can make different types of manicure with regular polish:
- On the water;
- Gradient;
- Art design and many others.
Edged
Let's focus on the most common coating - it is very easy to make yourself and does not require much time. After the base has dried, a layer of colored varnish is applied on top of it. It must also be completely dry. If the shade is not bright enough, the surface is repainted.
To make the manicure last longer, a professional fixer is used. It performs several functions: it gives neatness, strengthens the plate, helps remove delamination and prolongs the life of the varnish. The fixative is often enriched with various vitamin and mineral supplements.
Video: doing a trim manicure yourself
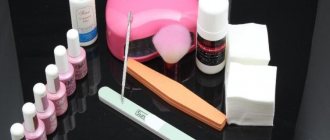
Materials and tools
To create a classic manicure you will need several specialized tools. There are slightly more of them than in Europe, however, they are freely available in many places and are not too expensive, and therefore extremely accessible. Before starting work, as mentioned above, the tools need to be sterilized.
- A spatula for separating the cuticle from the plate (can be replaced with an orange stick);
- Glass nail file;
- Nail and/or skin clippers;
- Nail scissors;
- Hand bath ingredients.
If you have all the tools, then you can begin. But before starting the process, we recommend that you familiarize yourself with how to properly do a trim manicure by watching our video tutorials.
Learn how to do French manicure
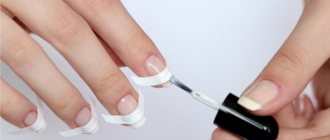
Doing a French manicure correctly is very simple; it does not require any special skills or tools, so it is often done at home. The only thing is that it is recommended to buy white varnish with a thin brush. Of course, you can work at home using stencils, but any professional craftsman will tell you that only by painting with a brush can you give your nails the desired and beautiful shape.
Instructions on how to do a simple French manicure at home step by step:
- The nail is prepared: degreased, covered with base. When the base is completely dry, the main color is applied on top of it. French is a very soft and elegant type of manicure, where pastel colors are often used. The base polish can be pink, beige, coffee, etc.;
- After the base dries, smiles are drawn. To create them, you can use stencils, but this technique has several disadvantages: there is no originality, varnish leaks through them, and they are inconvenient to peel off. Therefore, it is better to draw patterns by hand;
- This is why you need a varnish with a thin brush. The “smile” is drawn with thin short strokes along the natural white stripe at the end of the nail. Depending on the shape, it can be round, more square, or even straight. Depending on your skills, you can also decorate all your nails or just one with a simple pattern. For example, draw a few stripes or write something;
Photo - French manicure in stages - All that remains is to coat the varnish with a fixative and wait for it to dry. Some girls use glitter varnish (with sparkles) instead of a fixative. It also holds up well, but can be inconvenient when removing manicure.
Video: an easy way to create a French manicure
Classification of gel polishes by texture
All gel polishes are divided into 2 main categories:
- Reflective gel polishes. The main advantage is quick adhesion to the nail. Such tools are easy to use and easy for beginners to work with.
- Non-reflective gel polishes. In addition to this drug, an activating substance is also required. This type of gel polish has a glue-like texture. To dilute it, a special spray is required. And you need to apply this gel polish with a professional gel brush.
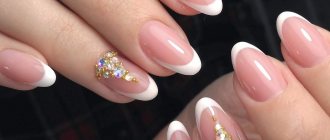
Lunar manicure with gel polish or shellac
The original moon manicure, which can be easily performed with both shellac and regular varnish, is becoming increasingly popular. Of course, if we talk about convenience, then it is best to do it with gel - it lasts longer and it is easier to draw holes with it. In appearance, lunar is the complete antipode of French. If in a French manicure only the tips of the nails are shaded with white (or another color), then in a lunar manicure the holes are shaded.
To make a professional lunar design, you need to prepare a manicure kit: these are accessories for trimming, tools for working with gel (removers, primers, etc.), and an ultraviolet lamp.
Fashionable manicure with gel polish with rhinestones at home step by step:
- Nails are cleaned and wiped with a degreaser. It should be noted that, unlike working with simple varnish, the usual tonic or alcohol will not work. Many masters use formulas enriched with various minerals and silicones, which fill the gaps in the nails, promoting stronger adhesion of the gel and the plate;
- Afterwards the nails are painted over and the holes are outlined. Please note that it is best to use a thin brush to create semicircles near the cuticle - then the work will turn out very neat and interesting. It is recommended to draw the moons first, and then paint over the plate;
- When everything is done, the nails are placed under an ultraviolet lamp for 2 minutes. Afterwards a second layer of gel polish is applied. It is needed for intense color. It is also dried for 2 minutes;
- When the main plane of the platinum is painted over, the holes are processed. They need to be painted with a thin brush so as not to smudge the contour. For this, masters work with acrylic brushes - they are thinner and stiffer than ordinary ones. Rhinestones or velvet sand for nails are inserted into the centers of the holes and pressed with a stick for better fixation;
- The painted holes are dried for 2 minutes;
- After finishing working with the biogel, you need to wipe the plate with a degreaser, which will remove the “stickiness” from the nails.
This is how you do a moon manicure
In order for this unusual manicure to look interesting and stylish, you need to select varnishes very carefully. Experts advise using paints in contrasting colors, for example, black and white, green and yellow. But, if you work in pastel colors (pink and white, brown and beige), you will get a more delicate design.
Video: 4 ways to draw a hole for a moon manicure
How to remove gel polish at home
To remove regular nail polish, you will need a napkin or cotton pad, as well as nail polish remover. It is better if the liquid is without acetone - it is less harmful to the nails. Simply wipe each nail with a cloth soaked in the product until the polish is completely removed.
To remove gel polish you will need:
- foil. Regular food grade food will do. Cut 10 long strips about 10-15 cm;
- gel polish remover. You need a specialized product; a regular one for varnish will not work. When choosing a product, pay attention to the composition - the more gentle it is, the better for your nails and skin
- file 150/180 grit;
- lint-free wipes or cotton pads - 10 pieces, 2 times the size of a nail;
- orange stick;
- cuticle oil.
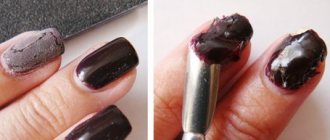
- The top coat was removed from each nail with a file. This is necessary in order to hold the remover less and reduce its harmful effects on the skin and nails. You only need to remove 1 mm of the product, so don’t overdo it—your nail shouldn’t show through the coating;
- Soak a napkin in the product and place it on the nail so that the entire plate is covered;
- Wrap a strip of foil around your finger to secure the napkin. In addition to fastening, the foil enhances the thermal effect, due to which the bonds between the layers break down;
- After 15 minutes, remove the foil from 1 finger and check if the coating has softened. Using the wide side of the orange stick, carefully remove the gel polish. If somewhere the coating has not come off, wrap the nail again in a napkin and foil - do not press on the nail with a stick and do not try to clean off the gel polish. This way you will damage the nail plate;
- Repeat the previous step with all nails and wash your hands with warm water and soap;
- Dry your hands with a towel and apply oil to the cuticles and nails.
Coating remover - how to choose and use
Matte and mirror for short nails
Recently, many girls have begun to create designs on their nails that are not shiny at all. Some even use varnishes that harden after application and become powder.
Matte or velvet manicure can be done at home in three ways:
- Use regular polish, and while drying, hold your nails over the steam for a few seconds;
- Use a special matte varnish;
- Use special sand coatings. After application, they dry out and turn into textured varnishes.
You don't need any special training to make an interesting matte design. You just need to buy a polish without glitter - they are sold in any cosmetic store.
Step-by-step technology:
- Nails are cleaned and filed. In principle, the beginning of the procedure is no different from working with simple varnish;
- After the matte surface has dried, you can “play” a little with the textures. For example, paint the entire nail matte black, and after drying, add glossy dots or stripes. This is a good option for a holiday or photography, where many will pay attention to the accents in the image;
- You can do a matte leopard manicure in the same way. Just dot your nails with a glossy color and outline them with a matte color. Then the base should be light, the dots themselves should be black, and the outline around them should be brown. Leopard
But the easiest and fastest manicure you can do at home is with foil. In order for the nails to be shiny and glossy, they are covered with special stickers. To do this, they use colored foil, on which patterns can be applied, or simple stickers that replicate the mirror coating.
How to do an artistic mirror manicure with foil at home:
- Nails can be painted with any varnish. It is best to take white or colorless;
- While the varnish is not dry, foil is glued onto it. It is very fragile, making it easy to break off along the contour of the nail. Although the options for its use can be very different: torn patterns, striped patterns, etc.;
- Afterwards you need to cover the plate with a fixative, because the foil gets scratched very quickly.
Manicure with foil - step by step photo instructions
Glowing manicure is performed at home in the same way - here either fluorescent varnish or foil is also used.
Video: manicure with foil
Choosing a shape for short nails
For short nails, it's not always easy to choose the right shape.
There are several useful recommendations for this:
- Experts recommend paying attention to the structure of the cuticle. The shape of the free edge should be close to its structure. This creates an optical balance and the nail plate looks more natural.
- For short nails, it is not recommended to choose a square shape. This shape of the upper edge of the nail will visually shorten not only the nail itself, but also the hand as a whole. The ideal shape for short nails is an oval; it visually lengthens the nail plate. Nail specialists also often recommend the almond-shaped filing of the free edge to owners of short nails.
Water manicure step by step
Despite its apparent simplicity, manicure on water or water design is quite difficult to perform. They can make the most unusual designs and patterns, but to do this you need to gain experience and purchase high-quality varnishes. To work, you will need a container with warm water (preferably disposable, because after nail art it will be spoiled), glue, a needle, and varnishes of the desired color.
Instructions on how to make a beautiful water manicure at home step by step:
- The nail is prepared and painted white - then all other colors will look bright on it. In order not to worry about erasing the varnish around the nail, the skin must be covered with either PVA glue or a special “fuse”;
- Varnishes drip into the water. You need to act quickly, because they harden, and it is difficult to work with a dry coating. When the desired range is obtained, it is necessary to draw patterns on them with a needle; Water drawing
- There are different schemes. The simplest one is to move the needle from the center to the outskirts of the circle. This painting will allow you to get an elegant web design;
- When everything is ready, the nail is blotted into the center of the pattern (or to the outskirts, depending on the chosen pattern). You don't need to hold it for long. During the process, excess varnish in the water is removed with a needle or stick;
Water manicure - All that remains is to remove your fingers from the water and wipe them with nail polish remover.
Drawings obtained using water manicure are very original and interesting, but require a lot of time. Therefore, it is often much faster and easier to make them with acrylic paints.
Video: making drawings on water for water manicure
How to disinfect and sterilize manicure instruments
Many people believe that instruments for individual use do not need to be sterilized. But in vain, because skin particles can remain on them and bacteria can multiply. In addition, without regular cleaning, tools will quickly become dull and fail.
For beauty salons, there are strict instructions on how to sterilize manicure instruments. The general process includes not only sterilization of the instruments themselves, but also disinfection of the room, the master’s clothing, and work surfaces. For sterilization, a special unit is used - a sterilizer for manicure instruments (sterilization is the process of destroying fungal and bacterial spores).
Let's look at how to properly handle manicure tools and care for them at home after use.
Processing of manicure tools is carried out in several stages:
- wash tools with soap;
- immerse in a disinfectant solution in an open form;
- place in the oven preheated to 200° for 20 minutes;
- remove tools after the oven has cooled completely;
- This procedure should be carried out at least once a month.
We also disinfect the files - we spray them with disinfectant spray. After this, the file should dry completely.
Newspaper and ombre
Color gradient designs are popular due to their simplicity. If it is done in salons with a special airbrush, then at home it can be done even with a simple sponge. This is ideal for New Year, birthday or any other holiday.
How to make a stylish ombre manicure at home:
- The nail is prepared and filed. A base and white varnish are applied to the plate;
- Afterwards, a small piece of sponge is cut out. Varnish is applied to it in strips. Thus, in the future you will get a gradient;
- To create an interesting winter design, you can combine red with white and gold, or blue with green and scarlet. Another secret to getting the perfect transition lies in choosing a sponge. It should be dense, without large pores;
- The nail is blotted with a sponge. Try not to press too hard, otherwise the transition will be too clear;
Ombre step by step - All that remains is to apply glitter and fixative. This will help hide sponge marks and give your manicure a salon look.
Ombre sponge
Video: gradient or ombre on nails
A newspaper manicure is no more difficult to do at home. Newspapers often use ink that can be washed off with alcohol. But, if you turn the newspaper over and rub it with alcohol, the print will simply transfer to the surface underneath it.
How to do a newspaper manicure step by step:
- The nail is painted in any color contrasting with black. This is done because the letters are most often black;
- A small piece is cut from the newspaper. It is applied with the desired side to the nail;
- You need to run a sponge soaked in alcohol over the paper several times. If the newspaper is thick, then you even need to apply the swab to the plate for a few seconds;
- When the letters have passed, you need to cover the nail with a fixative.
Newspaper manicure
How often should the procedure be done?
In terms of durability, a hardware manicure is very different from an edged or some other type. If you cover your nails with gel polish, the procedure can be performed once every 3-4 weeks. It is recommended to pay attention to your arms and legs more often and just maintain the condition so that it does not become neglected and you do not have to spend a huge amount of time on it. Another video from the master will help you achieve perfection in hardware manicure:
In beauty salons, a special coating is applied over the varnish, which allows you to keep your nails looking presentable for much longer. Many women noted that after visiting a manicurist, the effect of the treatment was much higher than with home procedures and it lasted much longer. But over time, you will also learn and will be in no way inferior to any master in professionalism.
If we are talking about extended nails, then you cannot do without qualified help. You will have to visit a specialist every 3-4 weeks to adjust the shape of your nails.
Home manicure ideas with visual instructions
Photos and ideas for manicure at home will allow you to choose the right design. If you know the basics of nail art, you can create almost any design.
Home manicure idea 1
Idea 2 Manicure idea - 9 steps
Photo - Idea 4