Every girl and woman dreams of a well-groomed manicure for a long period of time. However, duration is not the priority. The uniqueness and beauty of nail design attracts the attention of others if such a manicure has never been seen before. New interpretations are achieved through cat eye gel polish. With each season, cat eye gel polish acquires more and more variations in the execution of designs, complex volumetric techniques, and color solutions. How to apply and how to preserve this manicure for a long time? We'll figure out.
Features of cat eye gel polish
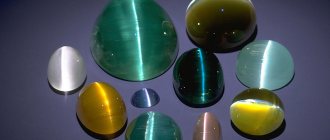
The artificial coating for nails acquired this name thanks to the already existing Chrysoberyl stone, which is referred to as “cat’s eye”. The effect is achieved through a deep shimmer of color, a seemingly narrow lightened vertical stripe at different angles of light refraction.
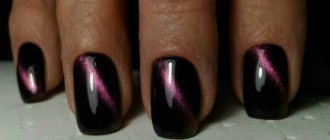
Applying cat eye gel polish is necessary to create a 3D effect on the nails, which is clearly visible under a glossy or matte finish. The composition contains metal particles that can move under the influence of a magnet. But, unlike stone, the strip on the nails is applied vertically, horizontally, creating gradients, all kinds of patterns, waves, stripes. You can even use one, two or more magnets to achieve a multi-faceted, multi-layered design.
Step by step guide
All the steps are very simple, and the concept itself is similar to the idea of a regular manicure.
- First you should prepare your nails, as in the case of applying regular gel polish.
- Then you need to apply the “cat” varnish in one layer, but it is important that it is thick enough. An important point - do not overdo it, as it must dry thoroughly. If you wish or the product is very liquid, you can apply it in two thin layers.
- Before drying, you need to bring the magnet and count to five. Five seconds is enough to fully form the pattern. There is no point in holding the magnet longer as this will not affect the clarity of the image.
- After the coating has already been applied and dried, you can begin decorating your nails. Another option is to cover your nails with a top product and dry it.
- Finally, you will need to remove the sticky layer.
When it comes to drying, much will depend on the quality of the products used and the brand. Some varnish coatings may spread because their consistency is too liquid. To maintain the clearest possible pattern, you should dry your nails one at a time - magnetize one nail and immediately put it under a lamp. If the product is thick, then you don’t have to rush, since there is enough time to paint several nails at the same time.
How to apply cat eye gel polish correctly
How to properly apply cat eye gel polish will be discussed in this article. Since such a product requires additional devices - a magnet, the application technology is slightly different from the usual one. It should be noted that the varnish itself looks distinctly pearlescent, but when applied it has a different shade and structure.
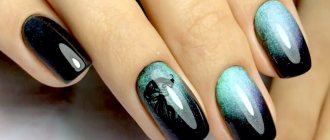
It is recommended to apply gel polish to a nail plate already coated with black or any other dark gel polish; one layer is enough. This is required to enhance the effect of reflection and glare of the material. It can be used without a dark base, but then the final result is expected to be different. The presence of a sticky layer on the previous background coating does not matter - it is a matter of personal convenience during application.
Be sure to shake the bottle before starting to apply, and then just form the first layer. This material is applied like any other and dried in a lamp for 30 seconds - 2 minutes, depending on the type of UV lamp.
After polymerization, a second layer should be applied, but before drying, bring the magnet close to the coating without touching the material. The magnetized strip loses its clarity if it is not fixed in the lamp for a long time, so you need to apply it one nail at a time. This way the design will be brighter and deeper.
Depending on the desired result, the magnet is brought upside down, vertically, horizontally, using two magnets at the same time, you need to hold it over your finger for about 5-15 seconds. This time is enough to get results. The finished effect should be fixed by polymerization for 30 seconds to 2 minutes.
Any magnet is suitable for creating a strip, but a more beautiful design comes out with a special magnet, which is purchased along with the varnish.
After the layer has dried, you need to make sure that the desired effect is achieved. If the result is not satisfactory, it is recommended to apply one more time. At the same time, you cannot apply many layers of coating, since it has a soft elastic structure, this will damage the manicure. The layers are applied thinly and evenly.
If no additions to the design are required, then be sure to cover the nails with a top coat and then dry them. The finished result has a three-dimensional appearance with a clearly defined stripe, which differs in shade from the base color. The entire application process, despite the complicated technology, does not take much time.
Manicure technique with cat eye effect
The first step in performing a manicure, whether you do it at home or in a nail salon, should be preparation. Give each nail a beautiful shape, remove cuticles and make sure that your hands overall look perfect - this is a prerequisite for a manicure that looks stunning. Next, you can proceed directly to applying gel polish:
- Degrease your nails with a special product and apply a base coat that will protect them from pigmentation and interaction with the components of the varnish, and also improve the adhesion of the varnish to the nail plate. Dry the coating under a UV manicure lamp;
- Carefully apply a thin and even layer of gel polish. Be sure to shake it before use to mix the metal particles and color pigments. If the gel polish is thick enough, one layer is enough, but more often two layers are required. In this case, after the first layer is applied, it will need to be dried under a UV lamp;
- Next comes the most important stage - creating a pattern using a magnet. To do this, bring the magnet as close to the nail as possible, without allowing it to come into contact with the coating, and hold for 5-10 seconds. Please note that the magnet acts on the product until it has dried, so the pattern must be made on the last layer.
- After forming the pattern, dry the gel polish under the lamp and apply a top coat that will protect the manicure from possible scratches and chips;
- Treat each nail sequentially in the same way. Manicure is ready!
Ways to preserve your manicure for a long time
To extend the life of your manicure, follow these rules:
- Contact with aggressive detergents, chemical reagents, open fire, or prolonged exposure of hands to hot water is not recommended.
- Gloves should be used when working with abrasives.
- It is forbidden to pick, pry, or trim the edge of the nail even after cracks or chips have formed.
No matter how well-groomed the manicure may seem, it is recommended to wear the coating for 2-3 weeks. In this way, it will be possible to avoid chips, breaks, drying out of the plate, and untidy manicure.
Required materials and tools
Before you start creating this manicure masterpiece, you need to make sure that everything you need is at hand.
The following materials and tools will be required:
- base and top coat;
- buff;
- primer;
- a special magnet in the form of a pen or spatula;
- degreasing agent;
- gel polish;
- LED or UV lamp;
- soft, lint-free wipes.
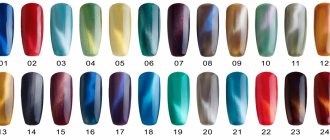
Varnish selection
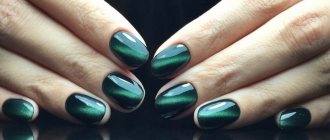
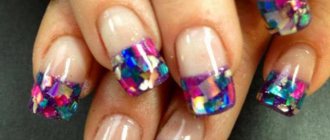
A spring look will be perfectly complemented by a pink manicure with a pearlescent accent. Green gel polish looks noble and gorgeous on nails in tandem with rhinestones.
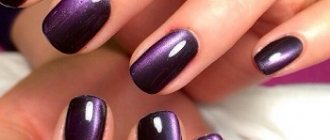
Red manicure does not lose its popularity among ladies; it is considered the most popular nail design. It is perfectly complemented by gold or silver designs, as well as rhinestones. The burgundy shade looks very modern and cool, which is suitable for a more formal look.
Particularly trendy colors this season include blue and light blue. Varnishes from turquoise, azure to deep sapphire will decorate both long and short nails.
When choosing a varnish for magnetic manicure, it is important to consider the following criteria:
- content of hypoallergenic components in the composition;
- rich color palette;
- correct texture - moderately liquid and not thick enough;
- the convenience of the brush, which should be sufficiently elastic, wide and elastic.
It is recommended to pay attention to the following brands that have proven themselves to be excellent. Bluesky Shellac is rightfully considered the standard composition
According to the manufacturers, it contains no allergenic components. The Chinese product is presented in beautiful and rich shades that do not fade or distort for three weeks. The product applies easily and evenly to the nail plate without bleeding.
Bluesky Shellac is rightfully considered a reference composition. According to the manufacturers, it contains no allergenic components. The Chinese product is presented in beautiful and rich shades that do not fade or distort for three weeks. The product applies easily and evenly to the nail plate without bleeding.
Lianail from a German manufacturer is characterized by high pigmentation and optimal density, thanks to which it is possible to obtain a uniform, beautiful coating when applying varnish in one layer. The palette contains 12 shades that combine perfectly with each other.
South Korean shellac TNL Magnet Effect has a low cost and excellent quality. Ideally combined with base and top coats from any manufacturer. Due to its moderate thickness, a single layer application will be sufficient.
Kodi Professional is a high-quality professional varnish with a liquid texture and good hiding power, that is, the ability to well cover the color of the base on which it is applied. The flat brush has medium hardness, so it covers the nail evenly. For the best effect, the product is applied in two layers.
Magnet selection
The beauty of the nail design depends on the quality and type of magnet used. The main criterion by which you need to choose a given item is the force of attraction: the higher it is, the more effective the result will be.
Professional magnets for manicure are available in the form of rectangles, handles, and also blades, which can have a one-sided or double-sided design.
The most common:
- vertical or horizontal lines;
- stars;
- crescents;
- circles;
- Christmas trees.
The principle of using the tool is simple: the plate (blade) is rotated from one side to the other, forming a given pattern.
A pen-shaped magnet is suitable for creating unique, complex and miniature designs.
Its main advantages are:
- maximum convenience and the ability to tilt in any direction to change the depth of the decor and intensity of magnetization;
- thin tip, thanks to which even the smallest patterns can be easily applied in any direction.
Using magnets, a galaxy effect, a kaleidoscope and many other interesting options are created. If you don’t have a professional tool, you can replace it with a pen for drawing on a children’s magnetic board. The effect will be similar. You can also use any flat and thin magnet - the main thing is that it is powerful enough.
Benefits of cat's eye
Bluesky cat's eye gel polish should be applied in the same way as materials from other companies, according to the diagram. Bluesky has a dense structure, is resistant to mechanical damage, and wear time is more than 20 days. Bluesky cat eye gel polish can be applied on a dark base or in two layers. The advantages include availability and quality of the material. Unlike other materials, it can be removed very easily without additional manipulations.
This type of material is combined with rhinestones or pearls, bouillons, and other decorations, and is used as an independent coating.
Main advantages:
- Speed of creating different designs
- Variation of an image using one color
- Pair with additional decorations
- Durability, strength
Some companies offer a finishing top with a cat's eye effect. This helps you create your own magnetic polishes at no extra cost. Visually, this design looks identical, but the application differs in that the magnet is used only on the finishing topcoat. Experiments with patterns by creating two or more layers of top are allowed.
Let's talk about a magnet
In creating a cat's eye manicure, perhaps the most important role is played by a magnet. You can find a huge variety of magnets in stores, and everyone can choose the desired pattern to suit their taste. But, if for some reason you were unable to find a special magnet, you can use a regular one, which has strong attractive properties, which almost everyone has at home.
Please note that magnets should be stored as far as possible from bottles of gel polishes in order to avoid weakening the properties of the magnetic particles.
Removing magnetic gel polish
How to apply magnetic cat eye gel polish is no longer a secret. When the time for correction has passed, the previous manicure requires removal. This procedure is best done in a salon. If this is not possible, then it can be done at home using a device with a special attachment, by soaking it with a dissolving agent, or with a manicure file. Each of the options requires consistency and accuracy to prevent mechanical damage to the nail plate. Removing old material is a simple procedure if done in a specific sequence:
- Drawings, stones, top fixing top are cut down
- A gel polish dissolving agent is applied to the sponge, applied to the coating, and sealed with foil or a special clip for 10 minutes.
- After the time has passed, remove the foil with a sponge, remove the remaining coating with a stick or pusher.
It happens that the artificial material is partially removed, you should not use force, this will lead to damage to the matrix. It’s better to wait another 10 minutes. This result is a consequence of the multi-layer coating, which did not have time to completely dissolve and requires a long period of time to react.
If, when applying the gel polish remover, you feel a strong burning sensation or discomfort, it is recommended to remove the foil, then continue removal using an ordinary file, abrasiveness 120-150 grit.
After removing the coating, sometimes additional polishing of the nail, moisturizing with nourishing oil or care product is required. Nails will take on a well-groomed appearance and will not crack at the free edge.
Gel polish with a cat's eye effect is a bold decision, a boundless flight of imagination when creating a manicure. This is a bright coating that will help you create a variety of designs, gradients, and add solemnity and elegance to your manicure. Ease of use helps you quickly and easily apply artificial material, create the desired pattern, and ultimately remove it effortlessly.
Required Tools
Regardless of whether a manicure is performed in a salon or at home, the list of equipment is the same. For a truly spectacular manicure, you will need the following list of items.
- standard set for hygienic manicure;
- buff;
- means for degreasing the nail plate.
- varnish coating with the required effect or several at once. This will depend on the desire to do a familiar manicure, or on plans to create a certain combination of colors;
- special magnet;
- UV lamp;
- base coat;
- top gel;
- sticky layer remover;
- special lint-free napkins for manicure.
As an addition, you can prepare a gel polish of a dark, rich tone. The best option is green or black to create a background. A special brush for gel polish, used by nail salons. Its advantage is comfortable, uniform and accurate application of the product. Compositions that will be required for proper application of varnish coating from a specific manufacturer. Some brands require the use of a primer.
An important point is that for the first time you need to devote at least three hours to performing this procedure. Over time, practical skills will help you cope with manicure faster, although a lot depends on the quality of the varnish used.