Nail extensions today remain the only way to get a chic manicure with the desired nail length in a short period of time. The high-tech scheme involves the use of special plates - tips made of plastic material. The template is placed on the free edge of the natural nail and modeled using gel, resin or acrylic.
Manicurists use tips only from well-known manufacturers. This is due to concern for clients, the preservation of the healthy structure of their nails and the duration of wearing the extended plates.
Plastic templates are available in various shapes and sizes, which allows you to choose the material for any nail plate. Colors and shades will create a natural effect.
Manicure with tips is suitable for the following cases:
- with very short natural nails;
- if you have a bad habit of biting your nails;
- – with very small nail beds.
The extension procedure using various technologies should be abandoned in the following cases:
- damage and cracking of nails;
- during pregnancy and lactation;
- during treatment with antibiotics or when using hormones.
You should also postpone visiting the salon before your menstrual cycle or in its first days.
Types of tips
Tips are plastic overlays or template forms that are used by masters as a substrate or as a stencil for forming an artificial nail plate.
This is the most convenient and popular extension option for beginners. It is also popular among experienced craftsmen, especially if it is necessary to reduce time and simplify the procedure. There are several varieties of tips, each with its own peculiarity in operation and design nuances.
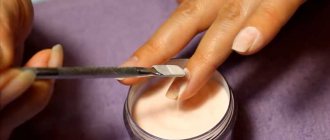
To form an artificial nail plate, acrylic, gel, biogel and acrylic acrygel, which is a combination of gel and acrylic, can be used. Acrylic dries in air, and gels dry in a lamp.
Tips-tips
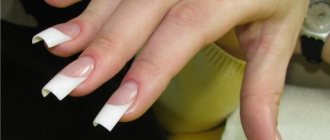
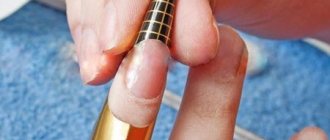
These are plastic nail tips with a convenient transition zone for high-quality adhesion along the smile line. Disposable. They are attached using a special glue that comes with them or can be purchased separately.
They come in different sizes within one set. It is necessary to select it individually for each nail, and, if necessary, pre-file it in width so that it perfectly matches the width of its plate. After gluing, the length is cut and filed. Next, everything is covered with camouflage extension material to create an outwardly complete nail plate.
White tips are very convenient for extending French manicure. This is a ready-made perfect smile line; you just need to cover the nail with a thin layer of base or camouflage gel or acrylic, and then with a top coat to add shine.
Camouflage nail gel - let’s figure out what it is and how to use it correctly
Upper forms
Upper forms - used for working with acrylic, gel, acrylic and biogel. The material is applied to the form, pressed against the prepared nail along the entire length under the cuticle or from the middle of the plate, then dried in a lamp and filed.
The top molds are made of a dense material compared to the more flexible liquid molds, and have a more curved design. Thanks to this, they allow already from the first layer to form a convex stress zone or fold zone, which is subject to the greatest loads when worn. The top forms are reusable. On average, they are enough for 100-250 extensions.
Liquid tips
They are used for extensions with all liquid materials, hence their name. Often opaque, with a matte surface. They have short “removal handles” at the ends. Unlike top forms, liquid patterns are more flexible and flat. They do not immediately form a stress zone, but only create the first base layer. Then you need to paint the architecture manually - with camouflage gel or acrylic using a brush.
When working with liquid tips, the material is applied to a mold and pressed against the nail plate. Smile lines are already drawn in the form, which is very convenient for beginners when laying out a French jacket. After drying in a UV or LED lamp, the tip is removed and the plate is filed down. Liquid tips are also reusable, like the top forms.
Depending on the desired result, you can work with any of the three types of tips. Try everything one by one to choose the most convenient and practical for yourself.
note
The shape of the free edge of the tip can be made in both classic and extravagant versions.
Today, there are the following forms of the free edge of an artificial nail: circle, oval, square, rounded square, almond, pipe, edge, stiletto and bridget. The shape of the free tip of the nail should be selected based on the desired length of the nail:
- short : circle, square;
- medium length : square, oval, pipe, almond;
- long : age, stiletto, bridgette.
According to the color scheme, the tips are:
- transparent to create any design;
- with a ready-made design , which is covered with a transparent gel;
- with a white tip of the free edge of the nail for a French manicure;
- colored to highlight the design.
The ideal result of any nail extensions is that the artificial nails look natural. To do this, you need to choose and glue the tips correctly, as well as work correctly with the gel.
Tips for beginners in gel nail extensions using tips
Selection of tips . To make the right choice, you should pay attention to the shape of your natural nails:
- For normal-shaped nails, any classic tips are suitable, but for flat or highly convex nails you will need special ones.
- If your nails are wavy, then you should glue them with adhesive gel, which will fill in the unevenness.
- For nails in which the free edge of the nail is pulled up, you need to choose a short tip length when adding extensions.
- The tips should be the size of your natural nails. You cannot glue tips that are already on your own nail. It is better to take a wider tip and file the excess with a file.
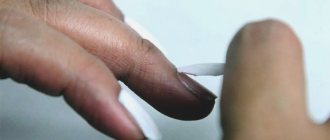
Gluing tips . There should be no bubbles between the tips, otherwise the artificial nail will quickly peel off. To prevent this from happening, it is recommended to use adhesive gel.
Due to the fact that this glue dries slowly, you can glue the tips perfectly evenly.
If, however, bubbles form during gluing, then in order to remove the tip, you should use nail polish remover or acetone, briefly dipping the nail into the liquid.
Working with gel . Do not put too thick a layer of gel on the nail. This can cause it to become very hot when dried in a UV lamp, which can cause burns or rapid delamination of the gel.
If, however, the nail has become hot and the gel has not yet dried, then you should take a break from working with the UV lamp and then continue drying. This simple step will help avoid unpleasant consequences.
Basic set of materials
In addition to the templates themselves, you will need:
- glue for extensions
- length cutter
- sawing machine
- UV or LED lamp
- file and buff
- pusher
- tassel
- lint-free wipes
- material to choose from: gel, biogel, acrylic, acrylic in base and camouflage shades
- degreaser/dehydrator
- acidic or acid-free primer
- base
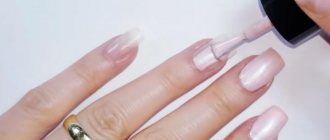
- top or finish to add shine
- varnish and decor as desired.
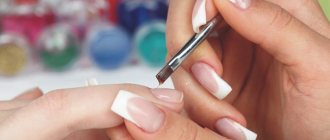
Preparing the nail plate
This stage is the same for all types of extensions using tips and consists of the following mandatory steps:
- Manicure . Before extensions, you need to do a trimmed, hardware or combined manicure to remove the cuticle and remove the pterygium. They are most often the cause of detachments of artificial material.
- Filing the top layer of the nail . To improve adhesion to the artificial material, it is important to remove the top layer of the natural nail. Don't get carried away, it will be enough just to remove the natural shine. Experienced masters use either a buff or a file for natural nails for this.
- Degreasing and dehydration . First, apply the cleaner to a cotton pad and remove the dust after filing. Then apply a special degreaser to your nails with a brush.
- Application of primer . This product lifts the scales of the nail plate and ensures adhesion of the artificial material. After applying the primer, wait until it is completely dry, otherwise peeling may occur in the future. When working with gel, an acid-free primer is used, and when working with acrylic, an acidic one is used.
- Applying the base . The base is applied in a thin layer under the cuticle, especially if the extension occurs not on the old layer of material, but on your own nail plate. Dries in a lamp. The sticky layer does not need to be removed.
Now let's move on directly to the extension procedure with various tips.
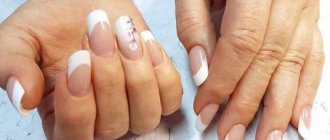
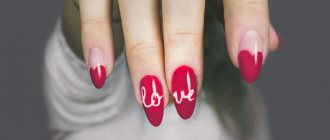
The secret of the popularity of French
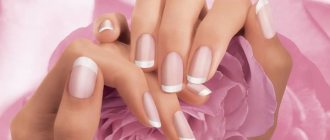
French is also known as “French manicure”. This is a fairly simple manicure technology to perform at home, but very effective. A thin “smile” is applied to the base color of the coating - an arc of a different color along the edge of the nail plate.
Beautiful French manicure
The secret of the popularity of this manicure is that the French manicure is quite universal . It suits any style of clothing and any situation, and all because the French jacket is the embodiment of naturalness.
In the process of creating a manicure, natural colors are used , which from an aesthetic point of view hides any imperfections in the nail plate. French manicure is one of the classic types of manicure, although it has very extreme variations.
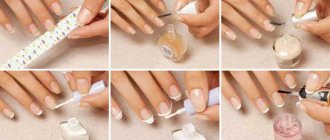
Extensions using tips - step-by-step instructions
- We select templates according to the size of each nail
- Glue the tips with glue onto previously prepared nails
- We remove the length with a tip cutter and file the edges
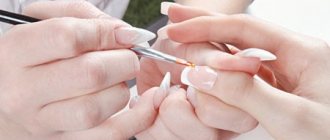
- We apply camouflage gel with a brush, build the architecture, and dry it in a lamp. When using acrylic, apply the material in a translucent or pink shade and distribute it evenly with a brush, wait until it hardens
- Remove the sticky layer from the gel
- We file down the length and thickness
- We apply a top coat or decorative varnish and design as desired
pros
- The fastest extension option
- The ideal smile line with French extensions
- A simple and convenient way for beginners to practice
Minuses
- Sometimes nails peel off due to poor-quality glue or incomplete adhesion of the artificial nail.
- Template blanks still look artificial; experience and skill are needed to achieve naturalness in their design
- Gel and acrylic can bleed at the tips, making the nails excessively thick in these areas; additional filing and understanding of architecture are required to achieve a natural result.
Extensions on the upper forms - step by step instructions
- We select the shapes according to size, slightly file the width at the side rollers, if necessary
- Using a brush, apply acrylic, base gel or acrylic into the mold, spread it in a thin layer and apply it to the nail. It is necessary to apply the form slightly from the tip to the cuticle so that the material is not squeezed out at the cuticle
- Remove excess material with a brush
- We send it to dry in a lamp or air dry (for acrylic)
- Removing the upper forms
- Using a brush, apply a layer of camouflage acrylic, gel or acrylic, and build the architecture of the nail
- Dry in a lamp for 2 minutes, acrylic in air until it hardens
- We cut the length and width
- Apply top or finish, dry in a lamp
pros
- Easy to use
- Nails are more durable than nail tips due to the absence of an additional grip zone along the smile line
- Reusable
- Due to the characteristic volume in the stress zone, it can be formed already at the first stage of working with acrylic, base gel or acrylic
Minuses
- When extending very long nails, they may initially have a “pecking” shape.
- The absence of a drawn smile line in the inner part of the form, which is inconvenient when forming a jacket
A detailed description of the extension technology on the upper forms with instructions for popular designs:
Extensions on top forms with examples and instructions
Liquid tips extensions step by step
- Selecting liquid tips by width
- Apply material for building up the base layer to the inside, distribute, remove excess along the edges
- Apply the form to the surface of the nail, press slightly
- We remove the excess squeezed onto the surface near the cuticle and side ridges with a brush.
- Dry in a lamp or air dry if it is acrylic
- Removing liquid tips
- Apply a second layer of camouflage with a brush, forming the architecture of the nail
- Dry in a lamp for 2 minutes or in air (for acrylic)
- Apply top or finish
- We make the design with varnish as desired
pros
- Durable, flexible, comfortable shapes
- Reusable, will last up to 250-300 uses
- The presence of markings of the smile line in the inner part for the convenience of forming a jacket
- It is convenient to remove using the special “tips” on the sides of the tips
- Indispensable for practice for beginners
- Allows you to create natural nails that do not differ in appearance from natural ones, unlike tips.
Minuses
- Unlike the upper forms, they provide a flatter base-plate, without a reinforced stress zone
If you have never tried to grow your nails yourself, then tips are the ideal material for beginners.
Start with the adhesive tips and then move on to the top molds or liquid tips. Ready to get started? Write to us in the comments if you have any questions. Comment
Extension technology
Everything for nail extensions is ready. Materials and tools were purchased. The nail plate has undergone the usual preparation and tips or forms have been installed. Having made a choice between gel or acrylic, you can proceed to the final stage.
Gel
The gel extension procedure includes:
- Applying base material with a brush. Do not allow the gel to come into contact with the skin or leak into the side rollers. Such consequences can be prevented by leaving 0.5 mm from the gel to the skin. At the same time, at this stage it is necessary to form the architecture of the future nail. The finished base is dried for 3-5 minutes. in the lamp.
- The next layer is applied modeling gel. The nail turns out hard and reliable if the procedures are repeated 2 times. Try to make each layer thin and apply it for 2 minutes. drying in a lamp. Decorative elements are inserted between the layers and painted.
- The extension process is completed by applying the finishing gel and drying it for 2 minutes in a lamp. Then the sticky layer is removed, the shape is sharpened and surface irregularities are removed.
Acrylic
Any type of manicure begins with disinfection of the hands of the master and client, preparation of the plate, selection of tips or forms.
After installing the base (tips, forms) when extending with acrylic, the following manipulations are carried out:
- The surface of the nail is treated with a primer, which promotes the adhesion of the future artificial nail to the biological one.
- The brush is moistened in liquid and then in acrylic powder. An acrylic ball (material for the future nail) is formed at the tip of the tool.
- The ball is placed in the middle of the plate, and the nail is formed with light movements of the brush.
- The resulting result is filed, giving the desired shape. Start the process from the sides, then adjust the tip and top.
- The surface is polished with a buff until it becomes shiny and small scratches are filed off.
Acrylic used for nail extensions in just 40-50 seconds. freezes in air. The material does not require drying in a lamp.
Article design: Anna Vinnitskaya