What is a gel polish topcoat?
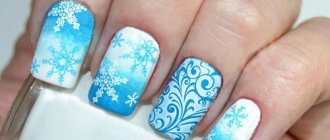
Top or finish, fixer, top coat is the top coat, the third phase in a three-phase system, the final stage in the procedure of applying gel polish to nails. First, the nails are covered with a base coat, then with colored gel polish and finally a top coat is applied. Each layer is polymerized separately. The finish is applied in a thin layer or with a slight leveling of highlights, but it is never used to strengthen the nails. Sometimes a design is made on top of the finishing coating, for example - gel modeling, three-dimensional painting, convex decor, loose glitter, etc.
Top without sticky layer
- What is top for nails
- Top with sticky layer
- Top without sticky layer
- Applying a nail top coat
- Why do you need a top for nail extensions?
- Finish coating for gel polish
- Top coat for regular varnish
- When to apply top coat to your nails
- How to use the top without a sticky layer
- How can you replace nail topcoat?
- Rating of tops for gel polish
- Reviews of the best top coat for gel polish
- Conclusion
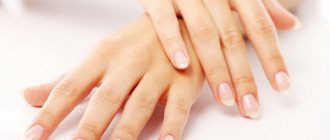
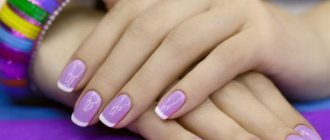
For a modern woman, manicure is considered a sign of well-grooming and an important element of her image. TopCoat nail polish is the finishing touch to any manicure. This is a special varnish that prevents the design from wearing off prematurely. You should learn about the nuances of using such a coating in advance.
What is top for nails
In simple terms, coat is a fixative varnish for a proper manicure. The ideal nail design, in addition to hand care, includes a base, color coating and top coat, finishing at the end.
Top coat for nails can be called one of the main elements of a competent manicure. There are several types of Topgel, each of which has its own set of unique properties.
Top with sticky layer
This type of coat coating is characterized by the greatest resistance to a number of mechanical damage. The finish for nails with a sticky layer has a plastic structure, which creates its strength. This top coating option is ideal for brittle and weak nails.
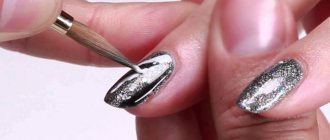
Top without sticky layer
This top is considered an ideal option for beginner manicurists. The absence of a sticky layer allows you to save on purchasing a special product for removing such coating. In the modern manicure industry, masters call it “cleanser.” And also such top coatings are perfect for nails where rubbing and pigmentation methods are practiced.
Applying a nail top coat
The base and finish for gel polish are considered the basic elements of a competent manicure. The finish raises many questions for beginners, unlike the base. The main tasks of top coating include:
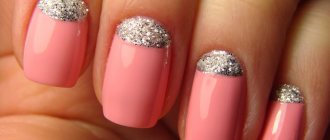
- the finish for gel polish adds gloss to the manicure;
- topcoat increases the life of the nail;
- fixes rhinestones and sparkles more firmly;
- A range of topcoat coatings help make nails matte.
Coat is necessary for more than just a regular manicure. For example, finishing gel for nail extensions is present in the work of many masters, and even experienced girls are not always clear about its main tasks.
Why do you need a top for nail extensions?
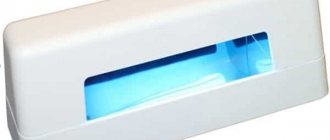
First of all, such a topcoat will help protect the work of the master. Most often, for these types of work, a coat with a sticky layer is used. After all, extended nails are the least resistant to minor mechanical damage. A finish without a sticky layer is used less often in this case. Gel polish also helps to consolidate the work of the master and extend the life of the extended nails. However, there is a downside to this method. For the best effect, you must use an ultraviolet lamp. And this, as you know, is unsafe for the nail plate and health in general. Therefore, experienced professionals do not advise getting carried away with the nail extension procedure, resorting to it only in extreme cases.
Finish coating for gel polish
Top coatings for gel polishes are a universal and affordable product. However, it must be remembered that the gel polish coating should not be applied at random, but following the established rules:
- A thick topcoat for gel polish is applied after the last layer of the base polish has dried. In the case of the coat drying type, it can be applied a couple of minutes after the last coat of varnish.
- Many beginners are faced with the appearance of characteristic bubbles after applying the top coating. They sometimes spoil the entire design, but are a characteristic feature for varnishes of this type. Pro advice is that the bottle should not be shaken before use. If the topcoat nail coating contains glitter or other decor, rubbing the bottle between your palms will help distribute it evenly throughout the bottle.
- Don't get too carried away with the thickness of the top layer. Coat is applied to the nails so that there is enough layer to cover the plate evenly. The method is the same as with regular varnish: starting from the cuticle level, or slightly retreating from it and down the nail.
- When applying top gel polish, it is important to maintain the correct position of the brush. Do not hold it perpendicularly or press too hard. This way you can avoid streaks on your nails.
- When using a standard topcoat coating on nails, you can use additional drying, for example, in the form of a spray.
Many people believe that the types of coats for gel polish and regular ones are very different.
What types of nail tops are there?
Classification of finishing coatings is made on several grounds, that is, on a number of unrelated characteristics. They affect the speed and ease of working with the material, the application technology and the range of tasks to be solved. The most important signs are:
- Glossy top or matte;
- With or without residual sticky layer;
- Elastic or hard;
- Thick or liquid;
- Turns yellow or blue;
- Whether it bubbles or not;
- Resistant to damage and rubbing or not;
- Specialized or general purpose;
- Decorative top or classic fixative.
Glossy and matte top: is there a difference in application?
Classic fixatives in the gel system have a glossy shine. Manufacturers are competing for the hearts of craftsmen, developing materials with an ever brighter and more durable gloss. The brighter the gloss and the smoother the highlight, the more expensive the manicure looks. Therefore, clients often choose the specialist whose coating shines better and lasts longer.
A few years ago, matte tops . And here, too, a wide choice is provided - the degree of matte varies from a smooth satin shimmer to the velor effect of an anti-slip surface. You can find names like these: satin, velvet, corduroy, velor, cashmere.
The nuances of using a matte finish. How to properly apply matte top over gel polish
- Often this finish serves only a decorative function. Therefore, before applying it, for reliability, it is better to cover the nails with a regular gel polish fixer with residual stickiness, dry, remove the stickiness and apply a layer of matte top;
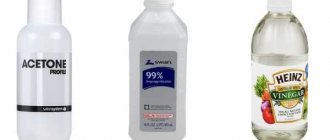
- Matte finishes actively absorb dyes and fats, rub off and begin to shine after just a week of wear, so they require care. They are not suitable for colorists, chefs, artists and anyone whose hands are subject to heavy workload. If the matte top gets dirty, you can clean it with a cotton pad soaked in alcohol. Do not use acetone, it will dissolve the gel polish.
- The more velvety the matte top, the more it feels on your hands, like it’s “braking” the entire surface. For girls with high sensitivity, we recommend choosing satin tops - they will provide a fashionable lack of gloss and will not irritate.
How to remove artificial material correctly and why is it important?
You've probably heard that gel polish spoils your nails, making them thin and brittle. It is a myth! It's not the material that ruins your nails! One of the reasons for damage to the nail plate is improper removal of the artificial coating, so this procedure must be approached with special responsibility!
Is it possible to remove gel polish yourself at home without damaging your nails? What materials and tools are needed for this? Let's figure it out.
How long can you wear gel polish?
First, let's figure out what period of wearing the coating is optimal. Often girls wear gel polish for a month, or even longer. However, they do not understand that they can damage the nail plate.
Technologists advise walking with the coating for no more than 2-3 weeks. Prolonged wear puts stress on the tip of the nail plate, its root suffers from the weight of the coating. All this can lead not only to breakage, but also to deformation of the nail plate.
How can you not remove gel polish?
RULE 1: Under no circumstances should you pick at the gel polish or tear it off the surface of the nail plate, because this can cause serious injury! If you are careless, you can remove the top layer of the nail along with the material, and this can lead to thinning and, at a minimum, painful sensations when in contact with water and various surfaces.
RULE 2: do not file away partially peeled off gel polish. In this case, you also risk cutting off the top layer of the nail and ruining it.
What other consequences might arise?
- There is a possibility of tearing not only the gel polish from the nail, but also the nail plate from the nail bed.
- You peel off the artificial coating, and the nail plate becomes thinner and thinner each time.
- Those with thin nails may feel unbearable pain during coating - the base will burn strongly in the lamp. They can also get a burn to the nail plate, which in turn can lead to onycholysis - separation of the nail plate from the nail bed. It will take quite a long time to treat onycholysis.
- You will have to strengthen the nail plate, and this will require additional time for the manicure procedure.
- You will have to buy materials to strengthen the nail plate: acrylic powder, gel or polygel. And these are additional financial expenses.
- Thin nails become mobile and weak, so the coating may be worn less than usual. You will have to try very hard to avoid detachments and chips.
We hope these reasons are enough to convince you not to peel off the coating from the nail plate and do the gel polish removal according to the rules!
By the way, the peeling process itself is quite painful, it’s hardly worth it!
Finish with or without tack. What is the difference
“Sticky” - the dispersion layer consists of material components that were not included in the polymer and did not evaporate in the lamp, but remained on its surface.
Tops for gel polish with a sticky layer
Classic gel polish finishes - soak off top coat, finish gel. In conventional topcoats, the dispersion is not sticky, but rather slippery, it has no functional load and must be removed.
Do not wipe off the sticky layer as soon as you remove your hand from the lamp - let the top cool a little. Otherwise, you can leave unsightly marks from the napkin on the hot surface.
The dispersion should be washed off carefully, without smearing it on the skin around it. For each nail, use a clean, lint-free tissue or the unused side of it.
After moistening it in liquid to remove the sticky layer or in alcohol, apply the napkin to the surface of the nail for a couple of seconds and remove it towards you. Due to such careful removal of the dispersion, the risk of allergies is reduced.
In specialized finishes, for example, tops for sliders, the dispersion can be very sticky - it helps to fix the decor and is preserved by covering it with another layer of a regular finish on top.
Gel polish tops without sticky layer
Widely used family of finishing coatings. No wipe top coat, no cleanse top coat, non-cleansing gel top, finish gel without sticky layer, top without l/s - all these are variants of the names of the material, all components of which are part of the final polymer, without the formation of a dispersion layer on the surface.
The no-tack finish has a brighter shine and is quicker to apply as there is no time required to remove the dispersion. Previously, such materials were considered fragile, but thanks to the development of technology, this problem has gone away. The main thing is not to overdry them much longer than the time recommended on the bottle, since with every minute in the lamp they become more compacted and stretched. You can safely choose them as the main fixative and enjoy the acceleration. Also, rubs are rubbed into such tops, broths and voluminous decor are secured with them.
What can you do without when applying gel polish? Useful life hacks for the budget conscious!
In the previous article, we talked about the essentials for a manicure with gel polish at home.
Now let’s look at those items that are not required to be purchased (although still desirable) and tell you what can replace them.
By degreaser we mean 2 functions
: degreasing the nail plate (dehydrator) and removing the sticky layer (cleanser). Since the purpose of the products is very similar, many companies produce these products in a 2 in 1 format, which is very useful.
Price:
on average, a bottle that will last you about a year can be purchased for 100 RUB.
What to replace:
if you still do not consider it necessary to buy a separate product, then you can easily replace it with any alcohol solution (for example, vodka) or boric acid.
As a last resort, you can use regular nail polish remover without acetone. 2️⃣ Lint-free napkins
Lint-free wipes are needed at the stages of degreasing the nail plate and removing the sticky layer.
Unlike cotton pads, they do not leave tiny fibers on the surface of the nail, which can ruin the manicure.
Price:
for 50 RUB you can buy 100 pieces at once, which will be enough for as many as 100 manicures.
For 300 RUB you can buy a package of 1000 pcs. What to replace with:
any non-woven material (for example, dried wet wipes), cotton cloth, a regular bandage, and, as a last resort, cotton pads.
Primer
– means for preliminary preparation of the nail before coating. In other words, this is a kind of primer that additionally cleans, dries and degreases the nail plate, thereby improving the adhesion of the base to the surface of the nail.
The primer is applied as the first layer, before the base, and dries instantly, without requiring eavesdropping in a lamp.
Price:
100-300 RUB depending on the company.
What to replace:
primer is not a necessary layer and can be completely skipped (especially if you use a good base with top and properly degrease the nail).
Bonder
– a means for bonding natural nails and artificial material.
Despite the fact that primer and bonder are two different independent (and by no means interchangeable) products, they are very often confused. Perhaps we will devote a separate article to their differences. But in general, the bonder also prolongs the durability of the coating, enhancing adhesion to the nail. It is applied before the base and can dry on its own or require drying in a lamp (always indicated in the instructions).
Price:
100-300 RUB depending on the company.
What to replace:
Bonder is an optional layer; you can skip it if you use a good base and top, and you are satisfied with the durability of the coating.
Price:
from 100-1200 RUB depending on the manufacturer.
We have sorted out all the materials that are needed to create a gel polish manicure at home. All that remains is to collect everything you need to remove this coating.
What do you need for gel polish at home? Only 5 necessary items for 1000 RUB! Read
.
Subscribe to Nail Cockteil to learn everything about manicure, and put