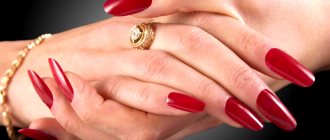
Nail extensions are a procedure that allows you to get beautiful, long nails. This is especially convenient for girls with short and brittle nails. Proper nail extensions allow you to get a beautiful manicure, even if the procedure is carried out independently, at home.
Form extensions
There are two types of extensions: forms and tips.
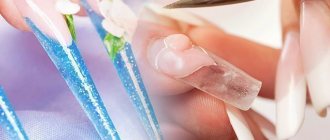
The first option is preferable, since the nails turn out thin and natural in appearance. To perform the procedure, you will need special forms, which are stencils with markings and a window. They are disposable, made of flexible plastic or paper, and reusable, made of thick plastic and metal.
The advantage of this method is its versatility - gel nail extensions at home can be done for nails of any shape. It’s easy to select a stencil, so there are no difficulties with the procedure at the stage of purchasing materials.
The markings on the stencil help you choose the length of the free edge that will be most comfortable. After the material hardens, the form is removed, which makes the nails thin.
Gel extensions: pros and cons
Gel extensions have the following advantages:
- These nails are flexible, they bend but do not break.
- They are quite durable.
- The gel hides nail defects and masks spots.
- The gel has a porous structure and allows air to pass through well, the nail “breathes” under it.
- Drying the nail under UV rays prevents the formation of fungus.
- The gel is very plastic, as already mentioned, so it allows you to give your nails any shape and create an original design.
- “Native” nails under the gel become stronger and grow better.
And everything would be fine if not for the inevitable disadvantages:
- Gel nails are less graceful than acrylic or even natural nails. Until you get the hang of it, you will find it difficult to lift small objects.
- They can crack due to sudden temperature changes and require special attention in winter.
- The gel can only be removed using special tools. Doing this yourself without the appropriate skills and equipment is almost impossible.
And yet, gel nail extensions are very popular because the gel does not cause any allergic reactions, this procedure can be used even during pregnancy.
How to do gel nail extensions: step-by-step instructions
What you need for nail extensions:
- antiseptic for hand disinfection;
- cuticle softener;
- an orange stick to push back the cuticle;
- manicure scissors, tweezers;
- files and buffs for leveling the nail plate and processing the free edge;
- primer for better adhesion of the nail to the material;
- base and top;
- forms;
- modeling gel for creating nails;
- gel polish for design;
- lamp.
Please note that the gel used for modeling is cured only in UV lamps, so equipment marked LED is not suitable.
Step-by-step nail extensions using forms.
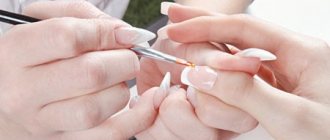
- You need to start working with disinfecting your hands and nails. This is important to prevent infection in wounds in case of a cuticle or finger cut. Instruments are sterilized before use.
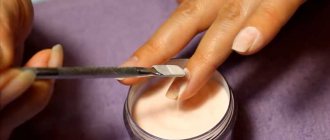
- Perform a hygienic manicure by removing the cuticle and pterygium. To make the cuticle easier to remove from your fingers, you should first soften it and push it away with an orange stick. Remove overgrown cuticles carefully, especially if you haven't had your nails done for a long time.
- The smooth layer is removed from the surface of the nail plate using a nail file. The nail should be handled carefully, without putting too much pressure on the finger. Nail dust is removed using a special brush.
- Nails are degreased with a dehydrator. Next, a primer is applied for better adhesion of the material to the surface of the nail.
- The base is applied to the prepared base. Before extensions, you need to apply the base in a very thin layer, then dry it under a lamp for 2-3 minutes.
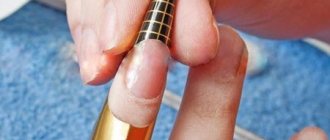
- The most important stage is installing the form. Beginners are recommended to use solid stencils: they fit easily, you just need to choose the right size. If the shape is too soft, you can combine two stencils. The form is laid carefully, arches are created.
The next stage of gel nail extension for beginners is the formation of an artificial nail. To do this, a modeling edge is applied over the form.
First, the nail is visually divided into three parts. After this, the material is applied according to the scheme.
Base layer.
The material is applied to the area near the cuticle, brought to the stress zone (where when you press on the tip of the nail, the plate turns white). The layer is dried under the lamp for 30 seconds.
Base layer.
In the stress zone, the material thickens and goes down towards the form. The gel is applied thickly to the stencil. If necessary, the thickness is adjusted with a nail file. Next, the layer is dried under a lamp for 3 minutes.
The final layer.
At the final stage, a thin layer of gel is applied to the free edge. Dries in 2-3 minutes.
The next stage is giving the nails the desired shape and length. To do this, first remove the sticky layer, and then file all the nails. Next, camouflage varnish is applied and a design is made as needed. Each layer of varnish is dried in a lamp for at least 60 seconds.
The self-manicure is completed by covering the top and removing the sticky layer.
How to improve your nails
The period of wearing extended nails ranges from 2 to 5 weeks. It all depends on the girl’s lifestyle, the frequency of washing dishes and hands using chemical detergents. After removing the nail plates, the masters advise carrying out wellness procedures to help natural nails.
The most effective procedures include:
- Taking vitamin complexes.
- Regular treatment of nails with Vaseline and iodine.
- Using gloves when washing dishes and floors.
- Increasing the time between extension procedures.
- Eating large amounts of milk, cottage cheese and other dairy products.
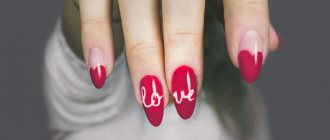
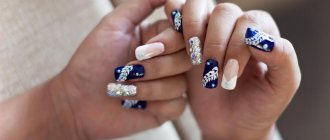
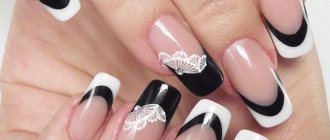
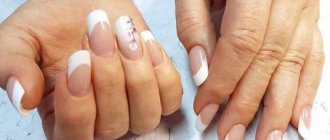
Nail design with gel polish
To prevent the nail plates from becoming thinner and to have time to recover, it is extremely important to extend them no more than once every two to three months. Considering that on average artificial plates last a month. The next couple of months should be allowed for natural nails to recover.
How to do nail extensions with tips
Tips are plastic forms that imitate a nail. They are glued to your nail and then covered with gel. This method of extension is easier, but we have to spend a lot of time on tips of the right size, especially for non-standard fingers.
Another disadvantage of this type of extension is the creation of thick nails. With this type of extension, a multi-layer designer coating is not applied, since it thickens the nail even more.
How to properly do nail extensions using tips.
- First you need to choose the tips. They should fit the nail as wide as possible. If you cannot choose, then it is better to choose a shape wider than the plate, since it can be filed and adjusted to the width of the nail.
- Nails are prepared for extensions: the cuticle is trimmed and the smooth layer is removed from the plate. The free edge is cut off, about 0.5 mm should remain.
- Glue is applied to the tips up to the step, which is applied to the edge of the nail. The tip is glued to the nail and pressed. It is important to pay attention to the line of the step - it should coincide with the edge of the nail.
- The excess length is removed with a tip cutter, then the desired shape is given with a file. Next, the surface of the artificial nail is slightly filed down for better adhesion to the material.
- A layer of gel is applied. The layer should be thin from the cuticle, thick in the middle of the nail. Make sure that the layer of material is not too thick, otherwise the gel may not harden.
- After the gel has dried, the sticky layer is removed. The procedure is completed by applying and drying camouflage varnish.
For beginners, it’s more convenient to get a beautiful manicure with tips. But they thicken the nail, preventing the excess layer from being removed. It’s different with forms - they are removed after the gel hardens and are no longer needed, so they are removed from the nail and thrown away.
Types of extensions
There were some variations here. The design is chosen to your liking. The materials are also varied. We will consider the extension variations below.
- Gel
. Together with the use of forms. Any length and shape can be created. - Builder base
. Composition based on rubber and gel. It is flexible and does not spread during operation. Used for lengths of no more than 5 mm, as well as for modeling corners - Tips
. Ready-made shapes, you just need to choose the length. Convenient to use. Save time. But it thickens the finished plate. - Acrylic modeling
. Made from polygel. Variations in length and design. The equipment is easy to operate even for beginners. - Fiberglass
. Creating a fiberglass nail. Suitable for nail repair and extension. You can vary between thickness and flexibility, while maintaining density.
How to do nail extensions: tips for beginners
To make the result pleasing for a long time, use the advice of nail experts.
The use of base and top is mandatory. They serve as a protective layer and are necessary to increase the wear time of the manicure.
If you have no experience in cutting the cuticle, then you can leave it alone. To make your nails beautiful, first treat the cuticles with a special solution, and then push them back with an orange stick.
Moisturize your cuticles and the skin around your nails with oils daily. This will improve the condition of the skin, make the manicure and hands more attractive in general.
When choosing your nail shape, consider the length of your fingers. If they are long, then choose a square. Almonds and soft squares are suitable for medium and short fingers.
If the plate is uneven, you can distract attention from it by using a bright camouflage varnish.
You can avoid peeling when processing your nails by working with a nail file in one direction.
Two coats of camouflage polish will last longer than one coat.
How to do nail extensions at home - take free courses from nail technicians, subscribe to their pages on social networks, study the material. You will have to spend a lot of time on this, but there is enough content to do a manicure just for yourself. If you are planning to do eyelash extensions at home and nail extensions for strangers, then it is better to take specialized courses and receive a diploma after graduation.
Stages of build-up
Let us remind you that all masters work in protective equipment. Respirators, gloves, hair caps are a convenient and safe means of protection against small particles that appear during work. The sequence and necessity of actions is determined by the selected material. Below are the stages and description in general terms.
- Before you begin, you need to evaluate your nails and the ability to work. Eliminate contraindications. Discuss the design and length with the manicurist.
- Hands are treated with disinfectant.
- After this, the old coatings are removed. Gels and gel polishes are filed off, varnishes are washed off. The process and time depends on the material.
- Filing the free edge of the nail, removing the shiny layer from the plate. Performed by a buff.
- Remove dust with a manicure brush.
- Degreasing the plate.
- Primer for adhesion.
- Applying a base layer and drying in a lamp.
- Main material, depending on customer's choice. Fixing the shape and building up with gel, or selecting tips and fixing, etc.
- Drying in a lamp.
- Shaping.
- Design. This is where your fantasies come true.
- Consolidate the result with a finishing coat.
- Cuticle care with oil. Applying hand cream.
Removal of cuticles and excess skin depends on the method. Either during the filing process, or before the main stage of extension. This can be done with scissors, forceps, or a device.
Recommendations after extension
The master and the client wish high-quality work and long-lasting results. After the specialist has completed the work, responsibility for the result falls on you. Factors that can ruin a manicure:
- Contact with fire. Please note that artificial material is highly flammable. There is also a risk of melting at high temperatures.
- Mechanical damage and fractures occur when nails are used as a means of prying, picking, or picking at something hard.
- When opening doors, using a kitchen knife, scissors, etc. you need to remember the length and be careful.
- You can reduce the length or change the shape of the plate only with an artificial nail file.
- Removal and correction must be performed in the salon. Requires exposure to special means and cutting. Do not tear off the artificial material under any circumstances. This will damage not only the nail plate, but also damage to the finger.
- After 2-3 weeks it is better to come for correction.
By following the precautions described above, you can extend the life of your manicure.
Who is suitable for nail extensions?
Classically, women and girls who are unable to grow natural nails
.
Public people also resort to using gels to create interesting and vibrant images. Wedding designs are interesting. This special day is decorated with a neat manicure. For brides, there are many variations with voluminous flowers, rhinestones, classic French, sparkles. Not only brides want to be beautiful. Guests of special events, visitors to concerts, and corporate events also often request nail extensions. For them, you can choose bright designs or choose simple decorations - it all depends on the occasion.
Lovers of naturalness, owners of their own long nails who have broken one nail, but do not want to cut off the rest, also come to the salon. In this case, we can increase one to the total length.
A suitable procedure for restoring damaged nails
or to
strengthen your own plate
, if your nails are brittle and you dream of length.
Nail extensions are suitable for anyone who wants to look beautiful and save time.
How long does the effect last?
If you take precautions and exclude mechanical damage, the first correction will be needed in 2-3 weeks. This is due to the speed of nail growth. Between the cuticle and the artificial plate, a distance and depression appears. This is what the correction will hide.
After this, you can wear your nails for another 2-3 weeks. Removal of the artificial material is necessary. Primarily for nail restoration. Also for neat subsequent design.
How the correction is carried out
To maintain beautiful nails, you should follow the rules of care. It is advisable to visit a specialist to make edits. There are corrections:
- Repairing a broken nail
. Minimal manipulation. It’s a pity to completely change your manicure, or walk around with a damaged one. And you can’t protect yourself from accidents. The same material will be used for the repair as for the base. The color coating is removed, the edges are filed down, the required piece is added to the mold, after which the design is manipulated. - Correction of an overgrown nail
. The top covering is removed and the surface of the artificial plate is leveled. If necessary, the length is adjusted. The cuticle is removed. The space with the natural nail also needs to be sanded to remove the top layer. Next, a primer and base are applied and a new design is created. With full compliance with technology. In this case, damaged or broken nails are repaired separately or re-extended. - Removing the coating
. Creating something new. Used when you want to change the shape. The same is done when the old extension wears out. Includes the entire cycle described in the “growth stages” section.
Why is it better to do nail extensions in a salon?
When you want to save money, you should consider the risks.
In our salon, instruments are completely disinfected. Specialists are trained, certified, and experienced. The quality of work is the face of the salon. You can see the works in the photo. The salon is responsible for the quality of materials. Fashionable new items, choice. An equipped workplace ensures the convenience of the master’s work. Allows the client to relax.
Fashion trends
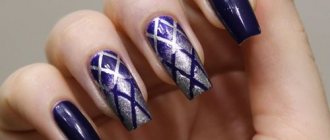
Season 2020-2021 The following designs and colors are distinguished:
- calm nude colors,
- plain nails,
- various designs,
- the use of stones, beads, crystals (bright accentuation on one or two nails, do not make a jewelry display on your hands),
- pearl shine,
- adding foil
- bright red colors,
- color of wild predators,
- thumb drawings,
- geometry, flowers, patterns, abstraction,
- minimalism,
- French design is still relevant.
Contraindications for nail extensions
Conditions under which the procedure is prohibited:
- Extensions should not be done for people with diseases (fungus, virus, bacteria) of the nail plate and surrounding skin. Before the procedure, it is necessary to cure the disease,
- hematomas on the fingers under the nail plate,
- allergic reactions to the components of raw materials for extensions.
Factors under which it is undesirable to perform a manicure, due to the risk of peeling off the artificial material (that is, you can build it up, but there will be no long-term results):
- herpes,
- critical days,
- diabetes,
- problems with blood circulation,
- autoimmune diseases,
- hormonal imbalance,
- treatment with antibacterial drugs,
- undergoing chemotherapy,
- pregnancy,
- stress.
What determines the cost of extensions?
The materials, shapes, and design are listed above. It is already clear that the combinations of extensions and coverage options are limitless - any flight of fancy can really be brought to life. From modest and restrained to bold decisions. All that remains is to decide on the budget. Price formation is influenced by:
- material, its cost, quality, consumption,
- the number of decorations, accessories used,
- complexity of decor,
- presence of old coating and its type,
- qualifications and experience of the master.
Newcomers take on the job almost for free. The results of their work are unpredictable. They need several times more time. In the salon, the masters are prepared.
Choose a convenient Manicuroff salon in Moscow. Call to make an appointment and come see us for beauty.
Common mistakes when building hair extensions
Before you do nail extensions at home, you should familiarize yourself with the common mistakes of beginners in the nail industry.
- The material does not dry out. This happens in situations where a too thick layer of varnish is applied and listened to in low-power lamps. To prevent this mistake, you need to apply thin layers of varnish and dry them in suitable lamps.
- The form is placed incorrectly. This results in too little material near the side ridges, which causes nail breakage.
- Incorrect nail architecture. Another reason for broken nails. If the architecture is not built correctly, the load on the apex increases, which leads to rapid breakage of the free edge of the nail.
- Allergy. The use of low-quality materials and individual intolerance to the components leads to a negative reaction in the form of a rash, pain, and detachment of the material.
- Fungus. Occurs during the correction of extended nails when air pockets have not been eliminated.
- Unsealed end and material flowing onto the skin. Two reasons for the material to peel off from a natural nail.
When doing nail extensions at home, you need to learn how to apply the material with a middle layer. A layer that is too thin risks cracking, and a thick layer risks breaking natural nails as they grow.