The first experience of using gel polish at home raises many questions among non-professional craftswomen. How much of this or that product is needed, how to apply the varnish correctly and how thick to make the layer. Without certain knowledge, you should not start the process, since instead of a beautiful manicure, you can get the opposite effect.
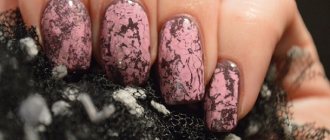
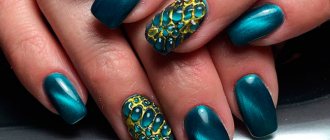
Color coating should be applied in several layers
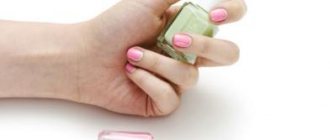
How to apply a thick layer of gel polish to your nails
The first experience of using gel polish at home raises many questions among non-professional craftswomen. How much of this or that product is needed, how to apply the varnish correctly and how thick to make the layer. Without certain knowledge, you should not start the process, since instead of a beautiful manicure, you can get the opposite effect.
Color coating should be applied in several layers
Methods for professionally applying gel polish under the cuticle
We examined the subtleties of applying gel polish according to the classical scheme. But not every girl will be able to repeat the work of a master at home. We will describe step by step how to paint your nails literally under the cuticle.
Method No. 1
It is easier to apply the coating after a trim manicure so that the pigment does not get on the skin around the nail.
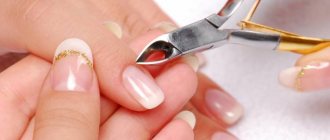
1. So, first remove the cuticle using tongs. You can skip this step and instead use a pusher to push the skin to the base of the plates.
2. Pick up pigment with a brush, squeeze out the excess on the edge of the container with gel polish. Place the brush at an acute angle (45 degrees), apply 1 thin layer. Dry, repeat 2-3 times, “pushing” the coating under the cuticle.
Method No. 2
Gel polish located as close as possible to the cuticle is considered aerobatics. Let's look at another diagram of how to apply it correctly.
1. Using an orange stick, push the cuticle to the base. While painting each nail plate, pull back the skin of the side ridges.
2. Using a thin brush, paint the area along the cuticle and periungual ridges. Dry and repeat all steps. After preparing the outline, paint the nails completely.
Method No. 3
We suggest considering another simple step-by-step method for applying gel polish.
1. Pushing the cuticle to the base, use a thin brush to paint the outline of the nail plates. With enough experience, you can do without drying. Next, immediately paint the nail with gel polish.
2. You can follow the reverse pattern: first paint the surface completely, and then use a thin brush to follow the contour as close to the skin as possible.
Reasons for the popularity of gel polish
Gel polish has become especially widespread in recent years, both among professional nail design salons and among self-taught people. Busy ladies prefer going to the hairdresser, buying everything they need and decorating their nails at home. This tool allows you to make your nails beautiful with minimal knowledge and low costs, and the effect will be higher than expected. Why is gel polish so popular?
Lumene Gel Effect Nail Polish
- This product, which combines the qualities of varnish and gel, lasts on the nails for more than 20 days! If everything is done correctly, there will be no chips, peeling, abrasions, or scratches.
- With such undoubted advantages, a manicure with a product is not associated with special knowledge; any woman can do it, saving good money at a beauty salon.
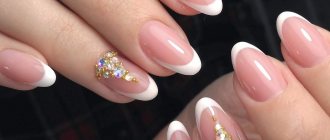
- Gel polishes are presented in a huge variety, from ordinary colors to delightful derivative shades - diamond, gold, with an admixture of sparkles and much more.
Technology of applying layers of gel polish
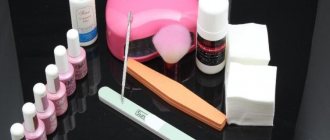
To produce a cool manicure at home, it is not enough to have only one coating product. There are several important components and tools you need to purchase. It will not be difficult to purchase them in a special store or enter them online.
You will need:
- UV lamp 36 W power.
- Gel polish of the desired color.
- Gel base.
- Lint-free wipes.
- Buff for preparing the natural nail plate.
- Top for gel.
- Sticky layer remover.
- Primer.
- Brushes, files, palettes, sanding.
The list includes at least three bases to cover the nail plate. Therefore, the question of how many layers of gel polish should be applied includes a base gel coating and a finishing layer. The application technique must be followed very carefully, otherwise the gel may peel off or break off almost immediately.
Applying gel polish
- First you need to sand the nail with an abrasive buff. If this is not done, the gel will fall off the next day.
- Now we apply the first layer - the base. A primer is applied underneath for greater durability. A primer under the base is necessary when removing plates from nail extensions. After them, the nails become thin and soft. You cannot ignore this layer, otherwise the gel polish will not stick at all. How many layers of base to apply before gel polish does not require much thought - just one. Rub a thin layer into the nail, the next step is to dry it under a lamp. Finally, remove the sticky layer.
- Apply layers of decorative coating. Typically, professionals recommend applying 1-2 layers. Ideally, one and thin, so the manicure will last longer. But in practice it turns out differently. Bright and pastel colors do not look uniform in one coat. It is necessary to do this. Apply very thinly the first time, dry under a lamp. Remove the sticky layer and repeat the process. Three layers are allowed. Three applications are needed when painting, French, or a very dark tone of the product.
- After completing the installation of the decorative layer, it is necessary to complete the work with a topcoat or finishing coat. It is applied thicker and dries for about 2 minutes. To ensure that the top has a glossy shine after removing the sticky layer, you need to cover your nails with a special Cleanser. Otherwise, your manicure will be dull, without shine or smoothness.
On a note. Never apply a thick layer of gel polish! It looks sloppy, and this manicure doesn’t last long.
Nails without waves and dents
Do not forget to treat the edges of the nail with each layer, otherwise the manicure will not look complete. Another tip - do not use anything other than special lint-free wipes to remove the sticky layer.
You can choose how many layers of gel polish you need to apply yourself during the process. One or three layers does not matter much, the main thing is that they are thin, uniform and lie evenly over the entire area of the nail. Compliance with this condition will provide you with excellent results for at least 20 days.
Source of the article: https://1gellak.com/voprosy/skolko-sloev-gel
Nail care after applying gel polish
After studying the sequence of applying gel polish, you should follow important recommendations. They will help maintain your manicure.
1. To avoid spoiling your beautiful nails after the procedure, you should refrain from going to the bathhouse/sauna or taking a bath. It is also not recommended to wash dishes in hot water. It will take 3 days to return to your normal lifestyle.
2. Gel polish cannot be filed. If necessary, adjust the shape of the free edge before applying it correctly. Otherwise, the coating will not last longer than a few days and will begin to peel off.
3. Before using cleaning agents and detergents, you must wear gloves. Otherwise, the aggressive composition will quickly damage the structure of the gel polish. The surface will become dull and cracked.
4. It is prohibited to try to remove the gel polish yourself. In this matter it is better to trust a professional. He will carry out the procedure as safely as possible for your nails. Ripping and filing of gel polish is unacceptable.
5. It is not recommended to keep gel polish on your nails longer than prescribed. This coating has its own shelf life. In order not to harm the nail plate, it is important to regularly update the gel polish. Every 2 weeks it is reapplied, removing the old layer.
Working with gel polish is not difficult if you strictly follow the recommendations. We have presented the classic application scheme and methods for creating a professional cuticle coating. Following useful tips, your manicure will not lose its appearance for a long time.
How to make your nails thicker
In pursuit of ideals, we resort to extension methods: eyelashes, hair, nails and everything that can be extended. But what's good is what's done in moderation. For example, long-term nail extensions lead to brittleness and dryness. Therefore, the question of how to make nails thicker is especially acute, and if there is a question, then there is a solution!
Some people naturally have thin and brittle nail plates - in this case it is not a matter of restoration but of improving the original material, in such cases additional care works wonders.
Good advice - how to make your nails thicker
If your nails were thick and strong, but you ruined them with various experiments, follow a couple of tips on how to make your nails thicker:
- Give them a rest. Too frequent use of gel polishes, simple polishes or regular extensions damage the nail plate.
- Evaluate your nutrition. This is said everywhere, but the condition of your nails depends very much on your diet. Nails need calcium, so try to consume a little more of it. Do not forget that fasting leads to splitting and dryness of the nail plates.
- Baths. Baths can be used as additional care. There are many different baths for nails: with salt, with iodine, etc.
- Oils. Moisturizing oils also help strengthen the nail plate. You can apply them before bed, even on a varnished surface. You will find such oils in almost any cosmetics store and at an affordable price.
How to make your nails thicker - salon care
If you prefer to have your nails extended, specialized salons will offer several ways to restore your nail plates. There are even special programs that provide rehabilitation after artificial nail extensions.
There are many ways for those who simply want to restore the attractive appearance and health of their nails. Among these services are:
- sealing the nails, in other words, treating the plate with a mineral composition, which is distributed with a polishing file. Upon completion of the procedure, silicon powder is applied.
- For additional care, you can use paper or silk wrapping. The composition is applied to the nail plate and sealed, protecting it from negative external influences.
How to Make Your Nails Thicker with a Special Mineral Sealer
How to make your nails thicker with shellac
An absolutely essential nail care routine for everyone: Cuticle care at home.
Source of the article: https://my-nogti.ru/kak-sdelat-nogti-tolshhe/
Preparation for application
Any manicure should begin with treating the nail plate and removing the cuticle. To do this, dip your fingers in warm water, then carefully cut off the cuticle or push it back with a spatula.
Then we give the nails the desired shape and process them using a sanding file. It is better to choose an abrasive buff to remove the gloss. This will ensure a better connection to the base.
The sequence of gel polish coating includes treating the nails with a degirator. It is applied with lint-free wipes. This way we remove excess fat and moisture. As a last resort, you can use alcohol or nail polish remover, but they are very drying and can even affect the final color.
It is not necessary to use a primer at home. If you want to comply with the rules as much as possible, then apply it after treating with a degreaser.
Preparing nails for a manicure with gel polish: what you need to pay attention to. TOP 10 mistakes made by beginners.
Careful and high-quality nail preparation will help the master quickly and correctly apply the color coating, as well as ensure good adhesion of the nail to subsequent layers of applied materials. Unfortunately, mistakes happen at this stage in the work of both experienced craftsmen and those who have purchased kits for home application of shellac for the first time. What are the consequences of the shortcomings made when processing marigolds and applying materials for degreasing, cleansing, dehydration and improving adhesion?
- Mistake No. 1:
The gel polish base came out with sagging.
Cause:
you have not completely removed the old coating. You need to carefully file down all the layers of the previous design with a nail file or a fraser so that the layer of the new base for gel polish lays perfectly flat on the nail and evens out all the grooves and depressions.
- Error No. 2:
microbubbles and mini-voids are visible in the layer of the polymerized base.
Cause:
During the unedged manicure process, you did not completely remove the cuticle, pterygium and eponychium. During the baking process in the lamp, microgaps formed between the nail layer and the particles of skin remaining on the nail. When wearing such a design, detachments at the cuticle and cracks may form due to water getting under the base layer.
- Mistake #3:
The color coating peeled off the nail, starting with the base layer.
Cause:
This is due to the fact that the master could skip the stage of removing the top keratin layer with a buff. Damn the nail, it’s important not to damage it. Do not apply significant force when pressing the tool on your nails and follow the correct direction of movement. Correctly buff from the cuticle to the free edge, with light movements. The same picture is observed if a nail polisher is used instead of a buff. It will make the nail smooth instead of rough, and the coating on the nail will simply not stay on.
- Mistake No. 4:
under the layer of gel polish, cracks formed in the nail plate, which led to the nail breaking.
Cause:
The result of cracks and chips in the nail is the thinning of the natural nail due to too intense grinding. The other extreme - not treating the nail well enough with a buff - can result in peeling of the coating due to the peeling keratin scales not being completely removed by the master.
- Mistake #5:
The gel polish peels off as a whole sheet.
Cause:
Pterygium particles remained unnoticed on the nail, and delaminations on the free edge were not removed. With subsequent regrowth and peeling of the pterygium from the keratin of the natural nail, the gel coating also comes off. The continued delamination of the natural nail in depth (under the gel polish) leads to detachments of the manicure already from the end.
- Mistake #6:
Shellac and gel polish chips a lot a few days after application.
Cause:
this phenomenon can have three reasons at once - the periungual ridges and the surface of the nail are poorly degreased with a special preparation; the primer application step was skipped; you touched the nail after degreasing and before removing the stickiness from the top coat. How to solve this problem?
- Degrease the nail step by step: disinfect your nails and hands with spray or foam. Next, remove the fat from the nails with a lint-free cloth, and finally treat the nails and side ridges with a dehydrator;
- Don't skip applying acid-free primer. It is advisable to use a product from the same manufacturer as the gel polish base. This way you guarantee maximum adhesion between the base and the natural nail;
- Try not to let your fingers touch the treated nails. If such an incident occurs, re-treat the surface with a stick remover and a lint-free puff.
- Mistake #7:
The coating cracks and breaks off in small pieces.
Cause:
you may not have sufficiently cleaned the nail from dust (sawdust), dirt and sebum (you did not properly treat the surface with a degreaser or used a substitute containing oil instead).
- Mistake #8:
Natural nails, even without blows, develop cracks right down to the flesh.
Cause:
nails suffered from overdrying. You or the technician may have used inappropriate preparations (alcohol, acetone, solvent) for cleaning and degreasing. Their regular use without subsequent treatment of nails with oil or cream leads to weakening, deep dehydration and thinning of natural nails.
- Mistake #9:
when using the base directly on a dried primer (the quality of both products is good and the expiration date has not expired), after a few days your coating still chips and peels off.
Cause:
If you have gone through and excluded all other options, remember: do not remove the remaining degreaser from the nail with ordinary cotton pads. You can't do this. The discs leave lint that is invisible to the eye, impairing the application of coatings and leading to a loss of aesthetics of the manicure. Residual traces of oil or cream that have not been removed are also contraindicated for gel polish (they also need to be thoroughly “washed off” from the nails with a gentle degreaser). Also monitor the quality of degreasing. If you have applied the base, dried it and see bald spots, repeat the application of the base and be sure to seal the end of the nail.
- Mistake #10:
Your client has long but thin nails, the length of which you mutually decided not to remove.
The process of creating a design with shellac and gel polish. TOP 10 common mistakes and ways to eliminate them.
If you managed to carry out the process of preparing your nails for applying shellac, avoiding all the pitfalls, do not let your guard down! Creating an image and decorating it with design also has its own subtleties and interesting life hacks.
- Mistake #1
: you carefully painted your nails with a thin layer, but after drying in the lamp you discovered polymerized streaks.
Cause:
When you or the client placed your hand in the lamp, you could keep your fingers tilted throughout the drying process. In this case, capricious or very liquid gel polishes could flow into the side rollers and onto the cuticle. You can solve this problem with the help of gel polish remover, a lint-free cloth and a metal pusher with a beveled edge. When you paint a nail, paint over the surface, avoiding the side ridges and cuticles, but also avoid gaps.
- Mistake #2
: the new gel polish chips and becomes cracked, although the design is covered with a thick topcoat.
Cause:
this phenomenon may be due to the use of an expired topcoat, a conflict of coatings (color and topcoat), or the use of a finish of poor quality.
- Error No. 3
: colored shellac was deformed after drying, bubbles and voids are visible in the coating. The gel polish has a good shelf life and was purchased from a reliable seller with a quality guarantee.
Cause:
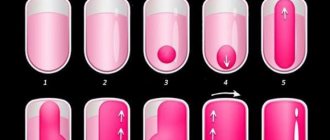
the coating was applied in too dense layers or was not dried long enough in a UV or LED lamp. Remember: the main rule of manicure with durable polymer coatings is to apply thin layers, squeeze the excess from the brush onto the neck of the bottle, and follow the manufacturers' recommendations on the polymerization time of materials. Another common reason is that you vigorously shook the bottle of gel polish before applying, which led to the formation of air bubbles in the thickness of the material. The correct way to lift the color pigment from the bottom is to roll the gel polish bubble between your palms.
- Mistake #4:
your manicure chips and becomes cracked, although you know for sure that the gel polish is of high quality and is stored in compliance with all rules and sanitary requirements.
Cause:
If the culprit is not shellac, turn your attention to your UV or LED lamp. If you have a completely new device, there may be a manufacturing defect. For a device that has been in use for a long time, it makes sense to check the light bulbs and replace them if the maximum service life has been exceeded.
- Mistake #5:
When applying layers, you do not brush the free edge of the nail with a brush.
Cause:
The secret to the longevity of shellac manicure is the tightness of all layers. If you neglect to seal, any of the layers of base, color, or top coat may peel off due to exposure to water, housework, or careless handling of the manicure.
- Mistake #6:
You love to create manicures by mixing colors and creating unique shades. However, despite all the tricks, the coverage lasts less than 14 days.
Cause:
Poor wear may result from mixing colors from different brands, or using a base, top, color, primer and dehydrator from different manufacturers. It’s not for nothing that brands recommend a “family” approach to purchasing materials for gel polish manicure. The fact is that the formulas of all shellac manicure products are created in such a way that their components complement each other and provide maximum durability to the design.
- Mistake #7:
Your manicure shows record wear time, but decorative elements quickly chip, become cloudy or peel off.
Cause:
The secret to high-quality fixation of decor is fixation with a second layer of topcoat, which beginners often do not do. For rhinestones, especially large ones, it will be good to coat the gaps between the crystals with topcoat. And for painting or liquid stones, it is extremely important to comply with the drying time in the lamp. A thick multi-layer design should not be dried for less than 3 minutes on the final layer of topcoat. An excellent solution for the master would be such well-proven top coatings as CND Duraforce and Tnl Viscous. Their thick, rich texture is specially designed for extra-strong fixation of decor and reliable protection of manicure.
- Mistake #8:
You use both completely new coatings and materials that have expired and are about to expire in the same design.
Cause:
It is not advisable to use old gel polishes for manicures. From the time the bottle is opened, the texture of the product changes; shellac can be applied in thick layers. When they dry, air pockets are formed, leading to inevitable detachments.
- Mistake #9:
You apply gel polish and shellac to nails that are too long, and clients soon complain about chips and cracks.
Cause:
Practitioners advise not to apply gel polish on nails that are too short. Either increase the minimum length with gel on forms, or advise the client to come for a manicure as soon as at least a small free edge has grown. The fact is that contact of the edge of the nail with the pads of the fingers is fraught with the transfer of subcutaneous fat, traces of household chemicals and sweat from them. If the nails themselves do not wear shellac well, such contact with sweat and fat secretions will inevitably lead to detachments.
- Mistake #10:
Your client has little time for design, and you are in a hurry to create a finished image without observing the required number of layers, their drying time and the density of the materials applied.
Cause:
a hastily created image will not please you with longevity. The nails should be painted slowly and carefully, lightly coating the ends on each layer. If you are working with a UV lamp, dry the layers for at least two minutes each. For greater durability (especially with problem nails), the base and color should be applied in two layers each, and for voluminous and textured decor, re-coat the manicure and top coat.
Application process step by step
Remembering the sequence of a gel polish manicure is quite simple. It uses a base, colored varnish and finish.
- First you need to apply a base coat to your nails. Use a quality base and you won't have to worry about how long your gel polish will last. The base also provides additional protection against color pigment. It must be applied in a thin layer so that voids do not form. It is better to leave just a little product on the brush and carefully distribute it, starting from the tip of the nail. We seal the end. If gel polish gets on the skin, remove it with a wooden stick. Then dry it in a lamp for 2 - 3 minutes (10 seconds if it is an LED lamp).
- The color layer must be applied in the same way. Make sure that the product does not spread around the edges, otherwise unevenness will form. Dry the gel polish in a lamp. Typically, for a high-quality coating it is necessary to apply 2 - 3 layers. Each of them is dried separately. Do not remove the sticky layer of colored varnish.
- The manicure sequence includes the application of a finishing agent. The top, like the base, seals the edge of the nail. The finish can be applied in a slightly thicker layer, but it also takes a little longer to dry. Remove the sticky layer using a degreaser. Once completed, use cuticle oil.
This is interesting: How can you replace a vibrator?