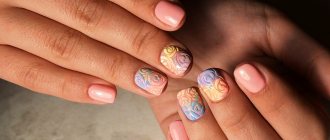
The snake print trend is still in fashion. Fashion designers actively use it in all seasons, coming up with new ways to design clothes with snakeskin prints. It is believed that the “reptile” design with gel polish will go perfectly with them. Create a beautiful and unusual look, add variety, using a manicure with a snake skin pattern.
Reptile manicure looks beautiful and rich
Genuine leather has long established itself as a high-quality and expensive material, especially when it is used to make clothes for fashionistas or leather accessories. It's not just things that are prestigious. In beauty salons they even do manicures with real snake skin. Nail art masters have learned to use the skin of snakes, which they shed when they shed.
This option for decorating your nails is called biosculptural. Visitors to beauty salons are offered to choose the pattern they like and make a manicure from it. Fashionistas eagerly use this method to decorate their nails. This allows you to make your manicure unique, because snakes have a unique pattern on their skin, and such a manicure will be truly exclusive.
Cost and options for making a “snake” manicure
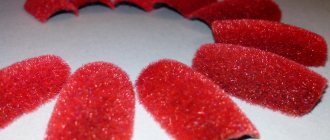
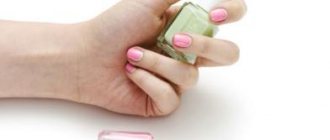
The technology is quite simple. A nail art master makes blanks from snake skin in the shape of a visitor’s nails. Then the nails are painted with a dark base and blanks made of natural snakeskin are applied. Next, everything is covered with a transparent fixative. This technology helps highlight the pattern with a base that highlights the texture of the snakeskin. This manicure has an exclusive shape and color scheme, for which you have to pay a lot of money.
According to representatives of the fair sex, in the USA you can pay from 150 to 300 dollars for such a manicure in beauty salons. The price is clearly too high, given that such a manicure can be easily done by yourself at home. Snake skin can be purchased from 700 to 1200 rubles per 40 cm crawl of a non-venomous snake.
This option is not suitable for everyone, because snakeskin is not sold in supermarkets within walking distance. There is a way out of this situation, and this is an option using the tools and materials for manicure that are familiar to us. The cost of such work is significantly lower than its predecessors made from natural materials, but the result of the manicure itself remains at the proper level.
Manicure with snake skin effect with gel polish: step-by-step instructions
Gel polish is rapidly expanding its area of use. Everyone knows its excellent characteristics: durability and brightness. Today we will open new possibilities for the product. For a “snake” design, prepare the entire standard set for working with gel polish. Choose two contrasting shades: dark and light.
- We begin the procedure with the traditional careful processing of the plate: filing, degreasing, polishing with a buffer, applying a primer.
- Apply the base in a thin layer, dry in the rays of the lamp for the required time - 2 minutes. Cover the entire plate thoroughly, without missing even a millimeter.
- Paint the nail with dark gel polish and dry for two minutes.
- Apply a light layer over the dark layer, but do not need to dry it yet.
- We begin to apply the finishing coat in droplets onto the undried layer of gel polish. The best way to do this is with dots. It is necessary to dip the tool in gel polish and place dots on the nail. The top color layer will begin to blur, and the dark gel polish will be visible through it. This is how peculiar scales similar to snake skin are created.
- We polymerize the coating for 2 minutes.
- Apply the final layer of topcoat and dry thoroughly too.
- Remove stickiness with a special product.
Using a mesh for a “snake” manicure
It’s not difficult to create a snake manicure with gel polish, but you need to have the following:
- We will need varnishes: dark shades, as well as light ones (golden, pink, etc.)
- The mesh itself.
Stages:
- So, you need to treat your nails. This must be done carefully and efficiently; the quality of the manicure itself depends on this. Then coat your nails with a light polish of your choice.
- The base should dry a little, and then the mesh is placed on it, the whole thing is covered with dark-colored varnish.
- We wait a little time for the layer with the mesh to dry, but not completely dry, and remove the mesh.
If you want to preserve the natural texture of snake skin, you will have to abandon the fixing varnish.
Helpful Tips:
- Try experimenting to achieve a different result. You can use several shades, but you need to change the location of the grid.
- Try using several different meshes with different mesh sizes.
- Do not use a brush to apply the base coat of varnish. For this case, a sponge is better suited.
Accessories for creating reptiles on nails
To do a manicure with a reptile effect yourself will require quite a lot of concentration and a lot of free time. Therefore, if it is important for you to preserve such an original design on your nails for as long as possible and not regret wasted efforts , I recommend creating it on a gel basis.
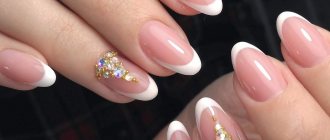
Using snake nail art elements, you can highlight the free edge of your nails
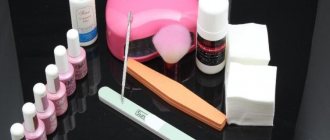
For a long lasting design we will need the following accessories:
- cotton pads and sticks;
- means for degreasing the nail plate;
- orange nail sticks;
- transparent base;
- primer;
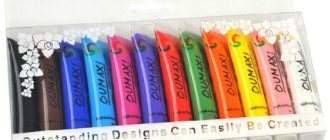
- colored gel polishes;
- design brush;
- dots;
- top product;
- lamp for polymerization.
Before decorating your nails, prepare all the necessary tools
When decorating a nail plate with your own hands, you may also need:
- nail scissors or tongs;
- nail files;
- nail buff;
- cuticle remover;
- cuticle oil.
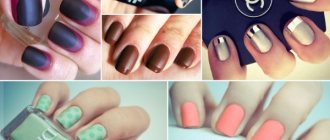
A bold reptile-style design is not suitable for every day, especially within the strict dress code at work, but only for special occasions - informal settings, meetings with friends, etc.
Photo instructions for one of the options for designing a nail plate in the “reptile” style
Method 1. Reptile style manicure in 10 steps
All the accessories listed above and about an hour of free time will help us make a manicure with reptile gel polish. I suggest you familiarize yourself with the whole process step by step:
| Illustration | Description | |
| Step 1 | Using an orange stick, push back the overgrown cuticle to the base of the nails. You can first apply a softening composition or take a warm bath. | |
| Step 2 | We adjust the length of the nails with a nail file and sand the nail bed to remove layering and ensure uniform coverage. | |
| Step 3 | Apply primer to treated nails and wait for it to dry. | |
| Step 4 | Cover the nails with the base product and dry in a lamp for 1 minute. | |
| Step 5 | We apply colored gel polish in two layers as a basis for the future design and polymerize it in a lamp. You can use both plain options and “cat’s eye” or other iridescent textures. | |
| Step 6 | To create the cat's eye effect, we use a special magnet. It must be placed on top of the coating, but not pressed. | |
| Step 7 | We remove the sticky layer from the coating so that the future design will stick better and not spread. | |
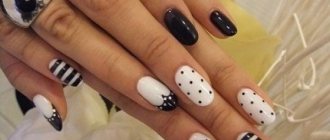
| Step 8 | Using a brush, draw hexagons with contrasting varnish - wide in the center and small in size along the edges of the nail. | |
| Step 9 | Using dots or a toothpick, fill the voids in the hexagons to create a three-dimensional pattern. | |
| Step 10 | Dry the resulting pattern in a lamp and remove the sticky layer. | |
The price of such a design in a showroom can be up to 2,500 rubles.
How to avoid drops of contrasting nail polish from spreading on your nails? To do this, just dry each of them for a few seconds in a UV lamp.
Carefully applying a pattern with the tip of a varnish brush can replace the missing dots
Method 2, 3, and 4 - how to make a “reptile” with regular varnish
If you don’t have a special kit for long-term coating or you still feel a little unsure about creating a complex design, I suggest trying simplified options with regular varnish.
Instructions for decorating nails in different ways:
| Illustration | Description |
| Method 1 Using homemade or purchased strips with an adhesive edge, you can create a pattern reminiscent of a “reptile” manicure:
| |
| Method 2 Using a mesh applied to the first coat, on top of which a contrasting varnish is applied. | |
| Method 3 Using store-bought stickers, you can give your nails an unusual “reptile” style look. |
Elements of the “reptile” design can be complemented with a classic manicure.
Manicure in the form of “reptile skin”
We use minx film. This will help you create your own unique nail design that looks like reptile skin.
The easiest and slightly more expensive way to create a snake pattern on your nails is to use Minx thermal film. Of course, this option will not add exclusivity, but it does exist. The variety of patterns and prints is quite large. There should be no difficulties in choosing a design for yourself.
To create a snakeskin manicure at home, you need to have thermal film with a snake pattern and an ultraviolet lamp.
Stages:
- Polish the nail plate, treat thoroughly and be sure to degrease the nails.
- Make blanks to fit your nails.
- Place the film under the lamp and heat it for about a minute.
- Then take the film and place it on your nail. This must be done carefully so as not to spoil the entire manicure. A manicure stick will help you smooth out the film on your nail.
- Excess pieces of film can be removed.
Helpful Tips:
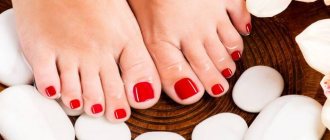
- A snakeskin manicure is more suitable for those with not too long nails.
- It is better to use a glass file to file nails.
- This manicure does not like moisture.
Use these ways to decorate your nails to stand out and attract the attention of others. Images using manicure with a snake pattern allow you to be more confident and attractive.
Creating simple designs on wet surfaces
If this is your first time deciding to make a nail design using a wet gel coating, then we recommend starting with simple drawings:
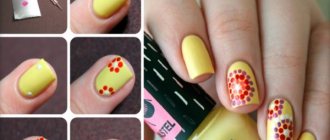
- Marble nail art or imitation of natural stone (garnet) on nails. To create it, you need to paint your nails red, dry them in a lamp, then you can immediately start making designs using wet gel polish. Choose a light palette, put a few dots with a brush and use a brush to shade the paint in any direction, as if imitating the stains of stone.
- Imitation of reptile skin. For this option you will need magnetic cat eye polish. Using dots, place lines or dots depending on the design and then, using a magnet placed at a short distance, stretch the design (along, across or obliquely).
- Cobwebs, stains, spirals. This is perhaps the easiest nail design with wet polish. You don’t even need to look at the diagram or practice. For a simple nail look, just put colored lines with a brush or dots and draw along them with a toothpick or a needle, creating blurry or clear lines.
- Dots, circles. This effect is easy to achieve - you need to place dots all over the plate and wait until they blur. For a more interesting design, you can again use magnetic paint.
And for those who have already gotten better at it, we recommend trying to make a drawing or painting on a wet surface.
Photo of reptile gel polish nail polish
Even more photos at the link: Reptile gel polish with photo.