Stylish look also implies having a beautiful manicure. There are many techniques that make it very easy for beginners to master gel polish design. This technique includes patterns on nails with a needle. Schemes of such nail art can be easily found on the Internet to master its creation step by step. Therefore, always start by studying the diagrams.
Drawings on nails with a needle
A manicure can set the tone for the entire image. It’s so easy to diversify your look, causing everyone’s admiration. The most important manifestation of such a manicure is a thoughtful pattern. Just how to paint your nails beautifully, where to get inspiration? In fact, learning how to draw with a needle step by step is very simple.
For a manicure at home you will need the following materials:
- different colored nail polish;
- primer, base, top;
- needles of different diameters (can be replaced with a toothpick, dots would also be a good alternative).
With a thinner needle you can make the curls of the pattern more graceful. But you will also need a thick needle, which can be replaced with a dots needle. With its help you can make a beautiful flower or other large element on your nail.
It is better to start mastering the technique with conventional coloring agents. Then a primer with base and top will not be required. But clear varnish will be needed. Take nail polish remover - this way you can immediately correct unsuccessful experiments.
Of course, without skill it is inconvenient to draw with needles - they are small and thin. But you can resort to a little trick: you can insert the needle into a regular pencil or fix it in an empty pen using a plate. Then drawing will not cause you much trouble - you will draw various valves, curls and ornaments, just like with a regular pen.
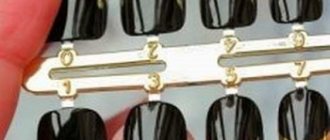
You should start with abstract patterns - without experience, it will be difficult for you to recreate the same pattern on all nails. It would be a good idea to first practice on artificial tips.
Nuances of nail design in Chinese technique
To decorate a manicure made using the Chinese painting technique, you can use additional materials: rhinestones, sparkles, foil. The main thing is not to overdo it with bright and shiny elements, otherwise the delicate and natural design will be lost against their background, and the design itself will become vulgar. The same applies to the black outline of the drawings, clear contours, as if in children’s coloring books; they are absolutely inappropriate for Chinese painting.
Where to begin?
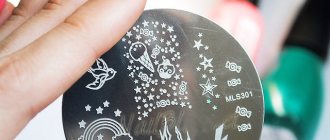
Even experienced craftsmen begin work by creating sketches on paper. Beginners should also practice well first, honing the technique of different strokes until it becomes automatic. There is special paper on sale for sketching Chinese-style nail art, but if necessary, it can be replaced with thick glossy cardboard, which is sold in the “creative” departments of stationery stores. Choose dark cardboard to better see the boundaries of the design and small flaws. In addition to paper and cardboard, you can purchase training cards (pictured below), they will help you get better at various patterns and hone your skills.
Start with simple drawings, gradually moving on to more complex patterns: from individual elements (strokes and strokes) to creating branches, petals, buds, and then whole flowers and wood patterns. Do not apply too much paint on the brush, otherwise the drawing will turn out to be too convex, and it is also worth working on a smooth background without bubbles. You should move on to working with the nail plate only after you have worked out all the strokes and created several full-fledged sketches.
Step-by-step master class
Nail design using the Chinese painting technique requires precise and confident movements from the artist. First, a base coat is applied to the treated nail, then the selected background. Beginners are advised to start with light and pastel shades. The following steps are performed step by step:
- The central element is drawn using a flat brush without lifting.
- Patterns are applied to the dried base of the flower according to the sketch, in two shades with an intermediate transition.
- Draw leaves, shoots, stems.
- A final transparent coating is applied to the dried drawing.
A master class on creating a simple design with rose buds on nails includes the following steps:
- A background color (contrasting dark blue, gray-blue or blue) is applied to the treated nail with regular varnish.
- A flat brush is dipped with different sides into white and pink acrylic paints on the palette.
- Using a flat brush, paint the upper part of the rose, then turn the brush 180 degrees without lifting it off and paint the lower part of the bud.
- For the leaves, use green in light and dark tones, a palette and an angled brush (it is also dipped in two different colors).
- Use a thin liner brush to paint stems and plant patterns.
- After 15 minutes, after complete drying, the resulting pattern is coated with a final colorless varnish.
You should not try to ensure that all designs on different nails are identical. Manicure design in the Chinese style welcomes variable images of plants in the same theme, color scheme, but of different sizes. Thus, the overall picture will turn out to be natural, like nature itself, which does not tolerate repetition. Be inspired by our photos, bouquets of wild and garden flowers, summer landscapes and create your own unique nail art using the popular Chinese painting technique!
Related Posts
leave a comment
For short and long nails
Let's consider options for the simplest designs on nails with your own hands, taking into account the length of your nail plate. If you have short nails, then the main thing is not to overdo it. A minimum of patterns is the main rule of successful design! It is also better not to use large and thick ornaments - they look rather tasteless. It is better to decorate just one or two fingers on each hand with delicate thin curls.
But for long nails there are no restrictions. But you should still follow some rules:
- It is better to draw patterns on a thick layer of the base coating.
- Start with simple shapes. These include: stains, twigs, peas, leaves, roses, stars, butterflies.
- Usually done on a single-color coating, but you can experiment. For example, you can divide the space of the nail with two shades of polish, applying a different pattern to each half.
- The drawing should start from the little finger, then you will prevent the shape from breaking.
- Create shallow strokes when you draw specific images.
- You can only draw on the ring finger - this technique is very popular now.
- Additionally, if desired, any design can be decorated with stickers, decorative ribbons, and sparkles.
Schemes of drawings and patterns for beginners
Painting on your nails with a needle is not that difficult. Below we have provided several detailed diagrams that will tell you how to draw patterns, both the easiest and more complex ones.
Master class with a cat!
Drawing technique
There are two main techniques for applying images with needles:
- Dry . Apply drops of varnish to the already dry varnish, creating beautiful stains on the surface using a needle.
- Wet . Apply the drops directly to the wet varnish, quickly using the needle.
Of course, the first technique is preferable for beginners due to its simplicity. But in the case of the wet version, you need to have time to create a certain pattern before the varnish dries. In the case of gel polishes, the task is simplified - they will not dry without a special lamp.
The application scheme is very simple. Apply drops of varnish of the desired color to the main background. Start moving the needle from the middle of the drop beyond it, drawing some kind of pattern. In this way you can create circles, lines, figures of eight, flowers, leaves. You can paint with several colors of varnish at once - this way the result will be more impressive.
Preparing for a manicure with a needle
The preparatory stage, which precedes the application of the original design, involves performing a regular manicure, giving the nail plates a beautiful shape, removing or pushing back the cuticle using an orange stick.
It won’t be superfluous to degrease your nails. This will ensure good adhesion of the material to the top layer of the nail plate. Clean your hands from sawdust residue. In general, in preparation, do everything that a standard nail care routine would suggest before applying polish.
The main element that makes this manicure stand out is the drawing with a needle . In order for it to turn out well the first time on your nail, it is better to train your drawing abilities. Glass can serve as a test site. On it, using a corner or a toothpick, it’s worth trying your hand at it. When simple patterns come out well, you can move on to implementing more original ideas.
Drawing on gel polish
If you have artistic skill, then you can create real works of art on your nails. With the help of gel polish, the resulting manicure will delight you for a very long time - up to three weeks. Consider the option of creating a manicure using a varnish strip and a needle.
- Prepare your nails thoroughly - this is the key to wearing gel polish for a long time. To do this, remove the cuticle, process the side ridges, and give the nails the desired shape. Sand the surface of the plates using a buff.
- Apply primer for better adhesion, followed by base. Dry in a lamp. In a UV lamp, the base layer dries for two minutes; in an LED lamp, half a minute is enough.
- Next, apply a layer of colored varnish and dry. It is always better to apply gel polish in two layers - this way the color turns out more saturated. But at the same time, the layers should be very thin, do not put a lot of varnish on the brush. The manicure will also be more neat; it will be easier to apply the polish as close to the cuticle line as possible.
- In the middle of the nail, draw a stripe in a contrasting color or simply apply stripes of dots. After this, do not dry the varnish, but immediately proceed to painting.
- Use a needle to make wave-like movements from the center of the strip beyond its outline. Repeat these steps on the other side of the strip. Complete the resulting pattern with small chaotic dots that can be applied with dots.
- If you are satisfied with the result, dry it safely in a lamp. If not, remove the layer of wet varnish and try again.
- Don’t forget to secure the finished result with a finishing coat and seal the loose ends well - this will guarantee that in just a few days there will be no chips or cracks in your manicure.
Simple and beautiful monograms with shellac, gel, acrylic
Creating designs in the form of monograms can be the main decor for a manicure or additional on some nails, using the main elements. The work process is carried out using acrylic, shellac, gel, and goes well with sparkles and rhinestones. Monograms are drawn using a needle or brush.
Volumetric
Volumetric monograms are patterns combined with volume that give a convex effect to the design and are quite easy to reproduce. To work, you will need gel paint that does not stick - the designs are applied over the topcoat.
Each component is drawn with a thick curl and immediately dried under a lamp for 10 seconds. It will be enough for the material to dry out and not mix with subsequent curls in the composition.
With French
First, a French design is made on the nails, decorating the top with patterns of simple weaves. The difference between this nail art is the spirals painted on the sides of the nail plate, usually on one side, complemented with rhinestones.
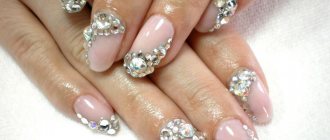
With rhinestones
Strokes with the addition of shiny stones look especially stylish and graceful on long nails. Professional craftsmen advise emphasizing the brilliance of the design by combining decorative elements and a plain background. You can use rhinestones to highlight the middle of the monogram, and also place it along the edge of the hole itself.
With acrylic powder or sand
To create monograms, you must also use acrylic powder and varnish with a sticky property:
- Cover the drawn pattern with a sticky layer of varnish.
- Using a wide brush, gently powder. The decor will be evenly distributed, the particles will be fixed without crumbling later.
- Dry the resulting manicure under a UV lamp.
This design is suitable as a DIY nail design. It should not be combined with other techniques.
With glitter
You should treat the nail surface in advance, painting it with a varnish base. Having decided on the choice of the desired sparkles, they should be applied with a hairpin or a toothpick dipped in water along the contour of the indicated pattern. The final stage of the procedure is drying and applying a bleached fixative.
With openwork
The most complex and somewhat painstaking technology in manicure design. The finest mesh, similar to lace fabric, carefully drawn over the entire surface. To facilitate this method, there are special stencils. Working manually, with the simultaneous use of different tones, requires a clear image of the future picture.
You can diversify your nail design with drawings and decorative elements. A step-by-step brief description of the work processes for beginners and photos will help you acquire skills and learn how to combine various techniques for applying gel polish.
Adviсe
To have beautiful nails, visiting a nail salon is not necessary. Master the art of nail art at home and please yourself with beautiful and well-groomed hands regularly at no extra cost.
Just take into account a few nuances so that the resulting result never disappoints you:
- think over the design in advance, first you can recreate it on tips, and then try to transfer it to the nail; choose the colors of varnishes so that they harmonize with each other;
- movements with the needle should be light - you can damage the nail with it;
- start painting with your non-working hand so as not to leave the most difficult part for later. If this is difficult for you, then let a friend or someone else help you;
- Always seal your designs with a clear polish or top coat to ensure your manicure lasts longer.
Believe me, beautiful nails are easy! Start experimenting, use your imagination and everything will work out for you. Watch training videos or photos with a finished manicure - this will motivate and inspire you to immediately start creating masterpieces on your nails.
Ways to create a manicure
Stripe nail designs are suitable for all occasions. It can be used in everyday life, at work or at a special event. A neutral stripe design on nails is ideal for a business meeting or office, while a bright, unusual design is ideal for vacation.
The stripes themselves can be located in different directions: horizontally, vertically, diagonally, or intersect with each other and be of different thicknesses. And the substrates can completely depend on the intended design.
There are many ways to create a manicure with stripes.
- Drawing lines by hand using a thin brush. But this option is suitable for experienced craftswomen, because the lines should be smooth and clear.
- Making strips from scrap materials, for example, thick cellophane and varnish of the desired shade. On the cellophane acting as a substrate, you need to apply a layer of varnish and wait until it dries. For a denser color, you can make another layer. After the coating has completely dried, you need to separate it with tweezers or simply pry it off with your fingernail. Then cut this piece of dried varnish into strips of the required thickness and use it in a “striped” design.
- In the nail industry, there are special glossy ribbons for creating this manicure. They can be fixed on top of the coating or used as a stencil for future stripes. You can also use office adhesive tape, but it must be glued to a well-dried surface.
- Using foil for manicure. It exists in a variety of colors. Strips are cut from it and glued to the nails in any order.
Step-by-step instructions for manicure “Twigs” 2016 photo
Can be done with both yellow and green paints. Do it step by step in the following order:
- Apply any varnish, the desired “delicate” color.
- From the bottom to the top corner, paint two curved stripes (branches) with rich yellow acrylic paint.
- Use the same color to paint small leaves on each branch.
- Paint the middle of each leaf with a lighter shade of paint.
- Apply clear polish to seal the design on your nails.
What drawings are in fashion
Fashion trends in the world of nail art have never been consistent. Every season, completely different techniques and designs become the “favorites” of fashionistas. What drawings were awarded this title in 2022?
The undoubted leader has become the minimalist style in manicure design. Elegant and laconic designs are a wonderful decoration for the nails of a girl with impeccable taste.
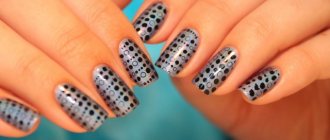
Geometry in nail art continues the idea of stylish simplicity and rigor. This design can be embodied with a charming “polka dot” pattern, abstract lines and geometric shapes.
In the spring-summer season, beautiful flowers begin to bloom on the nails of all fashionistas in the country. Absolutely any floristry is trending: unopened buds, various flowers, leaves, twigs and tropical plants.
Various patterns join these trends. The top features ethnic and lace motifs.
Animal art is not far behind: the leopard familiar to you from previous seasons is joined by various animal images. They may differ in realism or be emphatically sketchy.
The most delicious and original this season will be “edible” drawings. Amazingly natural strawberries, ice cream, various fruits and sweets - this and much more can become an extraordinary accent in your manicure.
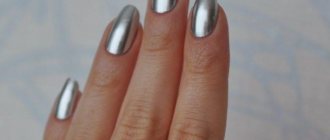
Step-by-step instructions “Golden pattern” 2016 photo
To create an artistic painting you will need a base varnish, black or dark brown varnish, gold varnish or gold glitter, a fixative varnish, and thin brushes.
Execution steps:
- Cover your nails with base coat.
- Apply black (dark brown) polish to your nails and let dry.
- Using a brush with gold varnish, draw any lines or other design on a black background. The main thing here is to ensure that the pattern does not turn out sloppy. You can simply apply gold glitter to a black surface.
- Cover your nails with a fixative varnish.
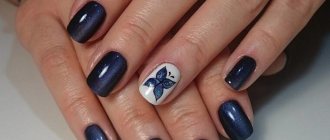
STYLISH FLORAL MANICURE IDEAS
Summer flowers (daisies, pansies) are suitable for young beauties. Romantic beauties are happy to paint roses, charismatic women like peonies, and manicure designs with poppies are chosen by purposeful ladies who know a lot about men.
So that you can choose the nail art you like and see how impressive it will look on your nails, we have prepared a collection of photos for you. Elegant flowers on nails will serve as a magnificent decoration for your hands. Enjoy viewing the photos and let them give you creative ideas that you want to implement in your own manicure.
What do you need for nail art?
A manicure with a needle should begin with the preparation of all the necessary tools and tools. For this you will need:
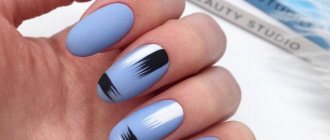
Photo 2. Manicure with a two-color needle.
- a series of needles of different lengths and diameters;
- toothpick;
- clear nail polish or sealer;
- paints of your favorite colors;
- table;
- good lighting (table lamp);
- nail file;
- acetone;
- dry wipes.
Toothpicks, as well as small and large needles, are used to create decorative elements of varying complexity. For example, large needles are suitable for drawing flowers, while thinner ones are suitable for veins and stems. If you need to fill in an image or a stain, you will need toothpicks or gypsy needles.
Return to contents
Consumables for manicure
To create Chinese-style nail art, you will need varnishes (regular, shellac or gels): colorless for creating the base, neutral for the background and transparent for the topcoat. You also need napkins, water for paints in a jar, a palette, brushes and acrylic paints.
Brushes for Chinese painting need to be purchased in several types:
- flat – to create the main picture;
- fan - for background and grass;
- beveled - for drawing branches, stems, chaotic patterns;
- liner - for small parts;
- brush - for shading, giving naturalness to plant elements.
To create nail designs in the style of Chinese painting, high-quality acrylic paints are used. To begin with, you can take ordinary art paints of good quality without spending money on professional consumables. Acrylic is absolutely non-toxic, easily diluted with water, mixes well and dries in about 10-15 minutes, since this paint is water-based. If silicone is present in acrylic paints, this will make it easier to create natural wood and plant patterns.
A palette or foil is needed to mix shades and create that unique stroke with a flat brush without tearing off, giving stunning play of colors and halftones. The selected paints are applied to the palette side by side, parallel to each other. The brush is dipped on one side in a light shade, the other in a dark shade, and a line is drawn so that these colors are mixed in its center, as in the photo below.
Advantages and disadvantages of acrylic French manicure extensions
To get an objective idea of modern technologies, you must understand the difference between gel and acrylic. Since our article is devoted to acrylic manicure, we will focus on this material. Let's look at the situation from the side of a client who wants to get a great one.
- First of all, acrylic has a persistent and very specific smell, which many associate with a hospital. This is a stumbling block for a number of beauty salon clients who do not want to experience discomfort during the extension procedure.
- The next major drawback is related to health aspects. Acrylic does not allow nails to breathe, which can have a detrimental effect on the condition of the nail plate. Also, due to the presence of chemicals in the material, it can cause allergies.
- The advantages of acrylic include its strength and, as a result, the durability of the manicure. In addition, acrylic French extensions will cost you less than gel ones. Some people think that they look more elegant and are as close to the natural version as possible. But this advantage is, of course, subjective.
All other features relate more to technical aspects. For a professional master, as a rule, it is not difficult to switch from acrylic to gel, and vice versa. Of course, qualified nail service specialists today prefer to work with gel. But not everyone loves and accepts new products, so some continue to do things the old fashioned way.
Let's move on to the next important point. What can be said about the visual side of the issue?