How was French manicure invented?
Let's delve a little deeper into history and find out where this design even came from.
The idea was born in the 1970s, not in France, as one might think, but in the USA. The founder of the famous brand ORLY, Jeff Pink, received a request from a Hollywood director asking him to come up with a manicure for actresses that would match all outfits.
At that time, ORLY produced special white pencils that were used to paint the area under the free edge of the nail so that the nail plates looked clean and tidy. The problem was that after each hand washing, not a trace remained of the product. Then Pink came up with the idea of applying a white stripe not under the nails, but on them - on the tips. And to achieve durability, do it with white varnish. As a result, Jeff soon presented the director with an innovative manicure - a white stripe on a natural-colored base. He called it natural look. And what better fits absolutely all images than naturalness? The director was delighted and said that Pink should be given an Oscar for his invention.
Step-by-step instruction
Any gel nail design begins with basic treatment of the nail bed. The smoothness of the finished manicure depends on this stage.
A rough manicure takes about half an hour:
- Treat your hands with antiseptic.
- Use a file to remove excess length and adjust the shape of the free edge of the plate.
- Use an orange stick or pusher, pre-treated with an antiseptic, to push the cuticle to the base, lift it slightly.
- Use pliers to cut off the raised epidermis.
- Polish the surface with buff.
- Remove excess sawdust with a brush.
- Apply dehydrator to degrease the coating.
Since the camouflage gel completely follows the shape of the nail, filling it evenly, before performing the technique you need to make sure that the nail plate is absolutely flat.
Sometimes a girl is recommended to pre-level and strengthen the nail bed using a dense, thick gel. This way you will eliminate all the unevenness on your nails and create their correct shape (for example, if the tip of your nail is pointing down, it can be visually normalized).
After this, you can begin the procedure:
- Apply one coat of primer (optional) and let dry. It will increase the adhesion of the surface to the decorative coating.
- Apply one base coat, let it dry.
- Cover your nails in two layers with camouflage gel polish. It is recommended to apply two coats to completely cover the natural nail. If the natural free edge is visible, the jacket will not turn out neat. Sometimes you can apply 3 thin layers of camouflage.
- Paint over the smile area by making a neat stripe at the free edge. It is not always white, but it is recommended to choose a color that contrasts with the camouflage. Be careful - you can only apply it in one layer, so you need to take a fairly large amount of varnish, carefully distributing it over the nail. Dry your nails after this step (30 seconds will be enough).
- If desired, customize the design by adding stamping, stickers, designs or rhinestones.
- Fix the result with a final layer of topcoat and dry it in a lamp.
- Remove the sticky layer.
French is a rather complicated technique, since not all girls are able to draw an even smile line the first time. To do this, you need to have a little skill and high quality white varnish.
Keep in mind that a French coat takes much longer than a regular plain coating. Typically, a girl needs up to three hours to complete her manicure.
Why is manicure called French?
Soon, Jeff Pink went to Fashion Week in Paris, where he offered a new manicure to models, who had to change their outfits even more often than actresses. The models and couturiers really liked this nail design, it was a triumph for Pink.
Returning to the United States from Paris, right on the plane, Jeff decided to rename his brainchild “French manicure,” because France is a symbol of fashion and the cradle of fashion ideas.
Current colors for French jackets
The variety of gel polishes is so huge that it can be difficult to choose a single color. We hasten to reassure you - any color looks great with a French jacket. These can be classic white, black, burgundy, or unusual options: turquoise, purple, green, yellow, etc.
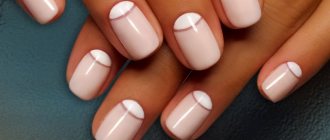
When thinking about creating a French coat with gel polish, you need to determine the main shade for yourself in advance. It is he who will show off on the edge of the nail plates. As for drawing a “smile”, there are also many interesting options:
- monochromatic classic coating - no frills, just the usual colored jacket
- manicure with ombre - the edge of the nail plate is drawn in such a way that it contains several shades at once with a smooth transition
- French with a triangular edge is an excellent option for square and rounded nails
- Twist French - combines 2 shades for drawing the edge of the nail plate
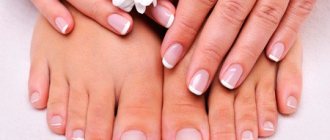
As you can see, French has come a long way from its classic “progenitor” and is transforming with each season.
How to do a French manicure at home: technology
Although it seems so simple, French is actually not so in the process of execution. Drawing an even and clear smile line is a rather difficult task. Let's look at the step-by-step technology for creating a classic French manicure with gel polish at home. Is it even possible to make the perfect French jacket at home? Spoiler: quite real!
Stage 1. Nail preparation
- We prepare nails for a French manicure in the same way as for any other type:
- Remove the old coating from the nails. Nail plates must be absolutely clean.
- Using a remover, soften the skin.
- Use a pusher to push away the skin. If necessary, we trim it with scissors if the cuticle is very overgrown or too dry.
- We soak an orange stick in water and use it to clean off the pterygium.
- We treat the surface of the nail with a soft file, removing the natural gloss, which will subsequently prevent the nail plate from adhering to the artificial coating. We brush away traces of sawdust.
- We wipe our nails with lint-free wipes soaked in degreaser to get rid of harmful bacteria and contaminants.
- If your skin is prone to oiliness, then use a dehydrator - apply it to the entire surface of the nail and leave it in the air for about a minute.
- The next stage is the primer, a special preparatory coating that acts as double-sided tape and promotes excellent adhesion of the gel polish to the nail. Apply it to the entire surface and air dry for a minute.
Voila, your nails are ready for French!
Stage 2. Applying gel polish
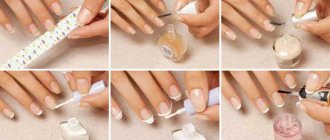
- Select the color of the base from among the camouflage bases. Apply 2 layers to the nail, dry each one in a lamp, do not remove the stickiness.
- Take white gel polish and use a thin brush to draw a smile line. After this, paint over the entire free edge. Dry it in a lamp.
- Cover with top. Let's polymerize. If the product has a sticky layer, then wipe the nail with a lint-free cloth with a degreaser.
French nail polish
If you are in doubt about the best way to do a French manicure at home at minimal cost, then start with a regular one.
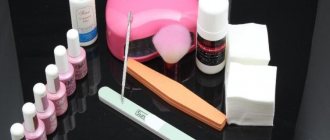
nail polish. Both ready-made kits and all components separately are available for sale. The kits usually include:
- base coat;
- pink camouflage;
- white nail polish for a smile;
- top coat for durability and shine.
To get an even smile line the first time, use stencils for a French manicure.
How to draw a straight smile line?
It’s great if you know how to draw the coveted thin French line exactly, but what if not? Don't worry - there are ways to make this task easier!
Stencils for French
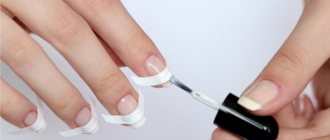
The simplest and most ready-made option is self-adhesive stencils for creating a smile line. You need to carefully place the stencil strip on the polymerized camouflage base, leaving a few millimeters of free edge. Paint it with the desired color and polymerize it. Then remove the stencil and proceed with further technology.
Special brushes for French manicure
There are also special brushes for French manicure with a cut out core - you need to apply a coating to them and simply apply it to the nails, imprinting it.
Stationery eraser
You will be surprised, but an ordinary rubber band is a very popular way to create an even smile line. Pull it over the nail, leaving a free edge, which you can paint with the chosen color.
How to make a French jacket with a stencil?
If this is your first time making French stencils, then this is what you need! With their help, you can easily apply even the most intricate designs.
Stencils are not only semicircular for the classic French jacket, but also with lace, wavy and oblique patterns. They are made from paper, vinyl film and even metal or plastic.
Vinyl stencils are easy to use. They fit tightly to the plate of the nail and allow you to draw an even pattern.
How to make a French jacket with a stencil?
- After you have applied the base color to your nail, wait until the polish dries completely.
- Carefully peel off the stencil from the plate and stick it on the nail, stepping back a few millimeters from the edge of the nail.
- Press the stencil firmly with an orange stick.
- Using a brush, gently apply the polish to the tip of your nail and let it dry.
- Peel off the strips and apply topcoat.
How to choose white gel polish?
When choosing a cosmetic product, the following criteria are taken into account:
- Hue.
It must be selected depending on the purpose of creating a manicure, as well as on your preferences. The packaging with the product usually indicates the tone characteristics, and visual examples of the final result from using a specific type of product can also be given. Therefore, study the labeling of the varnish before you buy it. - Degree of pigmentation
. The higher the pigment content in the varnish, the more economical its consumption will be. After all, in this case, you will need to apply fewer layers of cosmetics to achieve the ideal nail tone. Although there are some nuances here too. So, if you are going to do a French-style manicure, then products with medium pigmentation will suit you. And for a bright coating, buy gel polish containing the maximum concentration of pigments. - Texture of the product.
For beginners who are just learning how to do a manicure using gel polish, products with a medium-density texture are suitable. It is the simplest and most convenient to apply, because if necessary, the coating can be easily removed. But working with dense varnish textures is quite complex and painstaking, so such varnishes are more suitable for a professional manicurist.
Try to take products only from trusted and well-known brands. The cost of their products may not be entirely affordable, but the quality of the varnish, its durability and richness are the main priorities for girls who prefer a permanent manicure rather than a one-day manicure.
Nail design with gel polish: French with chic decor
A modern French jacket is rarely complete without an original design. Girls cannot imagine their nails without interesting designs, rhinestones and sparkles. What can you add to a classic French jacket to make it look stylish and expressive? Among the favorites of nail design there are several areas:
- manicure with glitter – decor is present along the edge of the nail plate or on a separate accent finger. Glitter is a simple and budget-friendly way to decorate your nails, which any girl can handle.
- with acrylic - a colored alternative to glitter. Place acrylic along the edge of the nail plate, cover the nails with a continuous layer, and use it to highlight patterns on the nails. Acrylic is used to create 3D floral designs or cozy knitted nail art.
- with rhinestones - serve to create an elegant and graceful nail art that will fit into absolutely any look. Rhinestones are placed mainly in the root zone, where they look more laconic and attractive.
- with design – on 1-2 fingers you can place a floral, geometric design. Nail art with a tropical theme, with animals, leaves and any other decor that you want to see on your nails, goes well with the jacket.
