How to create aquarium beauty on nails?
This type of manicure can be considered “layered” - the creation process consists of applying one layer to another. Let's take a closer look:
- First stage : building up the free edge. If you need an interesting and voluminous picture, you should build it up longer.
- Second stage : applying the base coat. Medium viscosity, sculptural and single-phase gels are used.
- Third stage : colored mica or any other decor is laid out on top of the finished base coat, a layer of gel coating, and the nails are placed under the lamp for twenty seconds.
- Fourth stage : similarly, beads are placed here, etc. + lamp for twenty-five seconds.
- Fifth stage : layout of the drawing according to the customer’s wishes.
- Sixth stage : filling the remaining gaps. The customer’s wishes are also taken into account here - you can fill it with different accessories, etc.
- Seventh stage : you need to apply camouflage gel to the nail plate. This will create the contrast needed to highlight the main design.
- Eighth stage : finishing work, which includes the final gel coating, filing the edges of the nail and drying.
And yet, creating an aquarium nail design cannot be called too simple. But this type of nail coating does not reach the level of high complexity.
Advantages and disadvantages
Aquarium design has many advantages. Impeccable decoration of nails with decor is in harmony with clothes, completes the image, and allows each lady to emphasize her individuality.
Advantages:
- extraordinary, original multidimensional format of each nail;
- creativity of design. The opportunity to show imagination and creativity in the selection and use of unusual decorative elements (fragments of living and dry plants, bird feathers, lace braid, colored sand, small shells (whole or halves), pieces of newspaper, colorful water);
- Suitable for ladies of all ages. Allows you to stand out from other women, feel unique, extravagant, special;
- universal multifunctionality. If it is necessary to comply with dress code standards, a bright aquarium manicure can be covered with a plain gel, then easily removed. The original design is perfectly preserved;
- strength, reliability. Thanks to the thick layer of aqua coating, the design lasts on the nails much longer than other types of manicure;
- practicality. Despite the complex multi-dimensionality, decorative items are securely fixed inside each nail. The manicure technique eliminates the occurrence of scratches, cracks, and chips on the smooth nail surface. With such nails a lady can do any job;
- intrigues, arouses interest, emphasizes the beauty of hands. Aquarium nails themselves decorate ladies' hands. With this design there is no need to wear rings or bracelets;
- perfectly complements other jewelry and costume jewelry - earrings, brooches, pendants, beads.
Flaws:
- creating an aquarium composition takes a lot of time;
- The procedure is expensive and requires experience and skill./
What you need to create aquarium nails
- colored mica;
- foil;
- powder;
- sand;
- glitter;
- beads;
- broths;
- marble chips;
- beads;
- rhinestones;
- multi-colored thread;
- dried flowers;
- lace.
Sand is always involved in creating an aquarium manicure - with its help, the basis of a stained glass image on the nails is created. This effect is obtained due to particles of different shapes that shimmer in any light.
Colored mica in combination with sand gives the nails a beautiful 3D effect, and foil creates volume and texture.
The presence of beads and broths complements the composition, adding notes of completeness to the manicure.
Dried flowers are used to compose a stained glass window, giving it integrity and introducing originality (which, in fact, makes this type of manicure competitive).
Working with two types
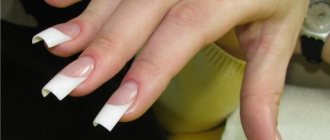
You can reproduce an aquarium manicure at home using transparent tips. You will need tips, sculpting gel, and decorative elements. Tips should be of different sizes, with the small one supposed to lie on top of the large one. Glue the small one onto the large tip, leaving a space between them that you fill with decorative elements. The resulting workpiece must be polymerized in an ultraviolet lamp. After the process comes to an end, place decorative elements between the tips, using a thin needle. Now fill the space between the tips with gel and seal it in the lamp.
You can reproduce an aquarium manicure at home using transparent tips
You will need tips, sculpting gel, as well as decorative elements
Before making an aquarium design, get a manicure
Advice! Before making an aquarium design, get a manicure. It is best to get a hardware manicure: the cuticle will not grow longer, and your nails will maintain an attractive, neat appearance for a long time.
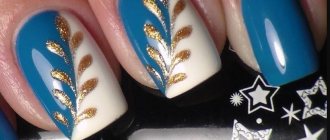
Floral design
It is the floral theme in emergency design that looks best using the French technique.
Volumetric flowers under several layers of transparent gel look as if three-dimensional, and the image looks different from different viewing angles.
For a floral aquarium manicure, it is advisable to make your nails long - on short ones, the massive design will be too saturated.
For floral stained glass windows, it is best to use dried flowers - they give much more naturalness than pictures.
Which nails is it suitable for?
Due to its variability, the multi-dimensional design is suitable for any length of nails. The limitlessness of design options allows you to show your imagination, taste, and sense of style. Certain types of modeling look better on long artificial nails, while some look great on short nails. In general, an aquarium manicure is suitable for any fingers.
Short
For short nails, floral, marine themes, French classics, decor with foil, multi-colored sand, gradient effect, and amber are perfect. Any miniature decorations are appropriate.
Extended
Aquarium nail extensions provide more opportunities for experimentation and imagination. The technique of aquarium modeling on extended nails is identical to the technique of working with natural nails.
The main difference is the ability to place large decorative elements (beads, chains, acrylic stucco, shells, starfish, large rhinestones, pieces of glass) on extended nails. The gradual formation of a composition on the extended surface creates the effect of a deep image “under glass”.
Aquarium glitter
A very bright and fresh idea in aquarium nail design is the use of glitter.
Sequins give the image on the nails an excellent sparkling effect, which looks elegant during the day, and at night, under artificial lighting, it looks festive and mysterious.
You can safely experiment - add glitter, create ombre with smooth transitions, etc. Suitable for any nail length.
Which polish to choose - regular or shellac gel polish
The modern market is ready to offer the fair sex a solid abundance of coatings that can, on the one hand, provide an attractive appearance, and on the other hand, guarantee durability during the long process of wearing aquarium-style nails. The most popular types of these coatings are gel polishes and shellacs. And it is about them that will be discussed further.
Initially, we note that many girls consider both of the above-mentioned beauty elements to be one and the same . This is a common mistake among inexperienced girls who have just begun to independently take responsible care of the condition of their nail plates. In fact, these two coatings have a number of similarities and differences.
You should know about each of them, because the effectiveness of the implemented design directly depends on your awareness. Next, we will consider the main features of each coating, based directly on their characteristics.
Application
Both coatings are placed evenly on the nail plate in several layers. Next, they need to be dried using a good ultraviolet lamp. At the same time, shellac dries much faster than any regular gel polish. Also, before using it, dehydrators and degreasers are applied to the surface of the nail, whereas standard gel polishes require initial treatment with a primer.
Structure
The basis of gel polish is necessarily a large number of useful microelements and vitamins. Shellac also contains them, but there are much fewer of them. Consequently, conventional options nourish the plate structure better, allowing it to recover from various mechanical damage.
Additional processing
Before applying gel polish, the master carries out mechanical preparation and grinding of the plate, which can cause damage to it and the occurrence of various uncomfortable conditions. Shellac does not require filing or sanding . Its texture evens out the contours of the nail plate, making them smoother and more attractive.
Removal
To remove shellac you will only need a couple of minutes, because it can be neutralized with ordinary available cosmetic products. With gel polish things are much simpler. Its remnants can only be neutralized with special preparations that are applied to the nail for soaking. Sometimes the nail cleaning procedure can take from 10 to 20 minutes.
Wear time
If you apply gel polish responsibly, your manicure will delight you with an attractive appearance for 2 to 4 weeks, while shellac without correction will have to say goodbye in just a week.
Note! Aquarium design is your space of options. Based on the general canons of this technique, you can implement on your nails not only primitive color abstractions, but also attractive holographic effects. By entrusting your nails to a master from a salon, you can count on high-quality graphics and even photo design.
Choose the best branded coatings
Today, the market for cosmetic products is ready to offer its customers a solid variety of different nail coatings. Without relevant experience, choosing the right options can take you a fair amount of time. At the same time, so that you do not waste your precious time resource, we recommend that you pay attention to the product of the following famous companies:
- Komilfo
A magnificent collection of coatings to realize any idea. Representatives of the brand are highly durable and have a bright, rich color that retains its characteristics even after several weeks of wear. The brand's products can often be found in leading beauty salons around the world.
- Oxxi
Today in the assortment of this brand you will find more than 150 shades of gel polish with outstanding performance. In fact, you can create any look, including a space manicure. Ideal for both professionals and beginners, as it does not require special skills to use. An additional bonus is that the drugs do not have a strong chemical odor.
- Gloss
The catalog of that brand contains premium-level gel polishes. Moreover, the choice is so diverse that you will definitely find a display option that suits you directly. The main advantage of coatings is uniform distribution. It is enough to pick up a comfortable brush and even the first layer of the composition will be ideally distributed throughout the entire nail structure.
- Kodi
A popular brand that is familiar to fashionistas from all continents. The manufacturing company pampers the consumer not only with high quality coatings, as well as an abundance of color shades, but also with original bottles. We also note that the products of this brand have a fairly liquid consistency, which means that when applying them you will have to show a certain level of skill.
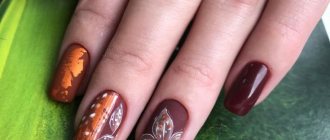
Using foil
Foil looks very unusual, but at the same time, universal.
If you use only foil to create a stained glass window, in a transparent gel the pieces of foil look bright and uniform, a little like the shine of opals.
Foil is also used in compositions with other materials for aquarium design on nails - with glitter, sand.
Suitable for nails of any length.
The same aquamanicure, only with varnish
The tools are the same as in the previous description, only instead of gel we take varnish. The algorithm of actions is the same. You cannot dry the varnish in a lamp, so we wait until it dries naturally.
There is no difference between these two methods, except time. The first one is done much faster, drying is carried out better. After the latter, the coating is very durable and difficult to damage.
In the second, drying the varnish takes a lot of time. After completing the last step, the finish cannot be said to be strong. It takes several hours for it to dry completely.
Fimo in aquarium manicure
Fimo is a specially cut polymer clay from which elements of aquatic nail design are created.
Volumetric elements made of polymer clay on the nails give each nail uniqueness and unusualness.
Clay is universal - you can use it to create any additions to your nail decor.
It is worth considering that this fimo is the smallest clay particles that require good fixation (you need to cover it with acrylic or gel in several layers).
Best used on long nails.
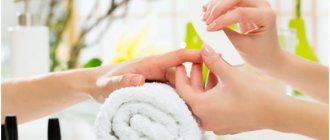
Getting your hands ready for aquarium design
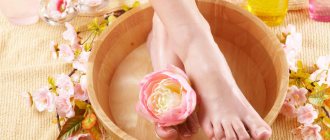
Aqua nail design assumes that the technology of performing nail art is carried out on prepared hands. Therefore, the preliminary stage will be a classic manicure. And to save on an expensive salon procedure, we perform it ourselves at home. For this we will need: a bath with warm water, aromatic and nutritional mixtures, a manicure set, and moisturizer.
The instructions for a classic manicure involve step-by-step implementation of the following steps:
- Steam your hands in warm water. For a relaxing and tonic effect, we recommend adding a few drops of rose, jasmine essential oil and a pinch of sea salt to the water.
- Gently treat the cuticle area with an emollient. We remove the excess with nail scissors or tongs.
- Give the nails the desired shape using a nail file. For those whose nail plates are fragile, we recommend using a glass file. It creates less oscillating movements, which makes the procedure more comfortable.
- Apply moisturizer to your hands. Let it soak thoroughly.
This is how we independently prepared our hands for further manipulations. Now you can perform aquarium nail extensions.
Using broths and sequins
These types of decor should be chosen taking into account the shape and size. The most convenient way to fasten and the most practical to carry is that the bouillons are as flat as possible.
Sequins can be considered universal - they complement any composition on the nails.
Sequins and bouillons must fully correspond to the theme of the composition - otherwise the manicure will look vulgar.
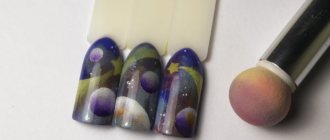
Acrylic powder and nail sculpting
You can sculpt anything - any objects that correspond to a given theme.
To make the manicure harmonious, it is recommended to paint the edges of the nail in the color of the sculpted objects for design.
Acrylic powder perfectly complements massive decorative elements on nails - it can shade or saturate the entire image without distorting the color palette.
The use of modeling and powder is only suitable for long acrylic or gel nails - on short natural nails it will look too massive and convex.
Minuses
The design also has some disadvantages. The main one is that creating an aquarium effect on the nails requires the highest level of qualifications from the master. Naturally, it is not always possible to find such a specialist. An inexperienced nail technician can make your nails too thick and rough. Therefore, you can only find a master who has the skills of not only an artist, but also a sculptor, by relying on the advice of friends or a portfolio.
The design also has some disadvantages
The main one is that creating an aquarium effect on nails requires the highest level of qualifications from the master.
An inexperienced nail technician can make your nails too thick and rough.
Another disadvantage is the long time it takes to create beautiful nails. A manicure can last more than two hours, so you should plan your time carefully so as not to rush the master.
Finally, aquarium manicure is quite expensive. However, in any case, the effect will be simply amazing and you will not be disappointed with the result (of course, if a real professional gets down to business).
Another disadvantage is the long time it takes to create beautiful nails.
A manicure can last more than two hours, so you should plan your time carefully so as not to rush the artist.
Aquarium design will be a great idea for a wedding manicure
Advice! An aquarium design will be a great idea for a wedding manicure. It is worth choosing light decorative elements, as well as jewelry that will match the color of your dress or jewelry. Your hands will look amazing in photos!
Shell aquarium on marigolds
Most often, nail shells are made from acrylic - this is a practical and versatile material.
In addition to acrylic, you can make shells from natural shell chips or from artificial ready-made decor.
Due to the volume and richness of the composition, it is advisable to use shell nail design only on long extended nails.
Decor for an aquarium effect
Harmoniously complementing some decorative elements with others is a real talent that borders on a sense of taste. To create unusual volumetric effects, you can use the most unusual materials: from gears to chains. Traditional decorative elements are more feminine and do not have such a brutal look as chains, for example.
Special beads, similar in size to beads or neat half-beads, are a trend in aquarium manicure. They can be successfully combined with other round decorations: kamifubuki, sequins, bouillons, etc. This design is complemented with scattered sparkles; you can choose foil, any colored varnish, mica, etc. as a background.
Such decoration requires a large layer of gel, so it is important to use such decorations on extended nails or based on tips.
Among acrylic decorations you can find different themes: slices of fruit, flowers, vegetables, shells, accessories, etc. It is also worth using such decor thematically and not mixing them with each other. For color, paint the tip of the nail in a color that matches the theme. For example, you can play up a seaside manicure with shells by painting the tip of the nail turquoise or blue.
Aquarium with painting the tip of the nail
Decorating a nail for an aquarium with acrylic powder is a bold and original idea. This decor goes well with other, more voluminous elements. You should not use sculpting for natural nails, as a lot of gel will be spent on filling and the manicure will not look aesthetically pleasing. Powder can be used for any type of base: natural nails, tips or extensions.
Depending on the material on which the image of something is applied, filling with gel of different thicknesses will be required. For example, a paper or vinyl base gives a decent thickness and is best used on artificial nails; plastic film with a pattern can easily be used on any nails, since it cannot make the nail thicker.
Foil for gel polish
Manicure foil has different densities and purposes. One type (transfer) leaves a shiny mark on the sticky layer, the second type must first be formed and placed on the nail as an applique. Depending on the desired effect, choose one or the second type of foil.
This decorative technique is acceptable for natural and artificial nails, since it does not make the nail plate much thicker, but still gives a magnificent shine.
The most popular decorations for aquarium manicure are rhinestones and glitter. Different sizes of these elements may look different on nails of different lengths. For short natural nails, it is better to choose small rhinestones; on artificial coatings, more daring experiments with the size of rhinestones are possible.
Rhinestones in aquarium manicure
Sequins can be used as independent or additional decorative elements. Their different sizes, colors, shapes can create the desired effect and do not require a large thickness of gel polish applied on top.
Glitter in aquarium manicure
Manicure with feathers is not so popular, but it looks very impressive. It is convenient to use feathers in design on artificial nails. Their color and size can be different; they complement such nail art with sparkles, designs, rhinestones, etc.
Manicure with feathers using aqua design technique
Lace
It is possible to use real lace in manicure if you work using the “aquarium” technique. Pieces of woven material can be used both on all nails and selectively, complementing them with rhinestones, sparkles and other related decorations. For natural nails, it is better to choose ultra-thin lace or even find an alternative in the form of stamping, stickers, etc.
Shells
In the form of shells and starfish, you can often find acrylic modeling: from acrylic it is convenient to create small-sized elements so that they can be conveniently used in design. Natural material can be used in the form of shell chips or small specimens that can be found on any sea coast. It is recommended to use this decor on artificial nails.
Benefits of aqua nail design
The popularity of aquarium nail design can be explained by three main points:
- Practical . The pattern is internal - therefore there is no wear, it does not interfere and does not deteriorate.
- Comfortable . Regardless of the volume of the design elements, the nail is still smooth.
- Durable . Such nails will remain almost like new for 3 months - the design will not deteriorate in any way, because thick layers of gel prevent it from abrasion or deformation.
Aqua manicure design with gel
The tools you need to prepare
- colorless gel;
- household UV lamp;
- primer;
- materials for work: sparkles, rhinestones, dried flowers and whatever your heart desires;
- nail polish remover;
- lint-free wipes;
- files for filing.
Sequencing
- Step 1. Give the nails the desired shape.
- Step 2. Degrease the surfaces of the plates.
- Step 3. Apply the first layer (primer), dry for 2 minutes.
- Step 3. Apply the 2nd layer, but now with gel (not thick).
- Step 4. Before it freezes, quickly lay out the planned composition. For the inexperienced, you can limit yourself to simple sparkles. As your skill level increases, your motives can become more complex.
- Step 5. Place the nails in the lamp and dry for the same 2 minutes.
- Step 6. Apply another layer of gel. It should completely cover the decorative elements. To check this, look at the surface from the side by raising your hand. We also dry everything for 2 minutes.
- Step 7. All that remains is to remove the sticky layer with a lint-free cloth moistened in liquid.
- Step 8. Cover everything with colorless varnish. We moisturize the cuticle with oil or nourishing cream.
It is recommended to use this method for those who have at least the slightest idea how to work with gel. Or those who constantly go to salons and know by heart what the master does, why and how.