Rules for applying varnish
We present step-by-step recommendations on how to carefully paint your nails yourself. To do this, we will consider the procedure, by performing which you can even avoid the need to get rid of excess varnish on the cuticle and skin of the fingers.
Preparing the nail surface
The very first step is to remove the old nail polish, for which you will need a cotton pad or roller and nail polish remover. To keep your nails healthy, you should choose a product without acetone. It will cost more, but will not affect the nail plate in any way.
Before carefully painting your nails with varnish, it is advisable to do a hygienic manicure. This can be a trimmed, untrimmed or hardware procedure. During such a manicure, you need to remove or push back the cuticle, as well as align the nail plate as best as possible. This is done by sanding with a special nail file. Also at this stage, the nails are given the desired shape and length. Now remove any remaining dust from the nails and wipe them thoroughly.
If your nails are even slightly damp, there is a risk of the polish coating peeling off. For the same reason, it is advisable not to come into contact with water at least a couple of hours before the procedure. Additionally, you can treat the plates with a degreaser.
Varnish application process
You should start decorating with a base transparent coating, which additionally levels the plate. Strengthening agents are good as such a base, because... They not only protect, but also treat nails. In addition, the base polish prevents the nail plate from yellowing and prevents dark and rich polishes from seeping into the nail. The last point is very important, because it is quite difficult to completely remove old varnish in dark shades.
After this, the actual application of colored varnish begins:
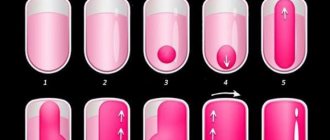
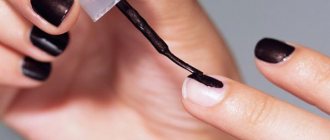
- Lightly heat the bottle with the selected varnish and roll it between your palms. Under no circumstances should you shake it, because... the resulting air bubbles will affect the appearance of the coating.
- Using a brush, apply enough polish to cover exactly one nail. If there is a lot of product, it will be more difficult to distribute it evenly over the surface, and it will take longer to dry.
- Now we begin to cover the nails, starting with the little finger. To do this, place a drop approximately in the center of the nail, a little closer to the cuticle, and use a brush to reach it. Then we move the brush from the center to the free edge, after which we paint the side parts. If desired, we can first move to the edge of the nail, and only then to the cuticle. At the end, be sure to seal the free edge with a gentle movement of the brush and let the nails dry.
- To get a more saturated color and avoid pale streaks, you need to apply a second coat of varnish.
- To ensure your nails are completely dry, you can use a hairdryer at low speed or an ultraviolet lamp. However, the best way is to dry it naturally, which will retain all the shine. When all the decorating work has been completed, all that remains is to coat the nails with a fixative. It will also need time to dry, although you can use a special spray to speed up this process. This spray can be slightly oily, thereby helping to moisturize and soften the cuticle.
Tricks for a neat manicure
It’s not enough to know how to carefully paint your nails yourself; there are tricks here:
- to cover nails, it is advisable to use high-quality varnishes that have a general structure;
- It is not at all necessary to buy expensive degreasers - regular alcohol will do;
- to check whether the coating has dried, you can lightly tap your nails against each other or lightly touch them with your lips;
- between uses, varnishes should be stored in dark, cool places;
- Do not move on to the next nail without dipping the brush into the varnish again;
- if you are not satisfied with the result, you should remove it immediately and repeat the procedure;
- To ensure that the polish lasts as long as possible, do not wet your hands for several hours after application.
Features of applying gel polish
A manicurist can easily and quickly apply gel polish in a salon, and it lasts for 2-3 weeks. Doing this on your own is not as easy as we would like, but nothing is impossible for a person who wants to get the desired result. In order to apply gel polish correctly and accurately at home, you need to understand the features of this coating. The technology includes several basic nuances and tricks:
- It is important to prepare the nail plate for applying gel polish. The nail must be perfectly smooth and polished, then it will be possible to ensure the most correct adhesion of its surface to the varnish.
- Remove the top glossy layer of the nail using a highly abrasive file. Clean the dust with a special brush; do not touch your nails with your hands, otherwise the gel polish will not lie tightly.
- To strengthen the nail plate and more tightly adhere the nail and gel polish, a base coat – an acid-free primer – is required. The procedure for priming the nail will extend the life of the manicure.
- The second layer is applied with a base gel. It is the link between the main coating and the natural components of the nail. The gel is applied in a thin layer and placed under a UV lamp for proper drying.
- After this, you can apply colored varnish, and another layer of gel on top. Then again polymerization in the lamp. An important nuance of applying the final layer of gel polish is painting the end of the nail, as if sealing it.
The procedure for applying gel polish must necessarily include such steps so that it lasts a long time, does not peel or crack. Correctly applied varnish looks attractive for a long time.
How to keep cuticles and skin clean
Even with professional skills, you can make a mistake and smear your skin or cuticles with varnish. There are several methods, the preliminary use of which will avoid such awkwardness.
Using tape or adhesive tape
To prevent the varnish from getting on the skin, the girl can stick ordinary stationery tape or electrical tape on the skin before drawing. After all the necessary procedures have been carried out, the adhesive tape and varnish smears on it are removed from the fingers. There is a small drawback to this method - it will be difficult to protect the cuticle, and therefore you cannot do without a trimmed manicure.
Applying hand cream
To prevent the polish from sticking to the skin, you can pre-coat it with a rich hand cream or even Vaseline. At the end of the entire process, your fingers will be cleaned with cotton pads. You need to use such products carefully, trying not to get them on the nail itself. Otherwise, there is a risk of rapid peeling of the coating or chipping.
Application of PVA glue
Stationery glue works on the same principle as duct tape. To protect the skin of your fingers, you need to cover it with glue and wait until it dries, turning into a transparent film. It can also be easily removed once the nails are dry.
Use of corrector and special liquids
This method is practically no different from those discussed above. The only difference is that the means used will be much more expensive. Special liquids are also applied before painting on the nails, turning into a film. It can later be removed by grabbing the free edge with tweezers.
Correctors can be applied before coloring, but there are also those that will remove varnish that has smeared the skin or cuticles. They have replaceable rods and are filled with nail polish remover.
You can see some of the correctors in the table.
| Name | Application | Image |
| Mavala | After application | |
| Stylo Correcteur | After application | |
| Nail Polish Removal Pen | After application | |
| RIO Profi (tape) | Before application | |
| Ibcccndc | Before application |
Required tools and materials
You don't need to go to a beauty salon and pay for the services of a specialist. You can completely apply shellac correctly at home. To do this you need to work step by step and have the following:
- manicure set;
- orange sticks and sponges;
- Ultraviolet lamp;
- grinder (buff);
- disinfectant, cuticle oil;
- base (transparent gel), color coating, finish gel;
- various accessories: glitter, slider stickers, foil, stamping.
To apply gel polish correctly, you will need manicure tools.
Many people do not understand how to distinguish shellac from any other gel polish. The CND company created a hybrid of varnish and gel, patenting the name “shellac”. Therefore, there are many names: shellac (CND), color gel, color gel. Different companies - different names.
Nail polish on the right hand
Probably every girl faces the problem of coloring her working hand, i.e. right in the case of right-handers. The strokes are sloppy and often the fingers themselves become coated with varnish. However, you don't have to ask for help. You just need to learn some secrets of how to carefully paint the nails on your right hand.
First of all, you should learn how to hold your hands correctly while applying varnish. The non-working hand should be relaxed and rest on the little finger side. The little finger itself must be straightened, and the ring finger must be tucked under the rest. Next, the brush is pressed with the thumb to the index finger. The position of the hand will allow it to be more stable.
Now let’s reveal a few tricks for applying varnish with your non-working hand:
- there should be slightly less varnish on the brush than is required for one nail, it should not drip;
- you can try to move not your hand with a brush, but control it with your finger on which the varnish is applied;
- in order not to attract the attention of others to a sloppy manicure, it is better to use varnishes of lighter colors;
- If the painting hand often touches the other, it is worth working on each nail separately, allowing it to dry completely.
And most importantly, don’t be disappointed in your skills. The more training you have, the better the process of applying polish with your left hand will be in the future.
How to paint your nails without staining your cuticles: the secrets of a beautiful manicure
A fresh manicure can please any woman, but only if it is done perfectly. However, very often it turns out that after spending a lot of time applying several layers of varnish, we find that the cuticle is stained with varnish, a kind of hell for a perfectionist. Attempts to eliminate the problem often aggravate it, since wiped varnish can leave streaks, thereby staining the skin, and any careless movement can ruin the beauty that took hours to create. Therefore, it is very important for every girl to know how to paint her nails without staining the cuticles, and this is precisely the issue we will discuss now.
Secrets of a beautiful manicure
Cases when a visit to the salon simply cannot be squeezed into your schedule are not that uncommon. But at the same time, I really want my hands to be spectacular and with beautiful nails. Just neatly filed, they don’t make such an impression, and everyone around them flaunts bright and original designs on their nails. Transforming your own in this way is not so difficult, the main thing is calmness, patience, and knowledge of small tricks, of course.
The first step towards a well-groomed and beautiful manicure is proper nail preparation: good shape and high-quality removal of dead cuticles. To improve the “adhesion” of the varnish and the nail plate, the latter needs to be slightly polished with a regular buff or a special file for polishing, and then degreased with acetone-free nail polish remover.
A properly selected varnish plays a significant role in a perfect manicure. Remember, only with a high-quality product you can paint your nails so as not to hurt the cuticle. It is quite easy to recognize: a good brush that takes the shape of the nail when pressed, a viscous consistency that allows you to apply an even layer. Spreading varnishes are taboo!
And of course, the application process itself. In addition to the varnish itself, it is advisable to acquire a base and top coat. The first will make application easier, and the second will consolidate the effect and allow the manicure to remain in excellent condition for quite a long time. That is, in the end we will get four layers: a base, 2 color layers and a fixer. Here's a simple formula for perfectly painted nails.
Application technique
If previously only nail art masters knew the secret of correct application, now it is of course impossible to keep it secret. As it turned out, everything is not at all difficult, but most of us still did it completely differently. The algorithm of actions is as follows:
- The first step, as we said earlier, is preparing the nail and applying a base coat. You can proceed to the next stage only after it has completely dried.
- Take the varnish and lightly squeeze the brush onto the neck of the bottle. We will paint the side on which the coating remains.
- Visually divide the nail into two parts with a vertical line. Stepping back a couple of millimeters from the bottom edge, we place a dot on it.
- By pressing on the brush, we seem to push the varnish to the edge of the lunula. With a good brush there should be no problems, since it spreads out evenly. As you understand, it is this stage that determines how evenly we paint our nails near the cuticle ,
so now we need to concentrate as much as possible. - Having completed such a delicate work, we paint the entire length of the nail, adhering to the same line.
- To paint the side lines, we return to the starting point and smoothly move the brush along the side holes, having first pulled them back.
- Having covered the entire surface in this way, wait for it to dry completely, after which we apply the second layer.
- The last stage is topcoating.
New technologies or how to apply gel polish under the cuticle
This type of coating is becoming increasingly popular because it helps maintain the ideal appearance of your nails for as long as possible. However, many young ladies are not satisfied with the fact that after applying the gel, a small transparent gap remains between the skin and the varnish. Agree, it seems that the nail has already grown, and the manicure itself is not the first freshness.
Therefore, nail art masters have developed a new technique that allows you to “fill” the coating literally under the cuticle. There is a lot of debate about the appropriateness and hygiene of such a procedure, but the unsurpassed effect makes it necessary to resort to it more and more often. So, we apply gel polish under the cuticle, the application technique is as follows:
- Perform a high-quality edged or hardware manicure, using a conical cutter to lift the edge of the cuticle slightly upward.
- Apply the base with a distance of a couple of millimeters from the cuticle and side holes.
- We pour the colored coating over the entire area of the nail, while additionally lifting the skin on the sides and the cuticle itself.
- Then we duplicate the color layer and apply a top coat. Let us remind you that each layer must be dried under a lamp.
- In order for the cuticle to return to its original place as quickly as possible, you need to lubricate it with caring oil at the end.
There is also a technique that allows you to apply makeup “end-to-end”, that is, as close as possible to the cuticle. It uses an ordinary thin brush, which is used to pre-paint the “delicate” area. After drying this area, the nail is completely filled with varnish.
Ways to protect cuticles from varnish
While watching a huge number of training videos, you probably noticed that girls use various products that allow you not to worry about the accuracy of your future manicure. This is especially true for new techniques, for example, ombre, where almost half of the finger ends up dirty. So what are these magical methods and what do they smear the cuticles with when painting their nails? In fact, there are several methods, both improvised and professional.
There are several homemade options: Vaseline, rich cream and PVA glue. All of them are applied to the area that needs to be protected and can be easily removed with a regular cotton swab or sponge. The precautions are as follows: in no case should the chosen product get on the nail plate, as it will make painting impossible; If you decide to use a cream for these purposes, then try to choose the one that is as rich as possible; it is best to use the so-called “winter” series, aimed at protecting against frost and bad weather.
Among professional products, the most popular now is skin defender, thanks to which the question of how to carefully paint nails at the cuticle becomes completely irrelevant. You simply apply the composition to the skin, wait for it to dry and start painting, then easily remove the film and that’s it. Your fingers will delight you with a neat manicure!
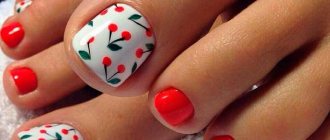
Toe nail polish
Now let's figure out how to carefully paint your toenails. Let's not talk again about the need for a trimmed pedicure and complete degreasing of the nail plates. Let us immediately point out the most important points for those who do not know how to carefully paint their toenails on their own:
- before starting the procedure, you should take the most comfortable position;
- hands should not hang in the air at the time of staining;
- Separators should be put on the fingers so that they do not touch;
- all movements must be smooth;
- You shouldn’t paint your toenails if you need to run somewhere soon, much less go to bed.
Important little things
The main nuances that it is advisable for everyone who is going to apply gel polish to become familiar with.
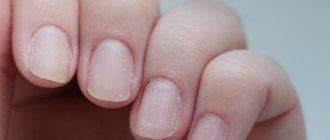
- It is necessary that the nail plate be carefully prepared. In order for the coating to be perfectly smooth and even without having to redo it, you need to treat the nail plate by polishing it. There should be no roughness or irregularities; if any are detected, the procedure must be repeated. The cuticle and side ridges need to be treated most thoroughly. A sign of a good manicure is smooth sides, smooth skin, and the absence of cracks and burrs.
- Before painting your nails, it is extremely important to fulfill one more important condition. Use an orange stick or pusher to push back the cuticle, do it carefully and slowly. This will ensure that the polish is applied closest to the base of the nail. This simple action can make your manicure look fresh and tidy. Once the painting is completed, the cuticle will return to its original place. The border of the polish will be covered, which means the new part will be less noticeable as the nail grows.
- You should not stop at just one chosen application method. Girls who were unable to create the perfect manicure at home on the first try quite often decide not to do it anymore and turn only to specialists. However, painting your nails is a task that absolutely any representative of the fair sex, who has neither talent nor artistic abilities, can cope with. It is important to choose exactly the method that is convenient and acceptable. Yes, you will have to experiment a lot and have a lot of patience. However, this activity – decorating your own fingers – is quite exciting and interesting. If ideas don’t appear on their own, you can look them up on the Internet or ask your friends.
These simple tips will help you avoid many problems. By honing your skills over time, you can achieve incredible success. Then you will not only be able to save on going to a beauty salon for a manicure, but also enjoy and enjoy your own skills.
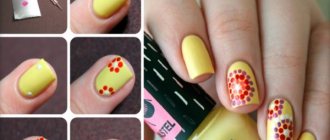
Neat manicure with several polishes
If a girl wants to create a pattern on her nails using two or more colors, she needs to be even more careful. Now an additional problem arises - one color should not overlap another. There are two ways to solve this issue:
- The use of stencils and stickers that will cover a certain part of the nail or become part of the design.
- The choice of nail design is a gradient, in which it is not at all necessary to maintain clear boundaries between different colors.
How to make a French
French manicure (French) never goes out of fashion because it looks great on any length of nails. It's quite easy to do this manicure at home. We carry out step by step everything that we did before: preparation – base coat – application of the main color. Now we do French.
We draw the smile line ourselves or use stickers. Cover the tip of the nail plate with colored gel polish. Choose color options that are contrasting or differ only in intensity.
Interesting jacket options will highlight the look
Girls increasingly began to do the “Hollywood French” with a metallic tint. To create this effect, use foil. Gently stick it onto the tip of your nail. Remove the remaining foil using a file. Cover the finished jacket with finishing gel.
Fashionistas will be interested in the reverse (lunar) jacket. The entire nail plate (including the end) is covered with a matte varnish of a dark shade, and the area near the cuticle remains transparent or is painted over with a lighter shade. Try using foil instead of varnish.
French and stamping go well together. Especially if you are doing a classic French manicure. Openwork stamping will look simply gorgeous. Glitter or slider stickers will do.
Gel polish under the cuticle: pros and cons
We all remember the main and unshakable rule of manicure - when applying gel polish, you must retreat 1 mm from the cuticle area. This requirement can be explained by hygienic aspects - the cuticle zone protects the nail from harmful bacteria, and a small area of the unpainted nail, just that millimeter, guarantees that oxygen will flow to the plate, albeit in a minimal amount.
Photo from the site: taginstant.com
The second aspect of why when painting nails you need to make a minimum distance from the cuticle is aesthetic. When applying gel polishes, even by a professional master, there is always a risk of the varnish flowing onto the cuticle and staining it. Such a manicure will look sloppy, and the shelf life of such a manicure is significantly reduced due to peeling in the area of contact with the cuticle. Why does gel polish peel off at the cuticle? Yes, because the cuticle and the pterygium located near it prevent good adhesion to the nail plate.
Meanwhile, the technique of applying gel polish under the cuticle exists, and even professional artists use it. Why? Let's look at the advantages of this technique:
- Long wearing period. Nails painted under the cuticle will look as if you had recently visited a specialist for almost two weeks. The thing is that the gel polish is applied deep under the cuticle itself, which is why in the first week of such a manicure the effect is created that already colored plates are growing from under the cuticle. In the second, the gel polish is very tightly located at the very base of the cuticle, and only in the 3rd week can you see the usual picture with a standard one-millimeter indentation from the cuticle. In other words, a manicure created using this technology will last instead of the standard 3 weeks, 5, or even 6 weeks!
- Economical. This point smoothly follows from the first one - the longer you can wear a manicure, the less often you will have to make corrections, and, accordingly, resort to lower costs.
- Aesthetics. In the first weeks, a manicure under the cuticle looks seamless, without sloppy gaps that form as it grows.
Photo from the site: divanail.ru
These three points alone are enough to make you want to make a similar option. But remember - all these advantages are possible only if you or your master knows how to apply gel polish under the cuticle. Otherwise, significant disadvantages cannot be avoided:
- Uneven line at the base. It’s not enough to “drive” the gel polish under the cuticle; you need to be able to do it carefully, forming a beautiful curve, which, when grown, will look the same as neatly painted nails with gel polish at the cuticle at a standard distance of 1 mm. If the line at the base is torn and spread, then such a manicure will last only two instead of the prescribed 5–6 weeks. Those. it will have to be removed as soon as an uneven border appears.
- Decorative coating coming off. When applying gel polish under the cuticle, it is very important to remove all the pterygium located under the cuticle, which is quite problematic. If you neglect this requirement, then the manicure will not last even a week. As the pterygium grows, the gel polish will move away from the nail, and water entering under the voids will intensify the peeling process. As a result, either part or all of the decorative coating is lost.
- Sloppy look. How not to stain the cuticle with gel polish and at the same time do deep coloring is not an easy task, which definitely requires skill and perseverance. If the gel polish does leak onto the cuticle, it will definitely stain it with pigment, which will neutralize the entire effect of the manicure. Another point is that overgrown nails lose their attractive shape. Untreated corners and edges of the plates, as they grow back, “gape” with their lack of painting. And the natural slope of the nails in one direction or another will look sloppy in just three weeks.
On a note
To avoid the risk of cuticle staining, take care of a special protective agent for it in advance. Apply it in a thin layer to the cuticle, let it dry and start coloring. After you complete all the decorative work, it is enough to remove from the cuticle the thin strip formed by the protective agent, along with the remnants of the gel polish adhering to it.
- Expensive. It’s a paradox, but saving on correction, you will have to fork out for the technique of painting nails under the cuticle, which costs 10–20% more.
- Damage to the plates. The most terrible consequence. In case of inept manicure or excessive cleansing of the nail root from the pterygium, damage to the proximal zone of the nail and matrix is possible, which entails separation of the plates from the bed and the risk of infection.
But don’t be so scared of side effects; if you follow the technology and hygiene requirements, you can easily avoid these troubles.
Photo of nail polish
Even more photos at the link: photo of gel polish.
We recommend:
Why do white spots appear on fingernails?