The technique of decorative coating of nails with varnish with a smooth color transition, or the so-called gradient, has long been well-deservedly popular among fans of nail design. Masters constantly come up with new and interesting things, combining several techniques in one manicure. geometric gradient - this is one of the options in the nail industry, the creative design of which is preferred by an increasing number of fashionistas. With this method, the composition on the nail is created by the color transition of one geometric element to another. Not blurry, but the clarity of the lines distinguishes this gradient from the classic ombre.
The combination of colors and decor in nail designs with diamonds
A manicure with diamonds, like any other, requires adherence to color rules. An excellent assistant when choosing suitable shades is the rainbow spectrum. More often, 2-3 colors are used in design, contrasting with each other.
A design using several shades of the same range is considered a win-win.
Important! It is not recommended to experiment with warm and cool colors of the same spectrum.
So, turquoise does not go well with deep blue. When choosing accessories (beads, rhinestones, sparkles), you should rely on the basic rules for choosing shades.
Kamifubuki with French coat photo 221 new items
Regardless of age, type of activity and lifestyle, every representative of the fair sex tries to pay due attention to her hands. After all, beautiful and well-groomed, they create a certain impression about a woman, providing her with a positive image. That’s why nail art remains one of the popular areas of cosmetology. A fashionable trend for many years now has been French nails with kamifubics.
On sale, the standard kamifubuki set is presented with round sequins in three sizes and colors. Each set is a complete design solution. Kamifubuki for nail design, photos of romantic, business and evening nail art solutions evoke genuine delight.
Manicure ideas with diamonds
The diamond pattern is versatile. Depending on the selection of colors and additional accessories, it is perfect for both an evening out and an office option.
To make the look look as complete as possible, it is recommended to combine a real nail design with diamonds with wardrobe items.
Manicure with diamonds and sparkles
Design in one color scheme with an emphasis on 1-2 nails has been at the peak of fashion for a long time and has already become a classic of nail art. Nail designs with shiny diamonds, additionally decorated in a beautiful pattern, look stylish. In this case, the accessory should be selected to match the color of the main pattern.
Bright accents contrasting with the main background look no less impressive. It is important to choose the main theme in neutral colors: black, white, gray. The main advantage of this design is its versatility. Diamonds on nails look great, as in the photo, with a shortened length.
A sparkly manicure with shapes can be created using a bright gold or silver background and a more subdued shade to highlight the lines. The geometric shapes of this design can form a new pattern of diamonds on the nails or decorate the nails with single, but larger shapes.
Manicure with rhinestones and diamonds
Diamonds with rhinestones on nails give a manicure a festive mood and are great for evening design. A bright figure made of pebbles against a simple plain background looks impressive. And creating such a pattern takes a little time and effort.
Rhinestones can decorate even an unremarkable design, complement it and make it more elegant. To do this, just fix several pebbles on the tops of the diamonds on different sides. A separate nail can be completely decorated with glass.
Quilted diamonds on nails
Quilted manicure has become the hallmark of the Chanel Fashion House. It was their designers who worked on creating a new technique for applying varnish. The idea is to create the effect of convex monochromatic diamonds. It’s easy to add volume and beautifully highlight each figure by attaching rhinestones to their tops or dottingly applying a contrasting varnish.
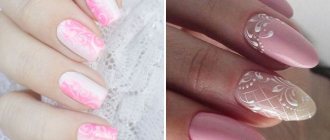
The white background with a gentle pastel color fill between the diamonds looks attractive. Additional color can be added when completing the manicure. However, more often the lower base color is used as a shading color. In this case, nail art looks more natural, the lines are more pronounced, and the “ties” seem more natural.
Nail design with diamonds and gradient
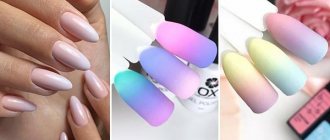
Gradient manicure, also called ombre, confidently burst into nail art several years ago and is finding more and more fans every year. One of the most popular gradient patterns is the diamond. When creating a pattern with transitional colors, it is only important to choose the right colors and distribute them in the right sequence.
Geometric Gradient Options
Before applying decorative coating, nails need to be treated. They should have the same length and beautiful shape.
Diamond gradient
To make the design on the nail clear and beautiful, you need to make a sketch on paper.
Step 1 Apply a base coat to the nails and dry.
Step 2 Paint the nail with white varnish and dry it. We put two colors on the palette - white and any color, in our example a dark purple color. And each time, before applying a new gradient layer, we add a little purple color to the white color. This way we will get a shade darker than the previous one each time. The result is a very harmonious gradient.
Step 3 So, add a couple of drops of purple to white and mix well. Use the resulting light color to paint the contours of the triangles with a thin brush for the pattern (photo 2). Now we paint the drawn triangles with the same color. Let's dry it.
Step 4 Again we mix the lilac color to our originally white varnish (now light lilac). We draw triangles in a checkerboard pattern, filling them with varnish (photo 3).
Step 5 Repeat these steps until the end of the nail plate, each time mixing more purple color into the white. This way you will get a smooth color transition, the pattern will be the lightest at the cuticle, and darkest at the end of the nail. We draw triangles at the end of the nail with a pure dark purple color. Dry each layer.
Step 6 Finish the manicure by applying a matte top coat.
Video:
Geometric gradient from center
Step 1 Apply a light color to the nails.
Step 2 Now we start drawing the gradient with the darkest color. Using a thin brush, create a diamond-shaped frame for the nail.
Step 3 Using a lighter varnish color, draw a diamond along the contour, without painting the middle.
Step 4 Draw a diamond with an even lighter color, leaving an unpainted light diamond in the center.
Step 5 Cover with a transparent top. Manicure is ready!
Video:
Stencil patterns
The geometric pattern in this embodiment is applied using special nail stencils. They come with different designs. Such stencils can be replaced with adhesive tapes. It can be done with both regular polishes and gel polishes. Consider the option with regular varnish.
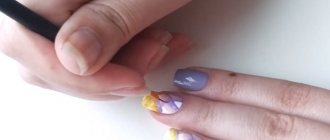
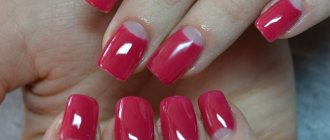
Step 1 Apply pink polish to prepared nails and dry.
Step 2 You can make a pattern on all nails, or on one or two. Glue a stencil with triangles onto your nails. We cut off the excess stencil with scissors so that it does not interfere.
Step 3 Using a sponge, make a transition with two colors. Place a drop of pink and white varnish next to the palette and mix them in the middle. We blot with a sponge and transfer the gradient to the nails. See here for more details. We dry our nails.
Step 4 Carefully remove the stencil. Cover all nails with a layer of transparent topcoat.
A geometric print always gives room for creativity and exclusivity; no two designs will be the same, which is exactly what many fashionistas like.
How to make diamond designs on nails
Creating a real geometric pattern yourself is not that difficult. You can complete the design in three ways:
- Using a thin brush and varnish that contrasts or shades the main background.
The complexity of this technique lies in the time required for work and the skill of the master. Important! No matter how skillful the craftsman is, it is impossible to manually make all the lines equally even. - A lighter and more popular option is tape. Special strips for manicure allow you to create clear, even lines. The size of geometric shapes can be adjusted if desired. This tool is indispensable when creating a quilted manicure.
- The simplest method of applying a pattern is to use stencils. However, you should pay attention that gel polish often flows under the carbon copy, while ordinary varnishes create the perfect design.
Photo gallery of stylish nail art
Quilted manicure, depending on the chosen color and technique, can look completely different. You can do it in one color, play with contrasts, make it matte or glossy, complement the design with rhinestones, sparkles and other decorative elements. Every time, even by making minor changes, you will receive a completely unique, beautiful and stylish manicure. We invite you to look at a few photos that will show you all the beauty and charm of quilted nail art.
As you can see, there are a lot of options. Use different colors, get creative, and combine it with other design styles to add a touch of personality to your look . You can decorate all your nails in this style or just one, and apply a monotonous coating to the rest. Limitless scope for imagination opens up before you.
Not all women use gel polish. Many people still make do with regular varnishes, despite the fact that they last much less. They are easier to work with; they do not require the use of additional devices, for example, a UV lamp or liquid to remove the sticky layer. Therefore, many people consider gel polishes to be a product for professionals.
If you don’t have a special lamp and gel polishes, don’t be upset. A manicure with a quilted pattern can also be done with regular polishes. For this you will also need thin self-adhesive tape, varnish and rhinestones. This manicure looks no worse. In conclusion, we bring to your attention another video in which you will find step-by-step instructions on how to perform a quilted manicure with regular polishes.
Kamifubuki with pink gel polish 2022 photo
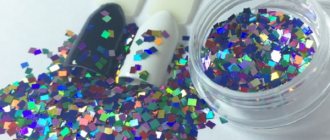
"Kamifubuki" is translated from Chinese as "paper storm". The composition of the material is more complex than paper decor. In shape and appearance, kamifubuki nail decor looks like diamonds, circles, squares of various shapes, colors and sizes. In structure, it is decor made of foil, paper, fragile plastic, visually reminiscent of confetti or sequins.
As it was correctly written above, “storm”, the name is ideal for these elements, since with their help you can create amazing whirlwinds, colored hurricanes and simple designs on the surface of your nails. Of course, stylish kamifubuki nail art will raise a number of questions for many, so we will reveal some of the technical issues related to the details of decorative elements and application techniques.
Kamifubuki and French
A classic design becomes exclusive when complemented with small bright elements. They are applied as a frame for the hole. You can glue such particles only at the cuticle. Masters suggest filling the holes with shiny elements to get an amazing result.
Some girls combine different methods, achieving amazing effects. Metallized elements of different sizes and shapes appear on one nail. The result is a unique and fashionable manicure that will attract the attention of others.
Pedicure with kamifubuki photo 2022 pictures
Foot care is an unshakable ritual of a modern woman, and beautiful legs with a fashionable and neat pedicure are the pride of any representative of the fair sex. Of the latest trends in nail art, pedicure with confetti is of great interest.
It is not at all necessary to do nails with kamifubuki on every finger. Get creative and combine several techniques at once. Focus on one finger or make each nail unique. Using kamifubuki you can come up with an amazing variety of great designs!
Kamifubuki with black gel polish 2022 photo
Black manicure this season strives to become the favorite of many girls. To prevent it from looking gloomy, the designers came up with several tricks, which consist of using different techniques and mixing color combinations.
Today, designers offer various techniques that can revive a black manicure, giving it magnetism and luxury. It can be not only glossy, but also matte. It can also be decorated with various monograms and patterns coated with shiny acrylic powder. A black manicure made using the popular kamifubuki technique looks impressive and interesting. A black manicure can be easily diluted with a white pattern. The black and white combination is a classic of the genre and therefore never goes out of style.
What is kamifubiki
The peculiarities of this style are in bright details in the form of confetti. Kamifubiki is the Japanese name for a well-known decoration.
And if you want something fresh and unusual, try creating a holiday on your own nails, kamifubiki will easily help you with this!
The technique of applying this design is distinguished not only by its decorative solution, but also by its innovative approach. The advantage of confetti is its unusualness, freshness, and chaotic arrangement.
You can never predict how these details will turn out - this creates the effect of surprise.
Such a beautiful prank on your nails is a guarantee of admiring compliments! It is not surprising that kamifubiki are preferred by women with a playful and light character. But in reality, this style suits everyone.
Kamifubuki with red gel polish photo 2022
The special beauty of kamifubuks is that they do not draw attention to themselves, fitting into the overall picture and combining with both cat-eye coatings and broken glass, looking stylish in space nail art and all variations of French.
If you want to create a calm look for everyday life, choose delicate and light pastel tones of the color coating and pair them with silver, blue or berry mini-sequins. For an everyday look, kamifubuki-reverse French and kamifubuki-negative space will be good.
Lots of diamonds
It would seem that there is nothing simpler than just a large number of diamonds on the nails. Your eyes widen while looking at these small and ideally shaped geometric figures. It is not at all necessary to create a similar pattern on each of your nails.
A pattern with diamonds can decorate only a few of them. You can create a manicure like the one shown in the photo below. To do this, one or two nails should be filled with many diamonds, applying such a pattern to a pre-prepared base. On the remaining nails, you can lay out any geometric shape with diamonds. The photo below shows how to do this. Now your manicure with diamonds is ready on your nails!