What is the difference between a gradient and an ombre on nails?
We come across different names and types of this design on the pages of magazines and on the Internet - gradient, ombre, Dip Dye and even striped manicure. What is this design? Gradient manicure is a special nail coating technique in which one color smoothly transitions into another. This manicure is often called a fashionable ombre manicure. In part, this has become synonymous with the word gradient, but the ombre design on nails involves gradually lightening the tips by several tones, while the color remains in the same color range. There is a term Dip Dye, it is also a synonym and has a similar meaning, but it more reflects the essence of the gradient as such. Dip dye means dyeing it a completely different vibrant color.
There are several types of gradient, among them horizontal
,
vertical
gradient and
gradient with transition
. Of course, every year more and more variations of this fashionable nail coating appear, but the classics still remain in fashion. The gradient manicure technique is not complicated, but it will require a lot of patience and perseverance to perform.
Useful tips for performing ombre manicure
- Instead of a sponge, you can use a regular dishwashing sponge , but the polish dries too quickly on it. For a “salon” effect, it is better to choose a foundation sponge or any other sponge that has a rubbery feel.
- To make the sponge absorb less varnish, first soak it in cold water and wring it out .
- The movements of the sponge should be light , as if blotting, but not pressing.
- To smooth out porous sponge marks, apply a top coat without waiting for the polish to dry completely . It is better to do this in 2 - 3 quick movements so that the transparent top does not mix with the colored polishes.
- Even the most fashionable ombre manicure will look dull on unkempt hands with overgrown cuticles.
- Try to renew the varnish applied to the palette each time before covering a new nail.
Gradient manicure
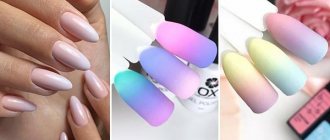
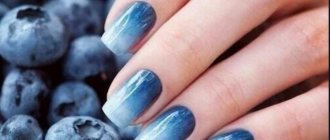
Gradient with transition: how to quickly create a fashionable design.
The simplest gradient with transition
. What colors are needed for this? We take 5 varnishes of the same color, but different in shades, and cover each nail from the little finger to the thumb in turn, the transition is from one finger to another. If you don’t have 5 shades of the same color, it’s easy to create them yourself. To do this, we need a primary color - for example blue, and an additional color - for example white.
We cover the first nail with a blue tint; on the second nail, in a separate container or simply on a plastic/glass palette, we mix a drop of blue varnish and a small amount of white, thus obtaining a shade that is a shade lighter. Cover the second nail with the resulting color. Next, mix in a little more white again, getting an even lighter blue tint, and cover the next nail. Next, we simply continue mixing polishes according to this scheme until we reach the last nail. At the same time, we can also show originality and creativity, cover all 10 fingers in a gradient from blue to absolutely white, or cover 1 hand from blue to the lightest blue, and cover the second hand as well, or mirror it.
How to apply shellac correctly?
It is worth remembering that the techniques for applying shellac and regular varnish are very different from each other. The new-fashioned material creates a dense and stable coating that fits tightly to the native nail. It is very difficult to achieve this effect at home. That is why it is necessary to strictly follow all instructions.
First of all, the nail is degreased in any convenient way. The easiest way is to use nail polish remover, which can be found in any home. However, there is also a special tool for removing the sticky layer. Any greasy stain on the nail will cause irreparable damage to your manicure. After the degreasing stage, do not touch the nail plate with your fingers. The only means of contact with the nail is a brush.
To work you will need:
- shellac,
- orange stick,
- base,
- sticky layer remover,
- finishing coating,
- cotton pad,
- UV lamp.
Apply the base on top of the nail , stepping back about 1mm from the cuticle. The layer should be very thin. Dry your nails under the lamp (at least two minutes on each hand).
Be careful! You should not experience any pain during the drying process. If you feel a burning or tingling sensation, immediately remove the gel polish from the skin. This situation can only arise in two cases: you applied too much base or accidentally caught the skin. An orange stick will help remove shellac from your finger.
After the base has dried, you can begin applying the shellac itself. Apply the polish in an even thin layer over the entire area of the nail, not forgetting the edge. Dry under the lamp for about 2 minutes. The exception is varnishes that indicate a different time.
Then apply varnish again . This way you will achieve a beautiful deep color and also strengthen the coating. This layer also takes 2 minutes to dry.
And only after that use the finishing coat , which is applied not only to the surface of the nail itself, but also to the edge. Again, 2 minutes to create a strong layer.
After this, you need to remove the sticky layer , which appears due to drying under an ultraviolet lamp. To do this, apply a special product to a cotton pad and wipe your nails. Don't be afraid, the varnish will not wear off or be damaged.
to contents ^
Horizontal and vertical gradient: technical features.
What is a horizontal gradient
? In this case, a smooth transition of colors is created on the nail, starting from the cuticle area and moving towards the tips of the nails. The color scheme can be absolutely any, from close shades - then the manicure will turn out more delicate and “smooth”, to completely different, contrasting colors. In this case, the manicure will turn out bright and extravagant.
In this manicure you can combine two, three or even more colors. It should be noted that the more colors are used, the sharper the transition of colors in a contrasting gradient of nails will be and the smoother the gradient will be with similar shades of varnishes.
Vertical gradient
It is also performed on the nail with a smooth transition from one shade to another. However, the technology differs in that the color changes from one side roller to another, vertically. You can also create different variations of this nail coating. For example, a manicure looks very original in which the little finger is painted entirely in one color, a gradient transition to another color is made on the ring finger, the middle finger is covered with the color we switched to on the ring finger, and a transition is made on the index finger again. This way, 3-4 or even 5 colors will be used in the gradient, and the manicure will become even more original.
Another interesting feature of ombre manicure is the use of thermal nail polishes. You also do a manicure with a transition, but instead of just varnish or gel polish, you use thermo shades; at the slightest change in temperature, the varnishes will change shades and the gradient will sparkle with new colors!
How to do a gradient manicure at home.
Here it is very important to consider the materials that you want to use for manicure: varnish or gel polish coating. Depending on your choice, the coating technology will change.
Let's look at the materials needed for the gradient.
When using quick-drying varnish, you will need: - several shades of varnish (gel polishes or nail polishes), - a soft sponge or a special sponge for a gradient manicure, - several toothpicks or an orange stick, - corrector or cotton swabs with nail polish remover, - top coating.
Many people ask the question: which varnish is suitable for a gradient manicure?
We recommend using varnishes with a dense texture and good pigmentation - they are optimal for the design and require a minimum of coating layers. Next, you need to choose one of the gradient methods that is convenient for you:
Gradient is quick and easy. The two most popular methods of execution.
The first method is to apply several shades of varnish in strips directly onto a sponge.
Immediately after application, you need to transfer the varnish onto the nail with light patting movements - due to this, the varnishes on the border will mix and give a soft transition. However, be careful! If you fiddle with the sponge for too long, the varnishes at the border of the transition may interfere with each other and give a dirty shade. To prevent this from happening, it is better to use different shades of the same color for this method. There is also a high probability that the varnishes will begin to dry out, since the layer of varnish on the sponge is very thin, and will begin to roll off on the sponge and nail, leaving stains and gaps. In this case, it is better to make a thin first layer, dry it, and then add a new varnish to the sponge and duplicate the layer again - so it will be bright, and the sponge will not create any inconvenience for you. So that after performing the ombre effect on your nails, it is easy and quick to clean skin from excess paint, you can use liquid tape (it’s called Skin Defender). Also popularly, this product for water and French gradient manicure is called pink tape or pink thing. It will allow you to remove excess from your fingers quickly and without the use of cleaning liquids, without drying out the skin of your hands and fingers.
The second method of applying gradient manicure with nail polish is to use any hard surface, plastic or glass. You can also mix polishes and create transitions using a special silicone nail mat.
We apply the lightest shade used in the gradient to the nail and let it dry. Next, we’ll dampen the polish sponge a little, so the polish won’t be absorbed into it too quickly and will allow us to do a manicure. On our glass surface we need to apply the dark shade used for the gradient, and next to it the same light shade that we applied to the nail. The shades should touch slightly. To make the border even smoother, we mix the varnishes at the junction with a toothpick or an orange stick, now we have our gradient in front of our eyes. This procedure must be done quickly enough so that the varnish does not have time to dry completely.
Next, we imprint our gradient onto the sponge with patting movements, slightly smearing it so that the borders of the colors blend a little and give a smooth transition, and apply the varnish from the sponge to the nail with the same movements. For each subsequent nail, you need to renew the varnishes, but with proper skill you can manage to apply the coating to several nails at once.
After the gradient has dried, you need to remove excess from the skin around the nail and cuticle area with a corrector or a cotton swab with nail polish remover. Next, cover all nails with top coat.
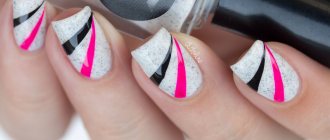
Geometric gradient: design features and method of execution.
In the last season, geometric gradient (graphic) on nails gained enormous popularity. The geometric gradient design with gel polish is done with a thin brush. For it you will need 2 gel polishes: rich color and white. Gradually diluting the colored shellac with white, we get an increasingly lighter shade and draw a geometric gradient step by step with a thin brush from the lightest shade, gradually moving to the darkest, applying a thin layer so that the gel polish does not spread. There is no need to dry each step. Only after finishing the entire drawing, we send the design to dry in the lamp. The most common and popular in 2016 was the geometric diamond gradient (diamonds, diamonds).
Source: website manikyr.ru
How can you create a geometric gradient on your nails with regular polish, since it dries very quickly?
For this it is better to use nail stencils. Stencils can also be used in gel polish manicure. But gel polishes tend to flow under the stencil, so you need to get used to it. For varnish, this is an excellent option, the varnish dries quickly in the air and does not spread, its excess can be easily removed with a cotton swab dipped in nail polish remover. In addition, manufacturers now offer a large number of stencils and slider designs with a variety of geometric patterns that are suitable for creating an incredible geometric manicure.
Manicure gradient:
What is needed for a manicure
Ombre with a gradient transition is done on natural or extended nails. To perform it, different techniques can be used. The easiest way for beginners to make a gradient is to use an ordinary sponge, which must first be cut into small pieces. This technique is well suited for painting natural nails. To do this, take a new kitchen sponge or a fine-grained sponge specially designed for creating gradient transitions. Materials for ombre manicure:
- foam sponge;
- transparent/white base;
- fixative;
- 2-4 colored varnishes;
- foil/sheet of paper;
- sticks with cotton wool;
- nail polish remover.
Ombre design with gel polish and gel paint: subtleties of application and methods of execution.
The technology for applying a gradient manicure with gel polish or gel paint is significantly different.
For such a manicure, we must fully prepare the nails for coating, apply a base coat and remove the sticky layer from it. It is advisable that the base coat be leveled, especially when using gel paint. Otherwise, all the irregularities will be clearly visible on the surface of the nail, and the gel paint will only highlight them even more, since it is a very thin coating. For the first method, we need 2 shades of gel polish and a thin brush. The simplest and most common method of creating a horizontal gradient is with a thin brush. It is necessary to apply 1 layer of colored gel polish to the entire nail and dry it in a lamp. Next, apply the second layer and, without drying it, apply a small drop of the second layer to the area near the cuticle. Be careful not to fill the cuticle with gel polish! Since gel polishes are thinner than gel paint, they flow more easily, so gel polish should be applied in a medium drop and slightly indented from the cuticle. We pre-painted the area near the cuticle with a brush in 1 layer so that there were no gaps in it.
Next, we distribute our drop with a thin brush, gradually “smearing” it down towards the end of the nail, but not reaching it. Depending on how well you blend your second shade, the smoothness of the gradient transition will depend. There are also special brushes for gradients; they are wider and make the process of creating a gradient much more enjoyable, speeding it up significantly.
The second method is similar to the method of applying a varnish gradient - with a sponge. However, it is better for gel paints, since they do not smear and have good pigmentation. We also apply the gradient to the nail with a sponge, without drying it, remove the excess from the side ridges and cuticle area, and send the design to the lamp to dry. If necessary, repeat the procedure 1-2 times and cover the finished manicure with a top coat for gel polish.
For vertical gradient technology, you can use a brush from the shellac bottle itself. It is better to use a brush of a darker shade, but you must always have a dry cloth on hand and often wipe the brush with it, so as not to introduce a different color into the bottle of gel polish. You can also use a flat square or oval brush. They are usually used for gel, but they are very convenient for creating a gradient. In this technology, a light shade of gel polish or gel paint is applied to half of the nail. Next, a dark color of paint is applied to the second half with a little spacing on the light part. After this, we wipe the brush and use a dry brush to walk along the border of the colors. This is our first base layer, put it in the lamp for 2 minutes. After this, we take a brush with half of the dark paint and the other half of the light paint at the same time, as if forming a gradient immediately on the brush. Using a brush with gel paints, apply the second layer with a brush strictly in the center of our nail, so that the middle of the gradient on the brush approximately coincides with the middle of the gradient on the nail. This way we form a soft vertical gradient.
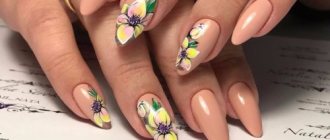
Combination of white ombre with French
To make a French manicure interesting, use the ombre technique to cover the tip of the nail bed with white. This double design is done on natural nails with gel polish.
Step-by-step instructions for ombre with French:
- put each finger in order, polish the plate and give it the desired shape;
- degrease and remove lint;
- cover the work surface with bonder and let dry;
- apply the base;
- paint one nail with white varnish twice, dry it under a lamp each time;
- like the first, paint the remaining nails in a beige or light pink tone;
- Using snow-white gel polish using a thin brush, draw a thin line in the form of a “smile” on the beige plates;
- Use a toothpick to stretch it to the middle of the nail bed;
- dry under a lamp;
- fix on top with a top coat and dry again.
“Air” gradient: features of using an airbrush to create a manicure.
Nowadays, creating gradients, especially horizontal ones, using an airbrush is gaining popularity.
An airbrush is a special device that sprays a thin layer of paint using air pressure. We'll look at the pros and cons of brush and airbrush gradients. A horizontal gradient with a brush on nails is quite difficult to perform; its careful execution is painstaking and time-consuming work. Many masters use an airbrush to simplify and speed up their work; thanks to the device, it takes about two minutes to create a gradient on 1 nail, while with a brush we spend about fifteen minutes shading gel polish or paint. The essence of the method is that we pour paint into the airbrush, turn on the compressor and simply spray the paint onto the nail. In this case, the paint is usually water-based or alcohol-based. In order to clean the client's handles and side rollers, there is no need to use special liquids; it is enough to cover the design with topcoat and send the client to wash their hands with soap. This not only saves liquids for the master, but also does not harm the skin of the client’s hands and eliminates allergies to liquids. The paint is sprayed in the thinnest layer, so paint consumption is minimal. The layer on the nail is thin and does not create “patty nails” that can be obtained by layering with a regular gradient.
What to choose, gradient manicure with shellac or varnish?
If you actively use gel polishes, then we recommend using gel polishes and paints, because the gradient effect in this case will remain on your nails for several weeks and will delight you every day. The nail polish gradient is quite simple to perform and can be completed faster, but it will last just like regular nail polish for 3-6 days.