The idea is extremely simple: why spend an hour or two creating drawings if there is a ready-made solution? We are talking about stickers: small decals can be used to decorate both “bare” nails and a colored coating, thereby decorating a manicure. Of course, like any handmade work, nail art, in which every line is drawn by a master, is valued higher. But we understand that in a couple of weeks any artwork will still have to be erased. In this sense, a manicure with stickers is much more practical. We’ll tell you more about its creation and offer a selection of photos with manicure options with stickers for short and long nails.
©Getty
Types of water based nail stickers
Today, there are several main types of manicure stickers, each of which is practical and attractive in its own way.
Types of decoration elements:
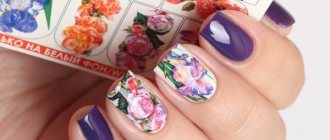
- Transfer stickers are a thin film that is attached to a backing made of special paper. The design is copied onto the nail surface after wetting. The film is mostly colorless and transparent, making it ideal for full or partial coverage;
- full-size - easy to use and no need to prepare the nail surface before application. The main advantage of stickers is the full coverage of the nail, creating a single composition and pattern. Used in shellac, helium, acrylic and varnish technologies;
- water-based self-adhesive nail stickers are universal, as they are suitable for any technology, shape of the nail plate and base. They are simply applied, creating an original and varied pattern.
All of them are easy to use. Creating a manicure will require a little skill.
Technology of using stickers
It is easy to attach decorative elements to the nail plates and use them. For manicure you need to prepare the surface.
You should also ensure that you have the necessary tools. After this, you can apply the sliders themselves. The main thing is to figure out how to use these products.
Features of nail preparation
Before gluing the sliders, the nail plates need to be prepared:
- Remove the old covering.
- Steam your fingers in warm water.
- Clean the areas under the nails and the surface.
- Using a nail file, give the plates the desired shape.
- Remove cuticles.
- Treat your nails with alcohol or a special degreaser.
- Apply base coat.
Required tools and materials
In order to create a manicure at home, you need to ensure that you have the following tools and materials:
- stickers;
- scissors;
- a bowl of warm water;
- cotton pads, sticks;
- UV lamp (when applied to shellac);
- orange stick;
- fixative
Slider gluing technology
The instructions will help you apply the stickers correctly.
To transfer them to the surface of the plate, you need to perform the following steps:
- Place the decorative element on the surface and measure the required size.
- Cut off the desired part using scissors.
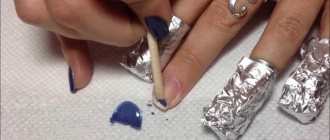
- Immerse the sticker in warm water for 20-30 seconds. The liquid should not be cold, otherwise the peeling process will be slow.
- When the protection comes off, remove the slider from the water using tweezers.
- Place the decorative element on the surface.
- Place a cotton pad on top. Such actions are necessary in order to remove excess moisture.
- Using cotton swabs, smooth the film with gentle movements.
- Dry the surface thoroughly.
- Apply a fixative to your nails.
It is important that all layers dry well. The period of wearing the manicure depends on this.
Advantages of water stickers
Decorating elements for creating an original manicure not only look advantageous, but also have a lot of advantages:
- 100% safety, since the film is not capable of harming the nail plate;
- the ability to create a different manicure every day, changing the design and aesthetics, unlike extensions and shellac;
- high degree of elasticity of the image - does not stretch during application;
- do not stick to fingers, which cannot be said about options created on the basis of glue;
- under the influence of warm water they do not change shape and size;
- do not “need” special application skills or effort;
- differ in thematic and color variety;
- low price category, which is fundamentally different from artistic application by craftsmen in salons;
- are disposed of using a special nail polish remover that does not contain acetone, which is harmful to nails.
What is thermal film?
Thermal film for nails is a relatively new product in the nail art industry. It appeared in the USA, receiving the resounding definition of “Hollywood manicure” or minx manicure. Initially, thermal film (minx) was, according to its developers Dawn Lynch-Goodwin and Janice Jordan, an excellent alternative to hand-painted nails. But, unfortunately, it was not particularly durable, and therefore its use was recommended for social events or especially important occasions.
Today, the situation has changed somewhat, primarily due to improved application technology. More durable analogues of the original minx film can be used not only on natural nails, but also on extended ones, and at the same time they retain all the advantages of the original thermal film.
The advantages of thermal film used for nail design are three main characteristics. Firstly , this is the ease with which an exquisite manicure is performed. In order to decorate your nails with luxurious patterns, for example, trendy lace ones, you don’t have to have artistic talents, you just need to choose the appropriate print. Secondly , this manicure can be done quite quickly even at home. And thirdly , this is the hypoallergenicity of the materials used to create the thermal film.
Preparing nails before gluing
Before applying water-based nail stickers, you must properly prepare the surface:
- saw off;
- treat the cuticle area;
- carry out hygiene procedures.
These simple manipulations will create a strong base for sliders and a well-groomed manicure.
How to prepare your nails yourself at home:
- Using nail polish remover without acetone, remove old polish;
- give the desired shape to the nails;
- make a soap or salt bath with the addition of a few drops of essential oil;
- lubricate the cuticle area with a nourishing cream to soften it;
- wash your hands thoroughly and disinfect each nail plate with an antiseptic;
- cut out excess side skin and cuticle using manicure scissors or a gentle chemical composition made from fruit acids;
- take a buff and polish the surface of the nails, thereby ensuring practical attachment of the art design and the immediate base;
- in the case of nails extended with acrylic mass, it is necessary to polish them with a pusher, then remove the dusting, grease and treat them with a special antiseptic;
- apply the base - the colors of the sticker and the background should be combined and harmonized.
The process of creating a beautiful and stylish manicure is simple, the main thing is to follow the above recommendations of qualified masters. After pasting the ornaments, completely cover them with a fixing transparent layer, starting from the nail base and ending with its edges.
Glue on gel polish or shellac
Gel polish coating, both with products from other brands, is durable and long-lasting. Why not diversify its monochromatic options with beautiful stickers?
What types of stickers are compatible with gel polishes?
Almost all types of decor used with regular varnish can also be combined with gel-based products. Manufacturers often emphasize this by indicating on the packaging of stickers what types of coatings they are compatible with.
Exceptions are thermal films (although you can use shellac to smooth the nail plate before applying them) and large 3D decorations, which require special glue (small ones can be pressed directly into wet gel polish).
At what stage should you add decor?
You can make an interesting design immediately during the manicure process: “hide” the jewelry under gel polish or shellac to preserve their surface from scratches and abrasions for a long time. You will find a master class on how to combine gel polish with stickers on the entire nail in this video:
Nail transfers, often reminiscent of fine artistic painting, can be added at different stages of the manicure: on an undried base coat or on a sticky layer of top coat. These methods are described in more detail in the video:
An important point: before gluing the stickers onto the shellac, cut them so that at least 0.5–1 mm remains from their edge to the cuticle line and the side ridges of the finger. This way you will “seal” not only the surface of the decor, but also the sides, and the manicure will be more durable.
Changing a finished manicure made with shellac
You can also stick stickers on gel polish that has been “worn” for several days. Water-based sliders are well suited for this; they can be applied over the topcoat using a regular topcoat (not gel-based) for fixation. Then these decorations can be removed using regular nail polish remover, without harming the gel polish.
Decorating a manicure with gel polish with sliders:
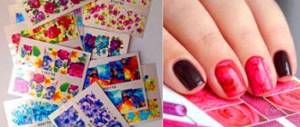
How to apply regular water stickers to nails?
Water-based nail stickers are a thin film fixed on a colored or white paper backing. They are applied to the nail plate, previously soaked in water, so that the self-adhesive pattern moves away from the base.
Step-by-step process of applying decoration elements:
- treat the surface of the nail plate with an antiseptic composition and a special degreaser;
- apply a layer of varnish, it is best to use neutral tones, thereby highlighting the design;
- cut out the selected sticker along the contour and, using tweezers, dip it in water for a few seconds;
- take out the film and gently blot it with a paper napkin;
- remove the sticker from the retainer and apply it to the painted nail;
- apply final varnish.
Despite the ease of using manicure stickers, it is important to take the process slowly.
How to do a manicure with stickers, features of the slider design
What should you be aware of when starting to create a sticker design?
What tools will you need?
- Round-tip scissors: Sheet and rectangular decals need to be shaped correctly, other types (accents and French embellishments) may also require adjustments.
- Tweezers for working with thin films cannot be replaced for slider design.
- Tool for leveling the surface: dry, clean paper napkin, orange stick or pusher with a rubber tip (depending on the thickness and strength of the material).
- A file, if you need to file off excess outside the free edge of the nail.
How to apply stickers to shellac?
This manicure looks impressive and expressive, does not require much time to create, and is durable.
How to apply decorative film to shellac surface:
- cut out the elements with scissors and apply them to the nail, determining the correspondence between the required dimensions of the plate and the ornament;
- immerse the selected option in water for a few seconds, dry very carefully with a lint-free cloth or in the air;
- The sticker should only be applied to wet shellac to ensure an extremely strong bond;
- Cover the surface with another coating and place under the lamp for a couple of minutes.
Popular thermal film manufacturers
As we said earlier, there are a lot of manufacturers of this nail material; you can choose a film to suit different budgets. The most budget option can be purchased in Chinese online stores, the estimated price is from 100 rubles per set. If you are looking for a quality product, we recommend the following popular manufacturers:
- Minx nail film. The cost is about 850 rubles per package.
- NCLA for nails. You can buy the product for about 900 rubles.
- Omnia. The price of the set is about 500 rubles.
Having made a nail design with thermal films, you will definitely want to keep it in its original form for as long as possible. Remember that to do this you need to try not to wet your hands in hot water and avoid contact with high temperatures.
Did you like the idea of a manicure with thermal film? Leave your opinion about this new nail product in the comments below.
Water-based stickers for gel polish
Before applying the film under gel polish you need:
- first remove the shine of the nail plate with a soft file and degrease it with a special cosmetic;
- important: this must be done with linen napkins or shreds, since the cotton wool will leave lint, and therefore it will be difficult to avoid chipping;
- lubricate the surface with dehydrate designed to remove excess moisture;
- apply a primer that will improve the adhesion of the nail to the gel polish;
- paint over the coating several times, drying each layer for a couple of minutes under the lamp;
- attach stickers previously soaked in water. If necessary, make small cuts in the nail folds;
- Apply the last 2 layers in order, making sure to dry under an ultraviolet lamp.
How to prepare your nails for applying transfer stickers
Before gluing transfer stickers, you need to do a manicure on all fingers, and then the treatment of the nail depends on what surface you will apply the image to.
- If the transfer sticker will be glued without a base, the nail plate must be leveled using a special block, then the dust must be removed and only then pasted.
- If the decorative element will be placed on a nail coated with varnish or gel, then you need to wait until the base dries and remove all the dust with a brush.
If you decide to glue transfer stickers onto a Shellac base, then the applied layer must first dry under an ultraviolet lamp.
Do I need to varnish the sticker?
The question often arises: is it necessary to varnish applied decorative elements?
The answer is yes, and there are several reasons for this:
- ensures durability and integrity of the image structure;
- creates a pleasant smoothness on the surface of the nail;
- makes the drawing more expressive and bright;
- protects against the effects of negative external factors;
- smoothes out all existing irregularities on the surface of the nail plate.
The use of varnish is considered mandatory, because with its help you can create a stylish and catchy manicure and keep its aesthetics unchanged for a long time.
Which fingernails should I put stickers on?
Which fingernails should I put stickers on?
If this is your first time doing a manicure yourself, then various questions may arise. What nail polish should I paint my nails on, and which fingernails should I put stickers on?
It all depends on your imagination. You can decorate with stickers one nail, several or all nail plates.
Advice: The main thing is that the manicure does not look too messy and sloppy. The color of the pattern on the stickers should match the tone of the base varnish.
Important: If you decide to stick one sticker, then it should be placed on your ring finger. This way the manicure will look stylish and beautiful.
Why was the drawing not bright enough or almost invisible?
When implementing a seemingly simple procedure - applying stickers to nails - many girls make mistakes that lead to an undesirable result.
The main reason for the inconspicuousness and dullness of the pattern is the use of a dark or contrasting shade of gel polish , therefore, to achieve the desired color and saturation of the pattern, it is better to use light tones of the coating.
Baby stickers
Before you decide to stick a sticker on your child’s nail, read the following recommendations:
- You don’t have to buy special “children’s” stickers; they can cost you several times more than regular ones . The main thing is that the drawings should be to the liking of the child.
- There is no point in messing around with complex techniques and expensive coatings for the entire nail. A small child, even if he appreciates the effort expended, is unlikely to be able to maintain such a manicure for a long time. But simple sliders and small stickers will be a good reason for a joyful mood on a holiday.
- Before applying decals, use a base coat to protect children's nails. It must be of high quality, from a trusted manufacturer - this is a guarantee of the absence of harmful substances, especially dangerous for a growing organism. A special children's varnish is also suitable for these purposes.
Why do chips appear on the finish coating?
The reasons why water-based stickers applied to nails may chip may include the following factors:
- the presence of moisture that was not completely eliminated during drying under the lamp;
- minor free areas of the nail were not left along the edges during the application of the varnish, thus the finishing coat could not reliably adhere to the nail plate;
- the finish was not applied correctly, meaning the nail edges were not “sealed.”
Failure to comply with these important points leads to the rapid destruction of the created manicure.
Photo of a beautiful slider design for short nails
The big advantage of the slider design is that it can be used on nails of absolutely any length. Short nails look very neat, even if you apply a rather bright and active design on them. There are a lot of design options using slider stickers, given their diversity, and in order to decide what you want, we suggest that you familiarize yourself with photographs of the most successful options for short nails.
Why does the design come off with the top coat?
Many women face this problem because not everyone is able to properly attach the sticker to gel polish. Especially if its layers were not dried enough.
Therefore, in order to minimize the possibility of such a nuisance, it is important to carefully dry each applied layer separately, using a special lamp. Even if the surface is even a little sticky, you should wait and continue creating a manicure when the polish has completely hardened.
How to print stickers yourself?
It is not necessary to buy special stencils for manicure, as you can make them yourself using available home remedies. The only disadvantage of homemade sketches is aesthetic simplicity
To create such a manicure, you need to get masking tape, adhesive tape or regular tape. With their help, you can create different shapes that are most suitable for a particular style.
For lovers of French, it is enough to take a strip of material, attach it to the base of the plate, leaving space for applying varnish. Paint over the empty area and remove the adhesive blank.
Using the materials presented above, you can make an unlimited number of designs, each of which will be unique and stylish in its own way. To achieve these goals, lines, angles and other geometric shapes are cut out.
By using homemade water-based nail stickers created using water and several colors of polish, you can create a 3D manicure. To do this, you need to take a container of water and drop in different shades of varnish in order, wet the nail with the resulting composition, removing excess varnish with a cotton swab.
In addition, wave stencils are very popular, which you can make yourself. Here it is important to use special serrated scissors, which are used to cut small strips. Such an ornament will look impressive on a dark varnish coating.
You can use a coating with glitter or pearlescent varnish as an aesthetic addition. Using straight lines, an elegant moon manicure is created, which is done using a semicircular strip.
The nail is first painted with varnish, ideally in a silver shade, which must dry completely. Next, a slight deviation is made from the nail hole and the cut out stencil is pasted.
Important: every line of the form must be clear and neat. The part that remains is painted with a varnish coating. After complete drying, the surface of the manicure is covered with a finishing layer.
Printing blanks is not difficult, the main thing is to devote a little time and your own imagination to this process.
Interesting ideas for nail design with stickers from Faberlic
Today, the world-famous company Faberlic offers a huge selection of water-based nail stickers that will help you create a stylish, noble and bright manicure. In the presented assortment, every girl will be able to find a decorative option to her liking.
Lovers of extraordinary appearance, who cannot imagine life without everyone’s attention and prefer to stand out from the gray social mass.
Can use animal-themed stickers:
- spiders;
- brindle color;
- zebras;
- snakes;
- ladybugs and other images.
Such a print will have a rather original and distinctive look. When creating a holiday manicure, the task is greatly simplified.
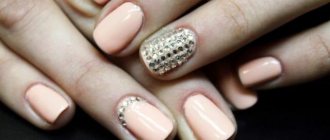
Nails can be decorated with sparkles or crushed beads, decorated with monograms or lace.
- For young fashionistas, there are options with interesting inscriptions and contrasting hearts, original floral motifs. For connoisseurs of a delicate image, stickers in a soft pink shade have been created that can emphasize their spontaneity and romance.
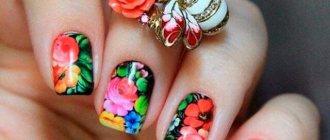
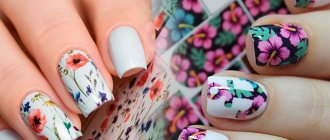
- A manicure looks elegant when several fingers are decorated with large blooming peonies, and the rest are simply coated with varnish. You can create a work of art not only on long, but also on short nails.
- Small prints look impressive and advantageous. Also considered the peak of popularity today are multi-colored flowers and stars, which can be used to decorate all nails. Partial images are not inferior, each element of which is placed on different fingers.
- Photo prints created from realistic photographs will look original. Similar stickers can be ordered in beauty salons. In addition, you can decorate your manicure with curved black cats, which will give it some of the audacity and wildness inherent in these animals.
Minimalist nail design should have an exclusively monochromatic background, decorated with inexpressive and delicate designs. For those who prefer geometric patterns, unusual stickers have been created that will successfully highlight the idea of the owner of a chic manicure, without making it look heavy and vulgar.
Also an ideal option would be patterns made in different tones, close in color to each other. For example, you can take coffee, brown and gold shades of varnish and apply chaotic lines or curves.
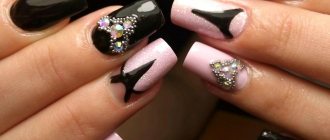
This manicure design will have a gentle, stylish and noble look, which is suitable for both a date and a special occasion. A red ornament on a black background and vice versa looks original. This style is typical for confident women who like to emphasize their appearance.
Water stickers are an opportunity to realize your own individuality, originality, femininity and uniqueness with the created manicure.
An additional and undeniable advantage of decorating is the ease of application, so every girl, if desired, will create the manicure of her dreams. Without a doubt, such well-groomed and attractive hands will not only attract male attention and female envy, but can also complement any look.
Modern girls prefer nail stickers made using a water base, as they are characterized by a high degree of durability and excellent aesthetics. With their help, you can create masterpieces and unique compositions by following simple rules for drawing and preparing nails.
Design for short nails
Girls with designs on long nails have the following problems:
- this length is handled carelessly, resulting in chips;
- some professions require short nails;
- Excessive brightness does not look aesthetically pleasing.
A manicure for short nails that has stickers of any type with a design looks more attractive.
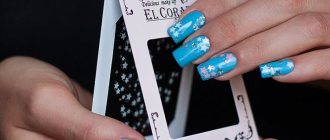
It is easier to create yourself and is natural. Bright prints look beautiful: red, orange, blue. For this, metallic or French is selected. Small stickers in the form of figures and animals, with stripes. These types of elements do not load the nail.
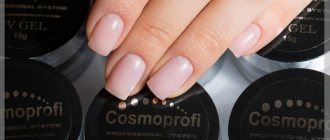
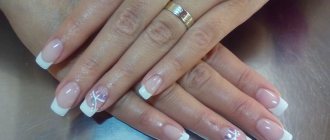
A good idea in this case would be a French manicure. This can be done using a camouflage base coat, which allows you to speed up the design and give the surface a more natural look.
Previously, this style was complemented by flowers, snowflakes, branches and other classic images. But inscriptions appeared that changed the idea of fashion.
Some tips for the owner of a short manicure:
- the shape is selected taking into account the structure of the fingers;
- the plate is not cut short;
- additional details complicate the idea and make it unaesthetic;
- if the bed is too wide, you don’t have to paint over the edges too much so that the shape is visually lengthened.
Quite often a jacket is created that combines text or graphic elements. Foreign inscriptions symbolizing something are popular.