In this article we will talk about gradient manicure. You will learn about its types, and also get acquainted with step-by-step instructions for recreating such a manicure at home.
Did you know that at home you can not only do a manicure consisting of one tone, but also recreate beautiful smooth transitions of shades? The so-called gradient manicure or ombre appeared relatively recently, but has gained wild popularity. What gives it a special charm is that, as it turns out, even children can learn the ombre technique. And the result is simply amazing - see for yourself.
Gradient manicure at home step by step
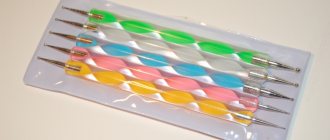
- First of all, you should stock up on all the necessary materials and tools in advance. You will need everything you can use to remove the cuticle - tweezers, an orange stick, scissors. Also prepare a base for manicure, varnishes, topcoat, sponge or cosmetic sponge, nail polish remover, corrector pencil or cotton swabs, a piece of polyethylene, foil or cardboard, a little water in a container
Correctly selected material is already half the success
IMPORTANT: Be sure to purchase a polish of some light pastel shade or deep white - against the background of this coating, the gradient manicure will turn out clear and bright.
- Now you can begin the nail preparation procedure. Carefully shape them, adjust the length to your liking. A gradient design looks more impressive on long nails, but even short ones can be transformed, especially since this type of coloring visually lengthens the nails. In any case, they should be given a neat shape. Make sure there are no hangnails, trim the cuticle
treatment
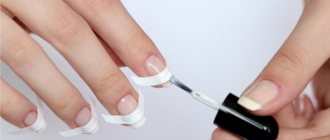
- It's time to degrease your nails and use a base coat. Do not neglect this stage - this will allow the polish to last much longer and, most importantly, the nails will be protected from the appearance of a yellowish tint
Base coat
- Now apply the same colored polish that we talked about above - some pastel or white color - over the entire length of the nail plate. Make a start from the fact that this shade should be included in the intended palette. Take your time - let this coating dry thoroughly
Plain coating
- At this stage, you can already use a sponge or sponge. Dip it in water and wring it out until the moisture is barely felt, otherwise the sponge will only absorb the varnish.
sponge
- Now make a line on the sponge with each polish. In this case, the lines should be adjacent to each other, having a neat common border. However, there may be a larger number of lines - for example, three. It all depends on how many tones you plan to get in the end
IMPORTANT: Perform all actions as quickly as possible, because the varnish dries quite quickly on its own, and some of it will be absorbed into the sponge. Therefore, you can apply several layers to each line.
drawing lines on a sponge
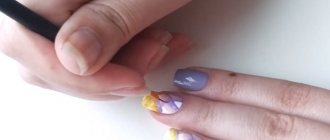
- It's time to print your nails one by one. And to do this, you can choose different methods: either apply the sponge to the base of the nail, stretching it to the tip, or make blotting movements over the entire surface. Keep in mind that frequent blotting will add brightness to the manicure.
- Usually, after treating one nail, you need to reapply varnish to the sponge. However, if you do everything quickly, you can have time to print several nails without re-painting the sponge. It is recommended that before applying nail polish, you still print it on a piece of cardboard in order to make sure that everything is satisfactory.
IMPORTANT: If you want to visually make your nails longer, make a transition from light to dark shades, with the darkest one being located at the tip.
This is what your nails look like after dabbing them with a sponge or sponge.
- As you noticed, such blotting movements leave marks around the nail. You still can’t do it without them, so don’t worry, but rather carefully get rid of them. For this you will need a special corrective cosmetic pencil or a cotton swab, previously soaked in nail polish remover.
- However, you can avoid unwanted contamination - to do this, before starting a manicure, simply seal the skin around the nail with stationery tape or treat it with some greasy cream. All this will allow you to create a protective film, which will bear the entire “impact”. However, there is a possibility that the area on the nail itself will be glued or covered up, so do everything carefully
This is how you need to treat the skin around the nail with cream
- The final stage is the application of finishing varnish. This action will lead to the fact that the manicure will be given shine, evenness, and the boundaries of the shades will be smoothed out - they will become smoother and softer
This is what a manicure looks like at the final stage
Varieties of "Ombre"
There are several specific methods for creating an Ombre manicure, a large number of types of the gradient itself and the components with which it is applied. The most suitable category of materials is gel polish.
A list of photos that provides examples of professional manicure with the “Ombre” effect will help you choose the most successful option.
- Classic vertical transition.
This manicure involves changing colors from top to bottom and is great for different types of nails.
- Horizontal gradual transition.
In this case, the gradient changes colors on the nails from left to right. This gradient will well emphasize the beauty of medium-length nails.
- A manicure in which each nail is painted with a different color looks unusual, but the shades change from one finger to the other.
Looks good on short nails.
- French with the Ombre technique.
In this case, the transition starts from the free edge of white and smoothly transitions to beige. A French style with the Ombre technique will perfectly emphasize the elegance of long nails. You can verify this by looking at the photos on our page.
- Linear "Ombre" gradient.
When creating this design, thin, straight or curved lines are used with a transition that becomes a tone darker with each line.
There are quite a lot of options for creating a design using the Ombre technique, but we will look at how to create a gradient on your nails with gel polish without the help of a specialist.
How to make a gradient on nails with polish?
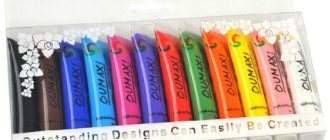
Choosing the right shades is not as simple a task as it might initially seem. They can be either the same color or contrasting. But if you still want a similar palette and have difficulty choosing, there is the opportunity to purchase a special set of varnishes containing up to 7 shades. Be that as it may, you need to have a pastel-colored polish or a rich white – they are excellent as a base.
Ready-made set of gradient varnishes
IMPORTANT: Make sure that the varnishes have the same texture.
- Varnishes do not necessarily need to be applied to a sponge. As an alternative, you can smear them on the lid or plastic film. In this case, the strokes should be adjacent to each other, and the joints can be smeared with a toothpick or some kind of sponge. After this, you can transfer everything to the nail plate.
- There is one secret to applying varnish: for example, if the coloring involves a transition of colors from light at the base to dark at the tip, you need to make this dark color the base color. If, on the contrary, from dark to light, then light is initially applied to the entire plate. By the way, in this case, you can apply a non-base shade to a sponge and simply stamp it on the tip of the nail
Transition from light to dark
Another option for transitioning from light to dark
Transition from dark to light
- The varnish can be evenly distributed over the plate thanks to the finishing coating. By the way, thanks to it, the boundaries of the shades become more blurred, and the surface of the nail itself is evened out.
- The latter is especially true if the varnish was applied using a sponge and pores from it are visible on the surface. Color stripes can be placed both horizontally and vertically - it all depends on the idea.
- There is a little trick: so, if you want to get as many shades as possible, try mixing different colors of varnishes on some surface. White and black are especially suitable for this - they allow you to successfully recreate dark and light shades
Horizontal stripes
vertical stripes
IMPORTANT: In order to create shades that are as close as possible in the palette, you should work hard, adding the same number of drops of varnish each time you mix. For example, try to increase the number of drops by two over and over again - this will help you achieve a smooth color change. If you like this method, apply the second layer immediately after the first has dried, and only then start experimenting with mixing again.
Mix colors yourself to achieve the desired shade
"Strawberry" gradient
The most summery version of the studied manicure is the so-called fruit one. It is very simple to do, you just need to prepare varnishes in the following shades: light green, coral, pink and black or dark green. You will also need colorless varnish and a match. When all the necessary tools are ready, we move on to the implementation of simple technology:
- We do ombre in any convenient way. First we apply green, then coral and pink. Shade the borders using a sponge or a gradient brush with gel polish. If you use a sponge, then simply make an imprint on the nail plate.
- Lightly dry the result and apply black or dark green varnish to the pink-red area, doing this with a match. After all, our task is to melt the dots.
- We fix the result with transparent varnish and let the drawing dry completely.
How to make a gradient on nails with gel polish?
The sequence of coating nails with gel polish is almost the same as in the case of regular polish, however, you need to stock up on an ultraviolet lamp with a power of 36 Watts for drying. In addition, in order to remove the sticky layer, you need napkins that do not contain lint. Once the necessary tools have been purchased, you can start manicure:
- First, carefully treat the surface of the nail. This can be done with a special file, the abrasiveness of which is 80-100 grit.
- Now you should degrease your nails with Bondex
- After this, you should use an ultraviolet lamp to dry it.
- The nails are covered with a gel base and dried again using a lamp.
- Using a degreasing agent, you need to remove the sticky layer.
- To improve adhesion, it is recommended to file the nail
- One color should be applied to half the nail plate.
- Now apply a different color to the second half
- Carefully paint the border with the first color so that it is smooth. It is recommended to do this with a small brush
- Use the lamp again
- Remove the sticky layer with a degreaser. This should be done with gentle blotting movements using a cotton pad.
- The final step is to apply the top coat.
This is the manicure you get with gel polish
IMPORTANT: Drying with an ultraviolet lamp should not exceed two minutes.
Drying nails with an ultraviolet lamp
The undoubted advantage of gel polish is that it dries very quickly and lasts about three weeks. At the same time, it does not break off in small pieces as is the case with ordinary varnish, and does not even lose its shine. There is also no need to worry about allergic reactions. True, it is not recommended for weakened nails; removing it requires longer soaking.
Brightness and shine of gel polish
Gradient using a fan brush
You can make a gradient with gel polish using a fan brush.
To do this you need:
- Choose two colors: dark and light.
- Apply gel polish of the background color to your nails. It will be visible at the roots. It is recommended to choose light colors as a base.
- Mix both colors on a tablet to obtain a medium tone. Cover the middle of the nail with this tone, marking the transition point.
- Apply a darker color to the tip of the nail plate.
- Take a fan brush and start shading with light hand movements.
- Dry the nail under the lamp.
- Repeat the procedure to achieve brighter colors. In this case, the base color should be applied only to the root part of the nail.
Fan brushes
The ombre effect on nails looks very attractive. It can be done in both pastel and bright colors. The process of creating a gradient on nails with a brush can be seen in the photo.
Gradient gel polish brush
It is advisable to choose a flat brush with a semicircular or straight tip, made of synthetic materials. The brush you will use to apply the base will also work. So, the principle of operation of such a brush is as follows:
- Paint half of the nail plate with one tone, then the other half with another. Try to make the layers as thin as possible - they will be easier to shade
- Now take a flat brush and moisten it in the cleaner so that it is barely wet. While it is still wet, swipe several times from the cuticle to the tip. In this case, the brush should be as horizontal as possible to the surface of the nail - this will allow you to achieve smoothness when smoothing out the lines. After this procedure, you can dry the nail
- Now it's time for the second layer for each shade. Again, use a slightly damp brush to soften the lines.
IMPORTANT: Between stages of brushing your nail, wipe it with a napkin. Also soak a napkin in the clinser.
Flat brushes
If working with a flat brush seems difficult for you, but the brush application technique itself is attractive, you can try starting with a fan brush. The transitions, however, are not so smooth, but this method is quite easy:
- First, apply a base coat of your lightest shade. Dry it with a lamp
- Since the shading will not be very smooth, it is advisable to create a third transition shade yourself. You can make it on a piece of foil and apply it to the middle of the nail plate between the two main shades
- Moisten the brush in the clinser, then mark with it until you get the expected effect
- Dry the nail
- Repeat the procedure, creating a second layer of coating
Fan brushes
Gradient gel polish with sponge
- A sponge is the most effective tool for creating a gradient manicure, since the transitions are so smooth that a brush cannot do it even with all your efforts. Above we described the technique of applying a coloring layer to nails.
- It is worth adding that prints should be made carefully. As for their number on one nail, it all depends on what intensity of coloring suits you - the brighter and more saturated you want to get a manicure, the more prints it costs to make
- Apply the fixing composition immediately after painting the nail plate - this way you can avoid transferring the porous structure of the sponge to the nail. The disadvantage of this method is that before treating each nail you will have to reapply the varnish to the sponge each time, since a certain part of it will quickly be absorbed. However, the result is worth it
Sponge
Sponge Smooth transition of contrasting colors
Smooth transition of similar shades
Creating a gradient with a sponge
The most common way to create a gradient on your nails involves using a sponge or an ordinary kitchen sponge. This method is recommended for beginners.
Step-by-step design process:
- Take a sponge and cut off a small piece, slightly larger than a nail.
- Apply a couple of drops of varnish of different colors to the surface of the sponge. Mix drops of varnish with a brush to create a color stretch.
- Apply the sponge to the nail so that the gel polish imprints on it. The sponge is applied with light, patting movements. To fix the color, the procedure can be repeated, but only after the first layer has dried.
Gradient sponge
In addition to the above, there is another way to make a gradient of gel polish with a sponge. It involves using a tablet on which gel polish is applied and the transition is shaded. You can use any surface as a tablet - plastic, glass, silicone. To create a transition, take an orange stick or a regular toothpick.
In the future, the sponge must be slightly moistened, pressed onto the resulting range, and then onto the nail. You shouldn’t rub your nail with a sponge for a long time, otherwise the varnishes will mix and give a dirty tint.
After the nails are completely dry, you need to remove any remaining polish from the skin. A cotton swab is suitable for this, which must be dipped in nail polish remover in advance. The process of creating a gradient using a sponge on short nails can be seen in the video.
Advice! To quickly clean the cuticle and side ridges of the skin, you can use a professional product - Defender. It is a quick-drying product that forms a film on the skin, which is easily removed from the skin after painting the nails.
Gradient shellac manicure
A mixture of gel and varnish - shellac - is gaining increasing popularity. If you are a fan of this coating, you can try doing a gradient manicure with it. For this, as in the case of gel polish, you will need lint-free wipes and an ultraviolet lamp. The sequence is as follows:
- Degrease the nail plate and dry it
- You can apply shellac with a sponge - as we wrote above, this is the most optimal way to achieve smooth transitions. Only in this case, it is recommended to first apply one shade near the cuticle or on the tip of the nail
- Dry with a lamp
- Now you can apply the second shade to the free part of the nail. At the same time, lightly touch the part that was already painted for the first time, thus going beyond the border
- Use the lamp again
- Now you can use a fixative that will even out the coating and add shine.
- Dry your nails again and remove the sticky layer with a degreaser.
Shellac
IMPORTANT: Be sure to treat the nail with a buff - in this case, the shellac will adhere well.
A shellac manicure compares favorably with a regular manicure in that it is much brighter, more neat and lasts longer. However, in the latter case, this is not entirely convenient, if you are tired of the manicure and want to try something new - such a coating is much more difficult to remove.
Accuracy with shellac
The final stage of manicure
After creating the design, you need to dry your nails under the lamp for 4-5 minutes. After this, you should fix the gel polish with a top coat. After the nails are completely dry, the cuticle must be lubricated with a special oil.
Author's gradient
Gradient gel polish manicure is a fashionable and practical way to decorate your nails. Many options for performing multi-color manicure allow you to find a suitable design for every woman. The technique of creating a gradient manicure is not complicated, but it does require patience and time. Step-by-step implementation of the technology for creating a gradient will make your nails beautiful even at home.
Nail design gradient gel polish
- As for design, it all depends on your imagination. Improvisation is welcome here. Even stripes can have different directions - not only horizontally, but also diagonally and vertically
- The colors can be either the same palette or contrasting - the only important thing is to create a smooth transition. You can also create transitions not within one nail, but paint each nail a slightly darker or lighter shade than the previous one.
- Lovers of rhinestones, stickers, and patterns will also have plenty to roam around - all these elements will fit perfectly into the design. Instead of a glossy fixer, you can try using a matte one - maybe it turns out to be something you like
Summer brightness
Delightful Contrast
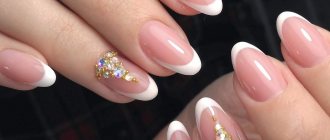
Delicate gradient with rhinestones
Pink gradient Romance of the night city
Gentle transitions
Delicate vertical gradient with rhinestones
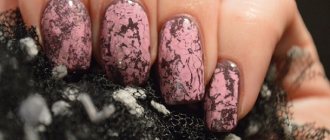
Mysterious dark gradient
Delightful black and blue
Winter version Gradient arc
Summer motley
Match the color of the clutch
Delicate gradient with patterns
Another option for winter
Space
Sober and elegant
Herbal brightness
Smooth transition on nails
Variegated patterns
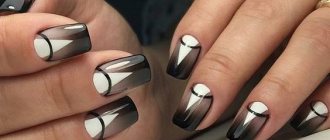
Predatory
Newspaper ombre
Diagonal Gradient
Varnish gradient
So, what should the varnish be like so that you don’t have to worry about damaging your nails? After all, a gradient manicure will certainly captivate you so much that you will want to constantly experiment. First of all, it must contain a large percentage of cellulose, since it is a natural product. You don’t need to look far for an example: cellulose is found in many plants, and 90% of cotton consists of it.
It helps strengthen your nails, and you don’t have to worry about their strength. And for nutrition and hydration, the content of camphor oil is necessary. Betonite is saturated with sea minerals, which whitens nails and helps to moisturize them. Brightness, shine and polishing effect are provided by silk amino acids. And, of course, you cannot do without vitamins, especially vitamin E, which helps strengthen, maintain health and beauty.
IMPORTANT: What should not be in the varnish is toluene formaldehyde, which has a destructive effect on the nail plate. In other words, it is a carcinogenic substance that it is better not to mess with.
Correctly selected varnish is the key to a good manicure.
There is a little trick to preserve the varnish longer - you should shake it, roll it between your fingers - then, due to the formation of air bubbles inside, its service life will be longer. Store the bottles in a warm place, but under no circumstances in the light. For a perfect manicure, be sure to use a manicure base and a quick-drying product along with the polish itself.
Use a base and dryer
As you can see, any fashionista can master a gradient manicure. The effect is no worse than the salon one. A little skill, accuracy and patience - and now your unique manicure is ready! Please yourself and others, but do not forget about purchasing a quality product.